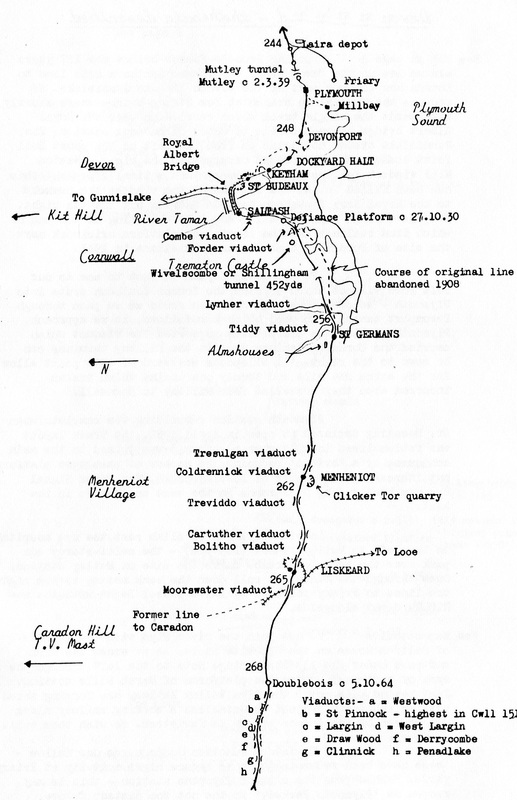
CORNWALL RAILWAY GALLERY
MAIN LINE - St Germans Exc to Plymouth Order of listing
In this section, we travel from St Germans Excl to Plymouth.
Credits, Many thanks to all contributors - please see a list on the home page.
Members and general visitors to the CRS site will be interested in visiting http://www.railmaponline.com From the opening page a full map of the UK can be accessed which can then be enlarged to show every railway line in the UK. Not just today's network but lines from the past have been overlaid. As you zoom in sidings and even tramways become visible.
A valuable tip from Guy Vincent.
A valuable tip from Guy Vincent.
If you do not see what you require
Go to the Links page and select Cornwall Centre, then on their home page select 'Cornwall Image Bank'. There is a selection of photographs by John Vaughan, Arthur Trevan, George Ellis and others.
A most excellent collection of old railway films has come to the net from Cornish Memories.Com Just click here to see them http://cornishmemory.com/items/browse?search=diesel
The first entitled Bodmin Rd to Padstow is actually from Padstow to Bodmin Road - it lasts for 11 mins and includes Padstow station, Little Petherick Creek bridge, lineside and on train sequences including Wadebridge, Grogley, Nanstallon, Boscarne Exchange (See the Bodmin N connection), Bodmin General and Bodmin Road.
The second entitled Plymouth to Fowey is actually Lostwithiel to Fowey. A film of almost ten minutes comprises a fascinating journey in both directions along the branch - see Golant, a run past the busy docks and round the bend into Fowey Station. Plus a glimpse inside Fowey Box.
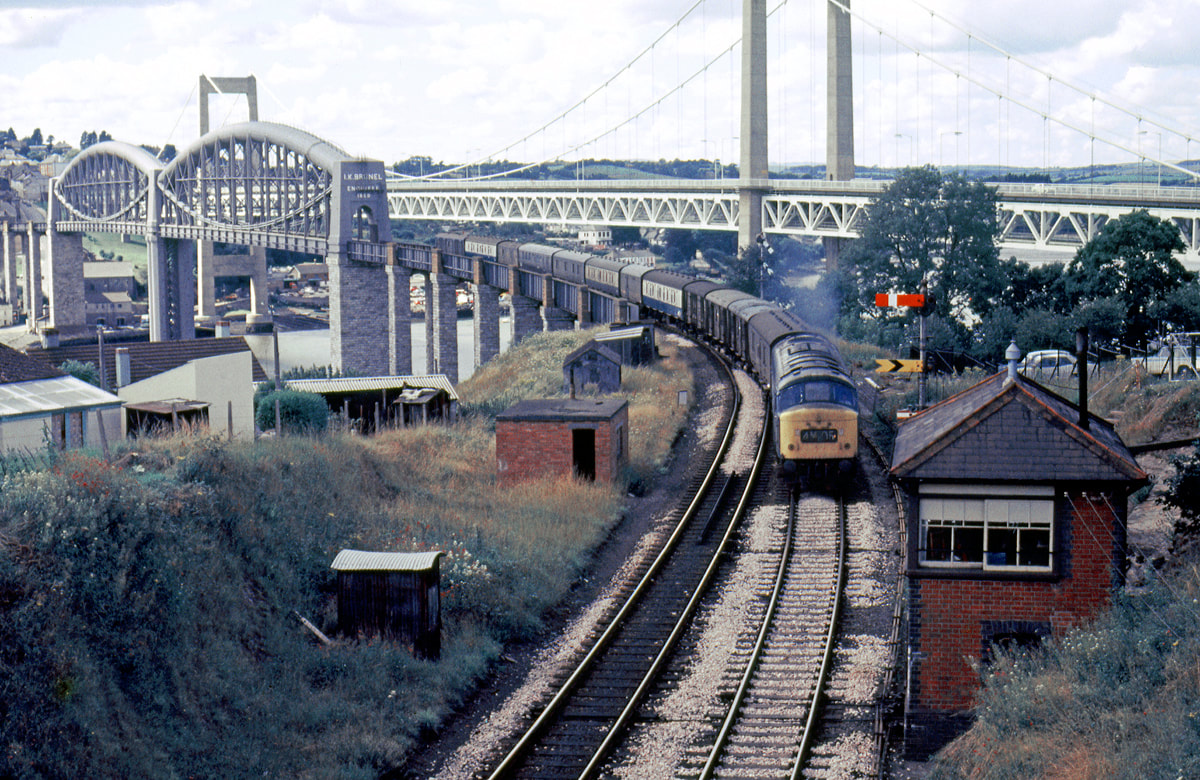
The third Plymouth - Saltash two minute film is actually from Lostwithiel to Plymouth. Lostwithiel station views, approach to Liskeard, Shillingham tunnel, glimpse of the Weard loop, The Royal Albert Bridge and the road bridge under construction, glimpse of Devonport Docks then the approach to Plymouth including Plymouth West Signalbox - this closed 26th November 1960.
Cornwall Memories. Com deserve a very hearty congratulations on making these long gone scenes available to the world. What memories they stir up.
The first entitled Bodmin Rd to Padstow is actually from Padstow to Bodmin Road - it lasts for 11 mins and includes Padstow station, Little Petherick Creek bridge, lineside and on train sequences including Wadebridge, Grogley, Nanstallon, Boscarne Exchange (See the Bodmin N connection), Bodmin General and Bodmin Road.
The second entitled Plymouth to Fowey is actually Lostwithiel to Fowey. A film of almost ten minutes comprises a fascinating journey in both directions along the branch - see Golant, a run past the busy docks and round the bend into Fowey Station. Plus a glimpse inside Fowey Box.
The third Plymouth - Saltash two minute film is actually from Lostwithiel to Plymouth. Lostwithiel station views, approach to Liskeard, Shillingham tunnel, glimpse of the Weard loop, The Royal Albert Bridge and the road bridge under construction, glimpse of Devonport Docks then the approach to Plymouth including Plymouth West Signalbox - this closed 26th November 1960.
Cornwall Memories. Com deserve a very hearty congratulations on making these long gone scenes available to the world. What memories they stir up.
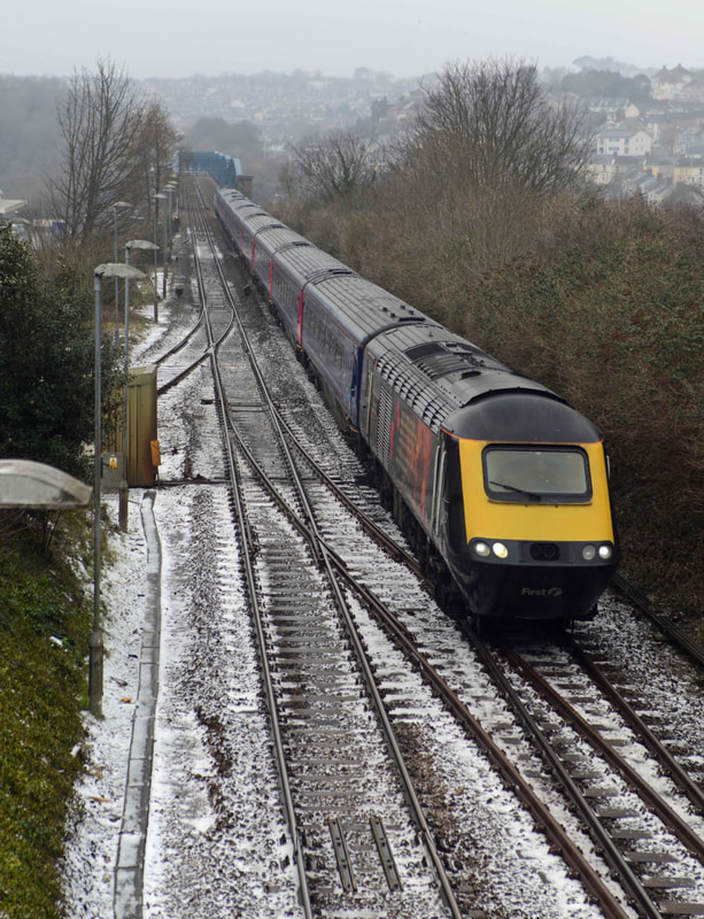
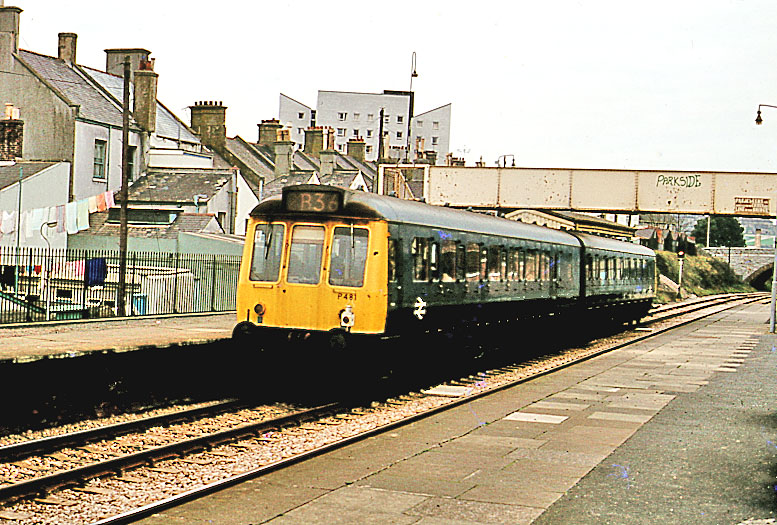
N.B Click on picture to obtain an enlargement and further details
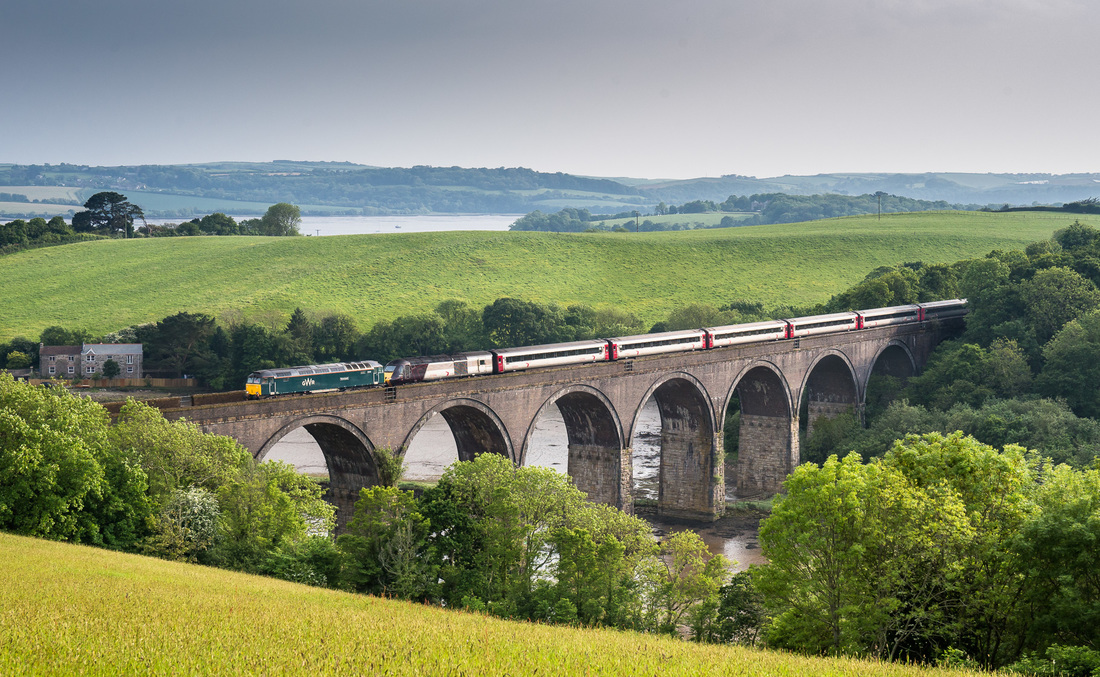
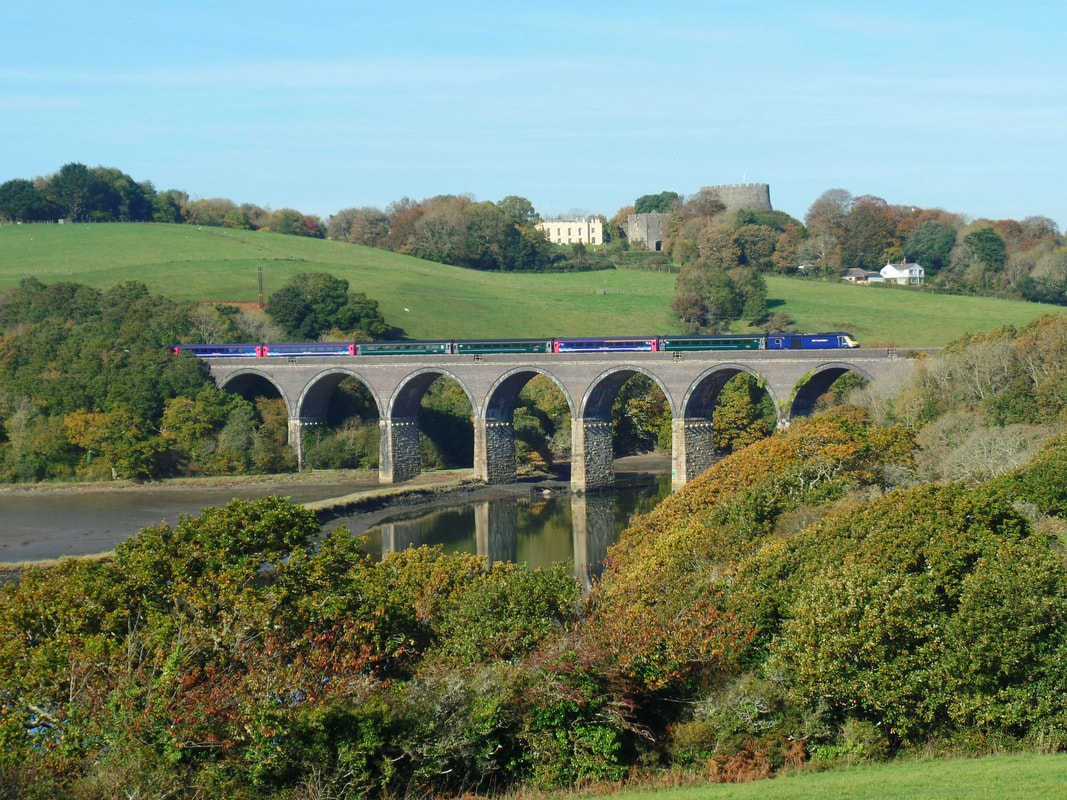
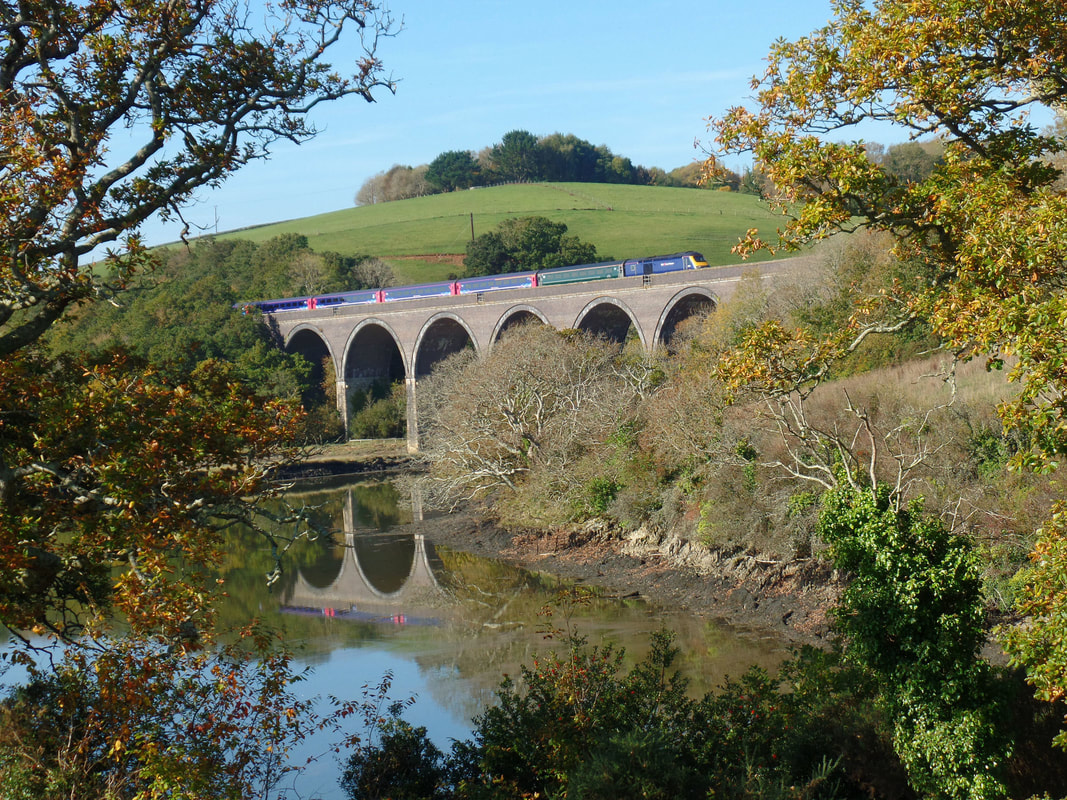
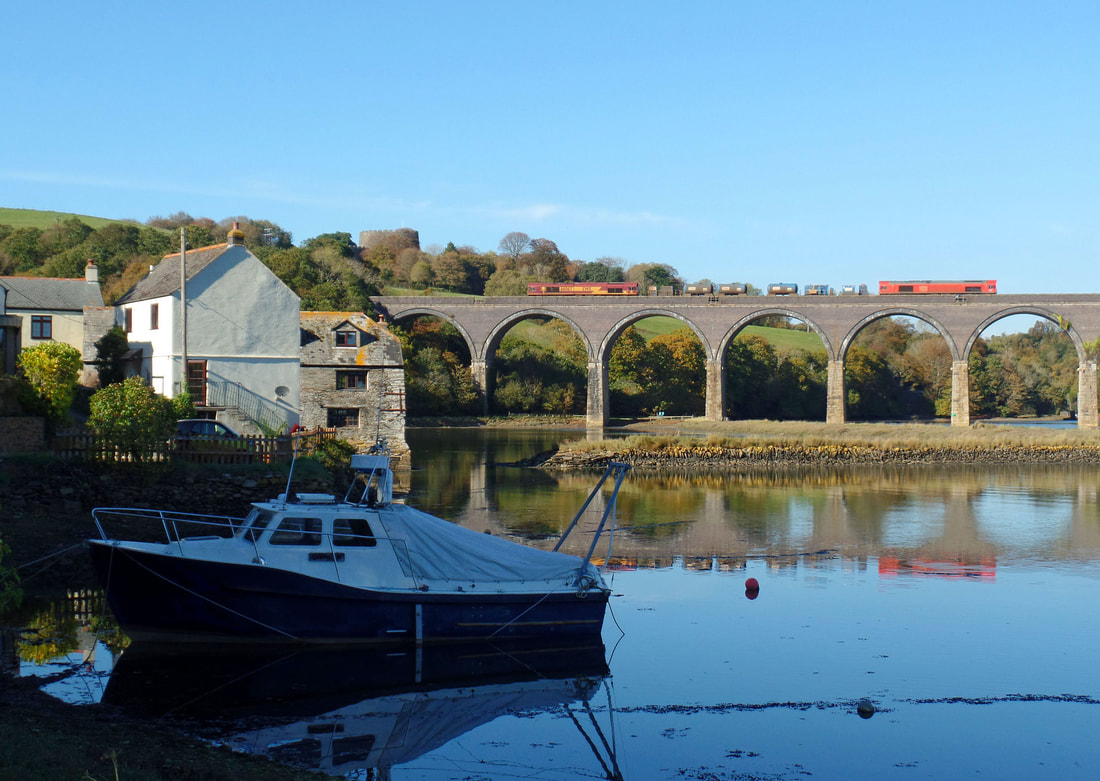
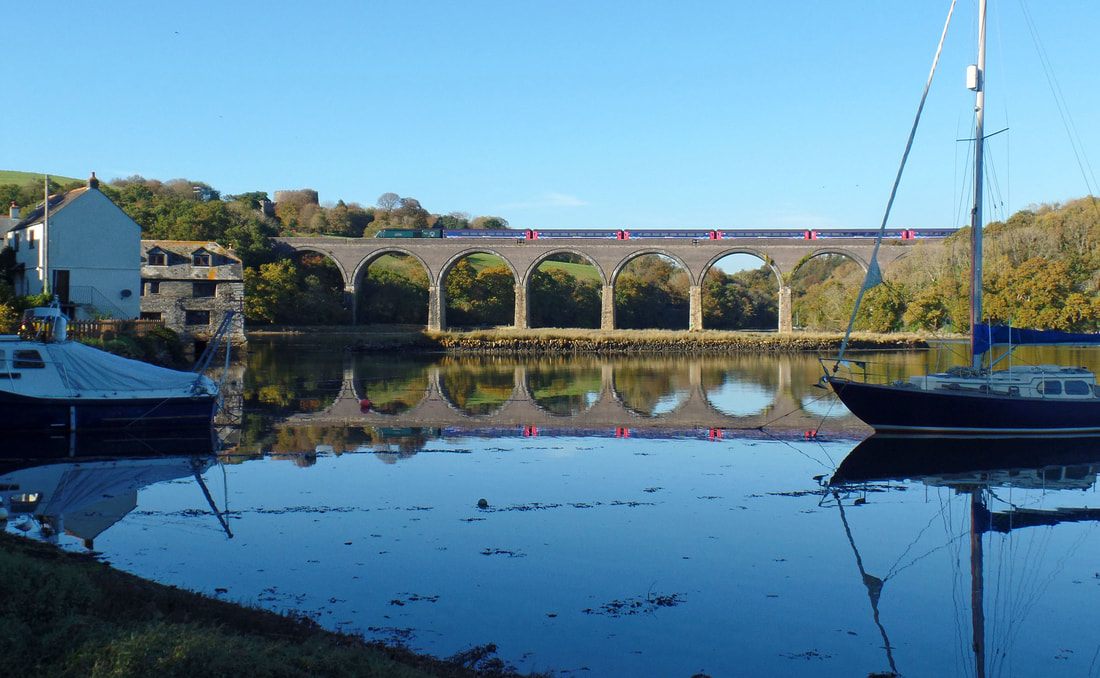
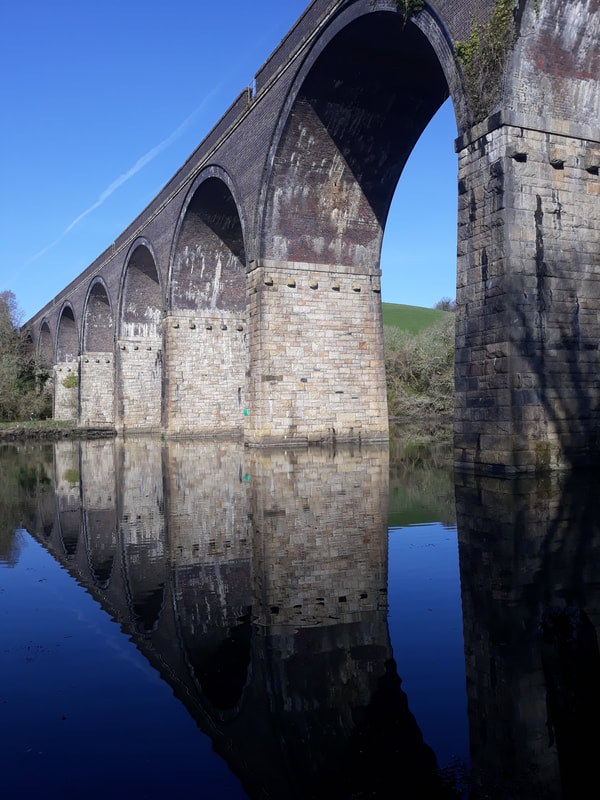
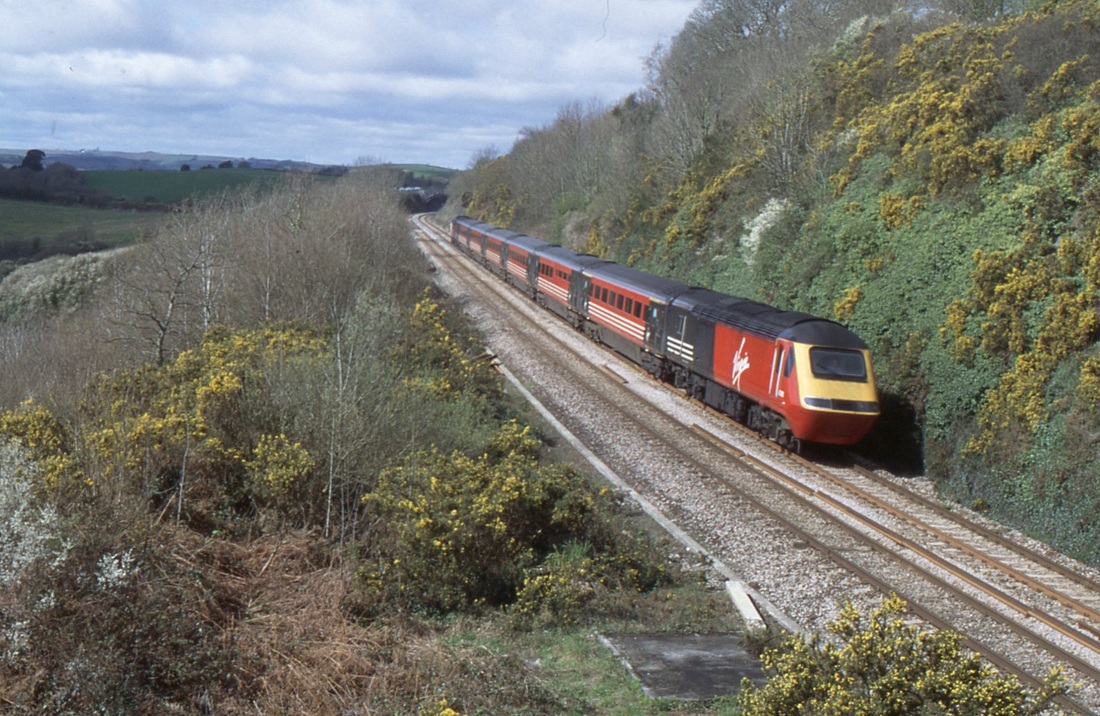
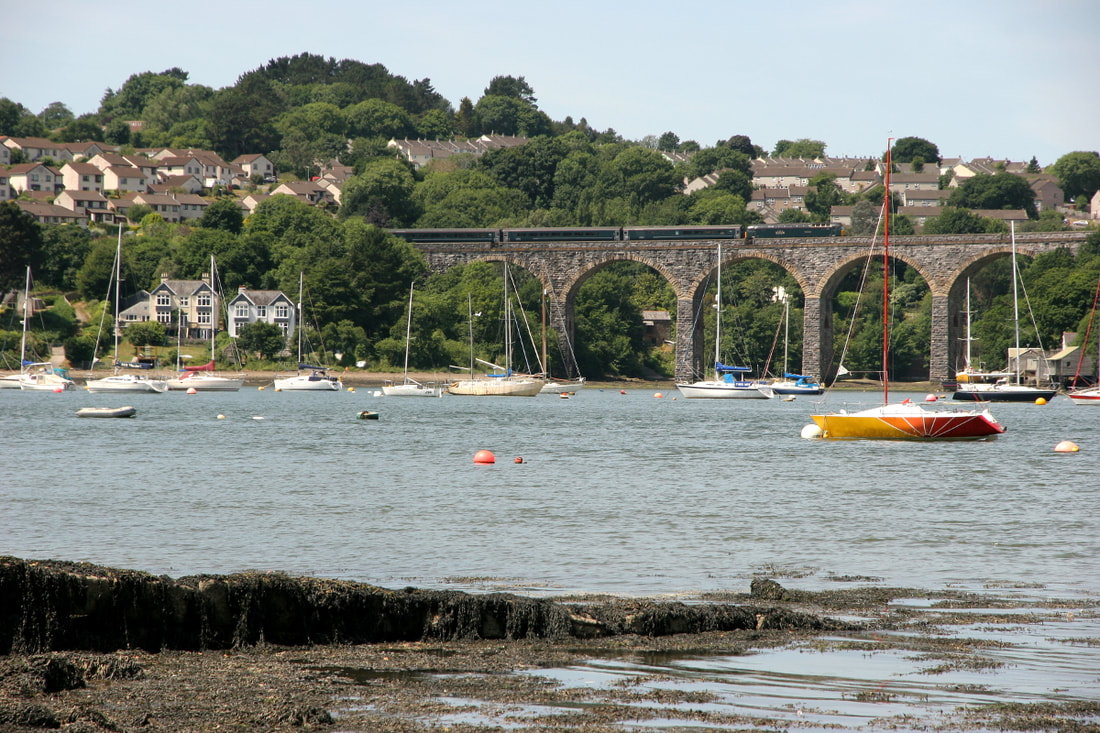
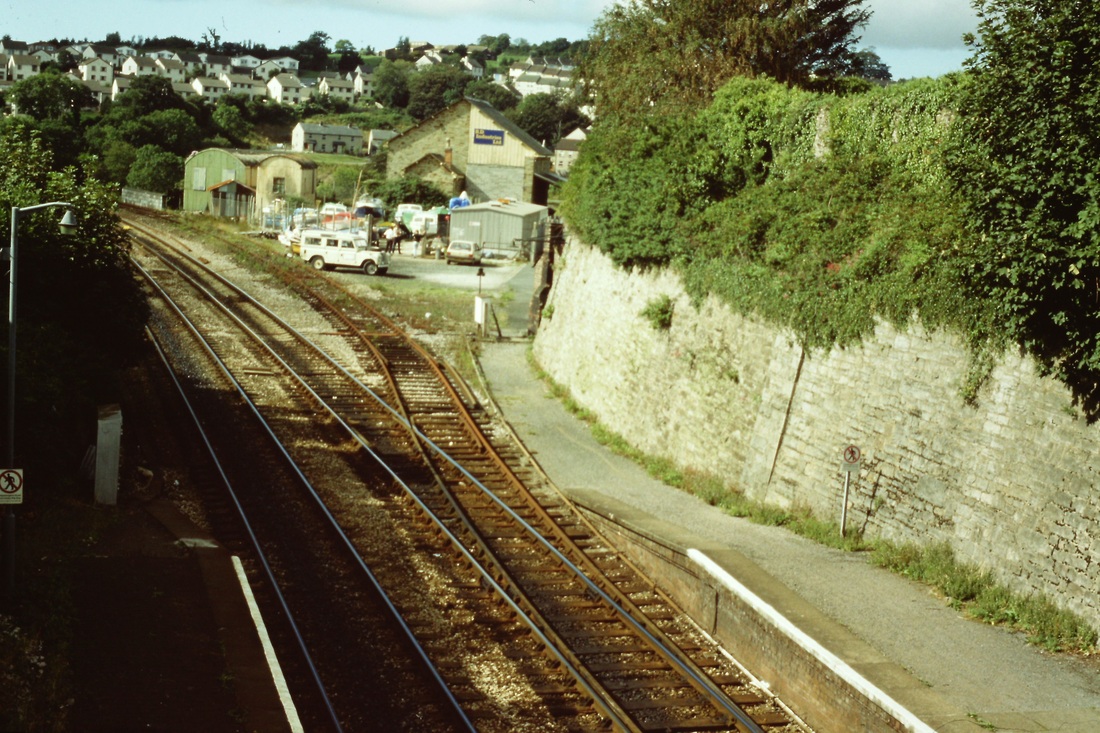
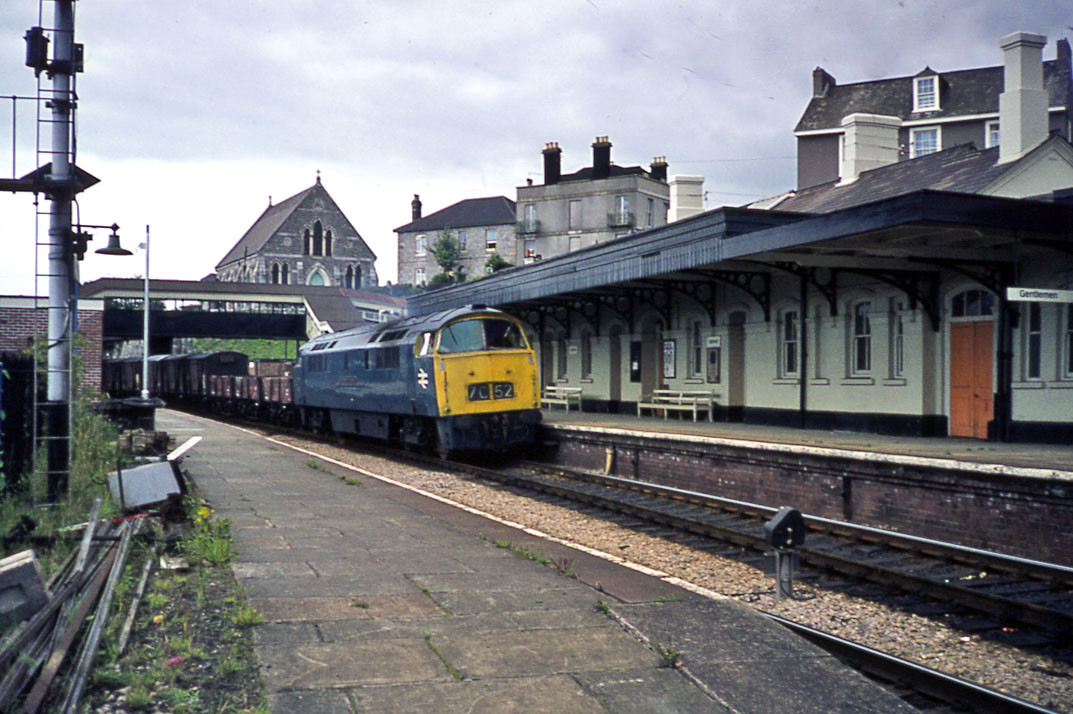
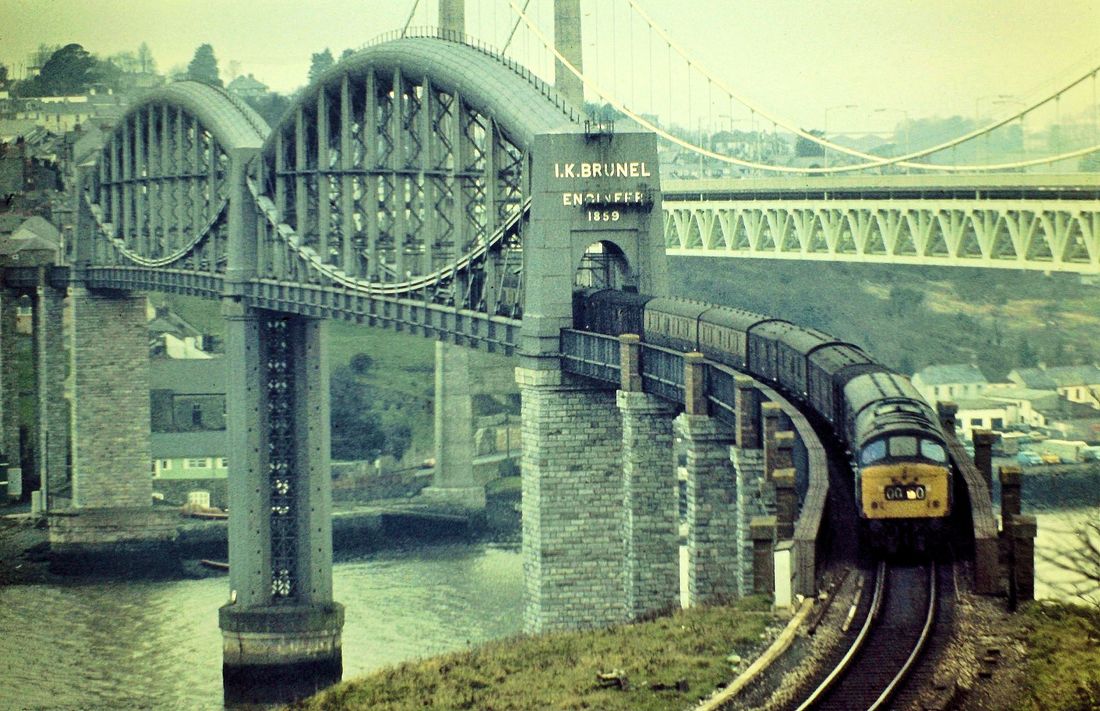
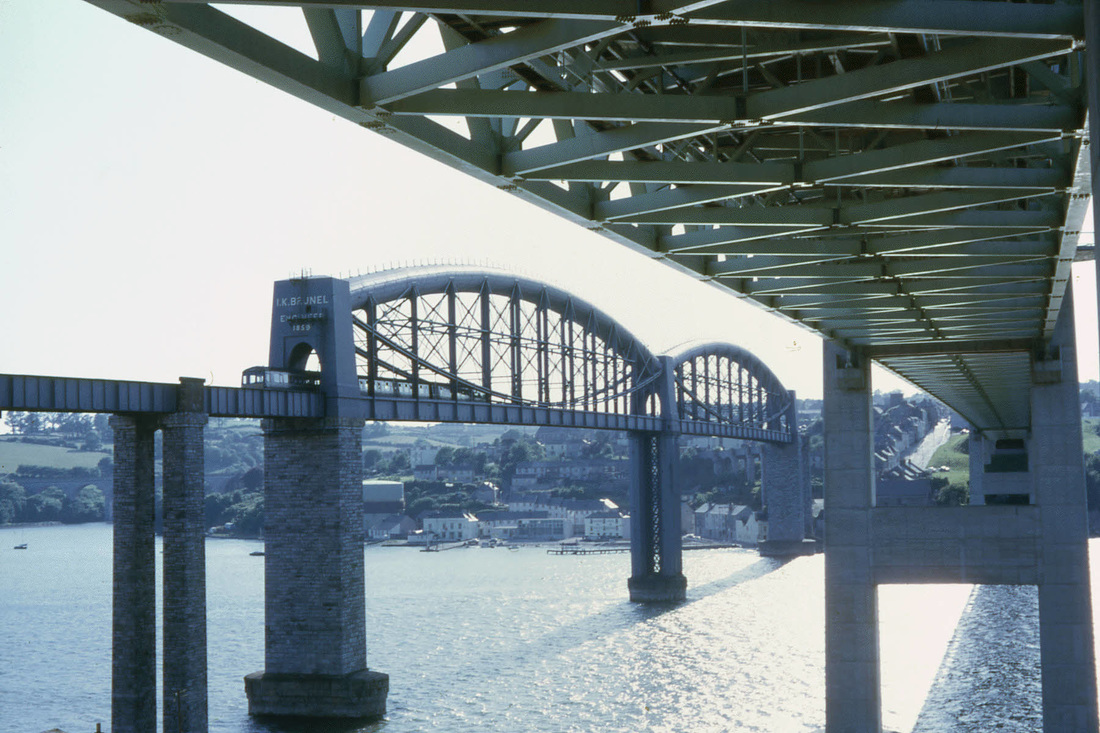
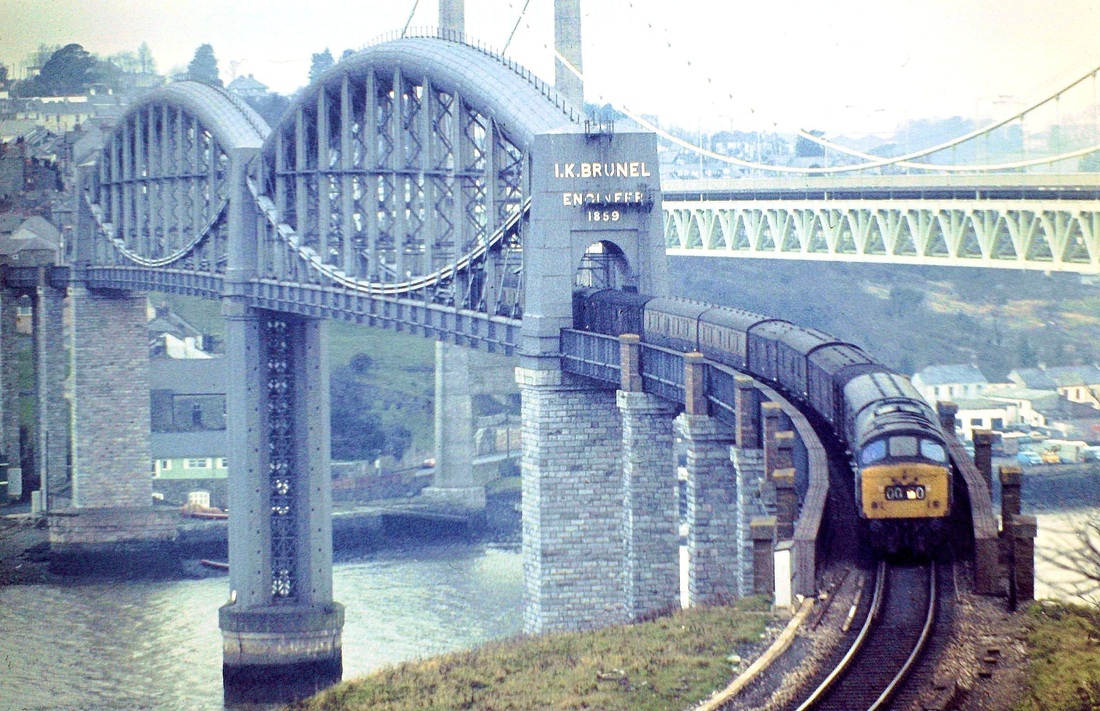
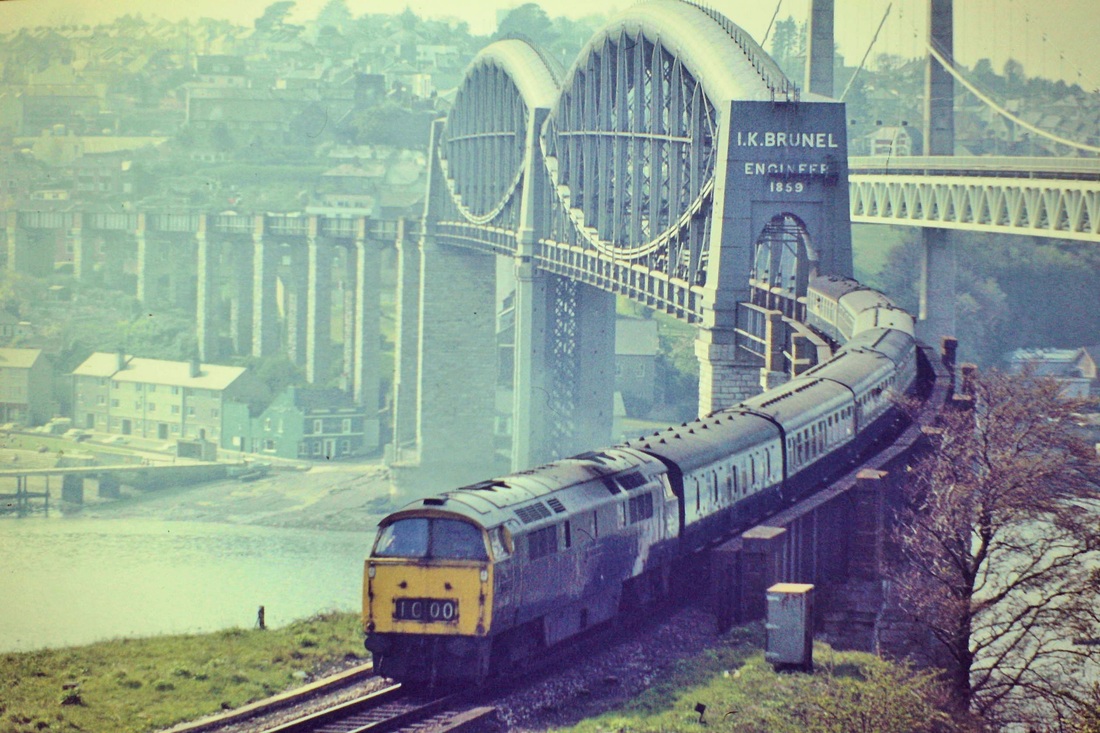
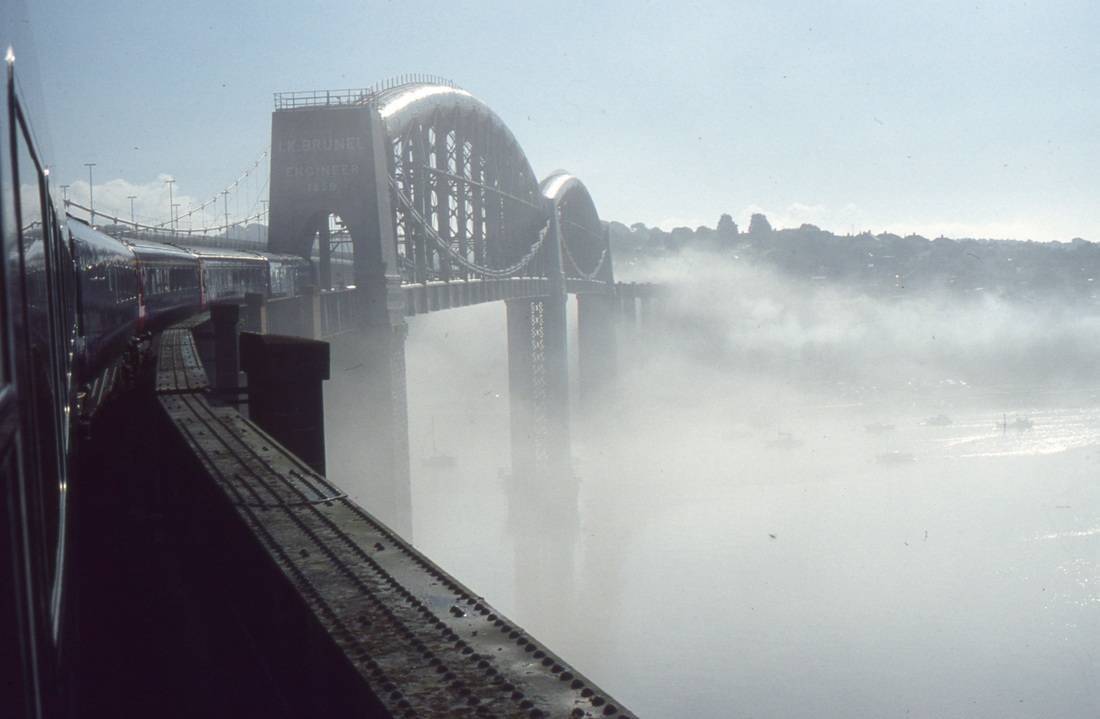
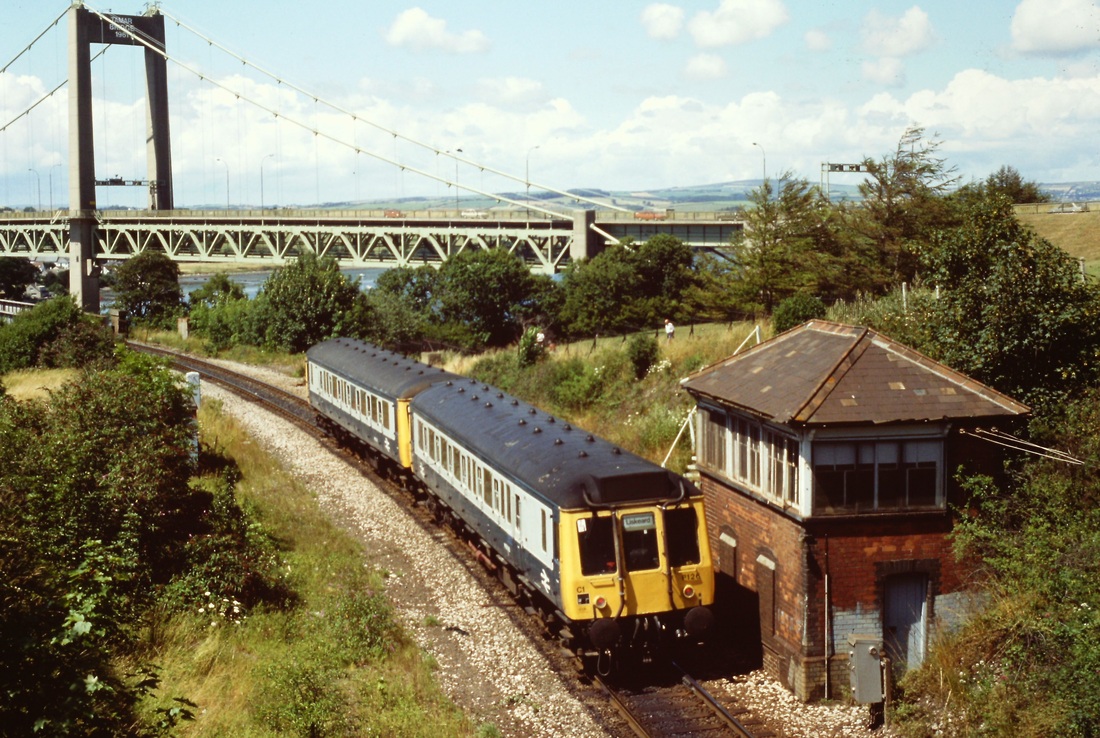
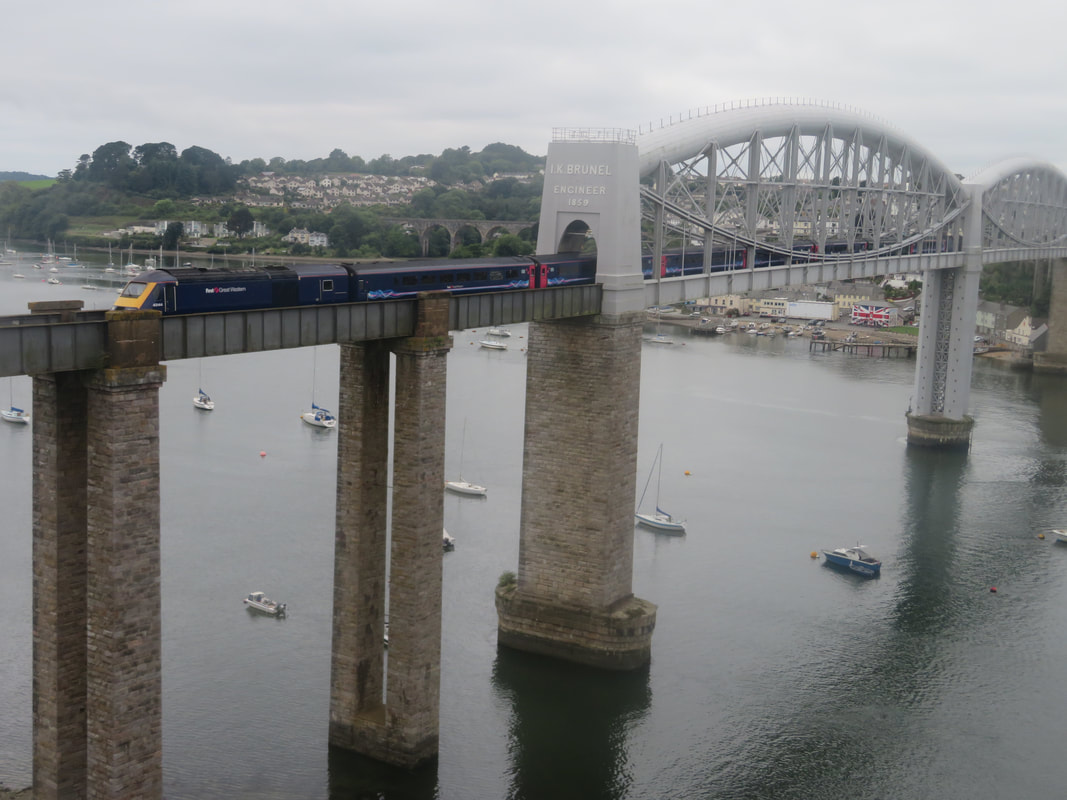
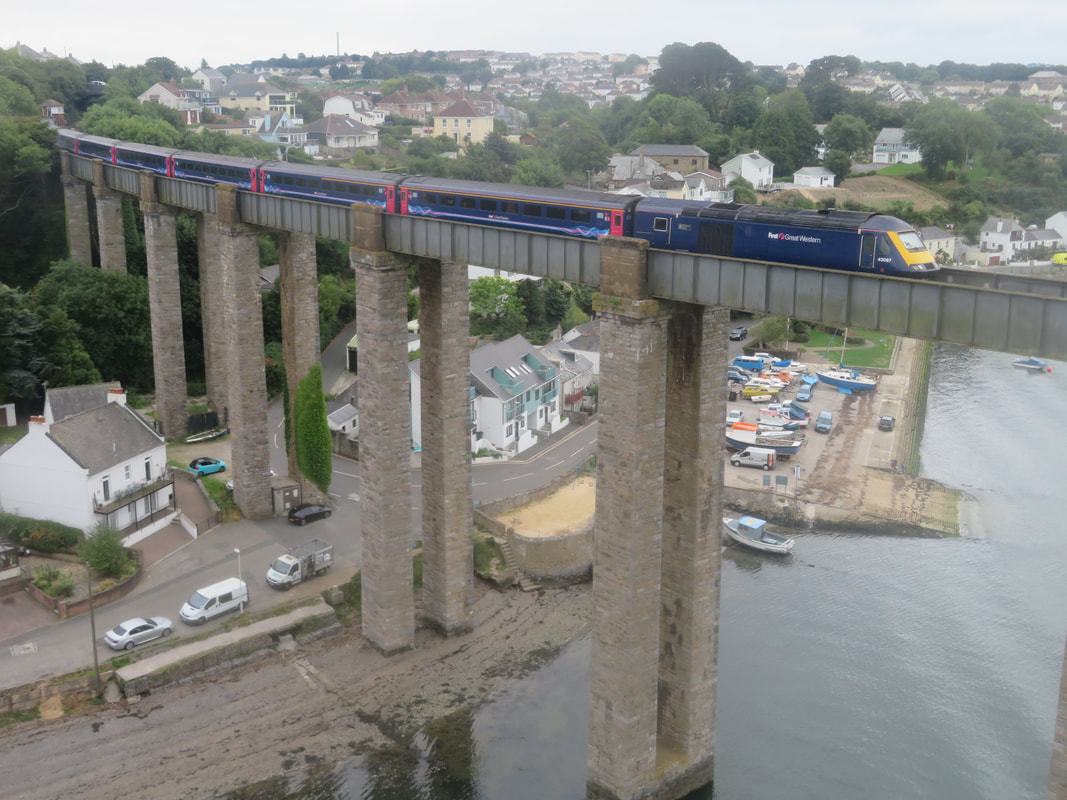
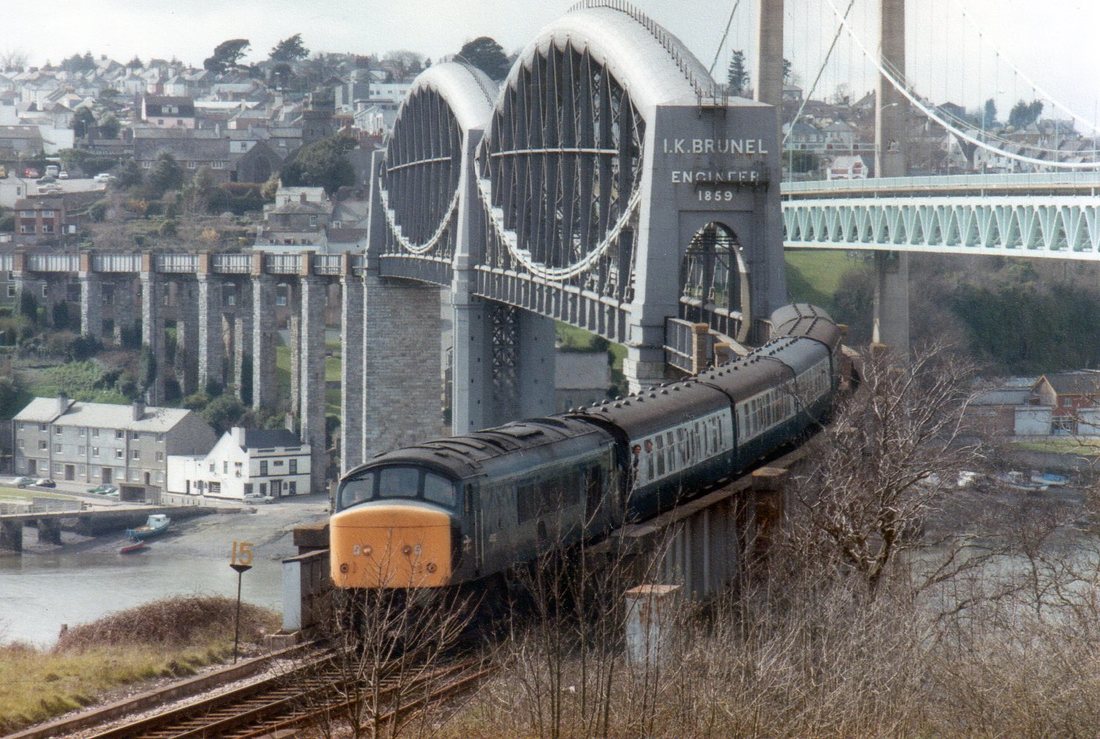
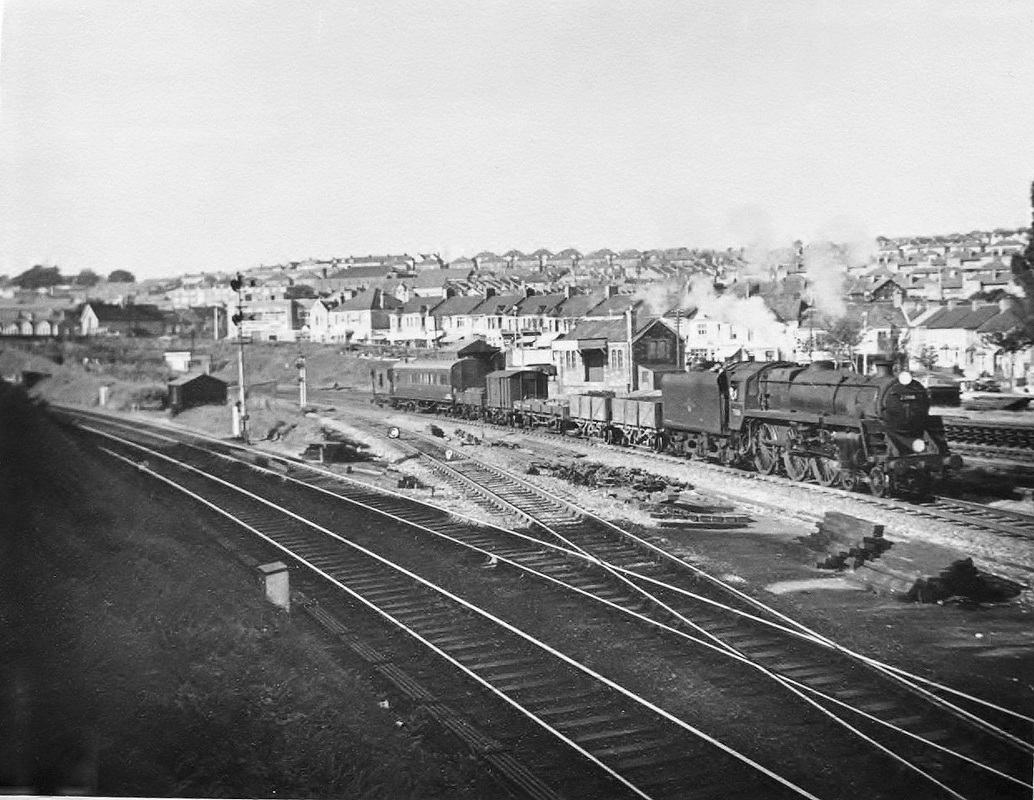
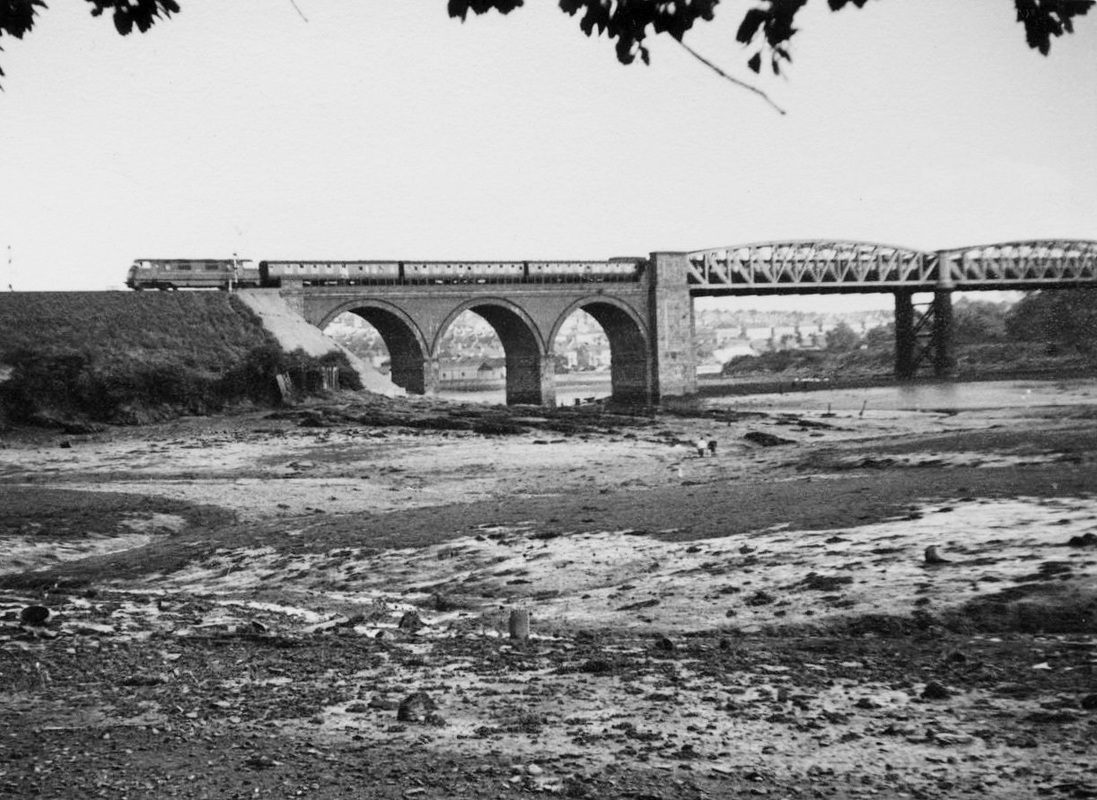
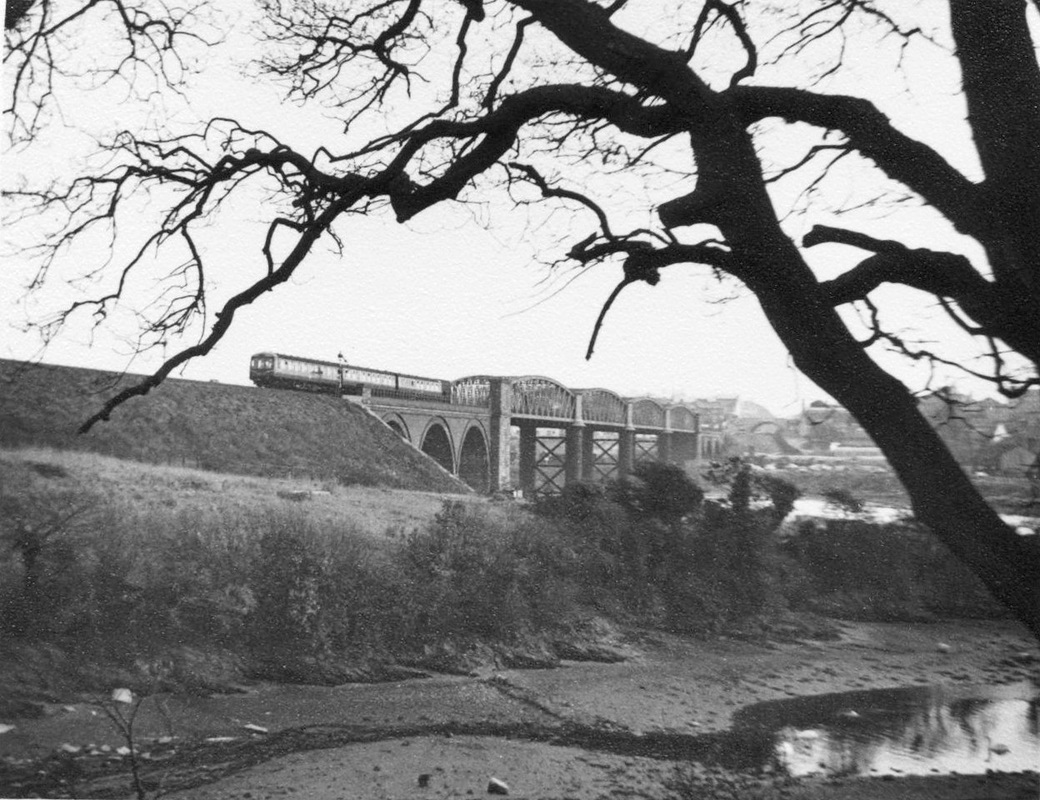
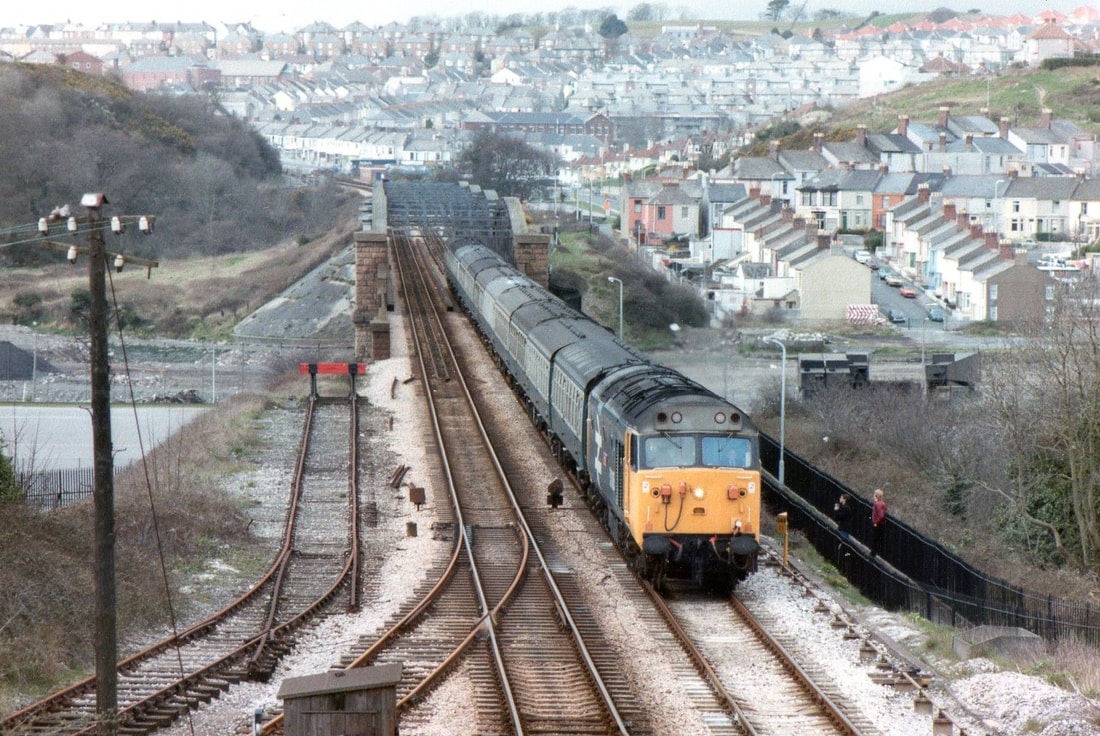
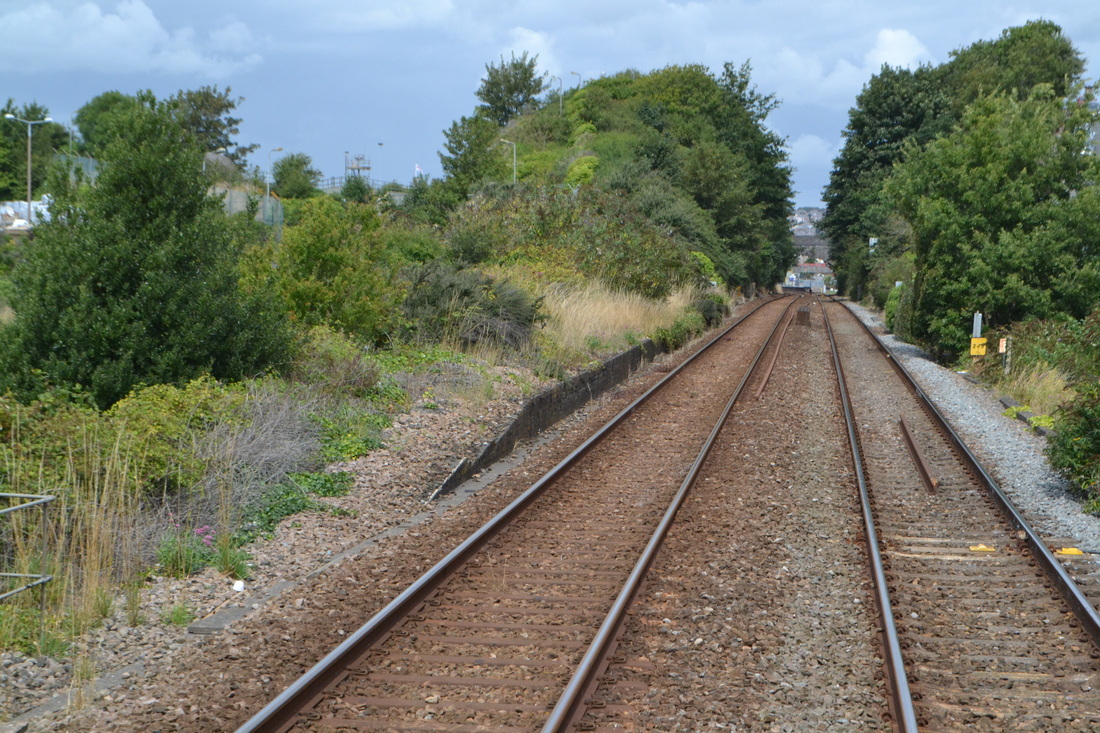
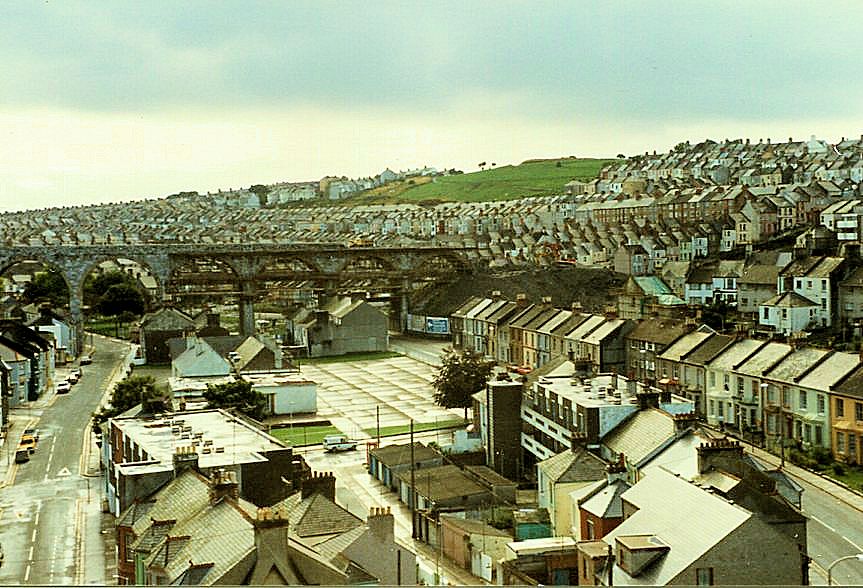
St Germans Viaduct
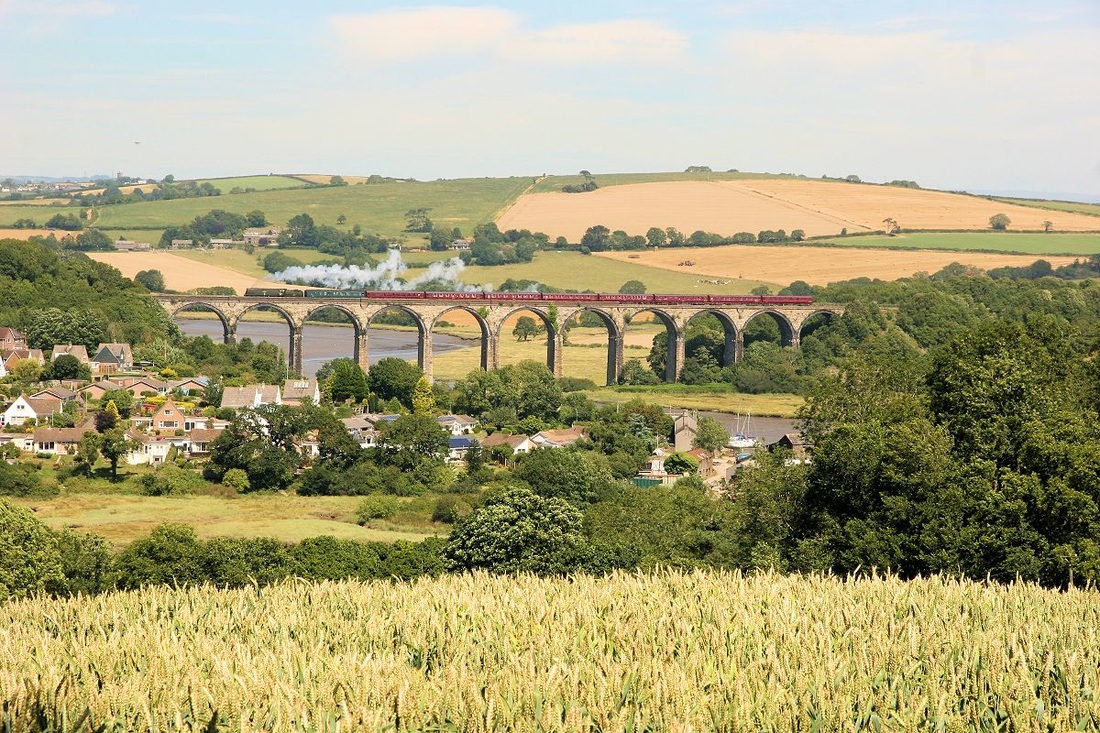
A view from the north of St Germans Viaduct with Tangmere crossing with the down working to Par. 2nd August 2015. Copyright Chris Harvey
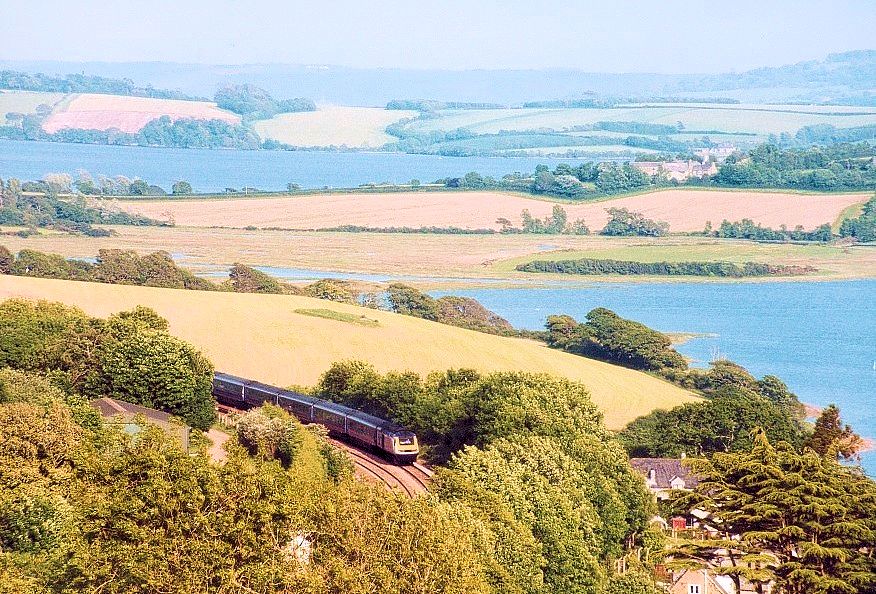
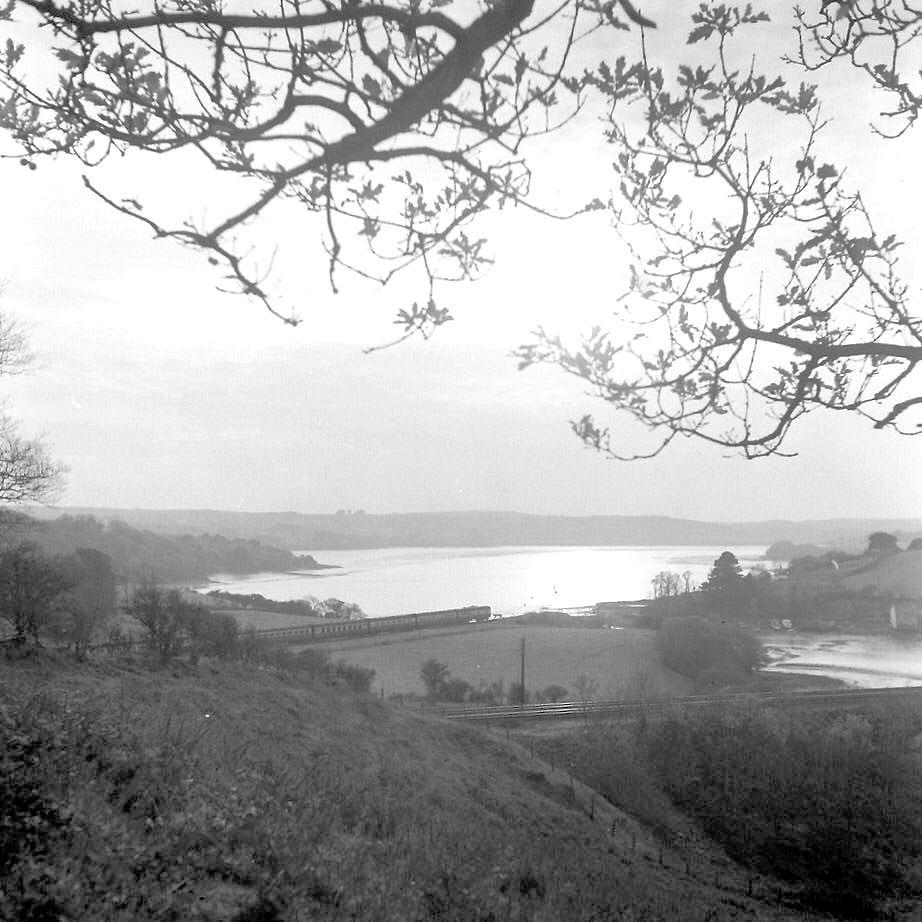
The date is 31/5/2003, and the location is the hill above St Germans station, With the River Tiddy on the left, and the Lynher in the background, the 1535 Paddington - Penzance is captured rounding the curve between St Germans viaduct and the station, on a gorgeous Cornish evening. Copyright Chris Harvey
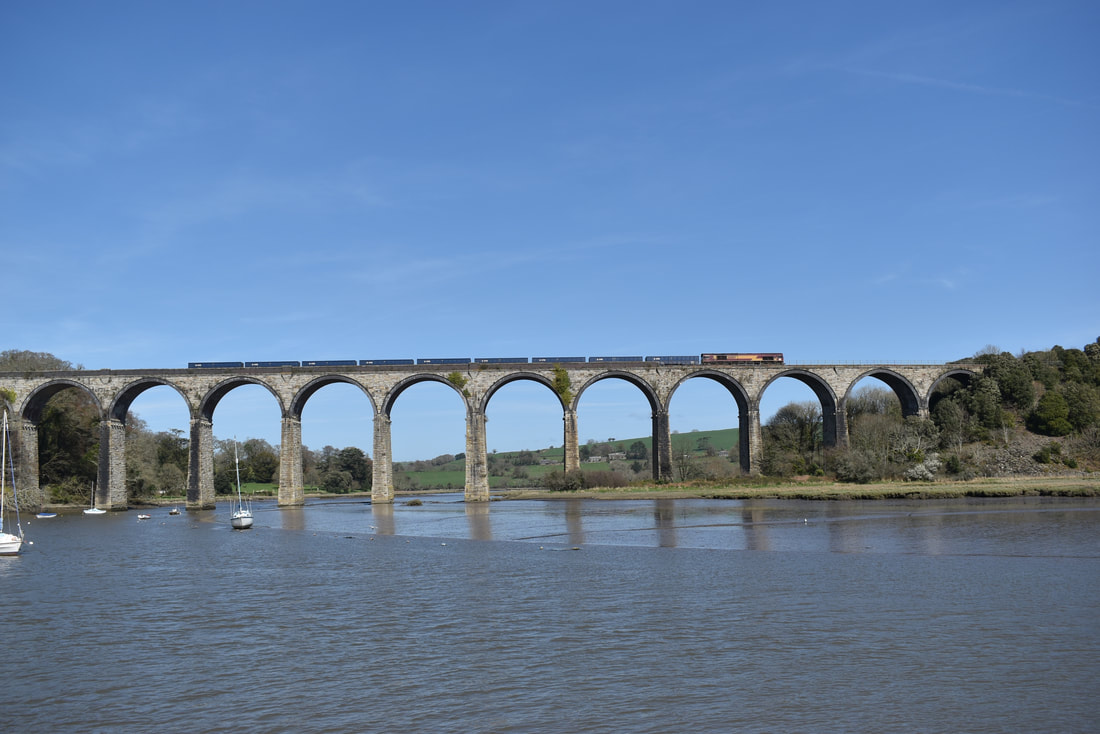
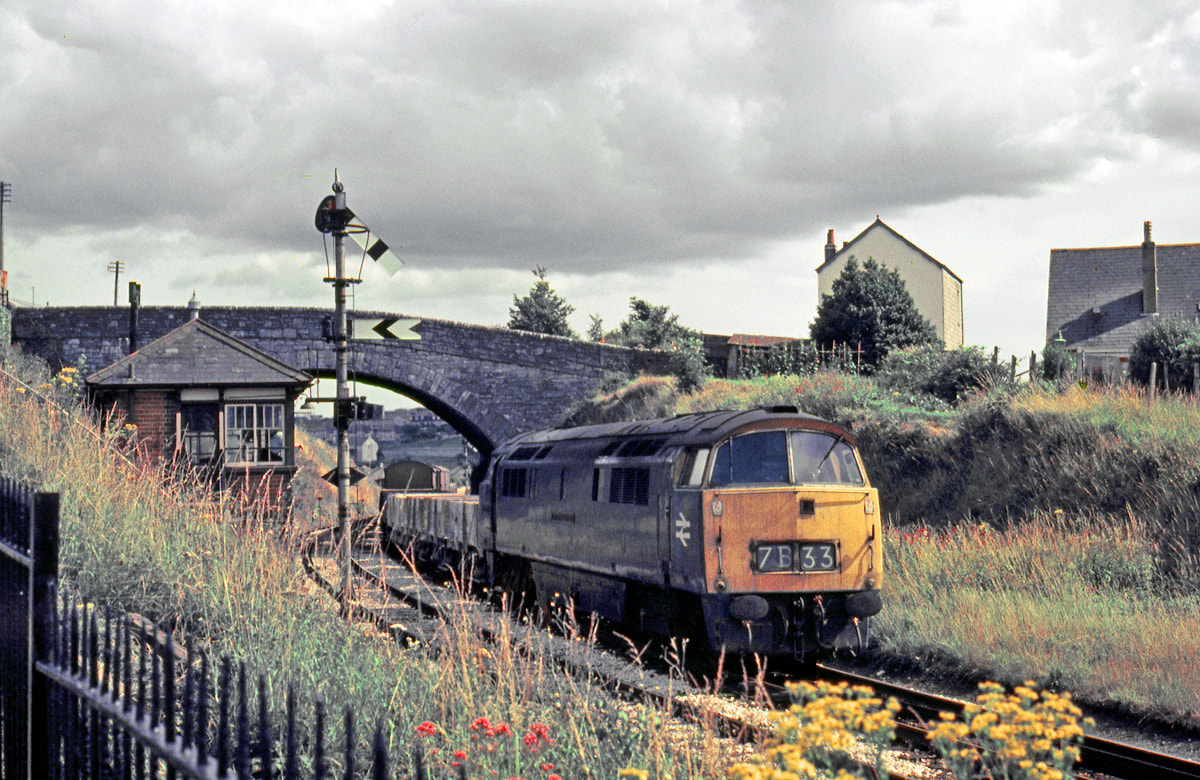
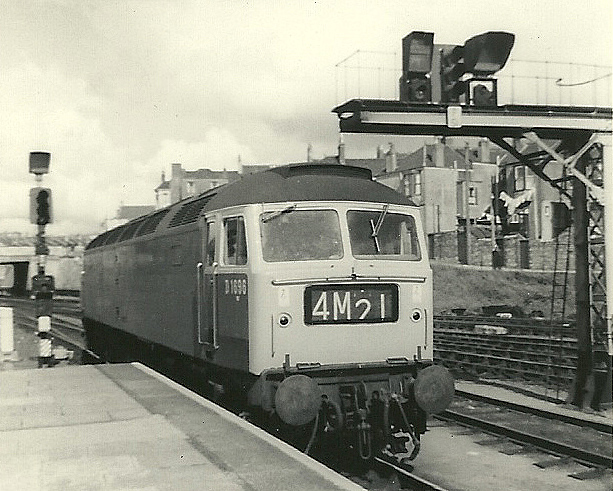
(1)Â 66127 crosses St Germans viaduct with early running 10.58 Burngullow - Exeter Riverside sand on the 26th March 2019. Copyright Clive Smith
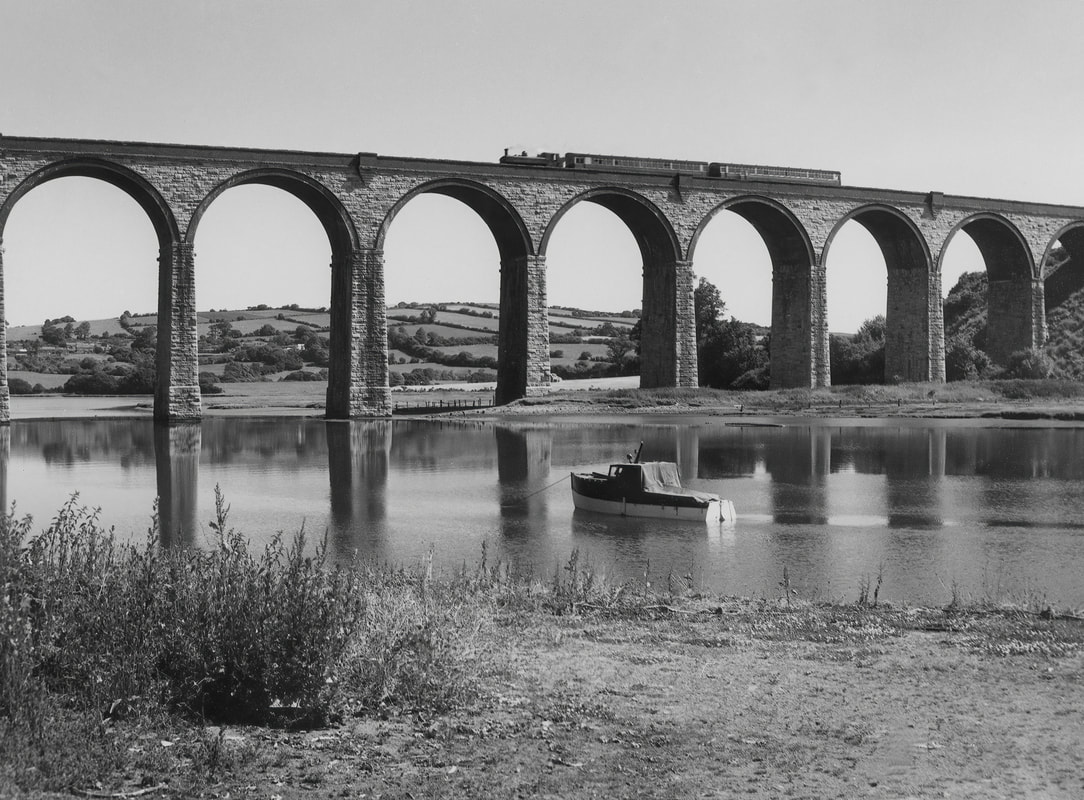
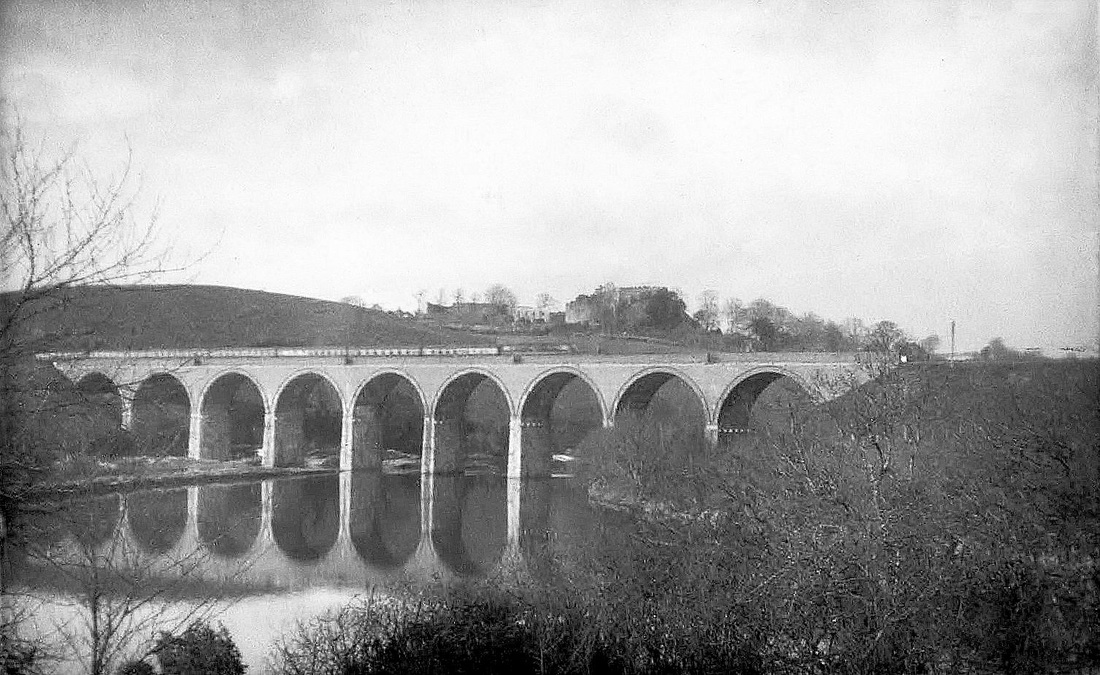
St Germans Viauct in the early 50's. Copyright the late John Vines.
St Germans Viaduct 30th September 1975 1009 Western Invader p121 of the book. Copyright The late Jon Vines. From the book 'Diesel Hydraulics a colour retrospective.
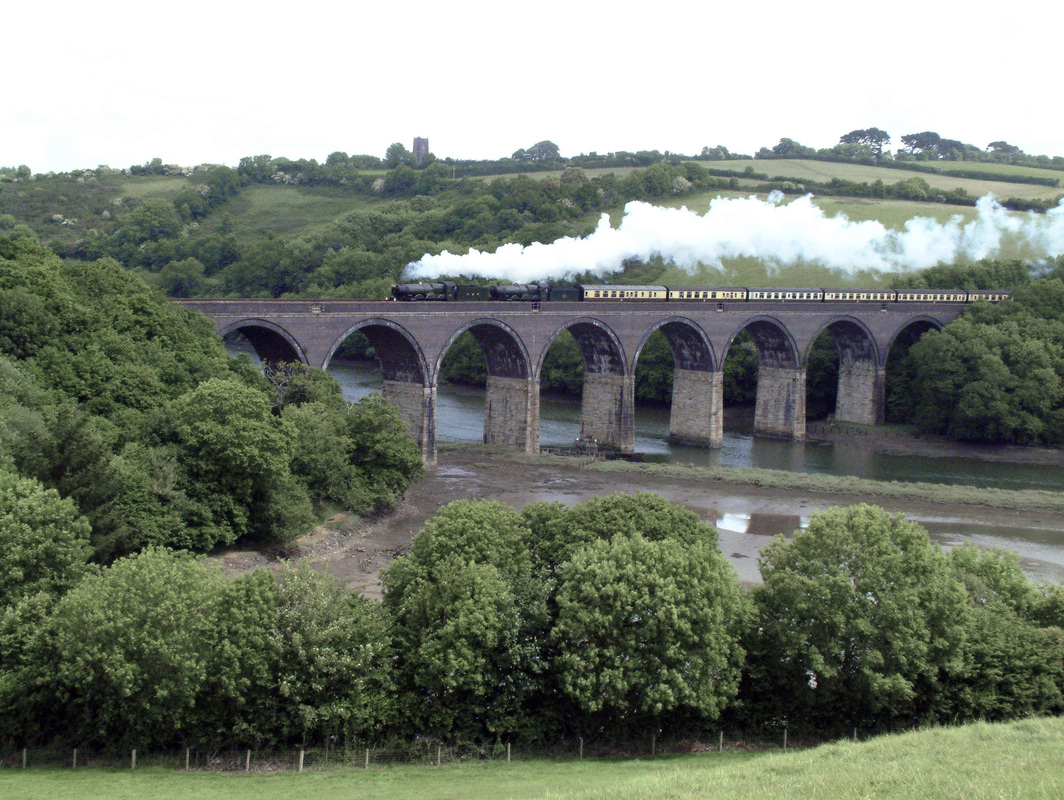
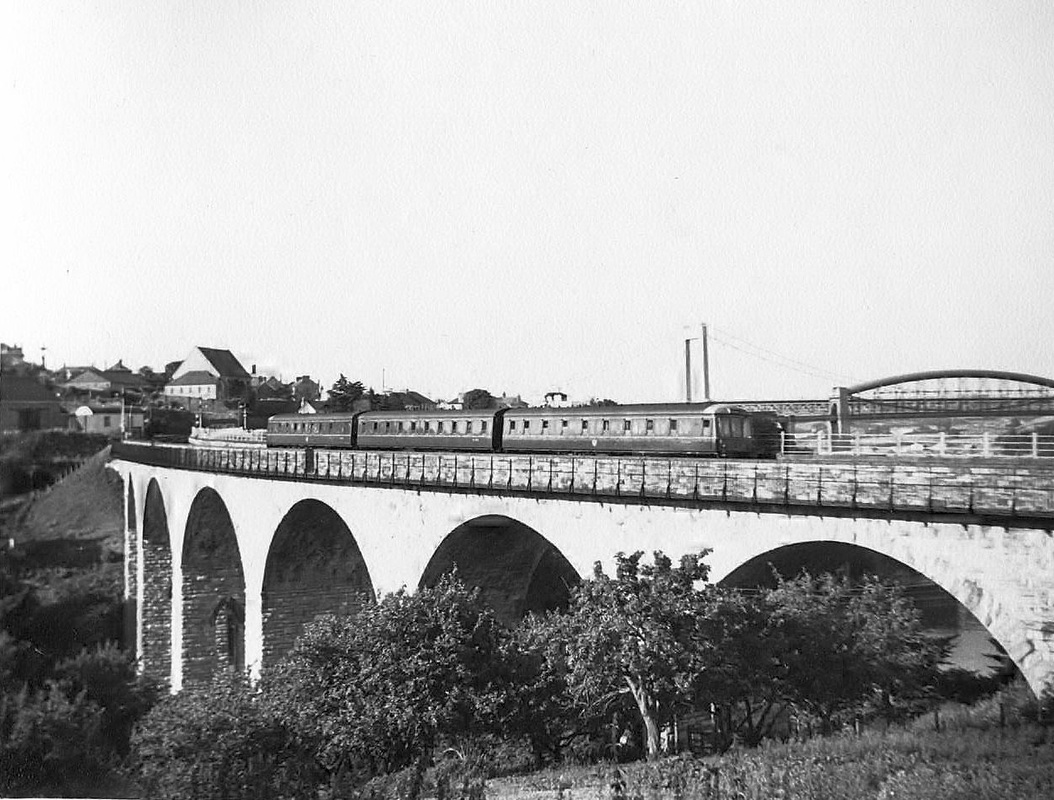
Lynher viaduct
Lynher Viaduct 6th September 1989. Copyright Roger Geach.
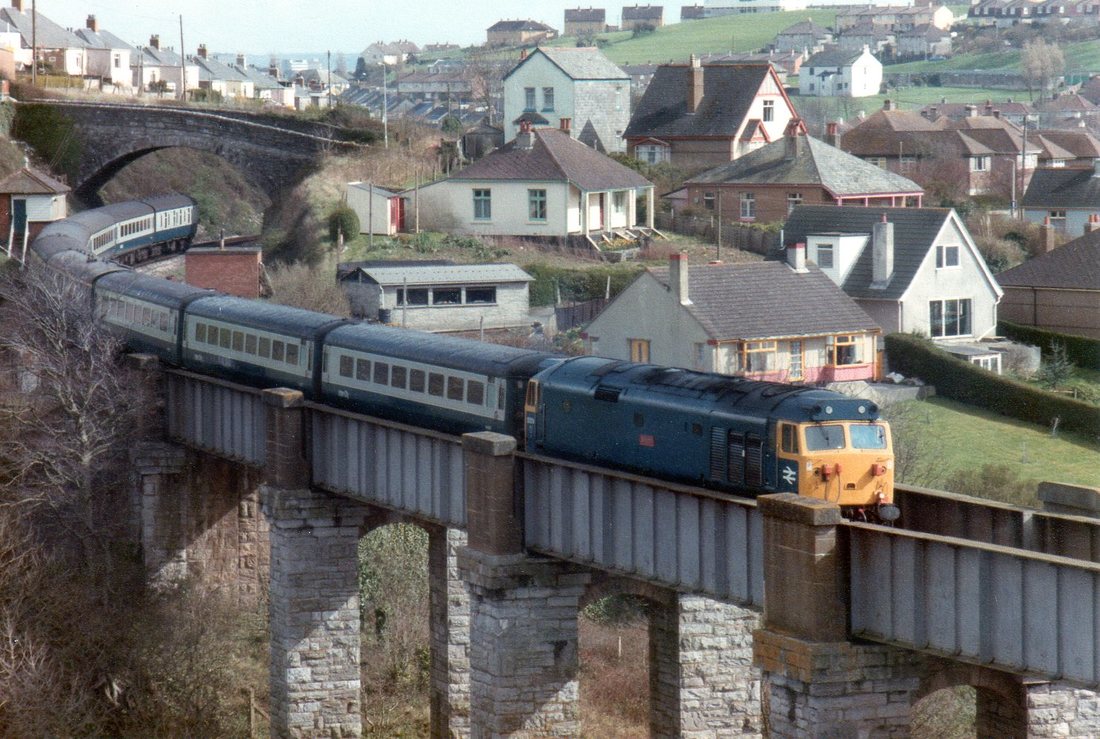
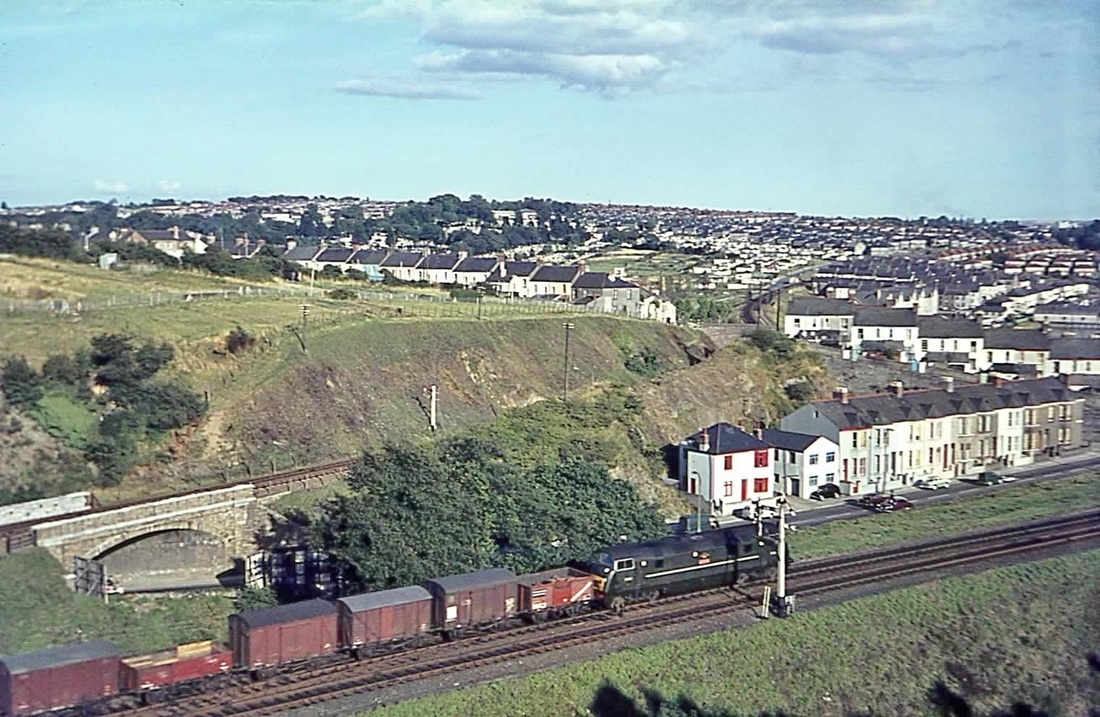
Treham
A colourful scene at Treham Nr Saltash June 1969 Copyright Mike Roach
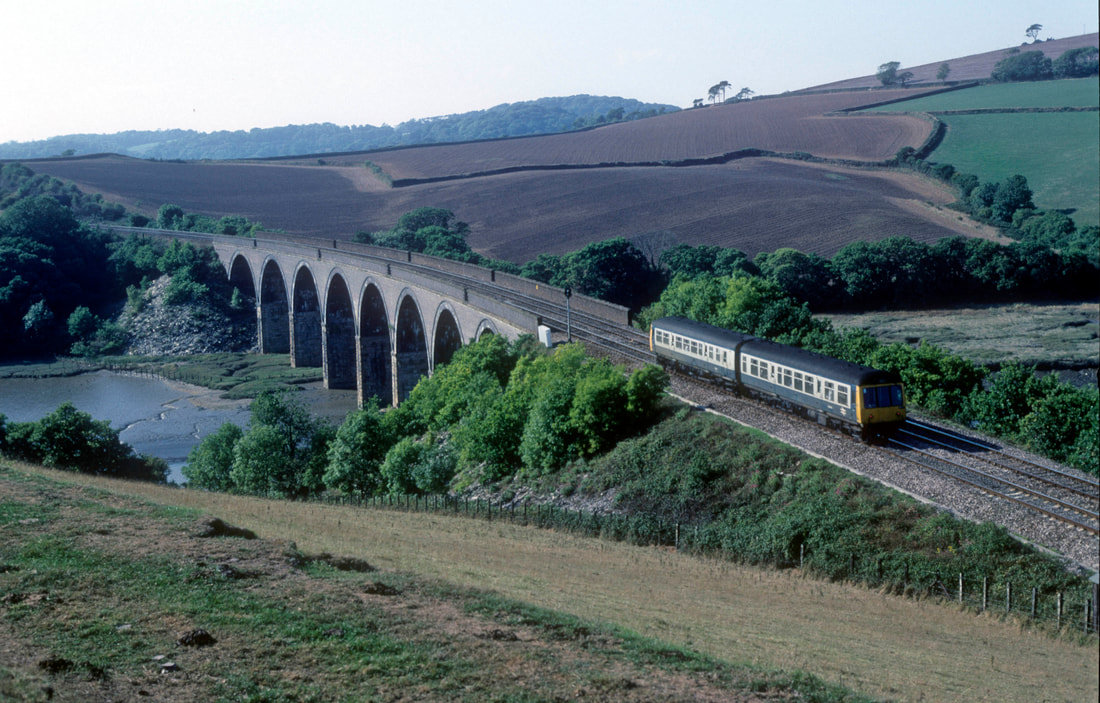
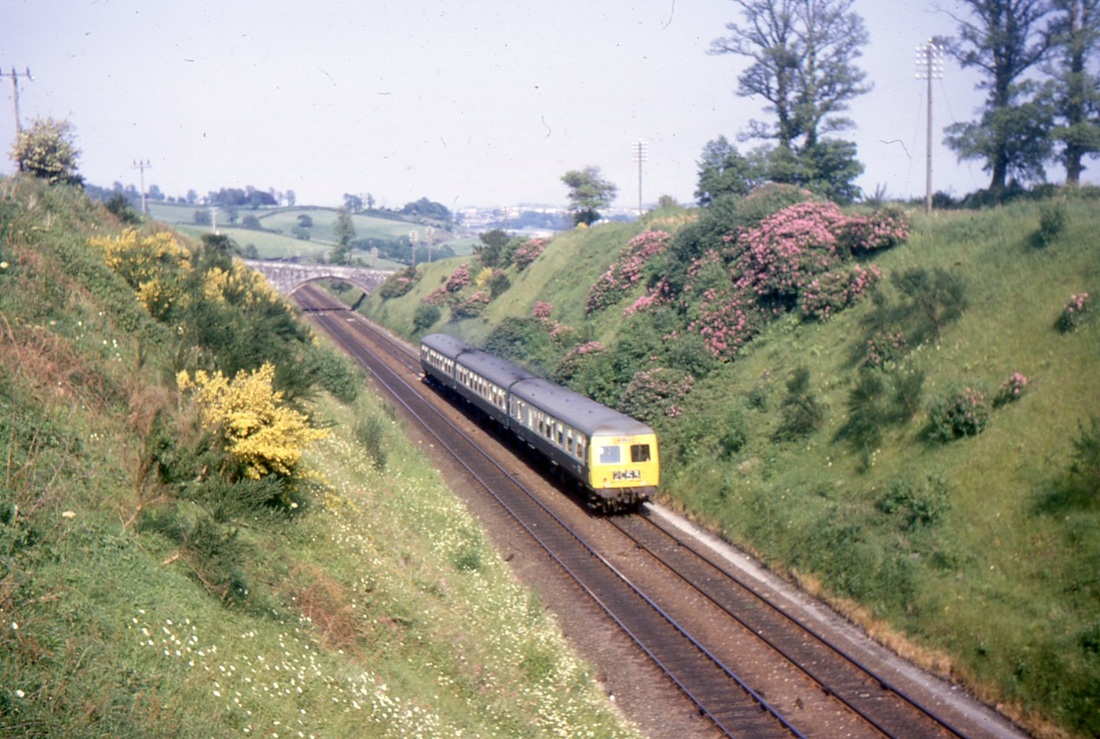
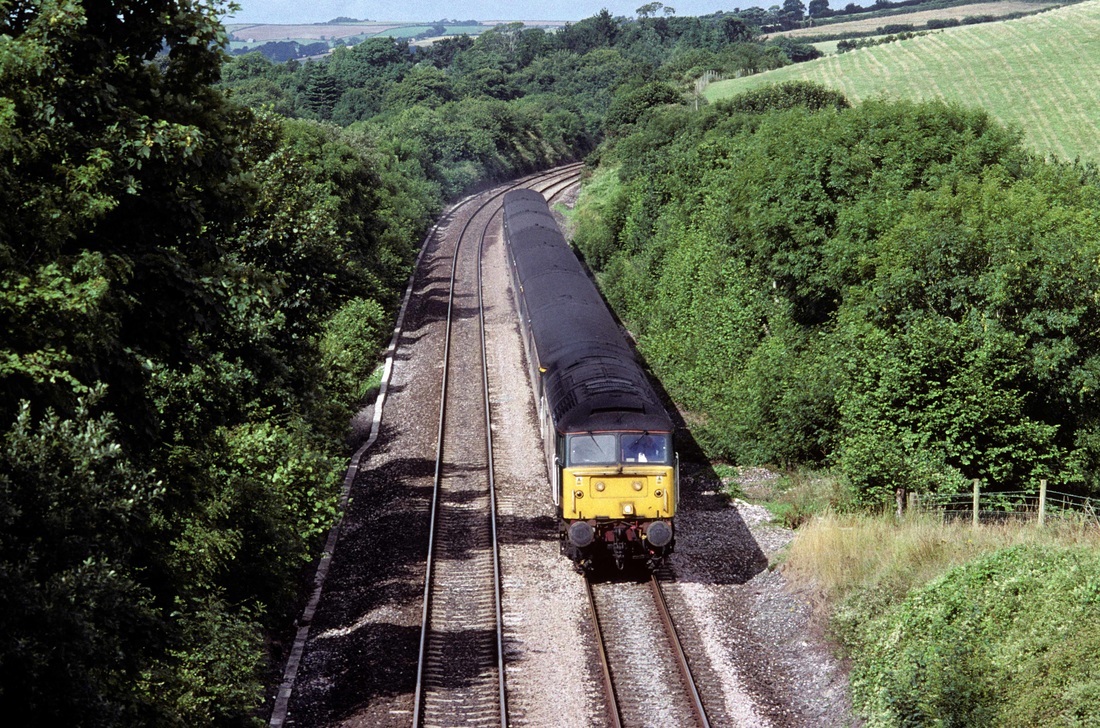
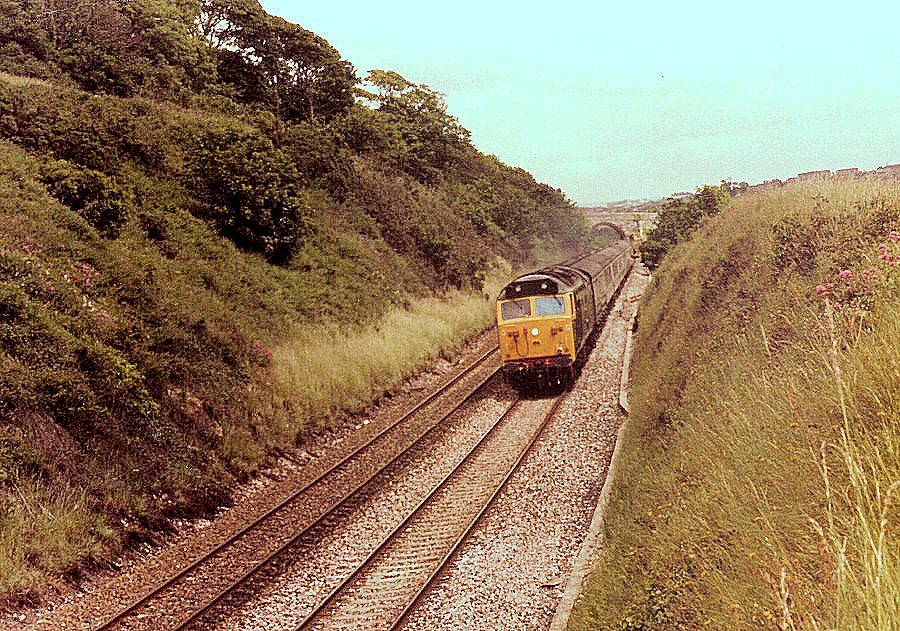
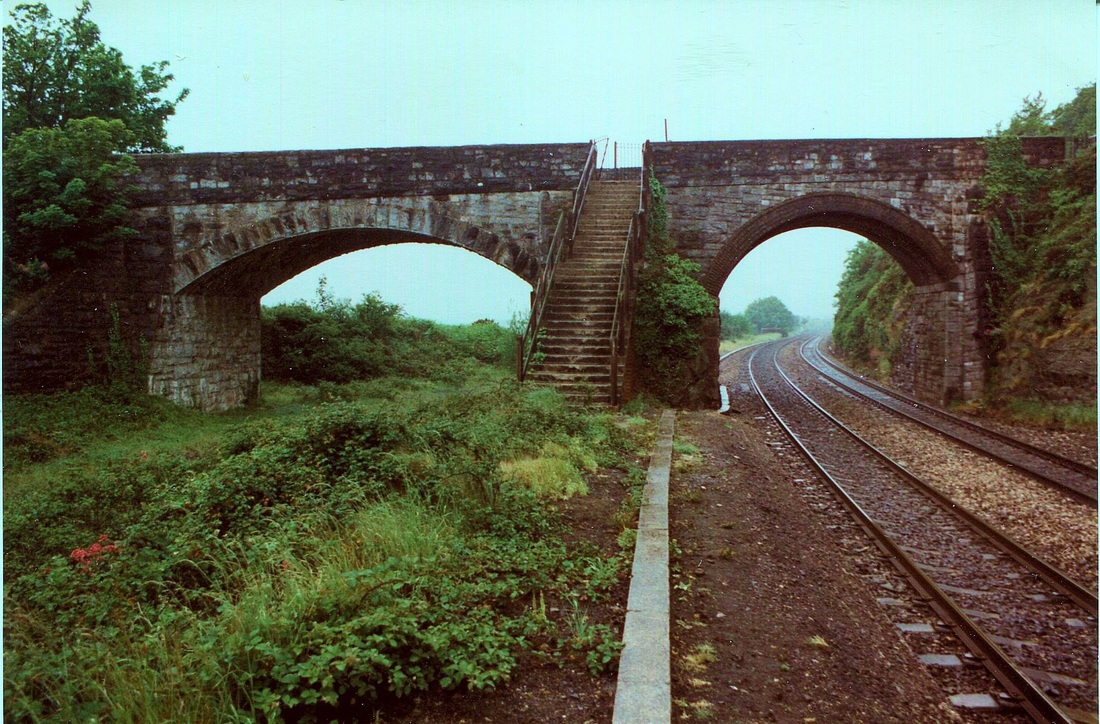
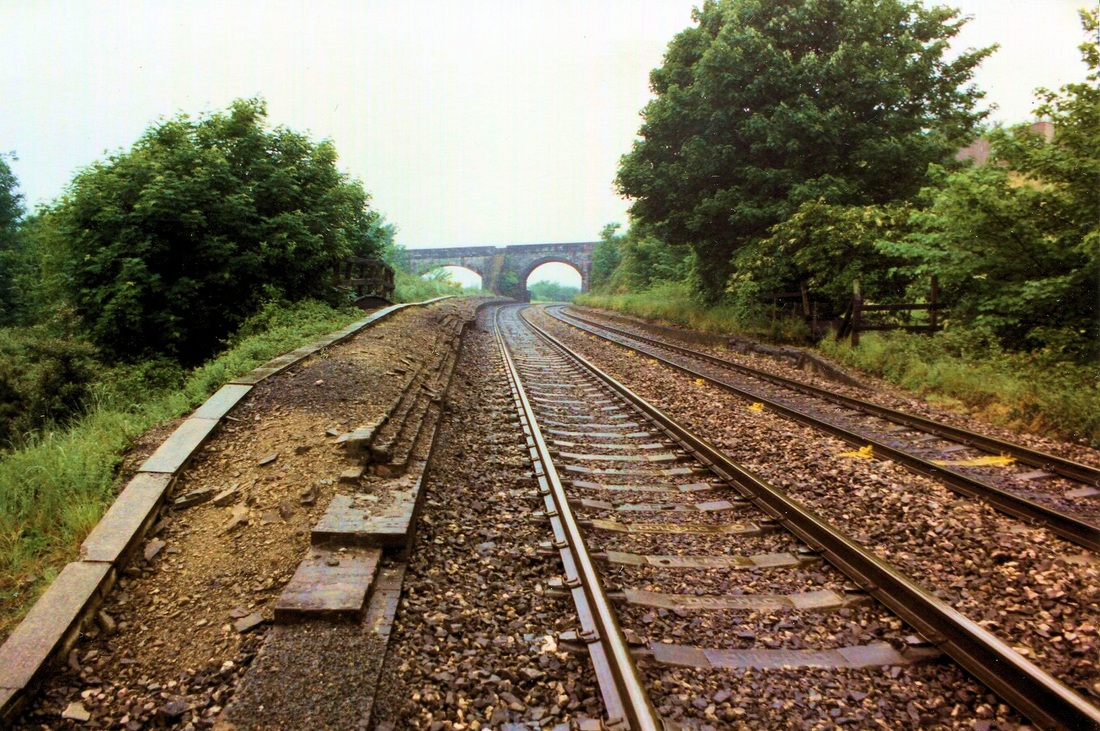
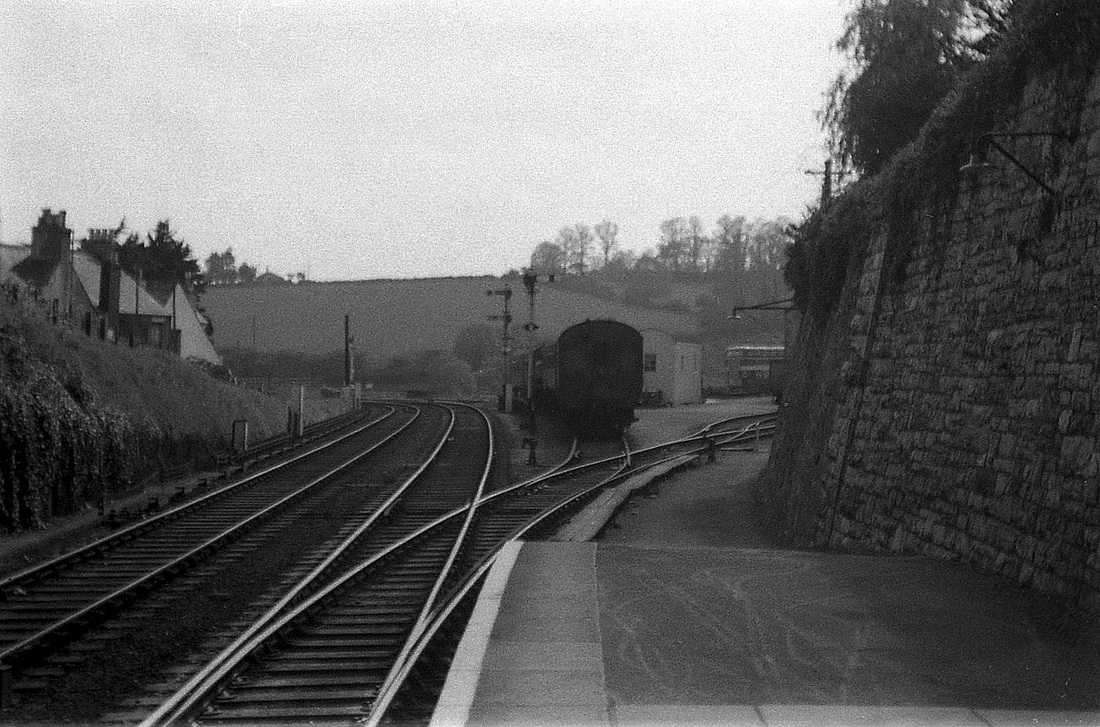
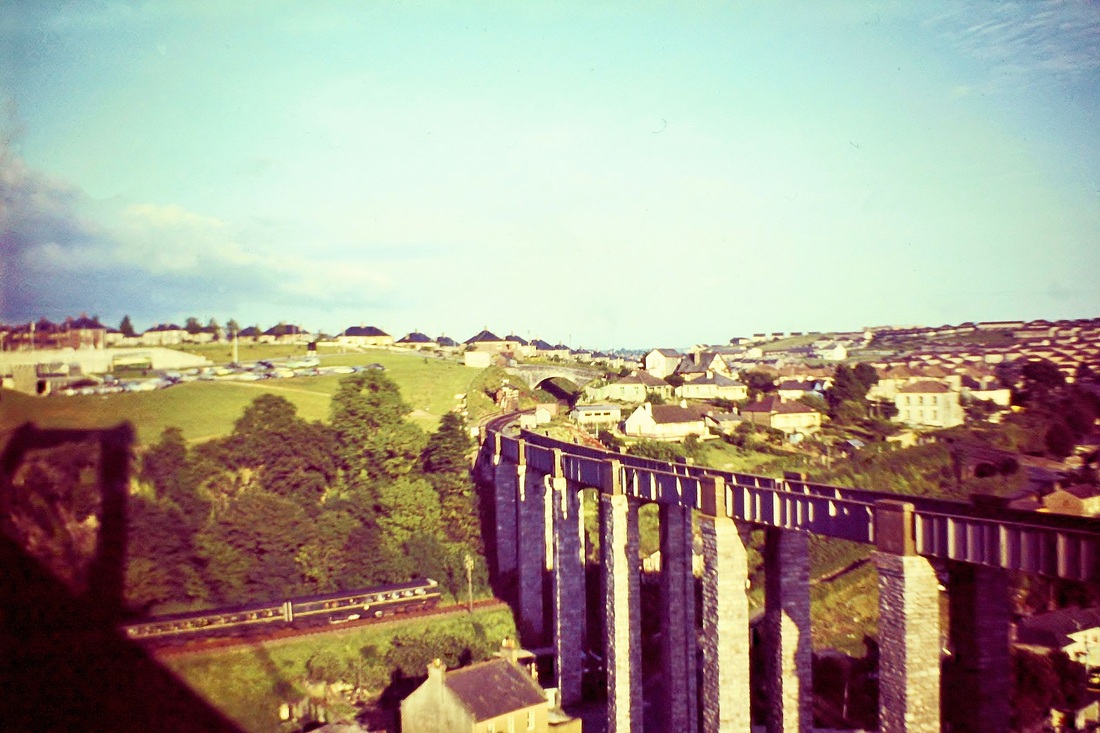
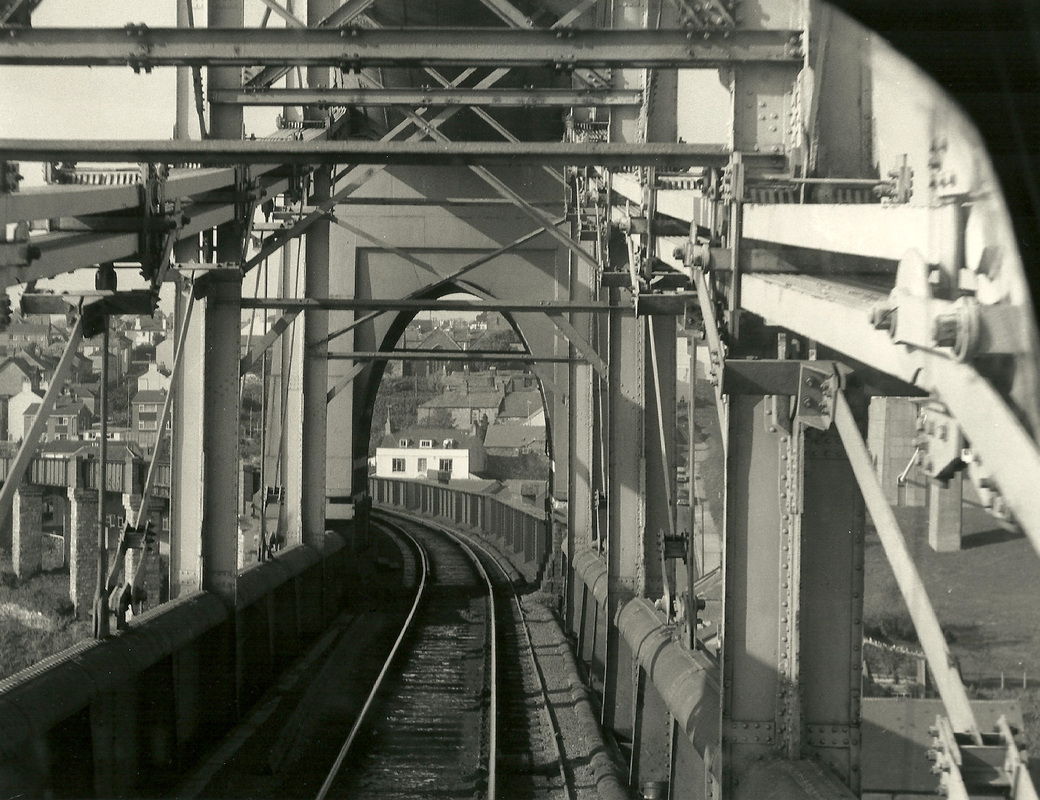
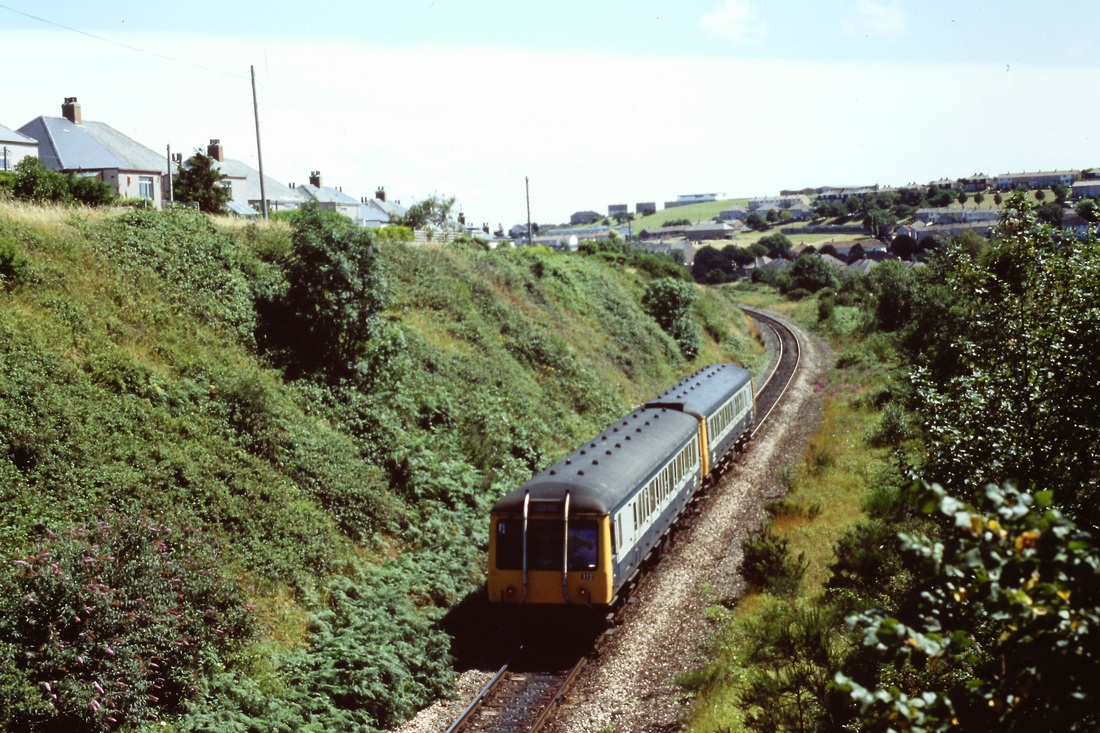
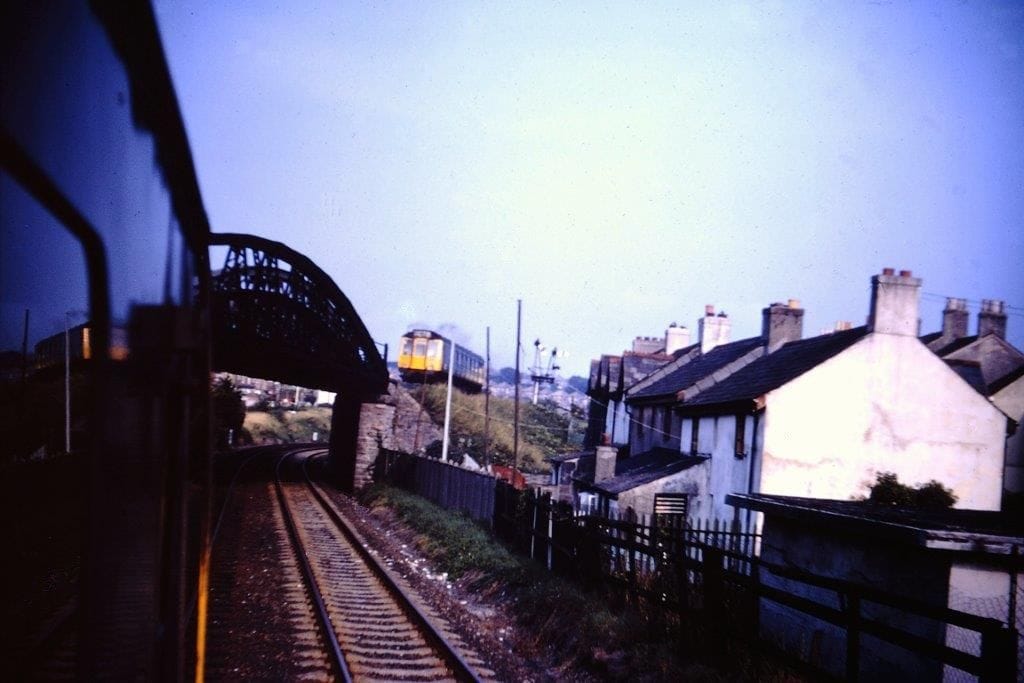
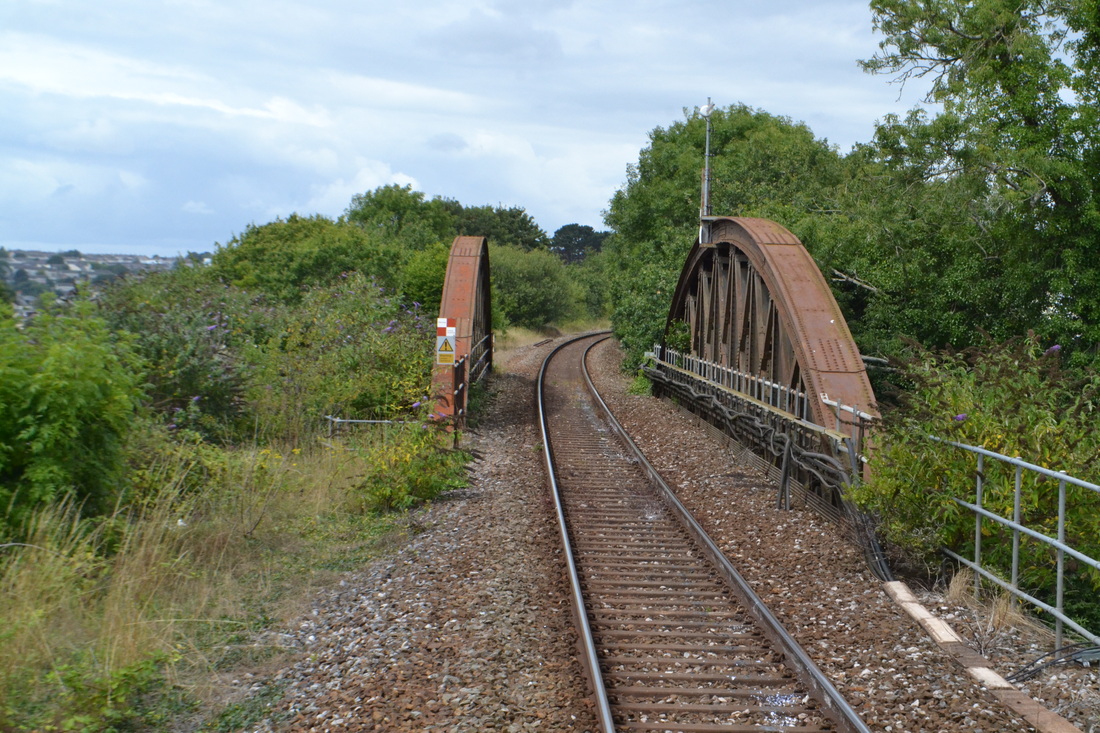
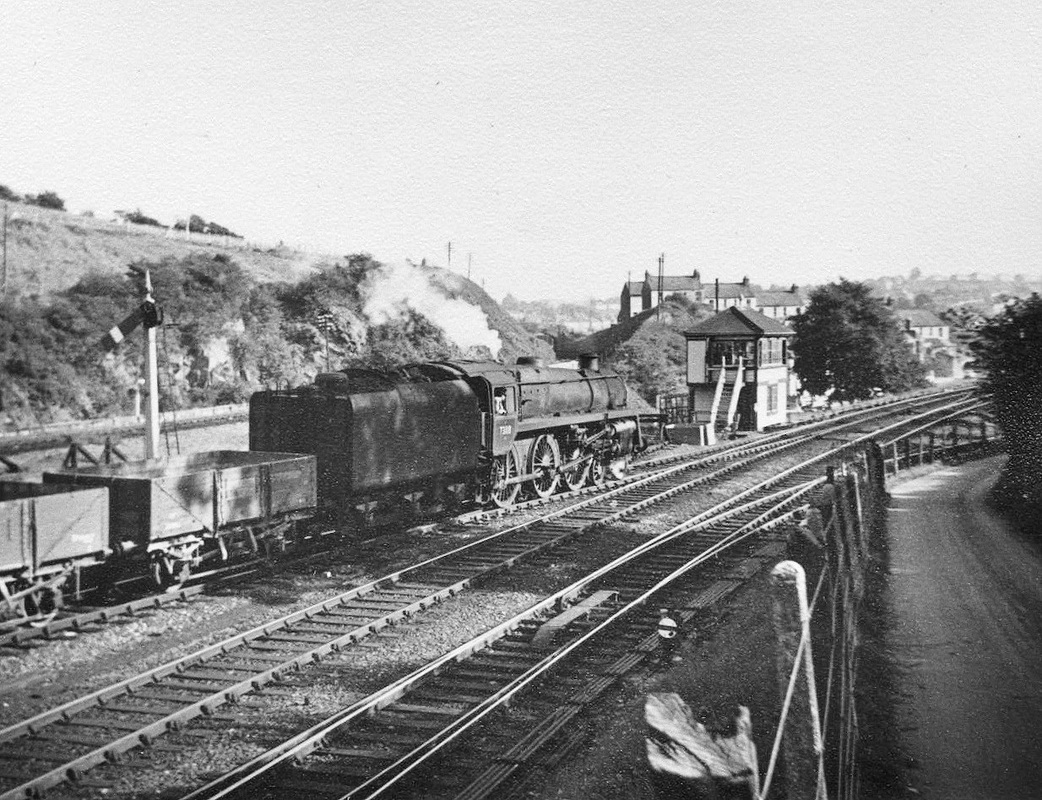
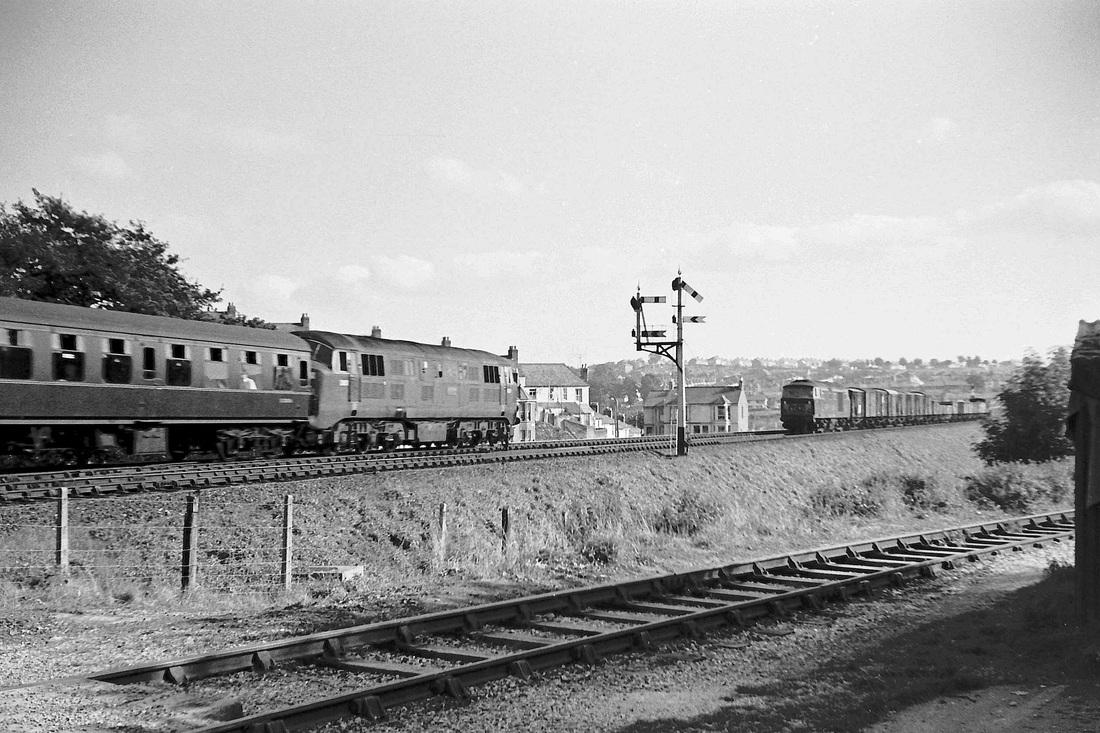
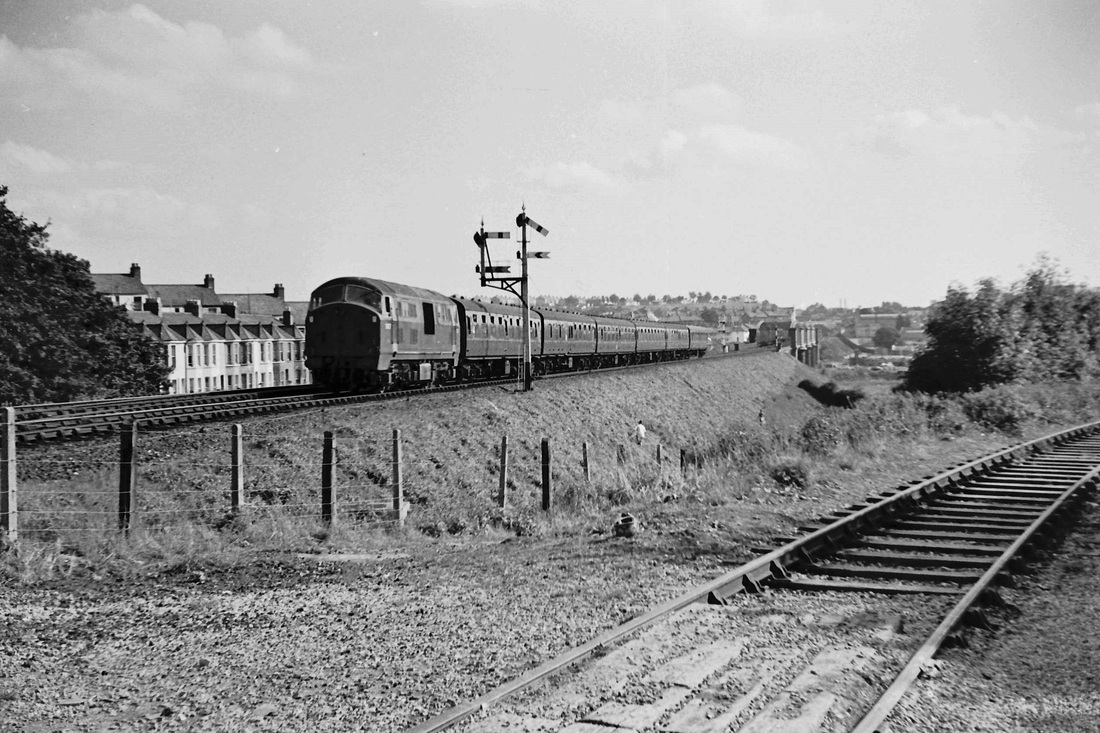
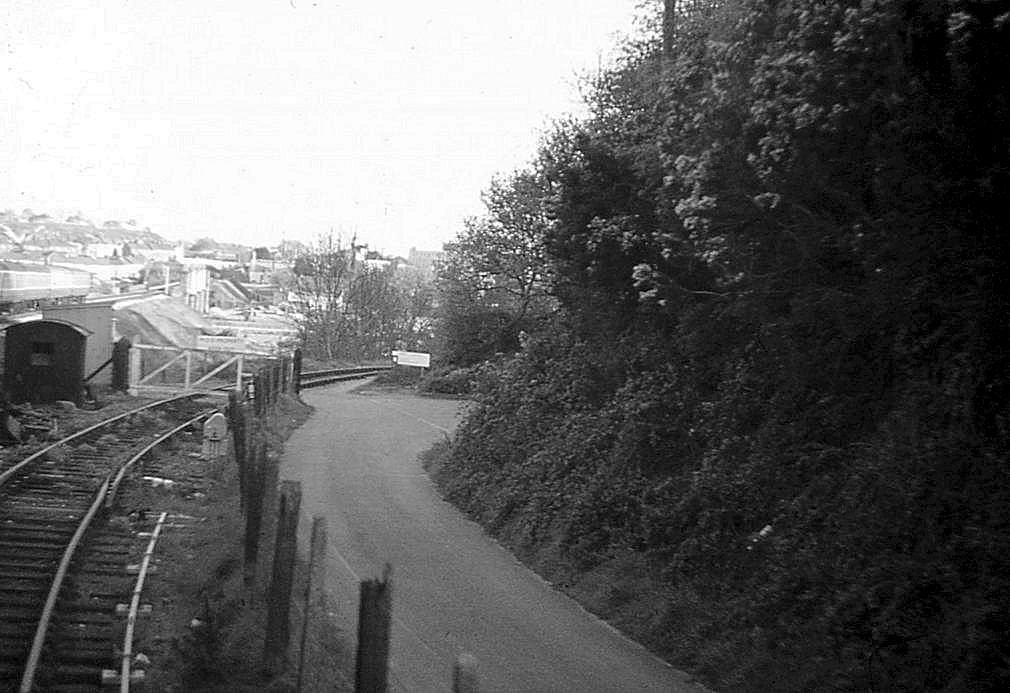
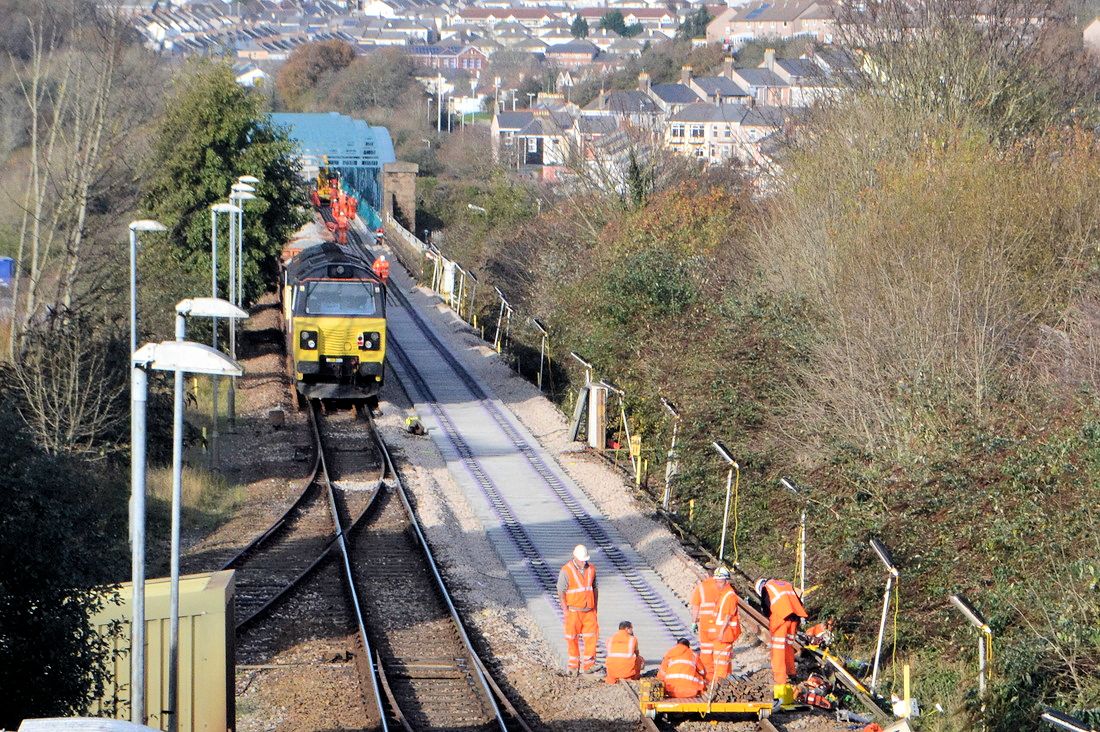
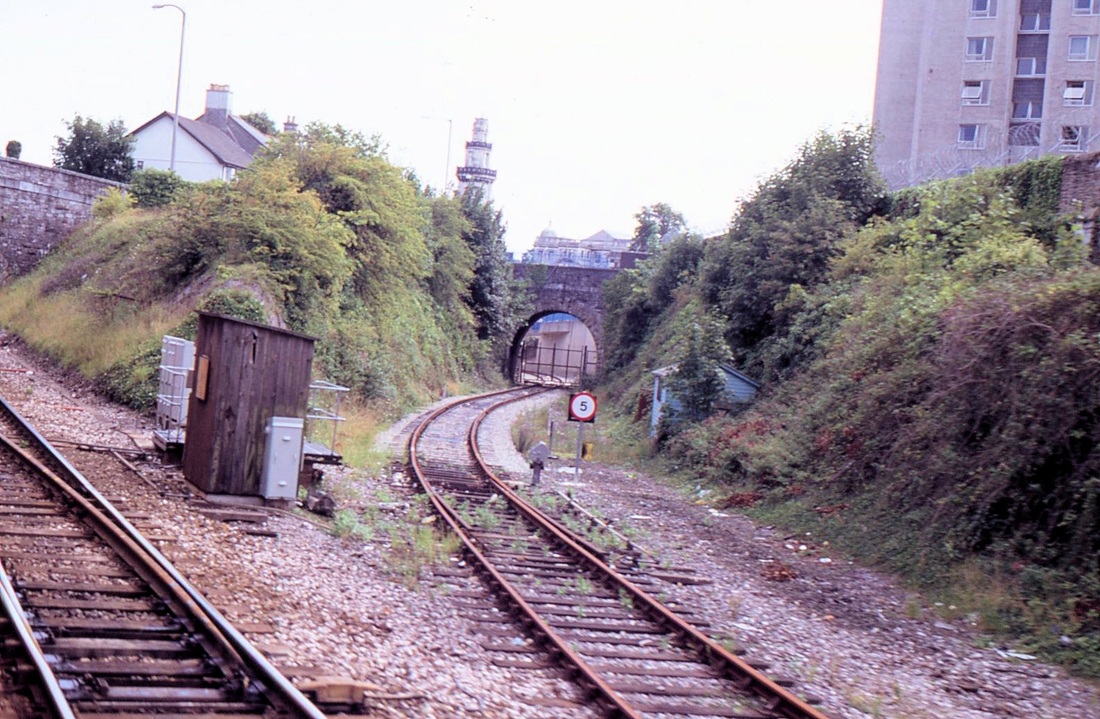
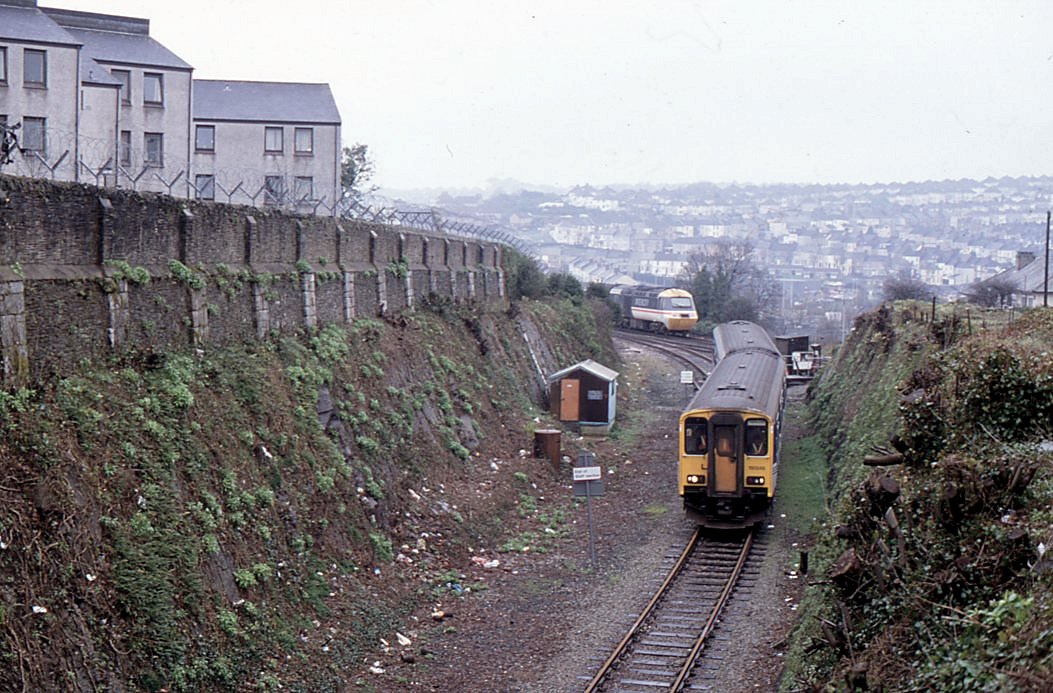
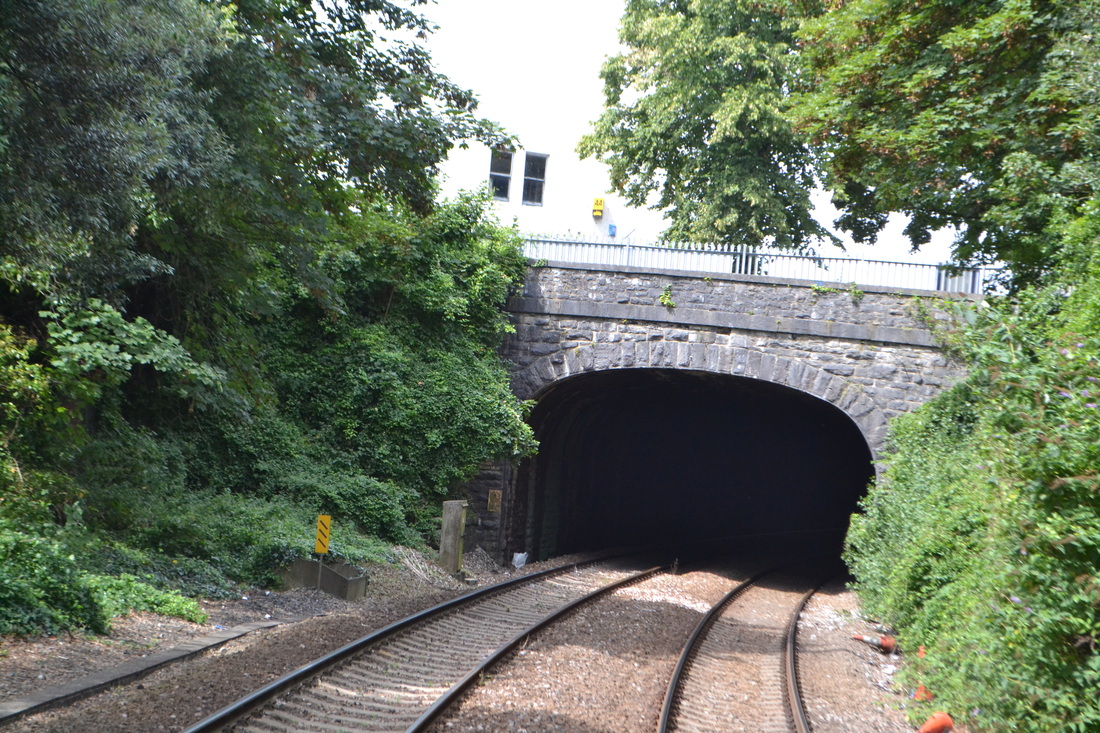
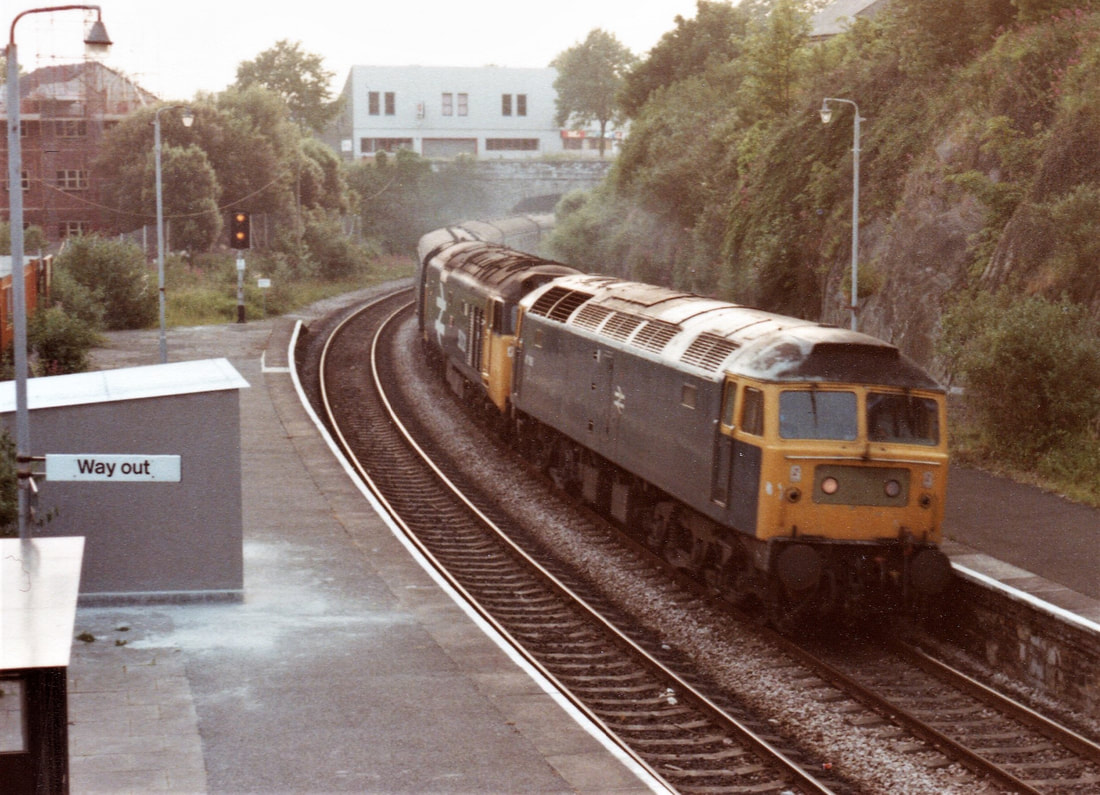
Wivelscombe or Shillingham tunnel
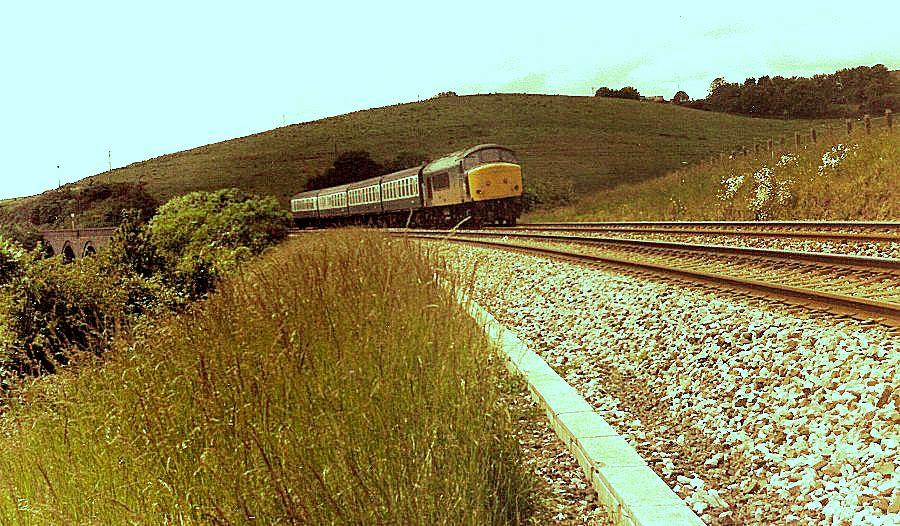
Situated to the east of St Germans station was the 452 yard Wivelscombe or Shillingham tunnel. This tunnel was opened in 1908 in conjunction with the new double track line which avoided the old timber viaducts on Brunel's original route.

A railway mans privileged view right through the tunnel. The date is 1986. Copyright Steve Eliott,
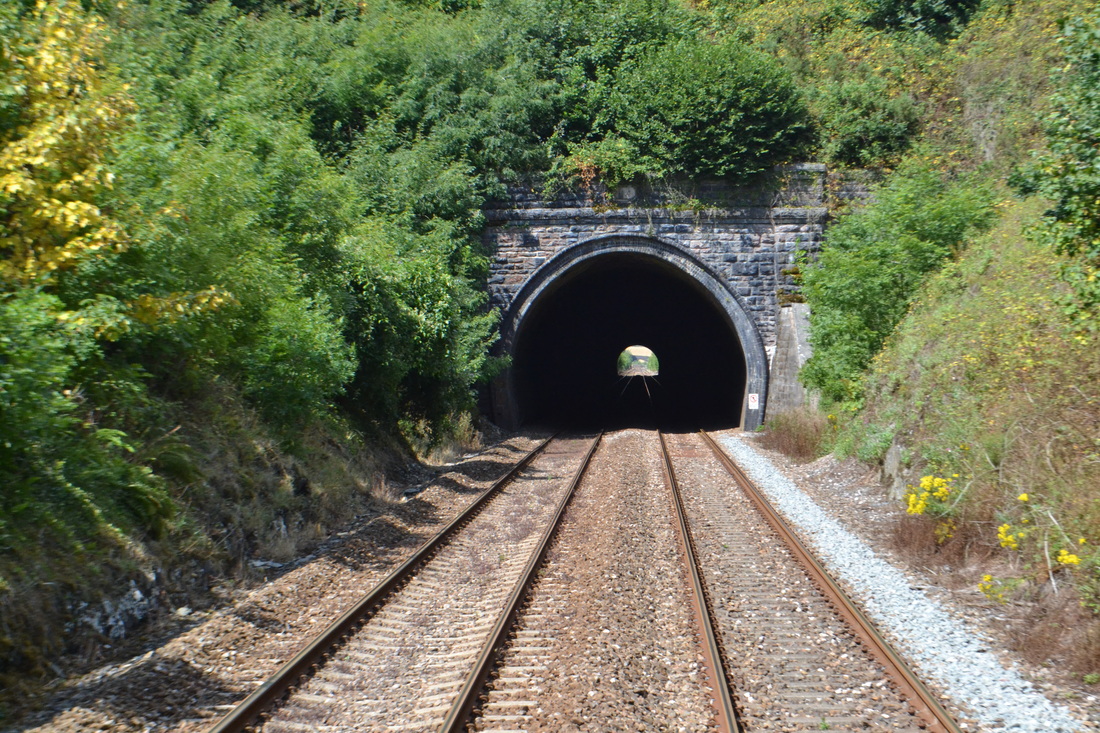
140802e An excellent view from the rear carriage of the loco hauled up working on 2nd August 2014 . The 450 yard Shillingham Tunnel dating from 1908. Copyright Roger Winnen
Note from Colin Burges - Carved in stone above the mouths of Shillingham Tunnel is the date 1907. I wonder if it had been intended to open the new route in that year or whether it simply marked the completion of the tunnel. Many thanks Colin. N.B. The route opened to traffic in May 1908.
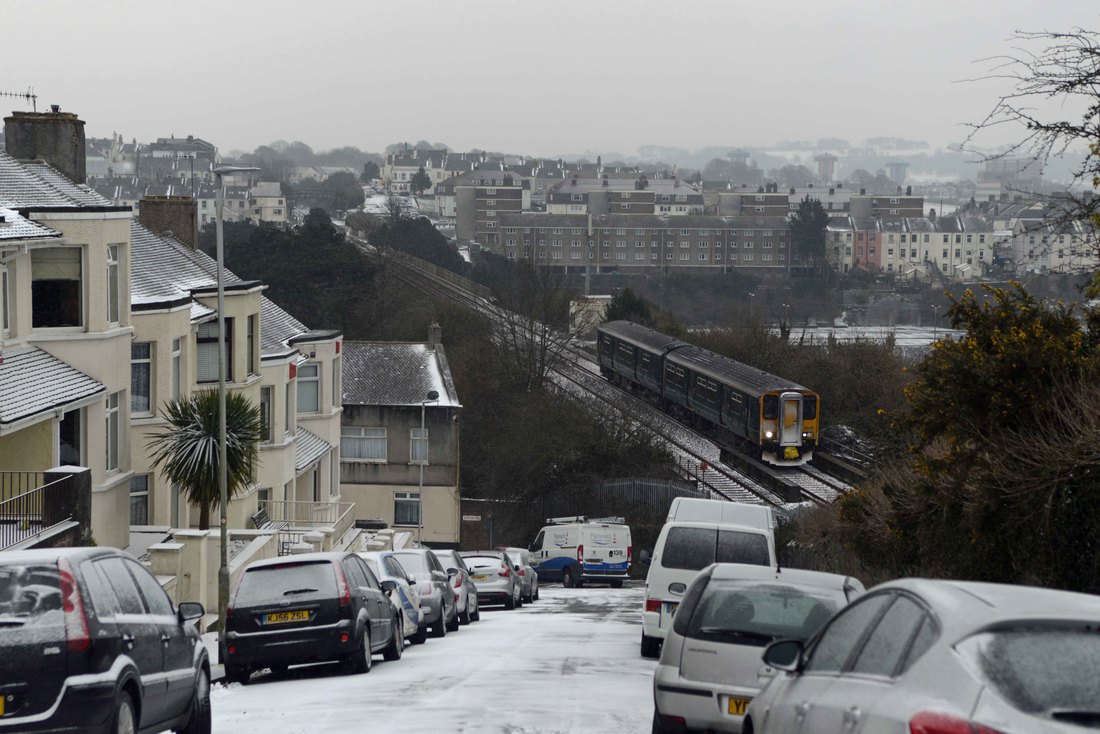
Passengers were bussed between Plymouth and St Germans
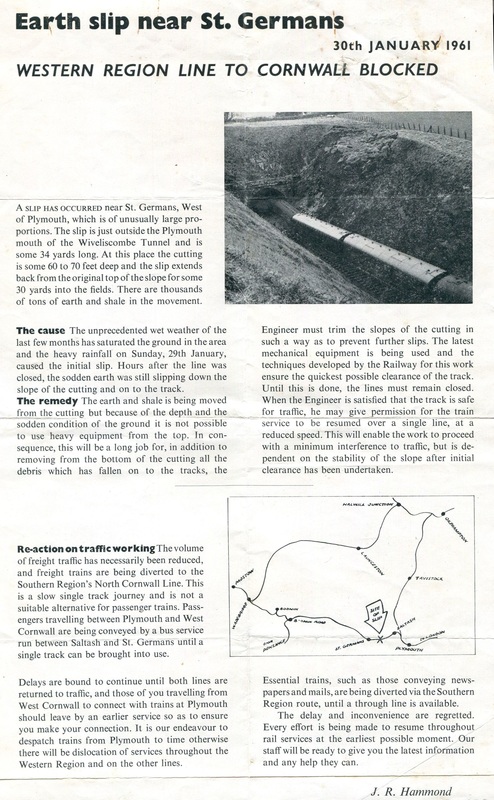
BR leaflet 30th January 1961
The derailed train - from the BR leaflet above 30th January 1961. KJ Collection
Wivelscombe Slips A further note from Roy Hart
The 'St Germans deviation' of 1908 was designed to replace the old single line and its many wooden ' Brunel' viaducts. On the old line was a crossing loop and signal box at Wivelscombe. The new line has a tunnel ( familiar to us all) and known as Shillingham - - presumably to avoid confusion with Wiveliscombe (note the spelling difference) on the old Barnstaple line in Somerset.
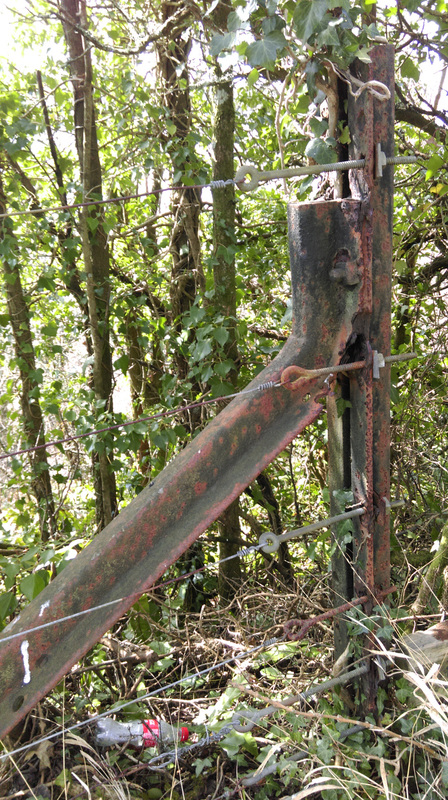
The new line at Wivelscombe (Shillingham) has always been subject to landslips ( note the steel nets protecting the line from slips at several points today). In November 1942 there was a huge slip which required 7 months of single line working through the tunnel, requiring two temporary signal boxes (Shillingham East and Shillingham West) from December 1942 until May 1943. Many thanks Roy
The 'St Germans deviation' of 1908 was designed to replace the old single line and its many wooden ' Brunel' viaducts. On the old line was a crossing loop and signal box at Wivelscombe. The new line has a tunnel ( familiar to us all) and known as Shillingham - - presumably to avoid confusion with Wiveliscombe (note the spelling difference) on the old Barnstaple line in Somerset.
The new line at Wivelscombe (Shillingham) has always been subject to landslips ( note the steel nets protecting the line from slips at several points today). In November 1942 there was a huge slip which required 7 months of single line working through the tunnel, requiring two temporary signal boxes (Shillingham East and Shillingham West) from December 1942 until May 1943. Many thanks Roy
Additional information concerning this derailment comes from Neil Phillips.
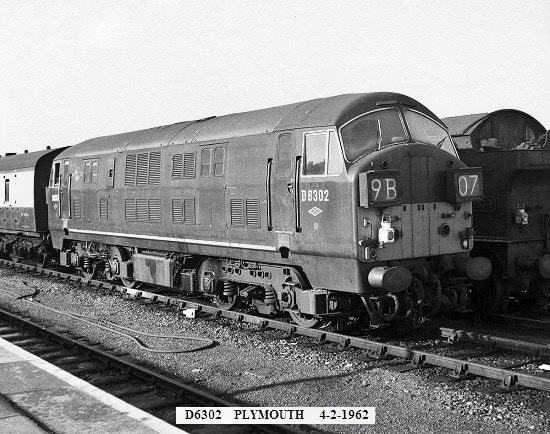
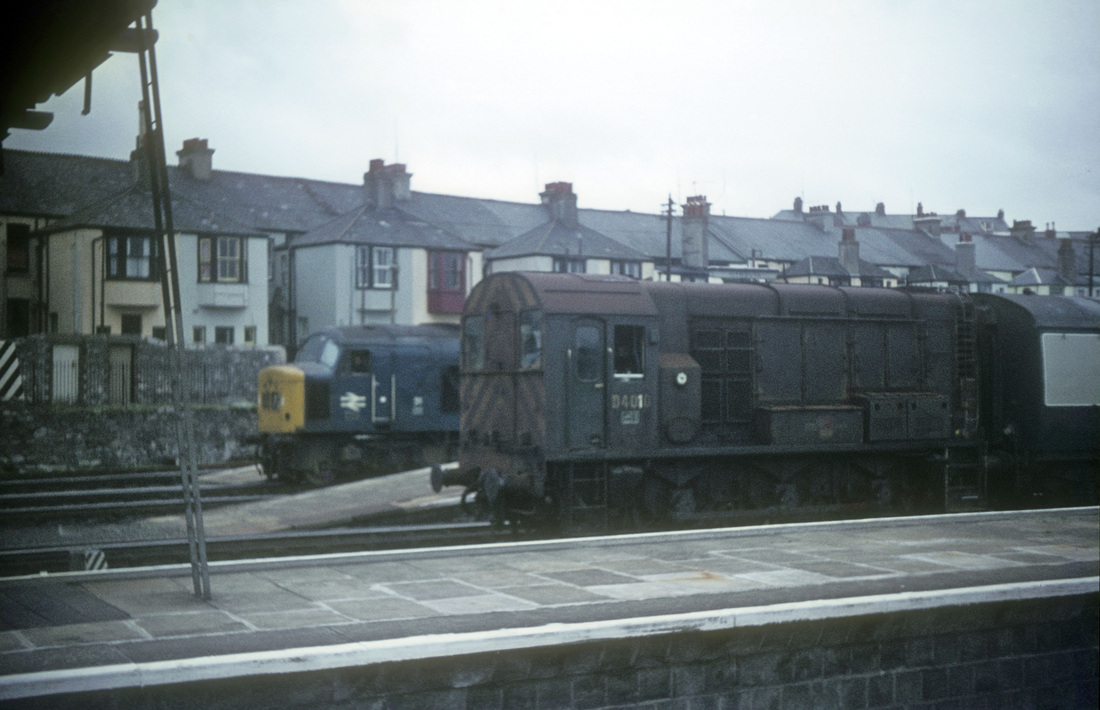
I read the 1961 ‘Earth Slip Near St Germans’ report with interest, because the location and date rang a bell. The train in trouble was the 2C74 05.10 St Austell – Plymouth local hauled by NBL Type 2s D6302 and D6324 working in tandem (not in multiple due to different control systems between Pilot Scheme and Production locos). Both locos were damaged badly enough to require returning to NBL in Glasgow for repair. They came back later that year – D6324 in October and D6302 in December – sporting those rather ugly Mark I headcode boxes in lieu of discs, the first WR hydraulics to be so converted, but still devoid of yellow warning panels since these only started appearing from January 1962 (ignoring D845’s experiment). D6302 gained the yellow panels during a visit to Swindon Works the following August but it’s not clear how long D6324 ran without them. Both locos received oversized yellow areas compared to the rest. Interestingly they remained the only converted members of the class for around 3 years, rebuilding of the other disc-fitted Type 2s commencing from late 1964. This makes it possible to identify the loco approaching Shepherds station in John Thorn’s photo dated September 1962 (posted last year to the Chacewater – Newquay branch image collection) as D6324. This photograph has now been up-dated.
To illustrate how far ahead these two rebuilds were, the 13 D8xx Warships were converted between 9/63 and 9/65, and the D6xx Warships between 12/64 and 5/67 (2 ½ years to do 5 locos.….these Far West exiles were clearly not a priority!)
Best regards, Neil Phillips
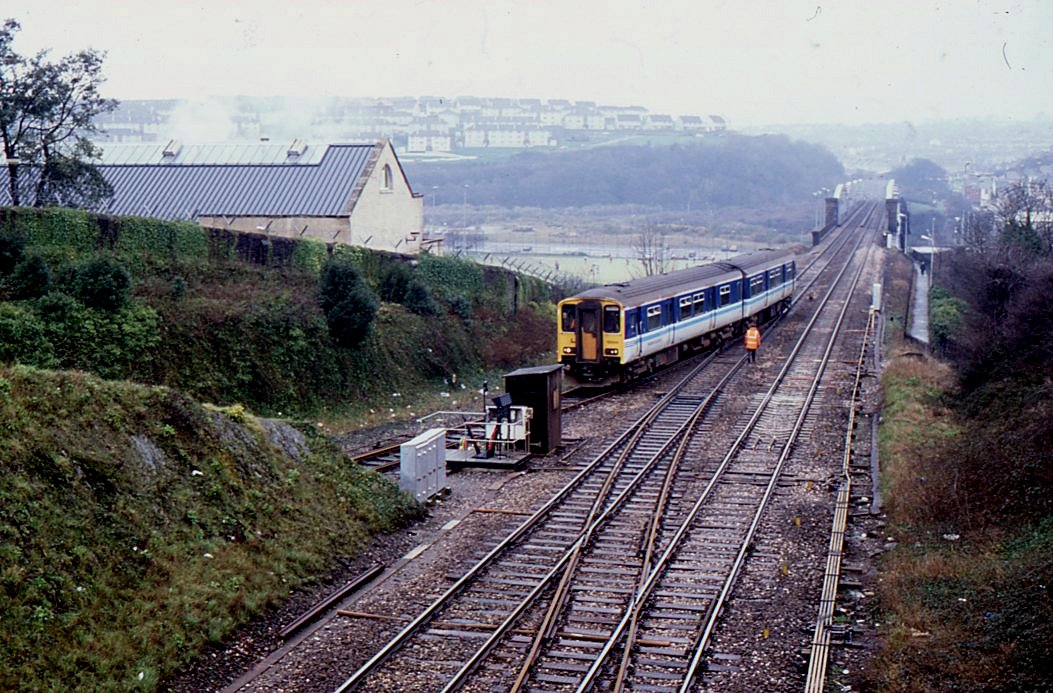
Wivelscombe Tunnel - 2022 Views Mark Howells

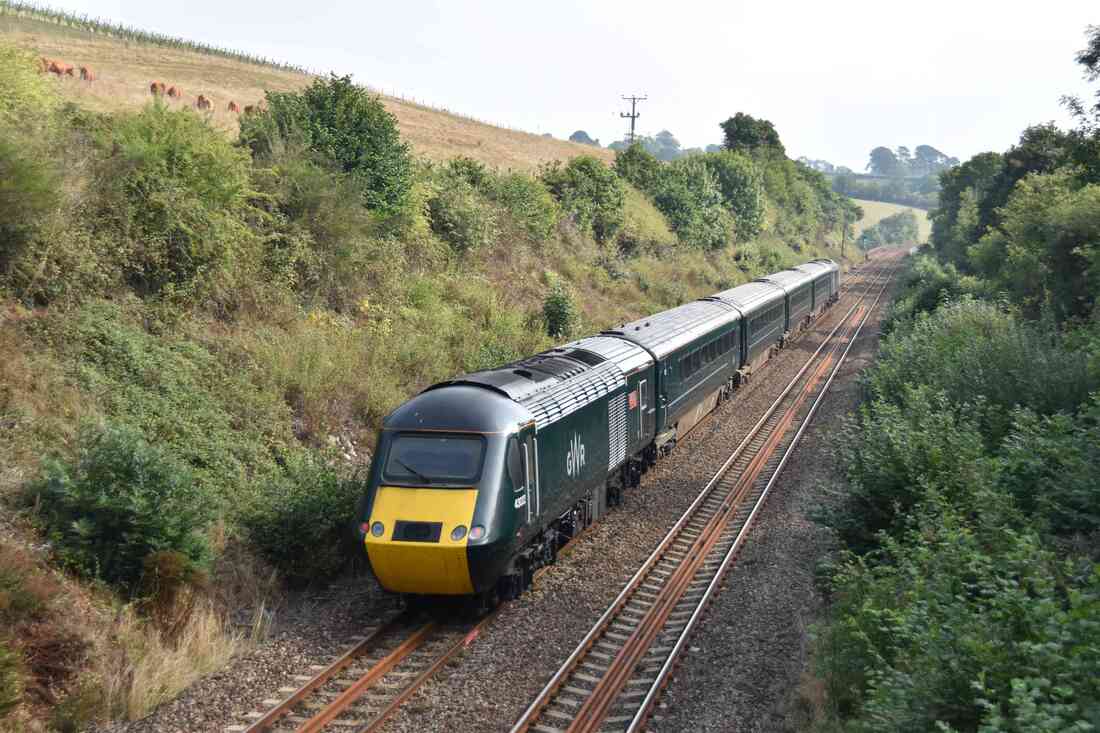
Wivelescombe Tunnel. A down IET emerges from the west end of the tunnel. 19th April 2022. Copyright Mark Howells - Network Rail.
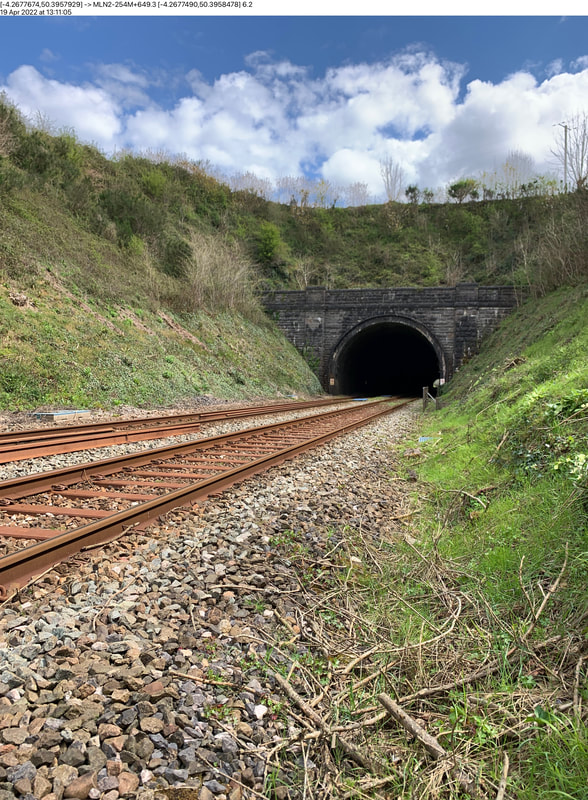
Wivelescombe Tunnel. East portal. 19th April 2022. Copyright Mark Howells - Network Rail.
Castle Farm Bridge - Forder
The 08.50 Penzance - Cardiff Central 43194 heads away from Castle Farm Bridge near Forder, Saltash with 43194 leading and 43005 the rear power car. The sunshine was somewhat watery with thin cloud but this may well be the last for a while as rain is forecast for the next week. Note the grape vines on the field ridge beyond the train.
Copyright Clive Smith
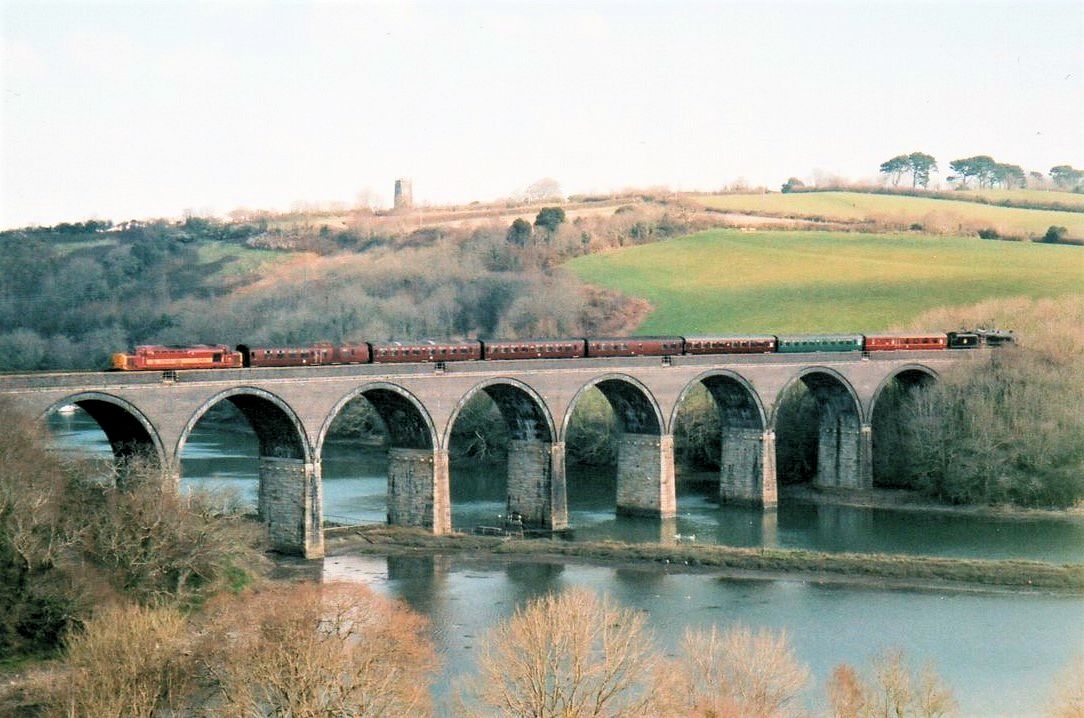
Forder Viaduct
Taken from the overbridge just west of Forder vaiduct. Here we see 47813 heading Penzance to Paddington service on a bright and sunny 18th July 2001 Copyright Roger Geach
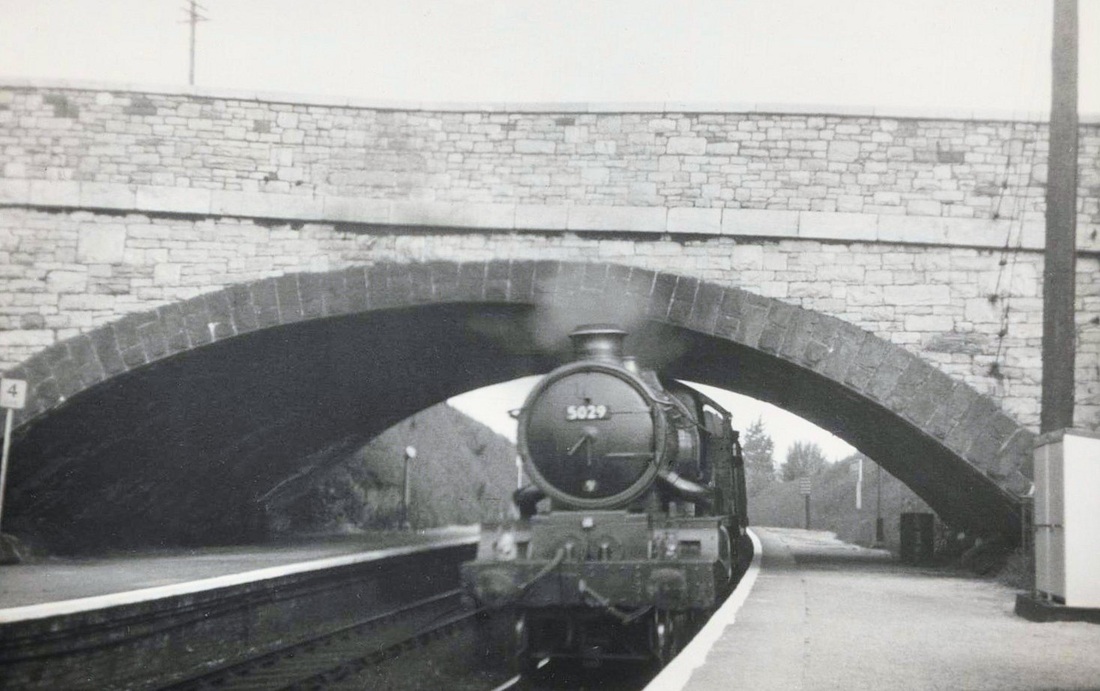
Forder Viaduct 5051and 5029 Forder viaduct on the 29th May 2004 Copyright Roger Geach
This was Day 2 of Past Time Rail's 'Devon And Cornwall Branch Week' . Following trips to Penzance, Falmouth and St Ives the previous day, 45407 was shedded at St Blazey overnight departing from there at 11.05 as the 5Z20 with 37410 on the rear. The ECS headed to Mount Gould where the 37 then took the train to Laira Junction where the Black 5 then took the stock back to Plymouth station where it then formed the 13.42 to Par Docks and Newquay. A very busy day for me and my camera as was the week ! . This location outside Saltash was sadly lost to photographers a few years later when the farmer put extensive fencing around the mound of land overlooking the river. A photo from the other side of the creek can be found in this site's archives taken by long standing contributor Roger Geach. Regards Clive Smith
Black Five 45407 & 37410 5Z20 Forder Viaduct 26th March 2007 USED 14th August 2019 Copyright Clive Smith.
Another view by Roger Geach - this time taken at high water shows 47423+37674 crossing Forder viaduct with the St Blazey to Gloucester freight on Friday 20th July 1990 Copyright Roger Geach Trematon Castle overlooks the scene.
57605 + 43378 + XC05 + 43366 1T55 1625 Newquay to Plymouth cross Forder viaduct. 29th May 2016 Copyright Ron Westwater For full coverage of this most interesting event see Craig Munday's coverage in Latest News 29th May 2016.
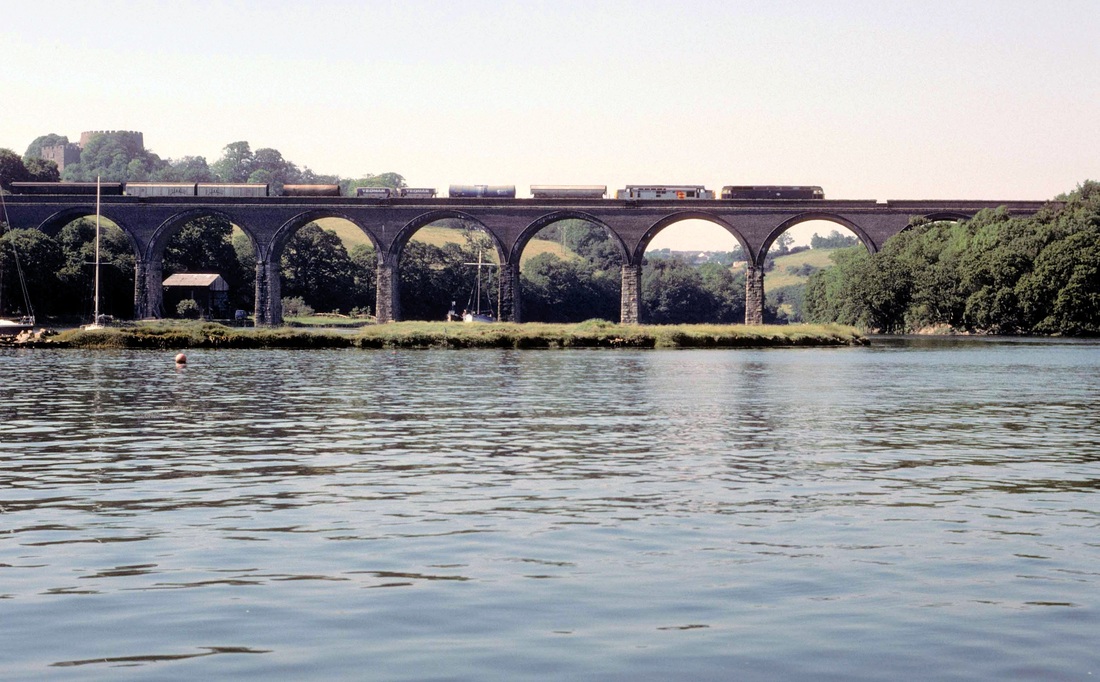
A picture from a Gratispool Film taken of Forder viaduct in the 1960's as a Warship crosses hauling an up service. Copyright Sid Sponheimer
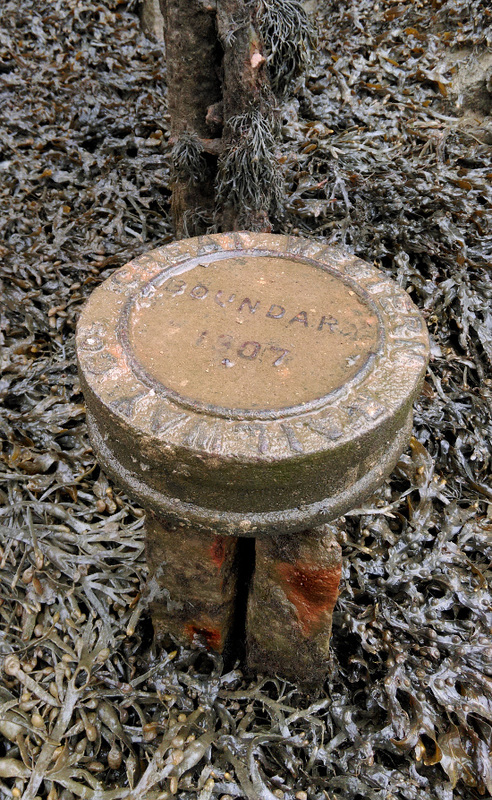
A Great Western boundary post found at the Plymouth end of Forder viaduct by Ross Griffiths on the 24th March 2016
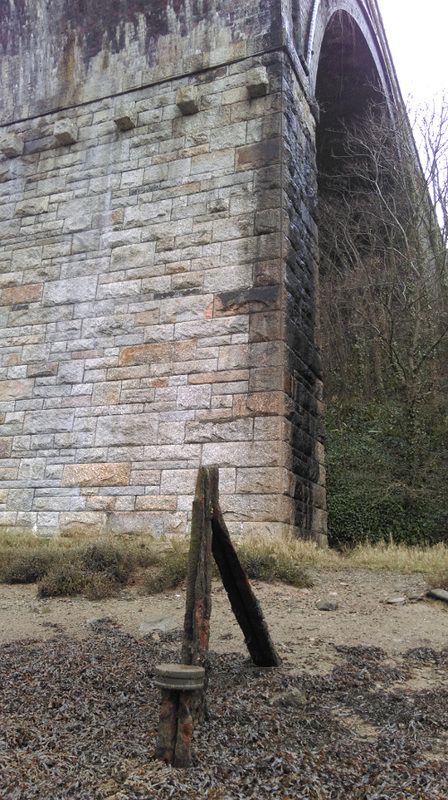
With mighty Forder viaduct almost looming over it here is the boundary marker together with a substantial bridge rail post. On spring tide anybody guiding their boat over this marker might sustain some serious damage! 24th March 2016 Copyright Ross Griffiths
An up train headed by a Peak has just crossed Forder viaduct and is heading for Wearde cutting. Mid 1980's Copyright Ross Griffiths
Forder Viaduct and Antony Passage in Autumn 2018 Mark Lynam
Yesterday (20th October 2018) I visited Saltash for some shots of the Forder viaduct with perfect conditions, the sun was shining, the tide was coming in and there was barely any wind, making for some great reflections.
Thanks,
Mark Lynam Thanks also to you Mark - superb pictures.
Thanks,
Mark Lynam Thanks also to you Mark - superb pictures.
43029 working 1A83 1000 Penzance to London Paddington. 20th October 2018. Copyright Mark Lynam
Through a gap in the trees 43158 on 1A85 1058 Penzance to London Paddington. 20th October 2018. Copyright Mark Lynam
From the other side of the valley at Antony Passage clean 66067+66104 work the RHTT 3J13 0907 Westbury to St Blazey LIP. 20th October 2018 Copyright Mark Lynam
From the other side of the valley at Antony Passage clean 66067+66104 work the RHTT 3J13 0907 Westbury to St Blazey LIP. 20th October 2018. Copyright Mark Lynam

order Vaduct. The 07.42 BTM to Penzance crosses Forder viaduct. 9th Octber 2021 Forder. Copyright Chris Harvey.
(2) Earlier that morning I was at Forder under the viaduct at 08.15. High tide was at 09.15 and there was not a breath of wind to ripple the water. The sun was directly behind me and not high in the sky. Perfect conditions for a study of this superb viaduct. Copyright Clive Smith.
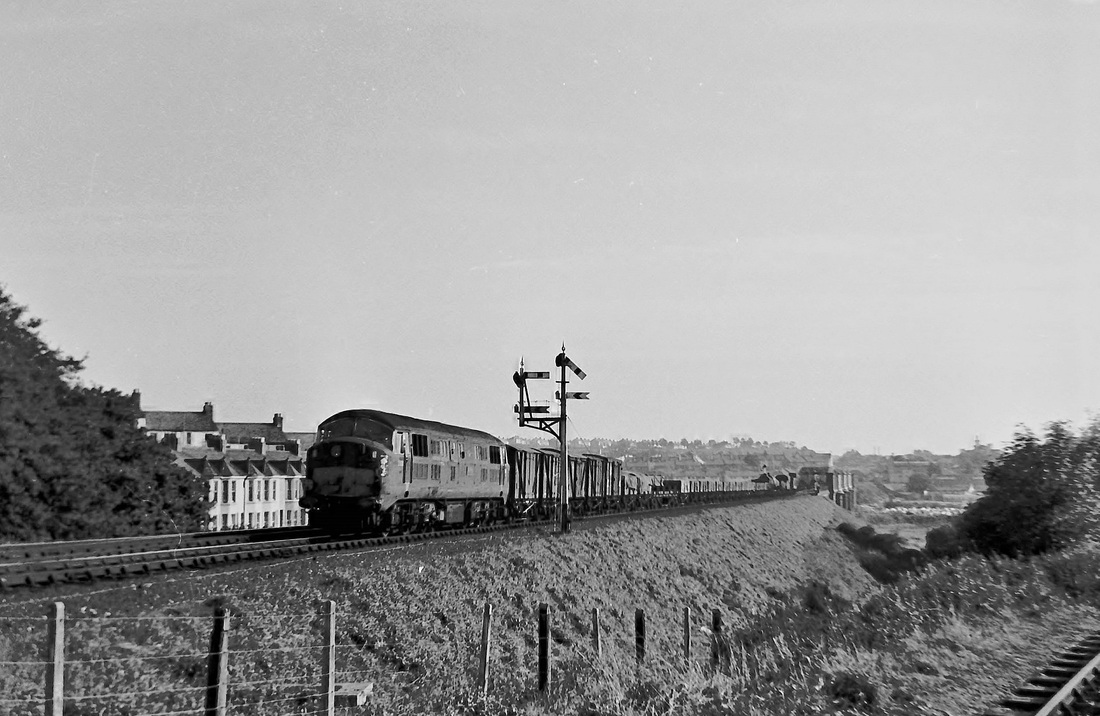
A down train headed by 50007 Sir Edward Elgar (Hercules) seen in Wearde cutting Mid 80's. It will shortly cross Forder viaduct. Copyright Ross Griffiths
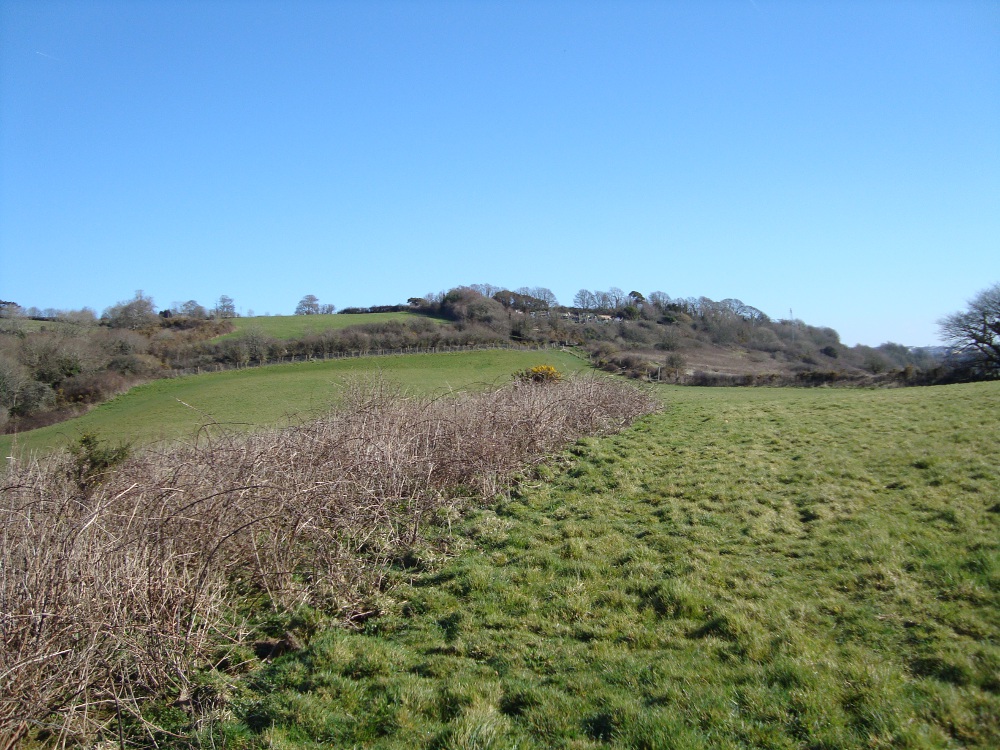
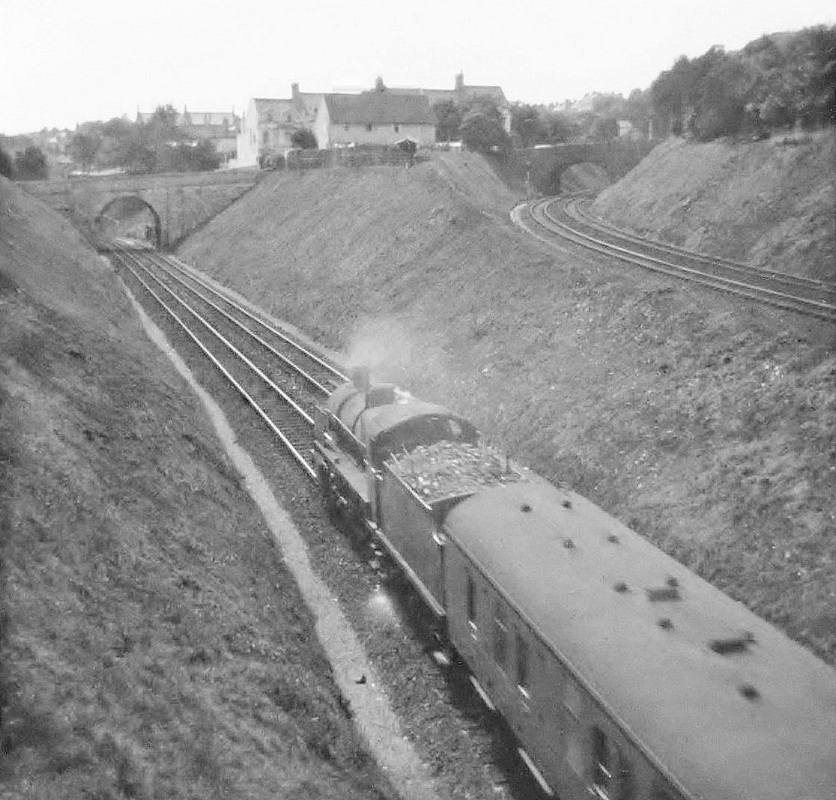
Heading up the county after passing over Forder viaduct looking south towards the main course of the river, up until 1964 a long siding could be seen stretching from the site of Defiance Platform and heading west. This formed a reminder of the Brunels route west. Prior to a deviation being opened inland which passed through Shillingham tunnel, and over the viaducts at Lynher and Forder the main line was a single line keeping close to the river bank traversing four of Brunels famous timer viaducts at Forder, Wivelscombe, Grove and Nottar.
In this extremely rare and very historical view taken by Sid Sponheimer one can see a train stabled on this siding (the former main line) and beyond this Forder Viaduct - the buidings on the skyline are of Trematon Castle. We have to be extremely grateful to Sid for rescuing this picture and allowing us to use it. Copyright.
Defiance 1 deviation . Churchtown Siding Copyright Roy N. Keith in the care of and provided by Mr. Paul Keith - Coaching stock stands on the original main line route to St Germans. This route closed to through traffic on the 19th May 1908. The line remained as a siding until 2nd November 1964.
Saltash - Defiance 2 deviation . Churchtown Siding snow Copyright Roy N. Keith in the care of and provided by Mr. Paul Keith. Any suggestions for the type of stock in the sidings.
A then and now pair of pictures - the view immediately above taken by Ross Griffiths on the 16th March 2014 is from a location as near as possible to that used by Sid Sponheimer. A very interesting shot. Copyright
From the same location as the shots above looking along the alignment of the former main line. The present main line is in the cutting behind the hedgerow alongside the hill. 16th March 2014 Copyright Ross Griffiths
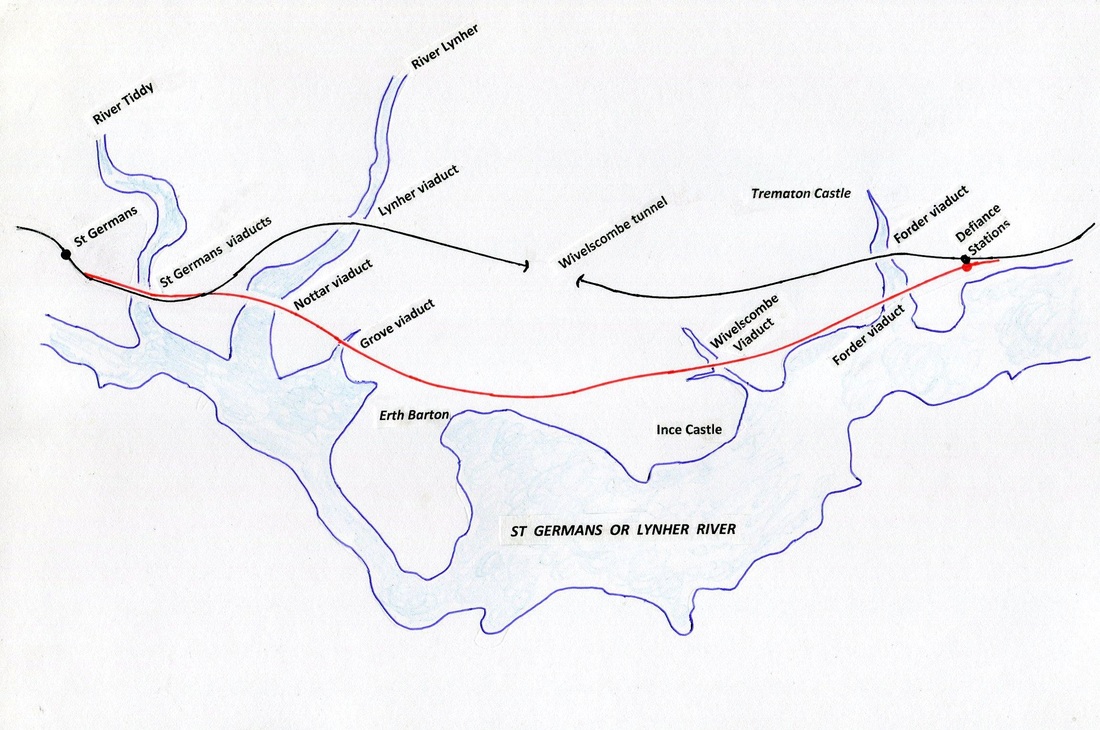
A sketch map showing the current route in black with the original single line Brunel route in red.
To see our relatively recent pictures of the pre 1908 route - the Weard Deviation click here
Defiance Platform
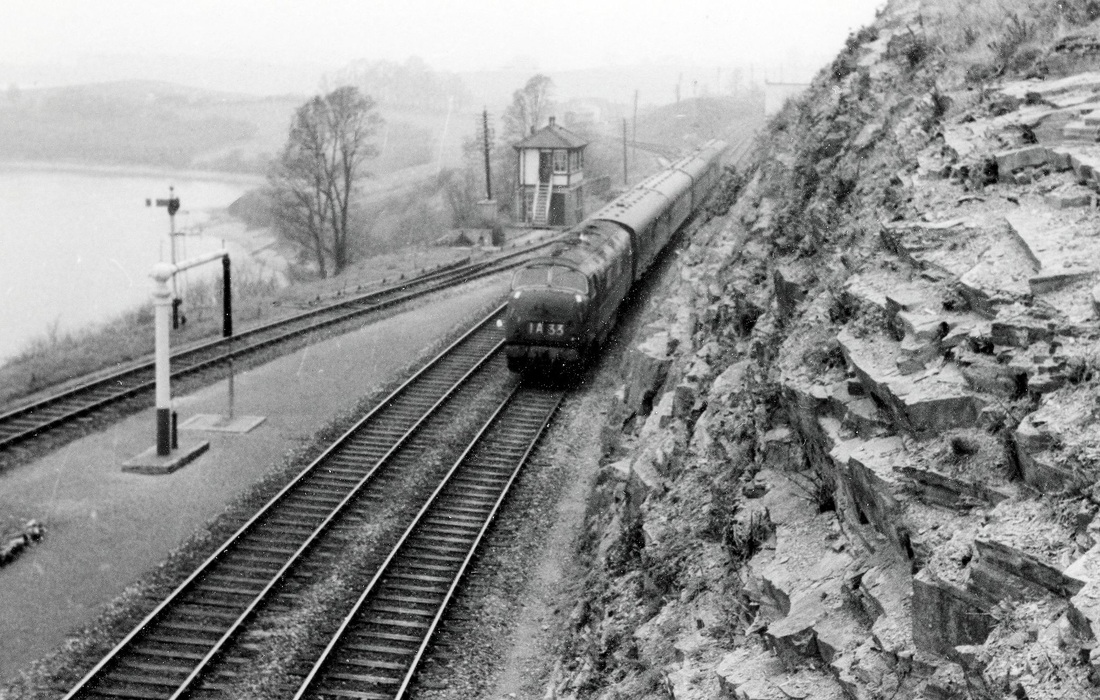
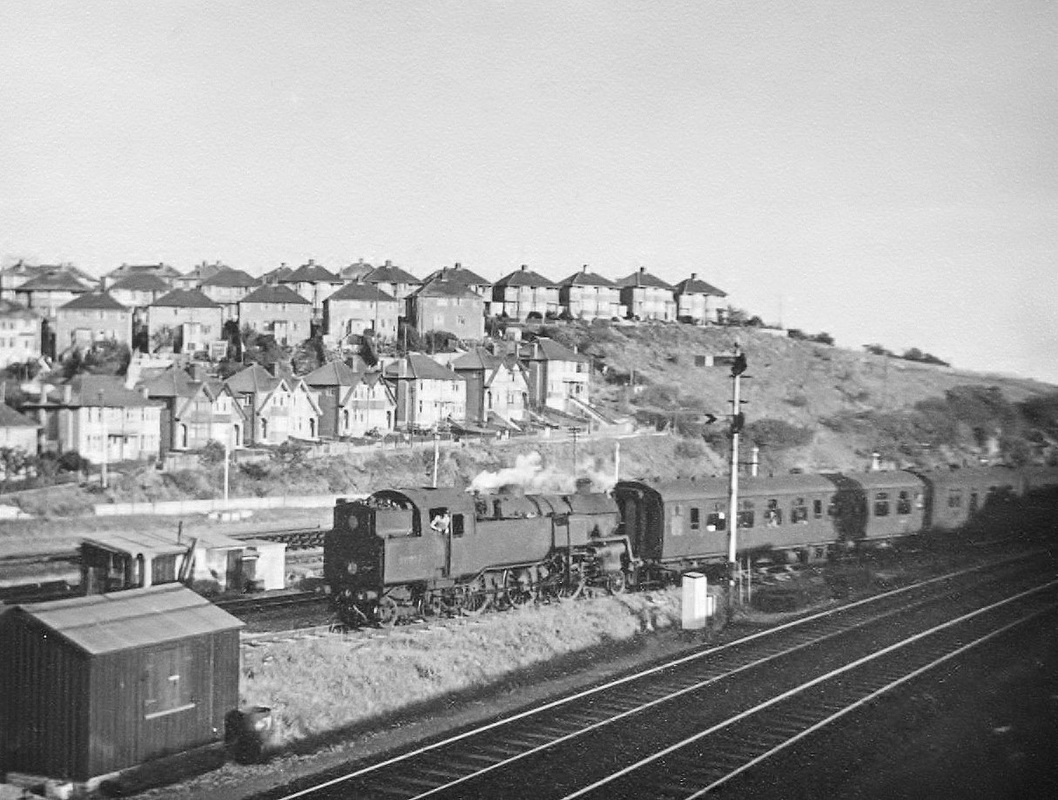
A most interesting picture showing Wearde signalbox which closed 31st October 1965 (Ref Track diagrams Sect 14 Tony Cooke). The down refuge siding which had been made into a loop in 1943 was closed the same day as the signalbox. The line seen diverging off to the left in the distance is the route of the original main line into Cornwall. This was retained as a siding for holding coaching stock - it was also taken out of use on the 2nd November 1964. It is understood that the loco approaching is D868 on the 13.20 Penzance to Paddington in either March or April 1962. This photograph from the collection of the late Keith Holt.
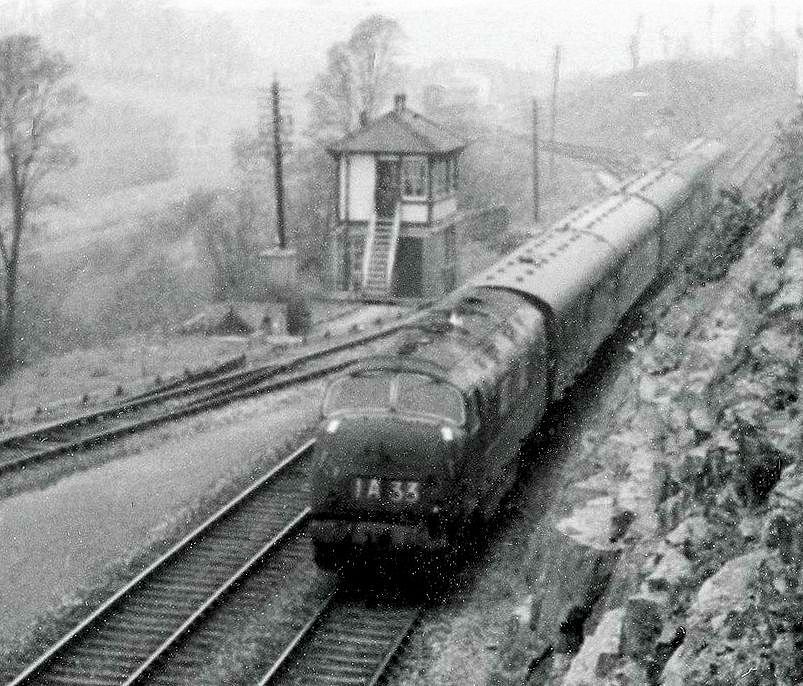
Taking a closer look at the image by the late Keith Holt and with some careful editing John Root spotted the tail end of a rake of stock standing on the old single track main line. Thanks to the late Keith Holt and John Root.
An additional note from Roy Hart for which many thanks :- Dear Keith,
The comments and the picture are interesting. When the new inland route was opened, in 1908, the stub of the old line was kept as a storage siding. It was connected to the main line by a compound crossover (single slip) and consisted of a long loop with hand-operated points at each end, which enabled engines to run round. In latter years the siding held older stock used for summer extras which would otherwise occupy the limited carriage space at Plymouth. Each spring the coaches had to be drawn out and taken to Laira or Millbay for cleaning, battery charge etc.
Wearde box was opened in 1908, replacing an older, smaller one. The box was of wooden construction but was fitted with a brick 'skirt' as some protection from bomb splinters, in 1941. Also during world war 2, the trackbed of the old pre-1908 single line between Saltash and Wearde was utilised to provide a long down goods running loop. The wartime need for long waits in loops saw a water column erected at Wearde (seen in the photo). Defiance platform was named after H.M.S.Defiance, a training ship moored below the railway at this point.
Roy
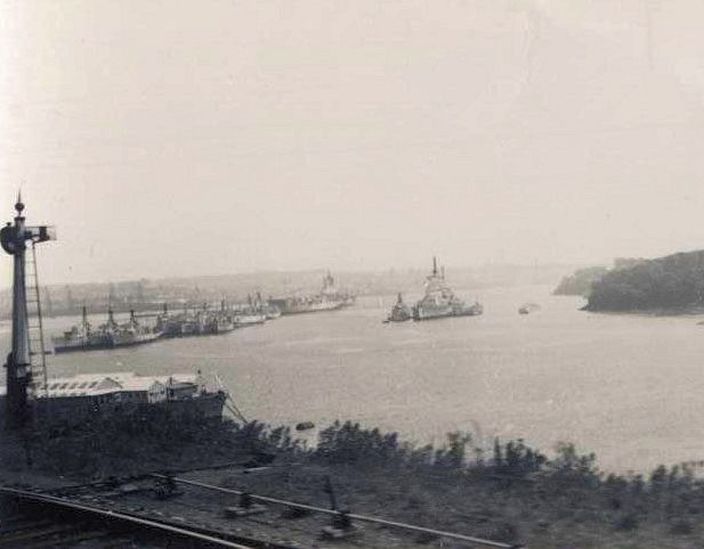
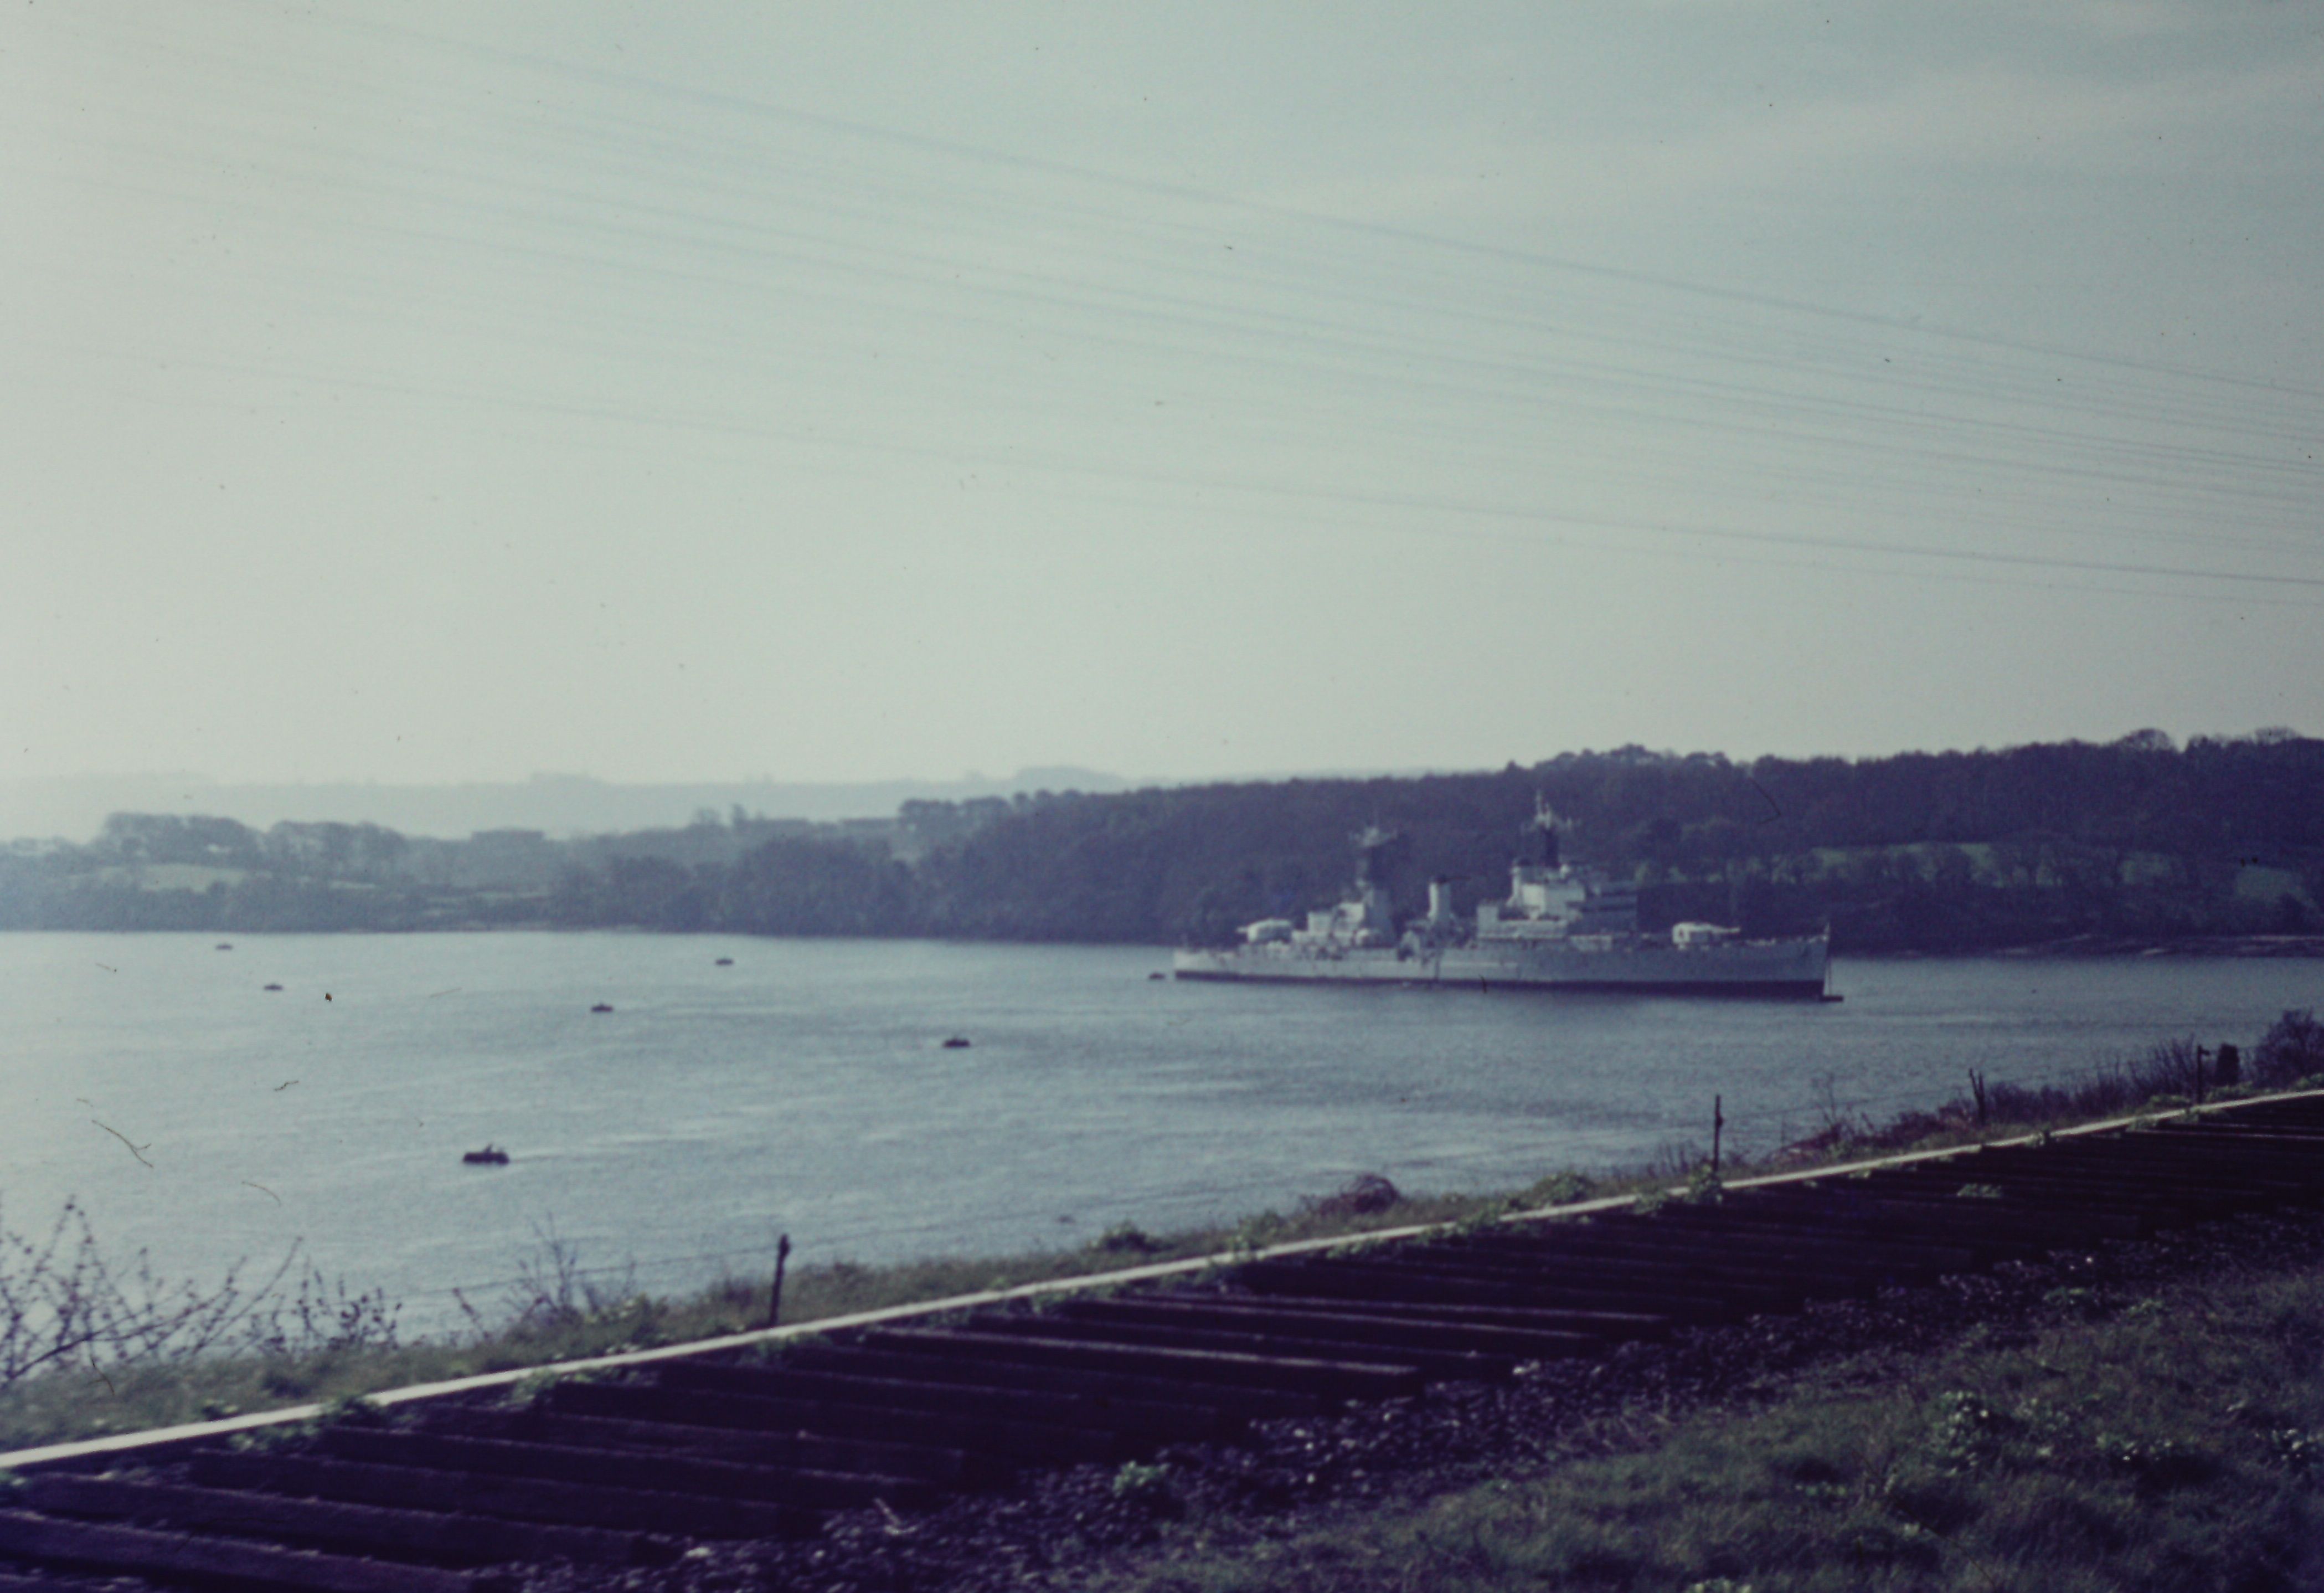
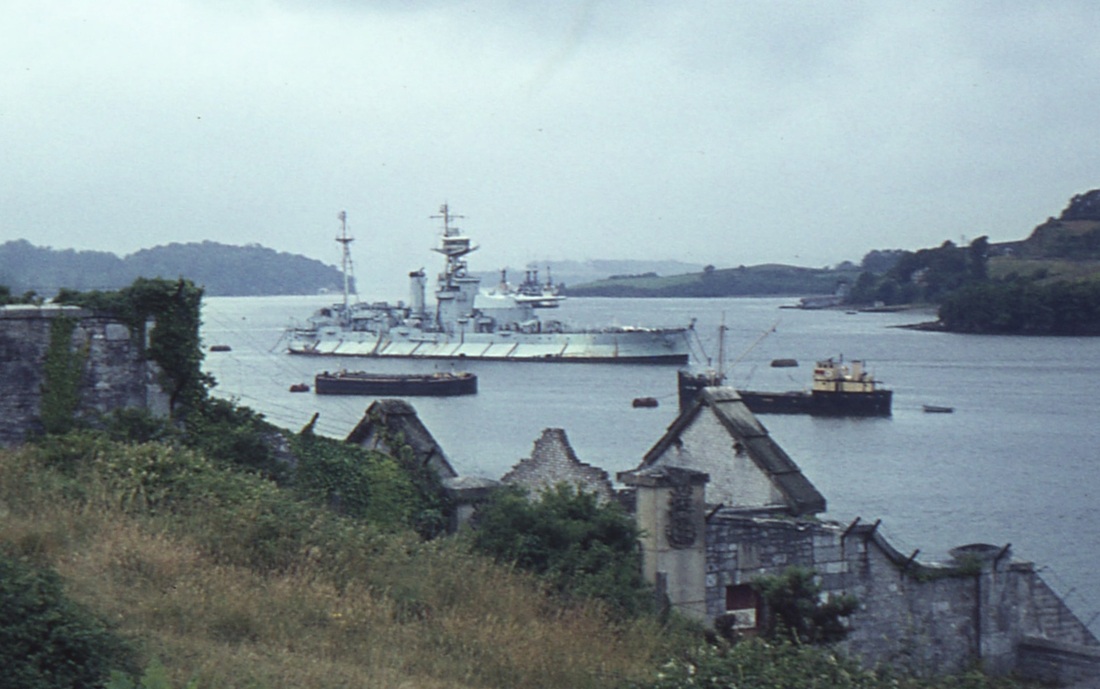
The Hamoaze 1950's Picture taken by the late Sid Sponheimer (senior) Copyright Sid Sponheimer. The signal, catch point are indicative that this is at the west end of the Wearde Loop which was removed in 1965.
A note from Roy Hart. Dear Keith, Yes, Wearde loop indeed, taken from the up side of the main line immediately East of the box. In the background is the stretch of the Hamoaze known as 'battleship trot' and, fittingly, on it is the battleship HMS Howe, which was laid up at Plymouth from 1951 till 1959, when she was towed away for scrap. Roy Many thanks Roy.
A view taken looking east, in, we are told in March or April 1962. It shows so clearly the platforms of Defiance Halt and to the right the down loop line which was taken out of use on closure of the signalbox on the 31st October 1965. From the collection of the late Keith Holt.
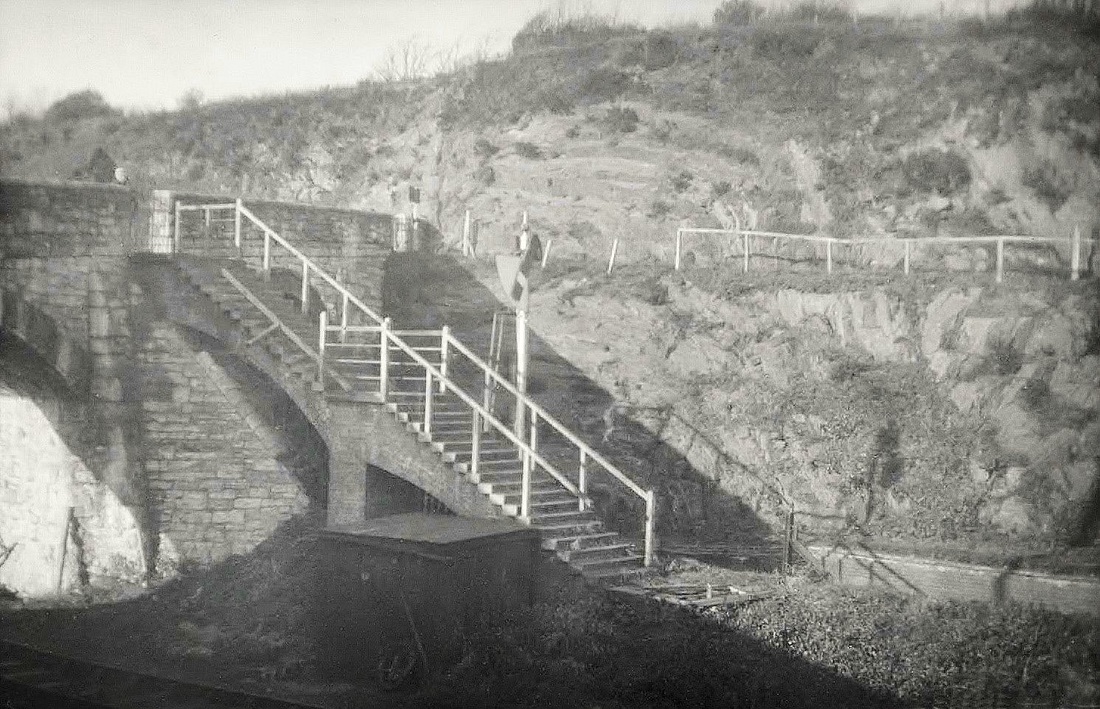
Two views of Defiance Platform from the same original maybe you prefer the lighter or darker image? The signal has a 'sighting board' behind it to improve its visibility against the bridge. Copyright Sid Sponheimer
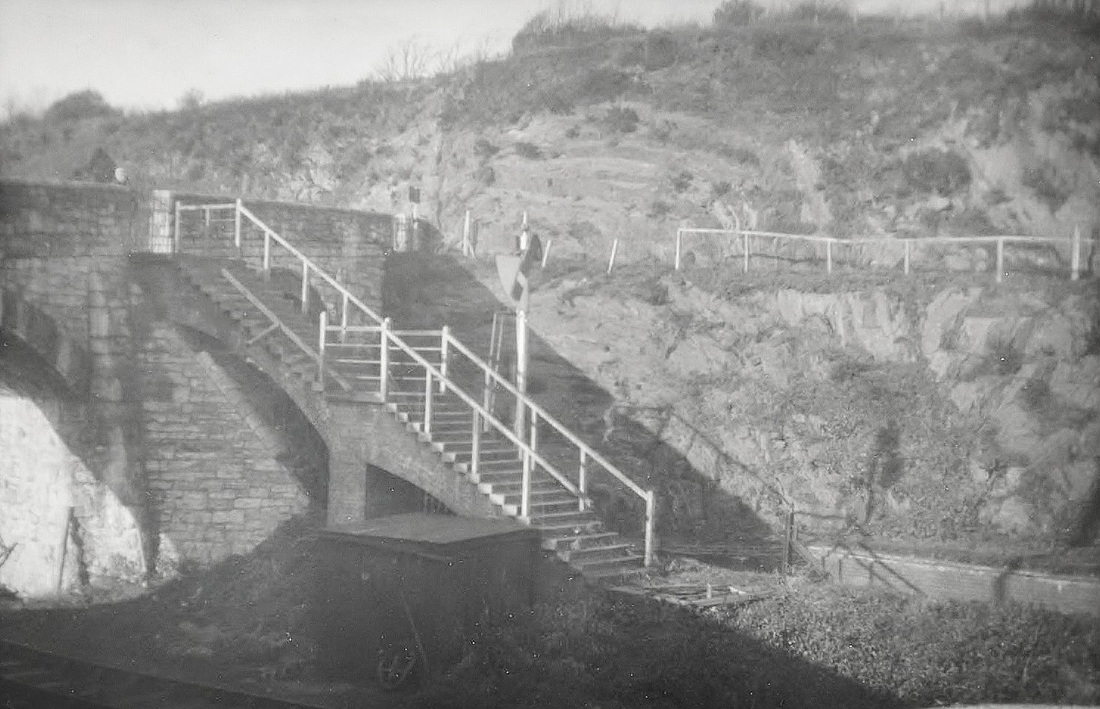
The lighter image. Note the access steps to the down platform looking in reasonable condition though the handrail has broken off on one side of the upper flight of steps. The hand rail leading down to the up platform also looks in need of attention. In the foreground lower left can be seen the metals of the former main line, the siding seen next but one above. 1960's Copyright Sid Sponheimer.
The access steps to the down platform are still there there today whereas those to the up platform of timber construction vanished long ago. The original Brunel Route passed through the redundant arch on the left, this was served by the very short lived single faced Defiance Platform - this survived from March 1905 to 1907 when the platforms seen here opened. These were closed wef 27th October 1930. This picture 3rd June 1989 Copyright Alan Harris
A view by Alan Harris looking east, the up platform was on the left. 3rd June 1989 Copyright Alan Harris.
We now look west from the end of the 150' down platform. 3rd June 1989 Copyright Alan Harris
140802f Defiance Platform near Saltash. Even in 2014 Defiance Down platform still exists. Copyright Roger Winnen


Defiance – some notes by Maurice Dart Reference to the left hand picture.
The original single line structure opened on 1st March 1905 named Defiance (Wearde Halt). It officially closed in 1908 when a new structure on the new double line called Defiance Halt opened.
This new platform officially closed to passengers on 27th October 1930. However it remained open for many years as an unadvertised halt to serve the naval facility, local residents, and flower growers.
An extract from the GWR WTT No. 6 from Sept 1938 to July 1939 shows the 12.45pm Meheniot to Millbay and the 5.05pm Wearde to Millbay calling shown as ‘to pick up only’. Also shown is the 4.40pm Millbay to Wearde calling to set down passengers and the 11.15pm from Millbay to Liskeard calling on Saturday nights to set down passengers.
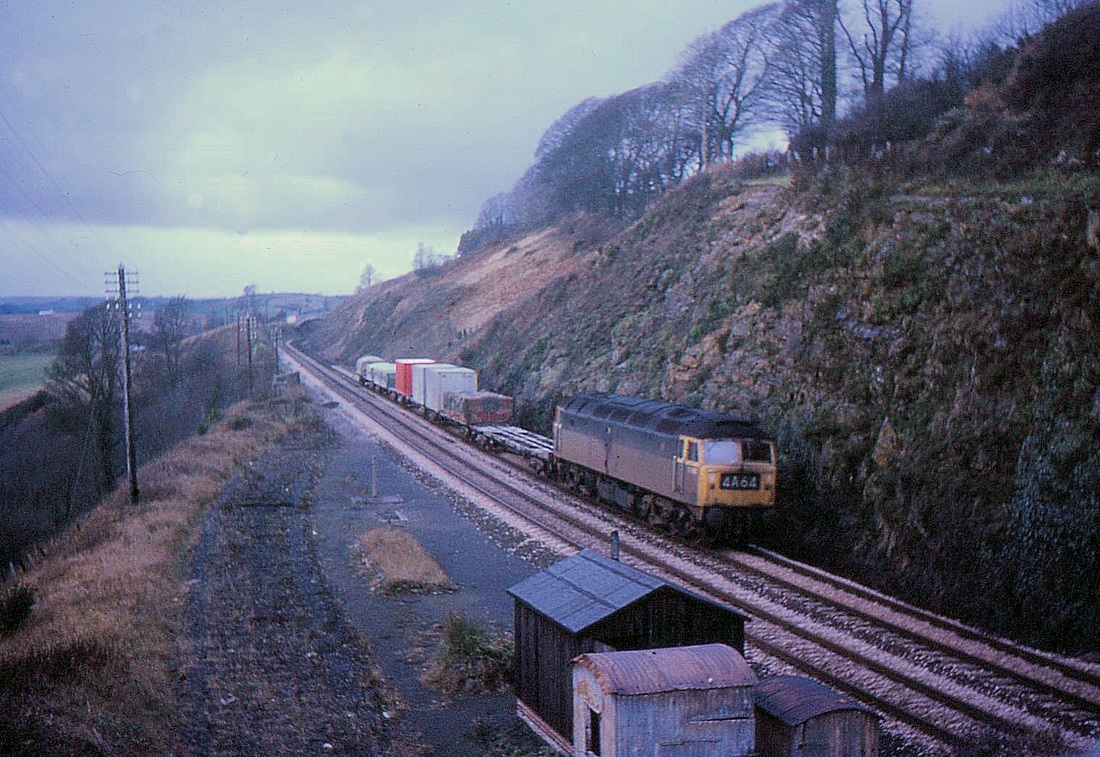
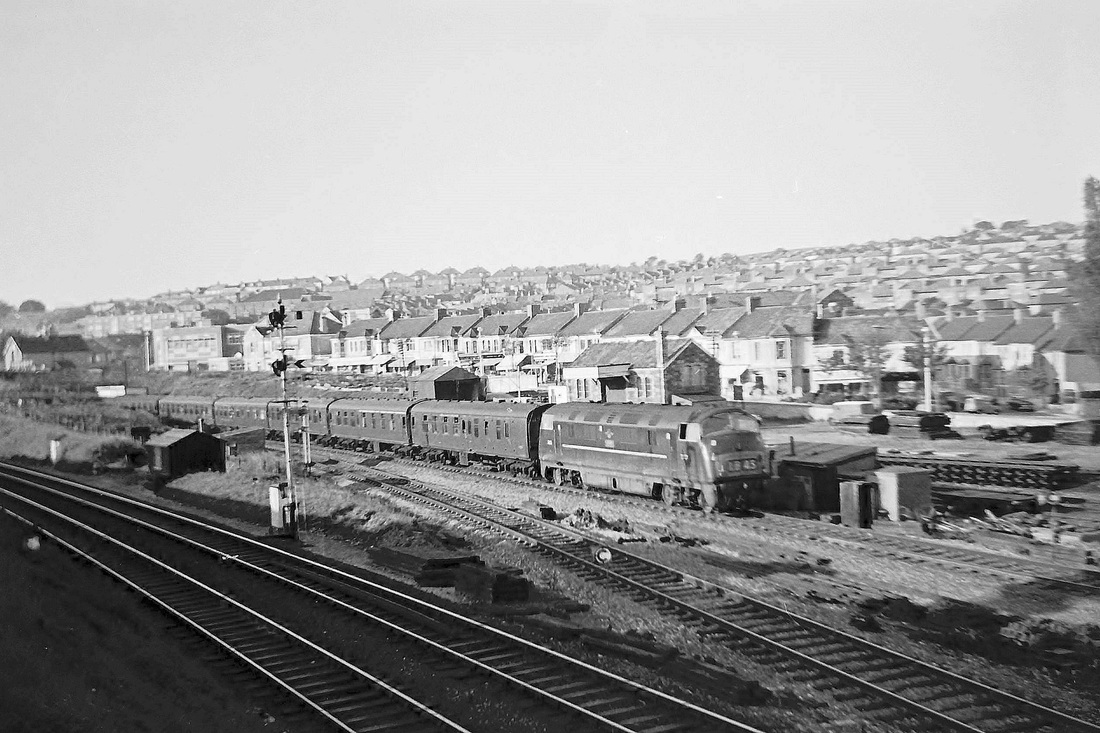
On a dull December day the red container on the 15,25 Par to Park Royal Freightline gives a little colour. The train is headed by Class 47 1587 Dec 69 - Copyright Mike Roach.
A going away shot at Wearde (Defiance platform As class 47 1587 heads the 15,25 Par to Park Royal Freightliner away into the gloom over Plymouth December 1969 - Copyright Mike Roach.
With heads craned and eyes looking for a first sight of the Albert Bridge from an up train in the 1960's one scarcely notices the metals of the Wearde down refuge loop in the foreground. This was taken out of use in October 1972. Copyright Keith Jenkin
Wearde. Remains of the down refuge siding nr. Defiance Platform as seen in 1973.. This was taken out of use Oct 1972. In the background a Tiger Class Cruiser . Copyright Roger Winnen

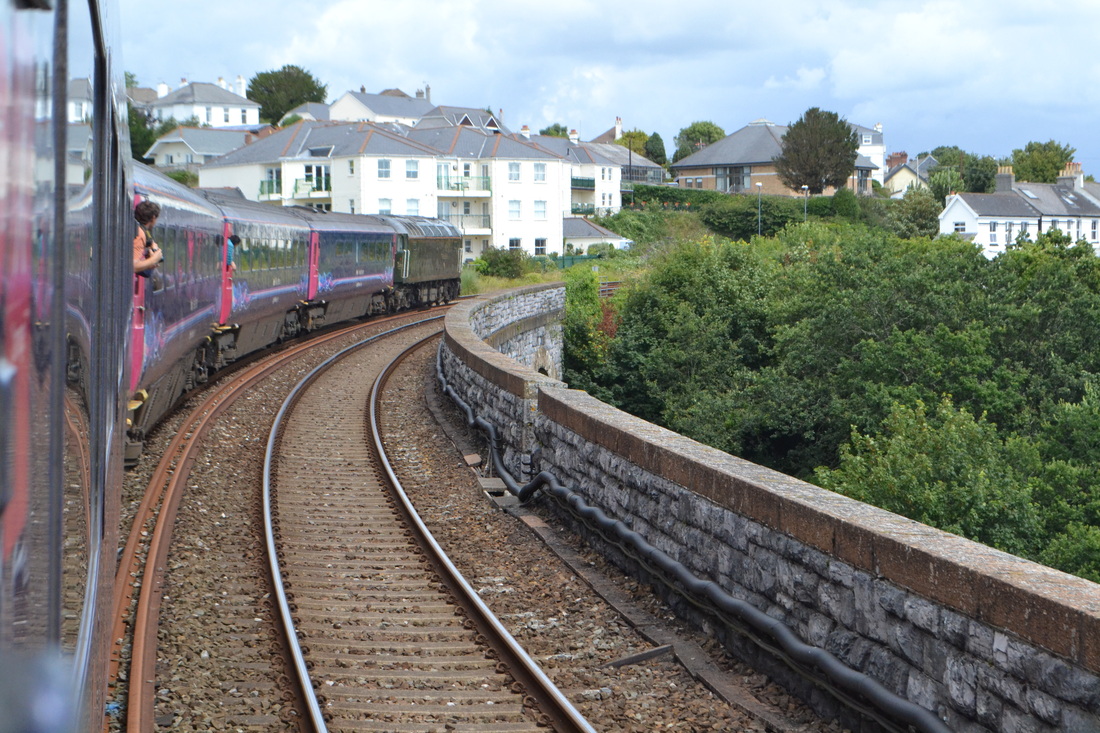
Combe by Saltash Viaduct
A heritage DMU crosses Combe by Saltash viaduct. Copyright Sid Sponheimer

Combe by Saltash D800 crossing on the 30th June 1964 Copyright Sid Sponheimer
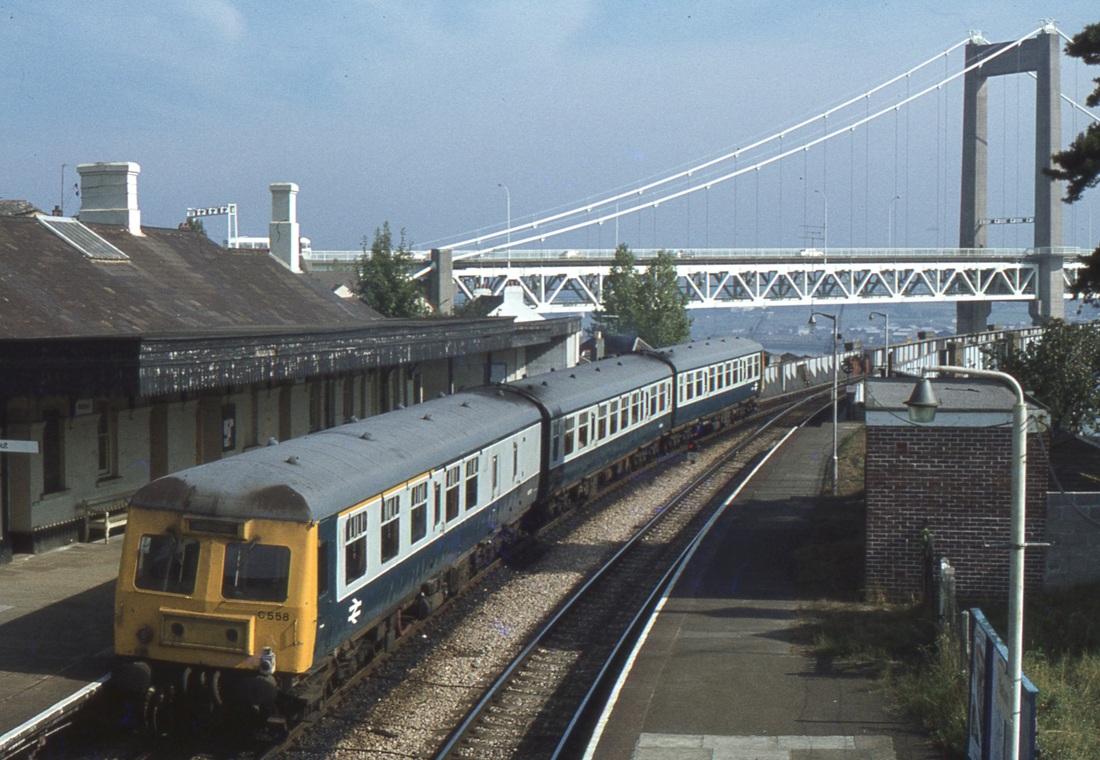
140809o Eagerly looking forward to the Royal Albert bridge one tends to not to notice the quite considerable and elegant structure of Coombe by Saltash Viaduct. This was rebuilt in 1893 when the timber structure was replaced. Here we seen modern flats which overlook the viaduct but also view the river Tamar beyond. There was once a small goods yard located between the end of the viaduct and Saltash station. Here an immaculate 57604 heads the summer Saturdays loco hauled working on out of Cornwall and soon to enter England.
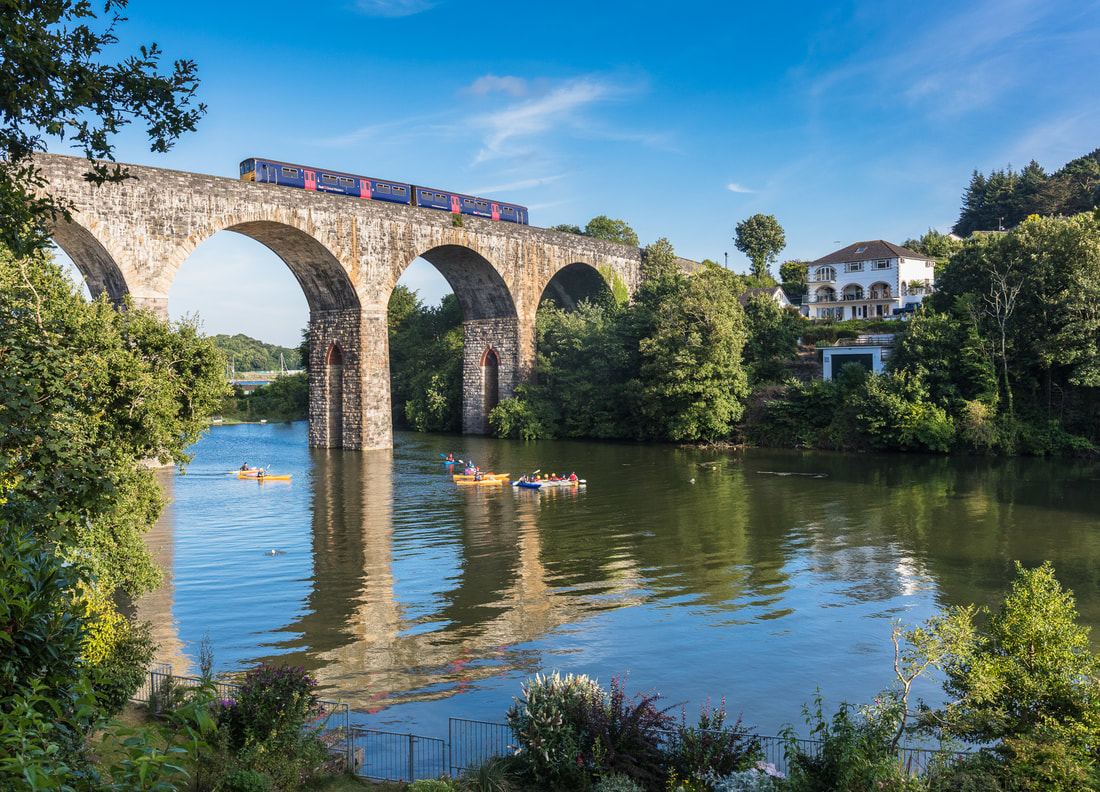
High water surrounds the piers of Combe by Saltash viaduct. The sky, the train on the viaduct and indeed the elegant property plus the boats make the scene as .FGW class 150 heads the 5C51 18.54 Liskeard to Plymouth 24th July 2017 Copyright Ron Waterworth
At 12.12 on the 23rd June 2018 Chris Harvey catches 57 605 crossing Combe by Saltash viaduct a summer only working enjoyed by all.
Copyright Chris Harvey
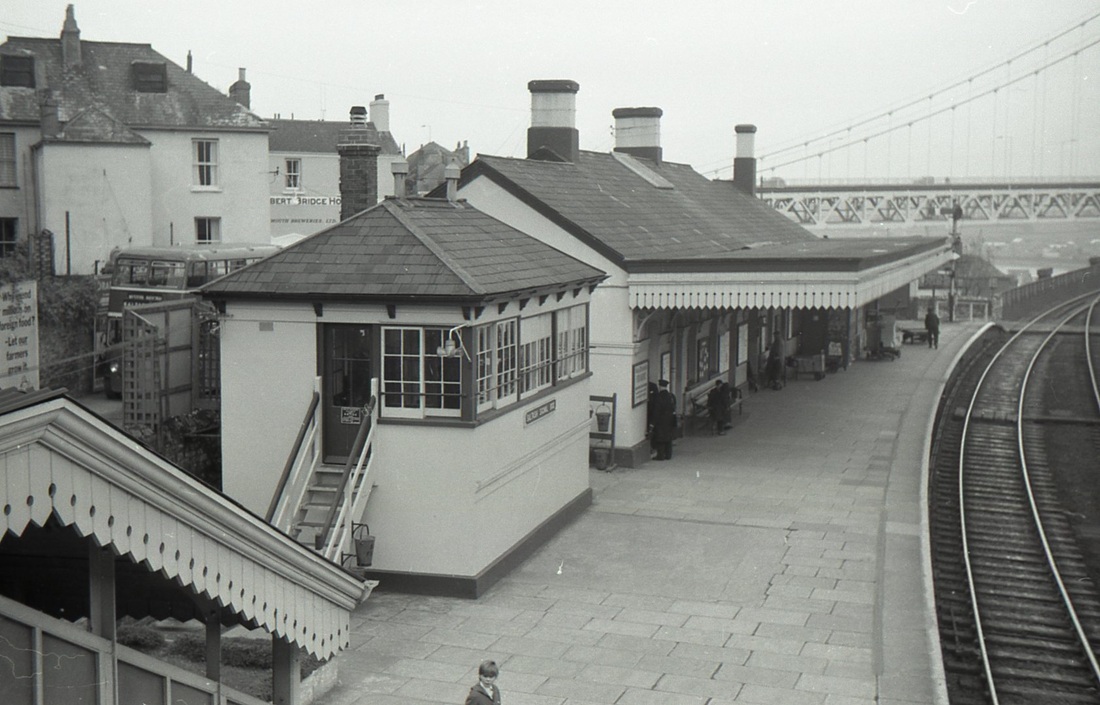
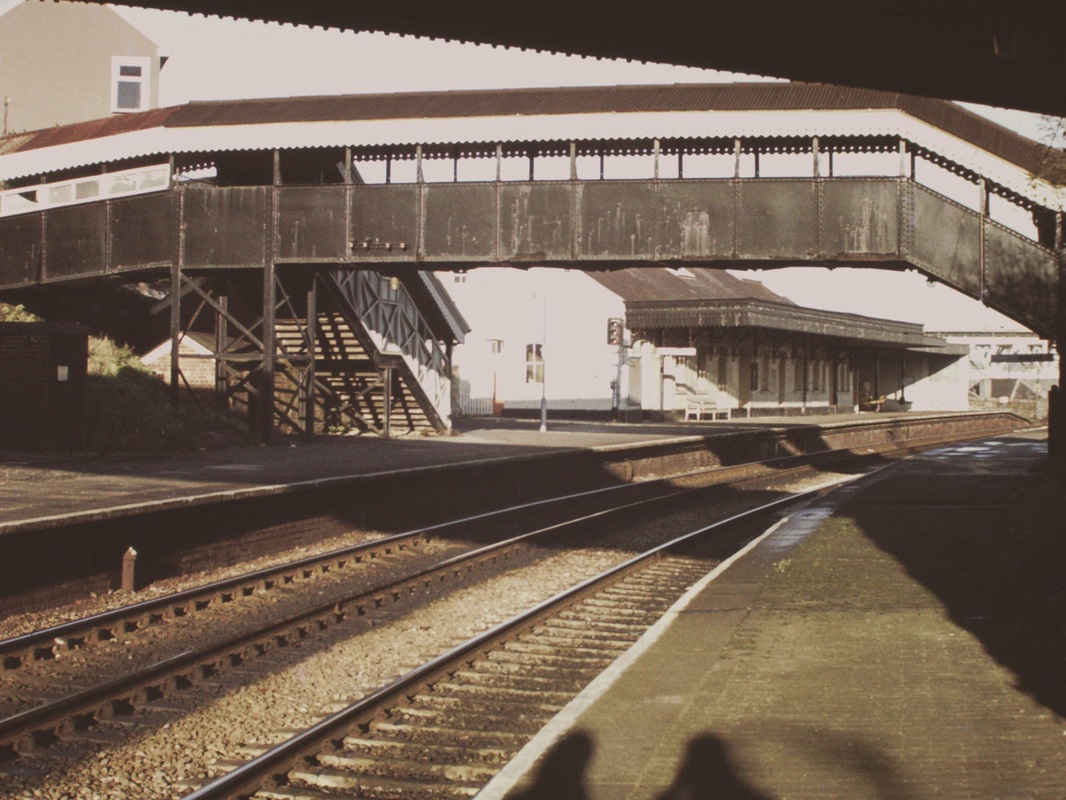
Saltash
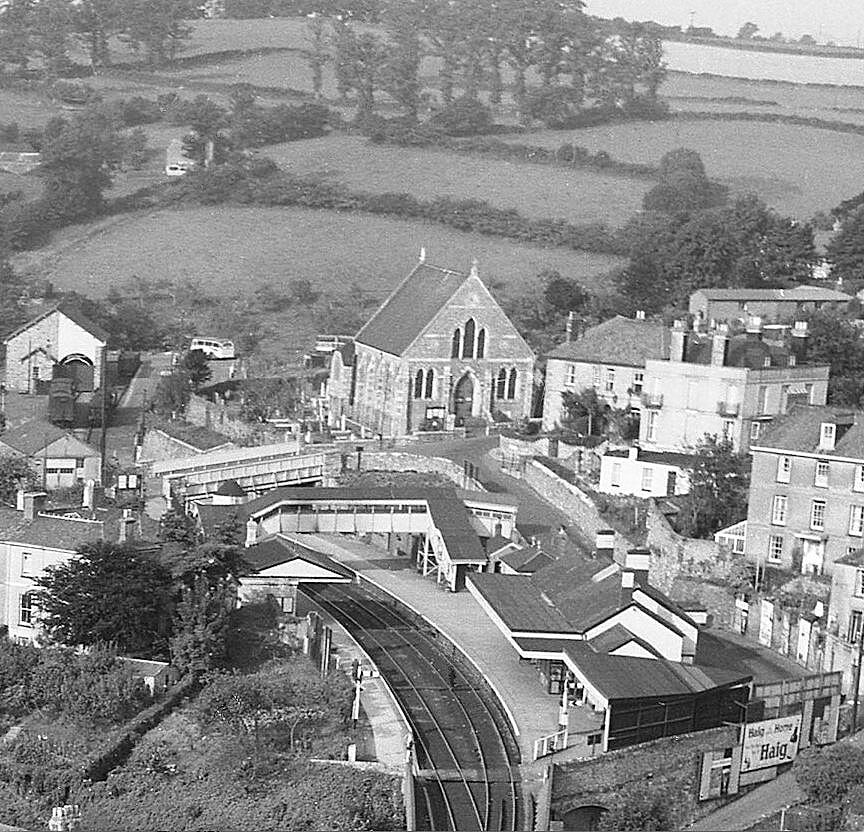
Saltash station - aerial view. Copyright Roy N. Keith in the care of and provided by Mr. Paul Keith . It it must be assumed that to get this amazing picture that the photographer was perched on the top of the nearest pier of the Royal Albert bridge. Also note the complicated design of the footbridge which gave access to the platforms as well as providing a level pedestrian route between close by roads and lanes, a board crossing by the signalbox was presumably for the use of the signalman collecting the tokens or simply for platform trolleys. Note also the goods vans parked in the rather cramped goods yard, and also beyond a modern road coach and a double decker bus. A very prominent feature in this view is the Baptist Church, the second church building on the site, a grand building which was destroyed by fire on Christmas day 1987. The present Church was dedicated and opened in March 1992.
Station platform view. Paul Keith in push chair. Copyright Roy N. Keith in the care of and provided by Mr. Paul Keith
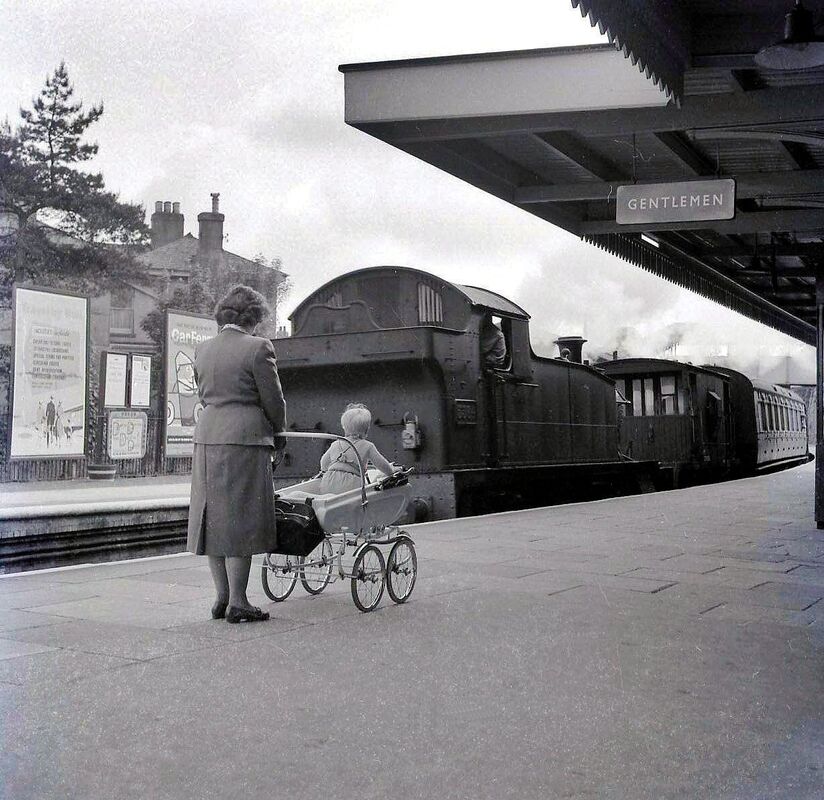
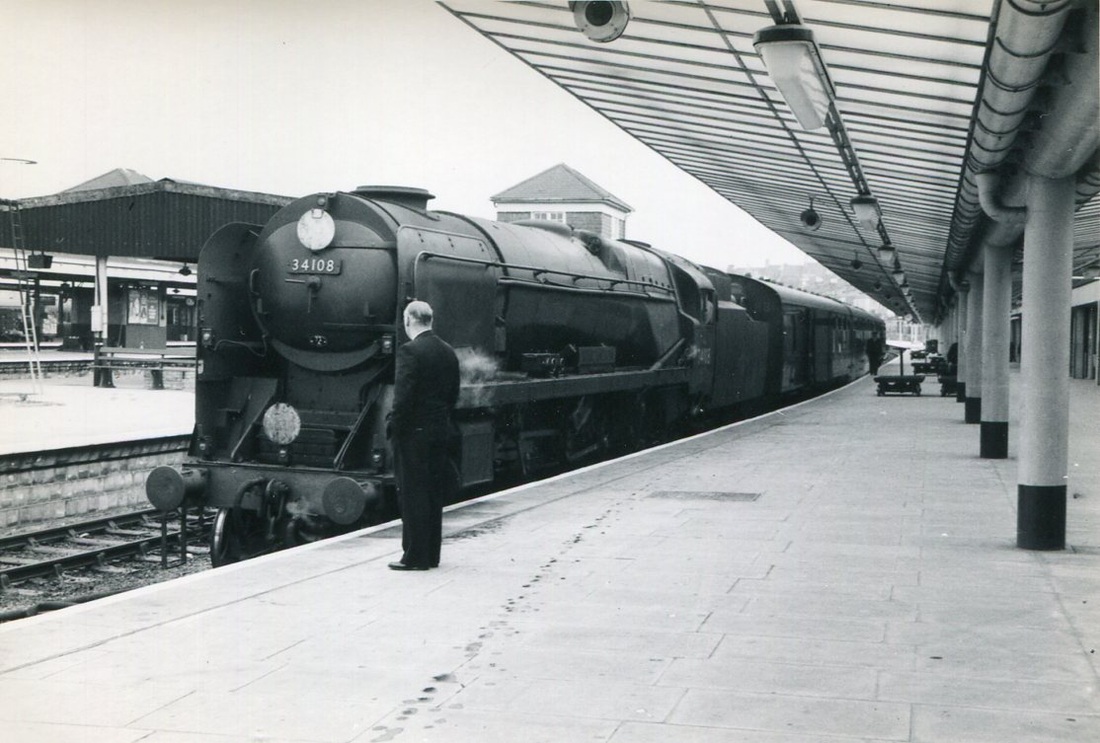
6410 in the middle of its train stands at Saltash on the 14th May 1960 Copyright Mike Roach
Quite sure it was 6410 which was at Laira from September 1959 to August 1960. It spent most of the time before and after in South Wales. Withdrawn November 1962.
Another Auto train picture by Mike Roach. In this one the 'auto' has taken refuge in the loop awaiting, presumably, the passage of an up through train. The garage in the yard housed buses one of which can be seen awaiting its next duty. 14th May 1960 Copyright Mike Roach
An early Christmas present from Andrew Vines.
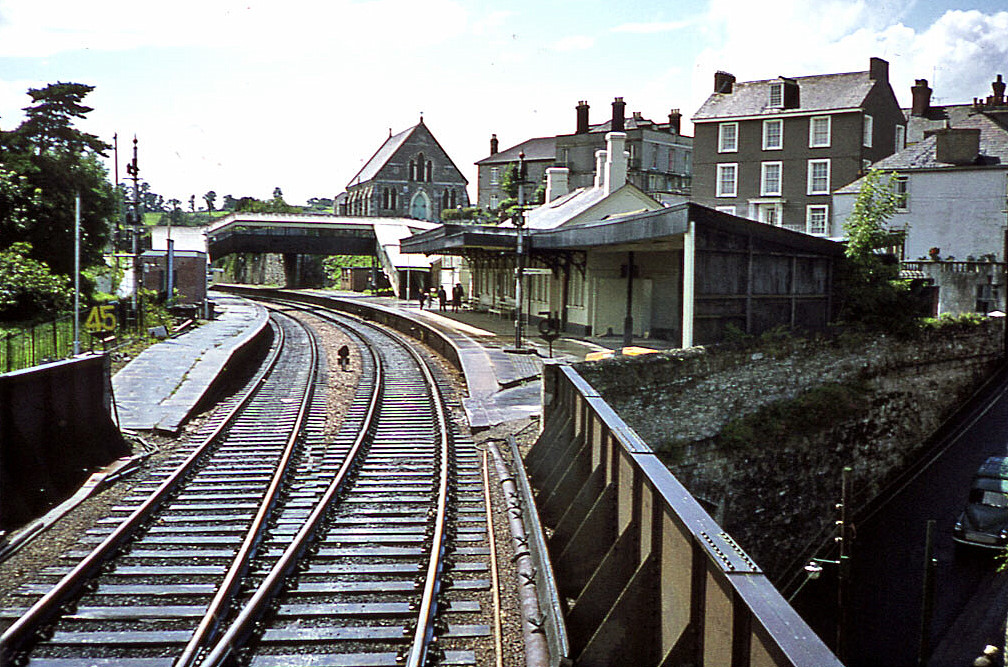
Here is a trio of pictures at Saltash, which Dad took on the same business trip as the recent views posted of Truro. Thanks to 'Warship' aficionados Steve Harrod and Martin Street for identifying the loco coming off the bridge as 854 'Tiger', on the then newly introduced 1C16 08.15 Bristol-Penzance service, which replaced the long-standing overnight Manchester-Penzance at the May timetable change. How complete the station facilities look, with bookstall, covered footbridge and a canopied building on the down platform - a sad contrast to the scene today.
Andrew (Received 1st December 2020)
854 Tiger running into the station off the Royal Albert bridge in 1970. Copyright The late John Vines.
Another shot featuring those wonderful semaphore signals and the fully canopied platforms. Note the board crossing between the platforms and the AWS ramp on the up line. The late John Vines.
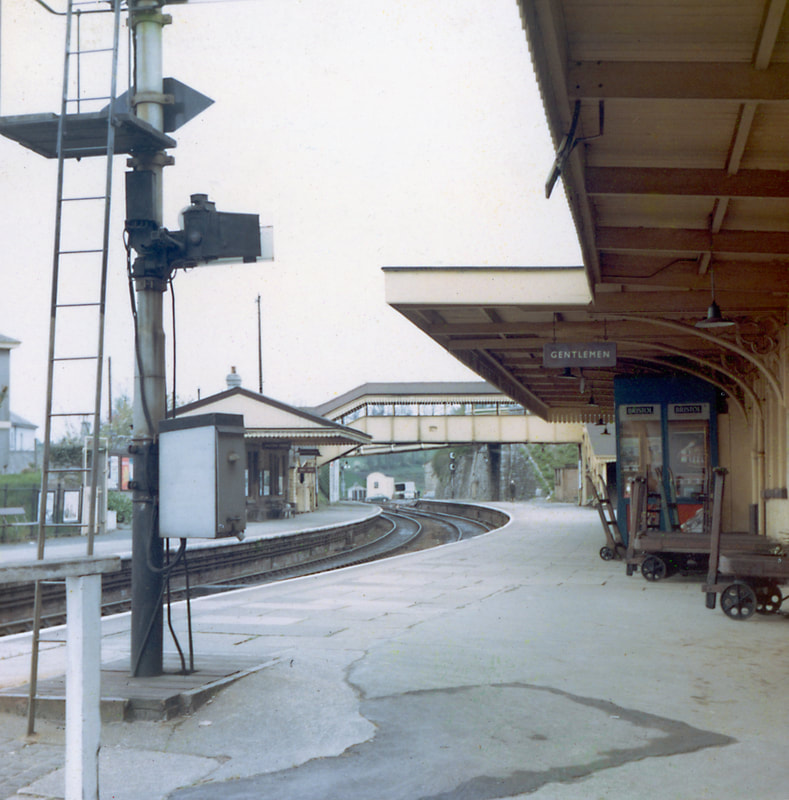
A view along the up platform, note the platform trolleys, the sack trucks and the distant view into the good yard . The distant view of the yard is framed by that very substantial footbridge not only with steps down to the up and down platforms it also provided access to the adjacent roadways. The bridge was very wide to accommodate the rush of foot traffic off the 'Autos. This 1970 view by the late John Vines Copyright.
Saltash with the milk siding and Goods Shed disused . 1st September 1990 Copyright Roger Winnen
A nice view of a tidy station at Saltash - from the footbridge. October 1965 Copyright Mike Roach
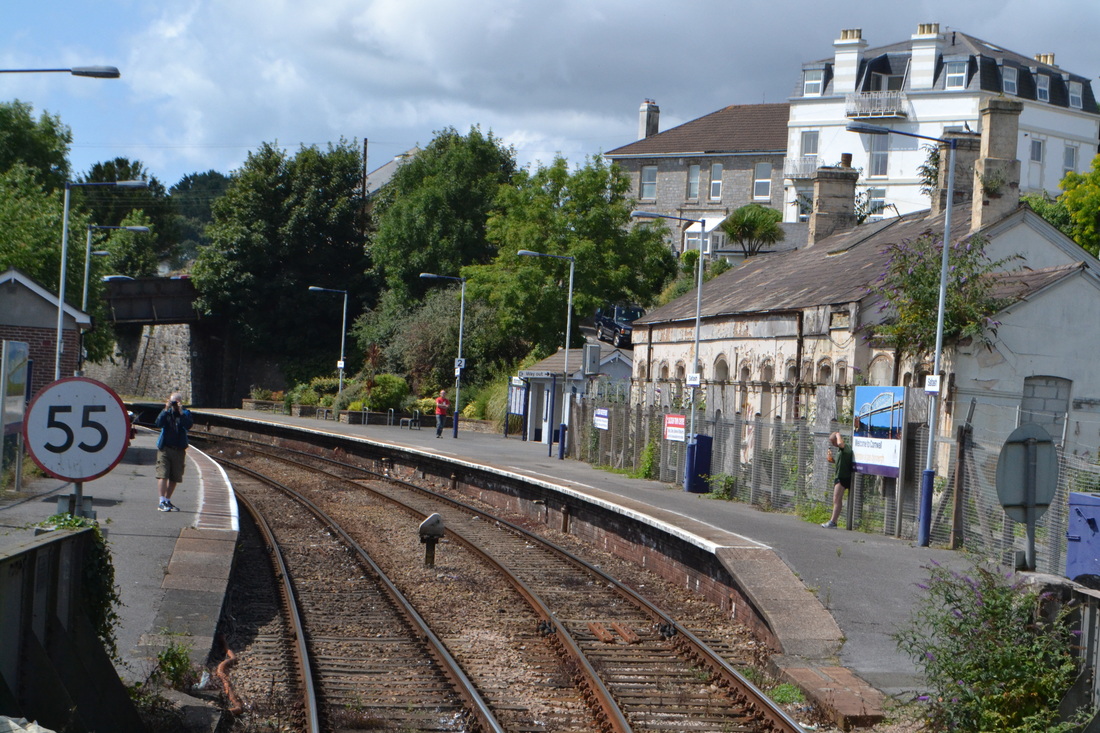
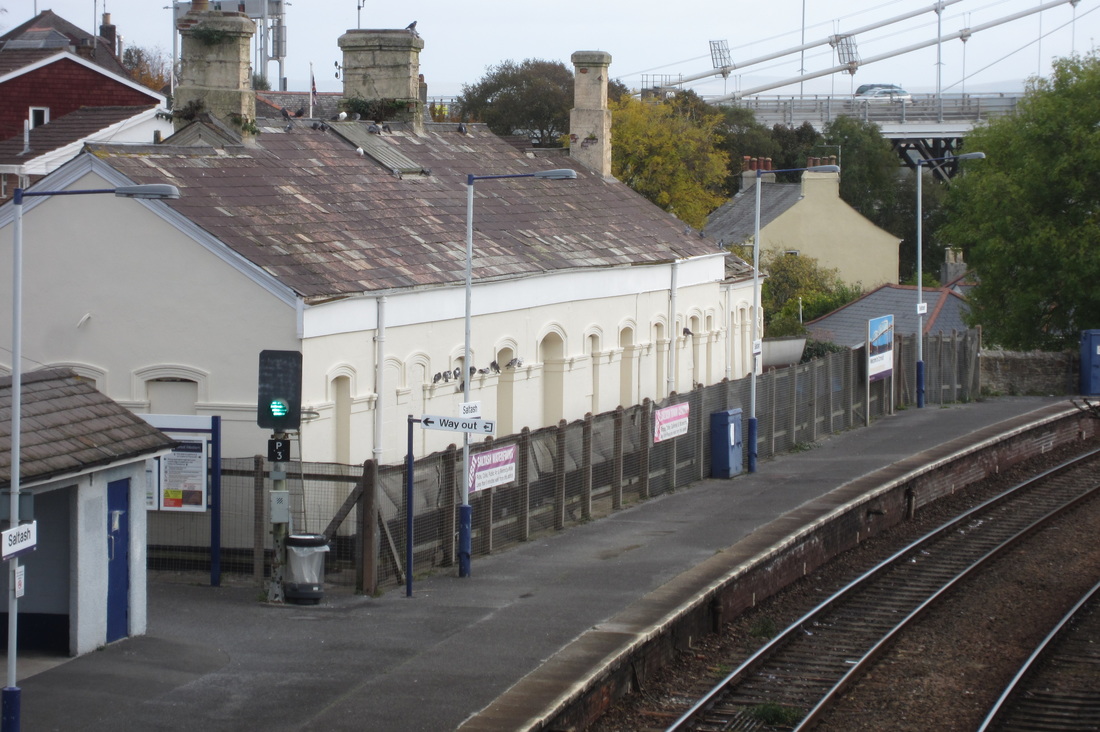
140802g Saltash Station. The former up platform building is quite a disgrace. Not a welcoming view for passengers coming into Cornwall. Otherwise the station is smart. Copyright Roger Winnen
A smashing view in March 1962 of a Prairie bringing a short train from Cornwall across the Tamar. Copyright Mike Roach
A cross country DMU heads for Cornwall. Copyright Sid Sponheimer
Emerging through the mist 1028 Western Hussar rolls into Saltash and Kernow on the 23rd August 1971 with the 1025 Manchester - Penzance. Copyright Ron Kosys. Note the buildings in use on the up platform and the platform awning, not forgetting the semaphore signals. (Pity about the other bridge in the background!!)
After having just taken the standard 'train-on-bridge' shot I thought I would go for something different using the open windowless east side of the Two Bridges pub beer garden drinking 'shed' to create a framed picture. Perhaps my fifth pint had unleashed my artistic side. The train is the 13.28 Exeter St Davids - Penzance operated by 'Castle' HST power cars 43088 and 43194 on the 17th October. For the beer afficianados the pint is a small batch brew from the St Austell brewery called Harlequin at 4.8%.
Regardssssh, Clive Smith
Saltash 14th November 1973 (1) Copyright Howard Sprenger
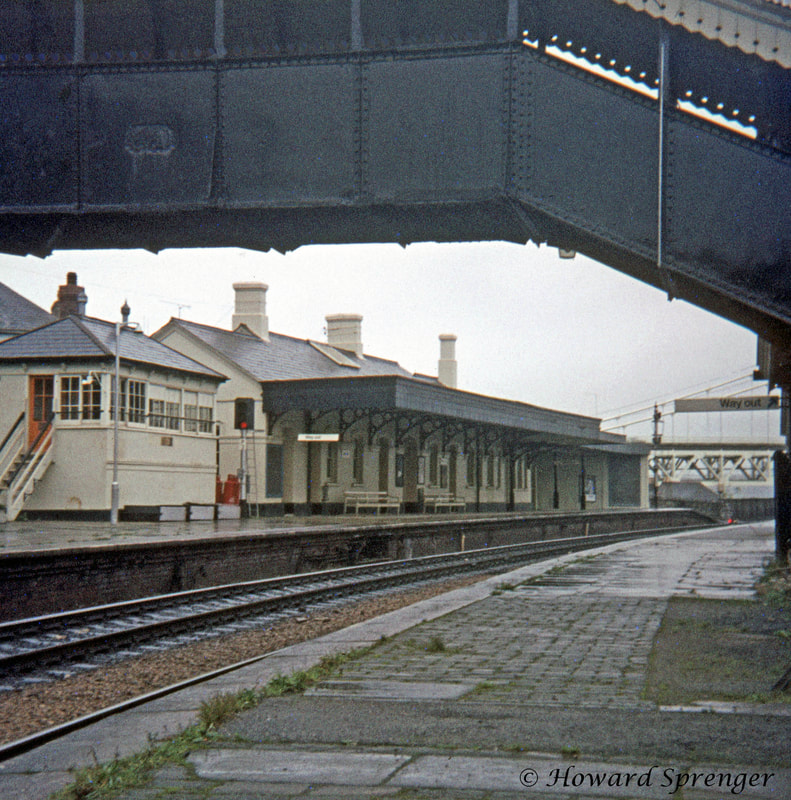
A fine view of the up platform building and signalbox at Saltash taken on the 14th November 1973 (2) Copyright Howard Sprenger

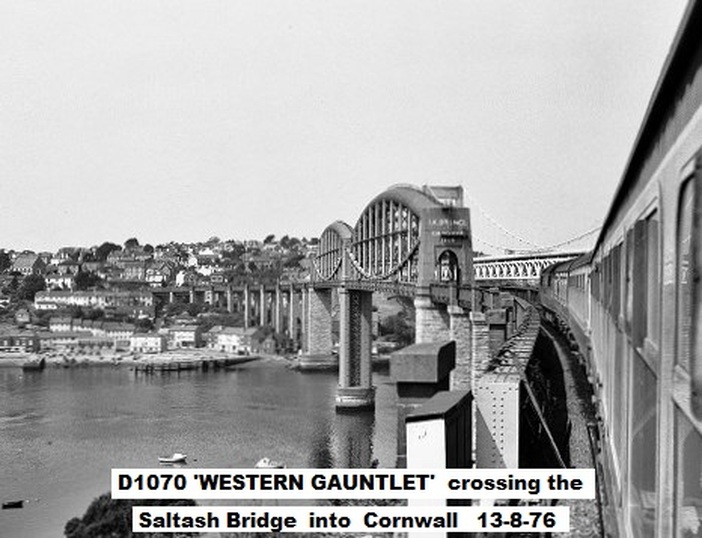
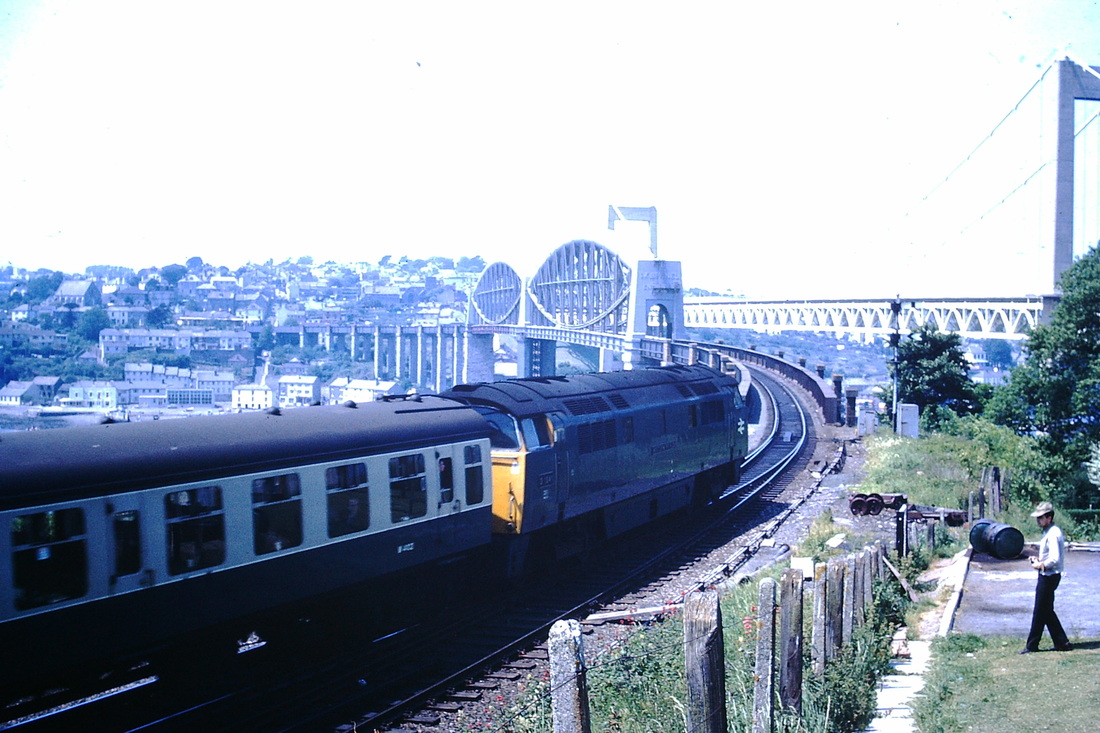
* A long Penzance to Paddington train crossing the Saltash bridge
behind 1061 Western Envoy on 12 April 74. This was when Plymouth signal plan was ongoing and the Paddington
trains to and from Penzance did not drop off the rear / front coaches for the
duration of the work. Information courtesy of Roger Geach.
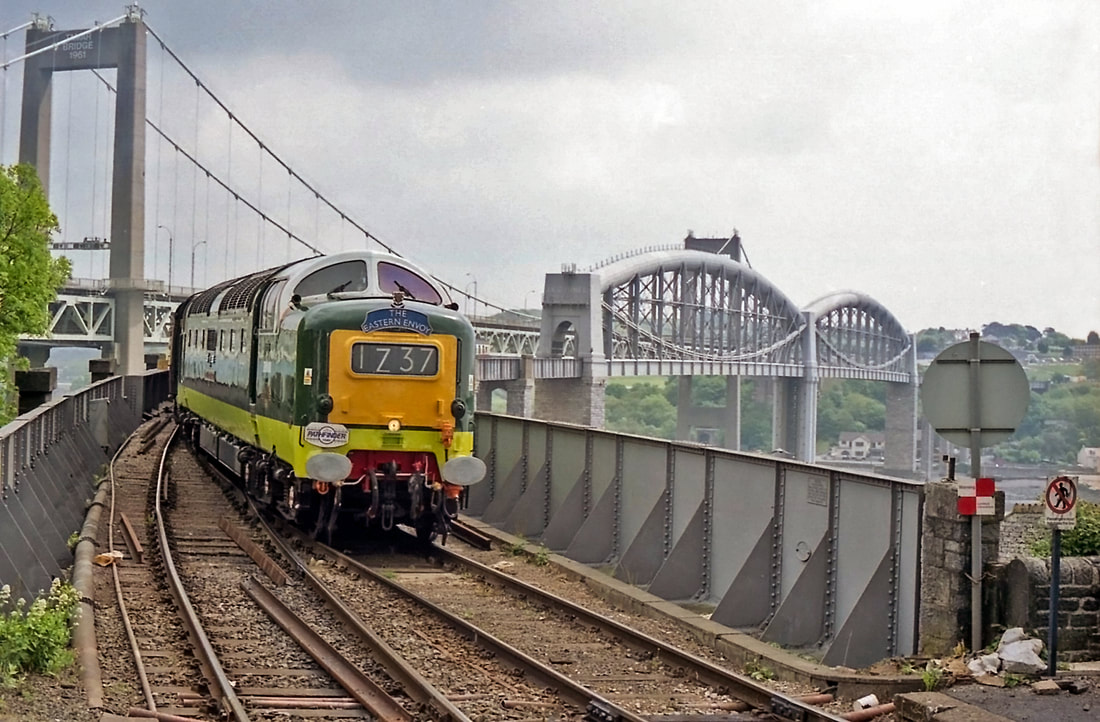
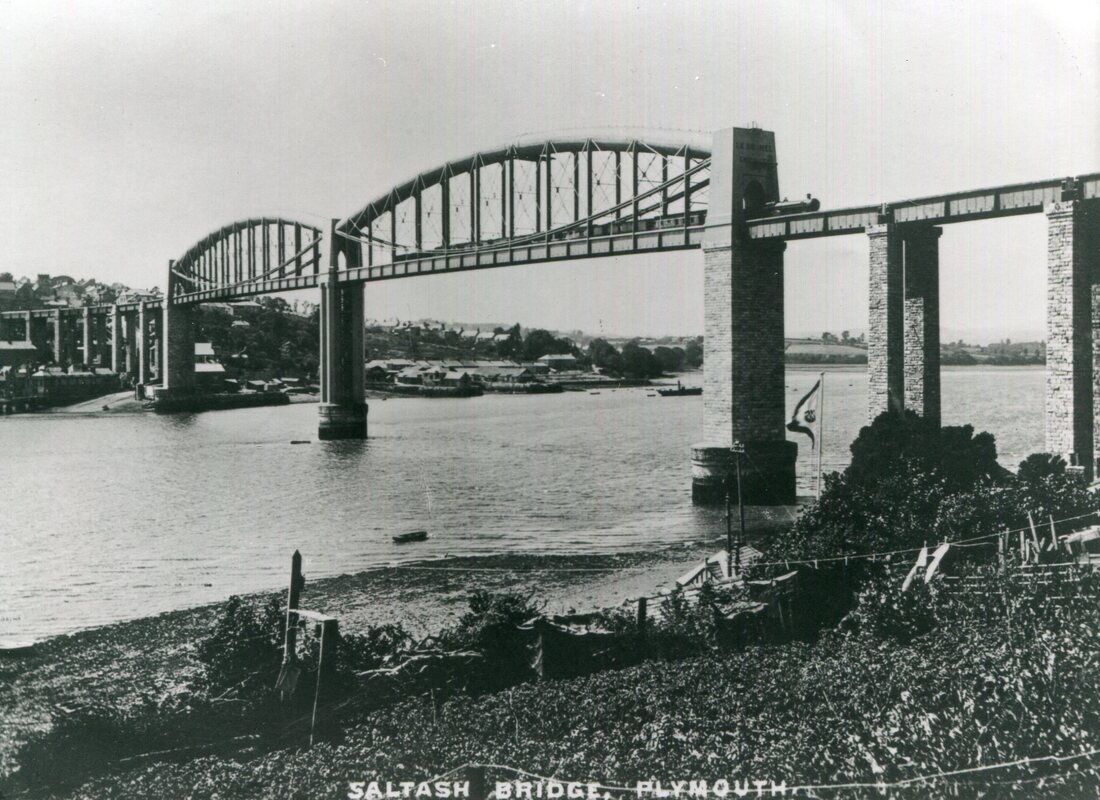
A great bridge, a great locomotive and a great photographer. D9000 'Royal Scots Grey' crosses the Tamar on the 'Eastern Envoy' 15 May 1999. Copyright T Tremethick
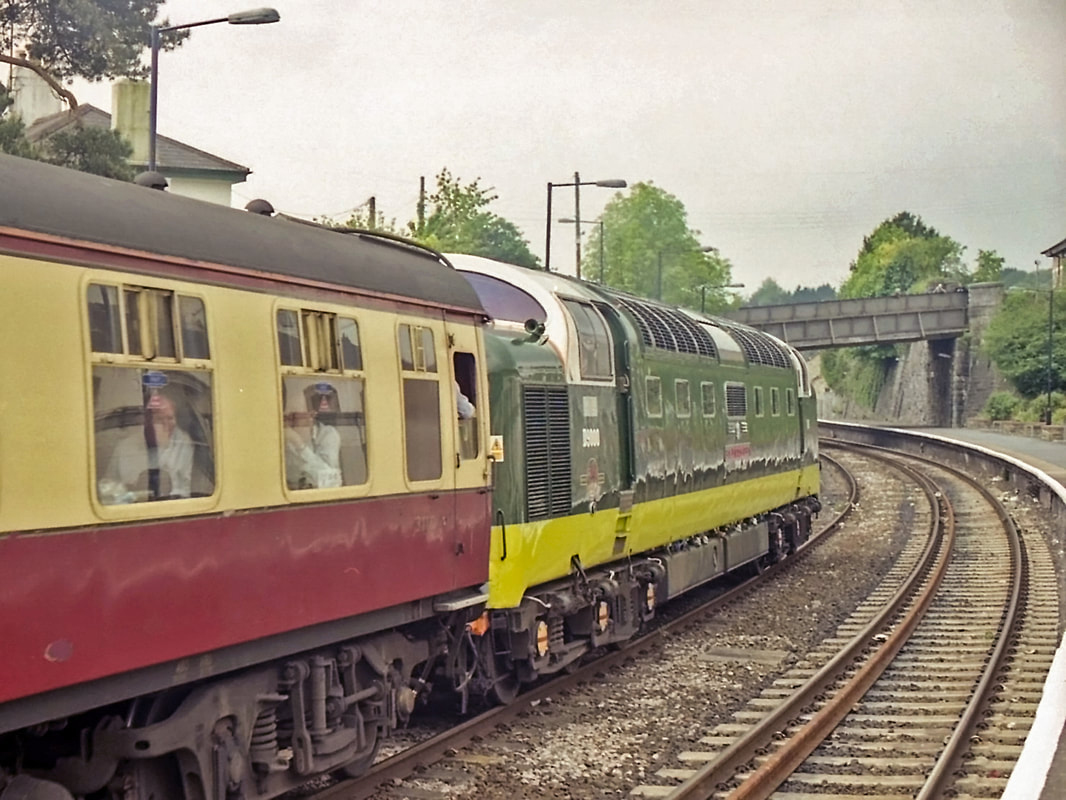
D9000 'Royal Scots Grey' passing Saltash on the 'Eastern Envoy'. . Copyright T Tremethick
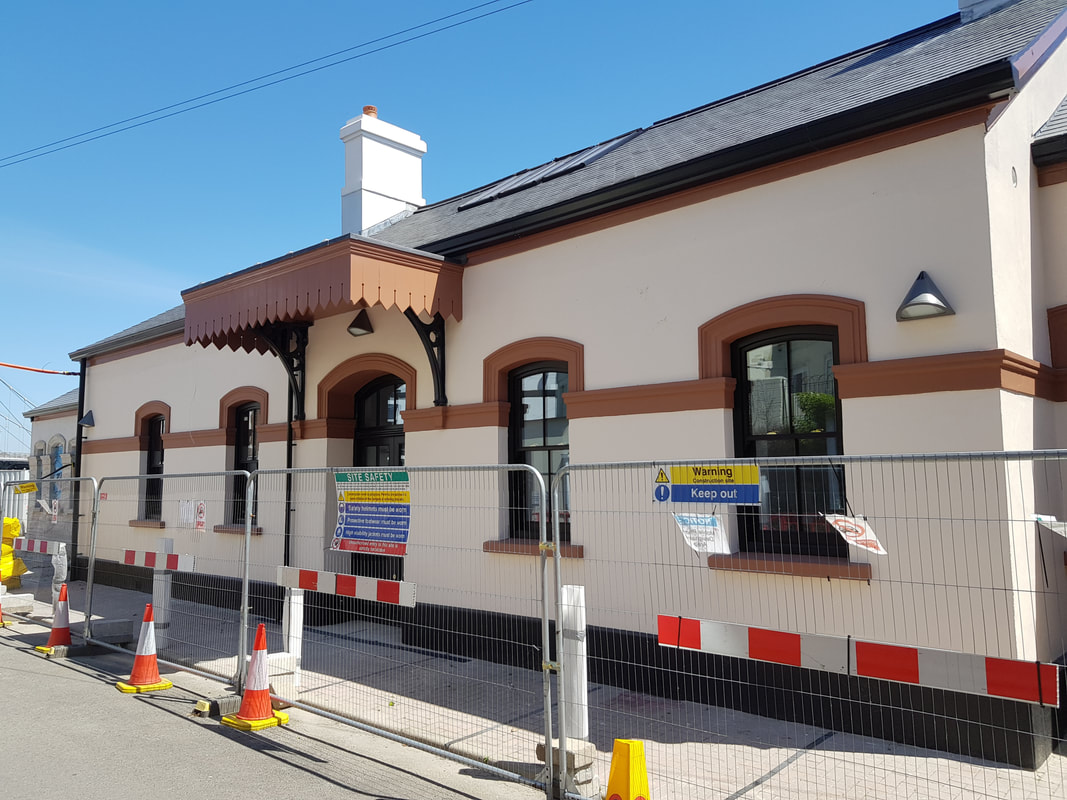
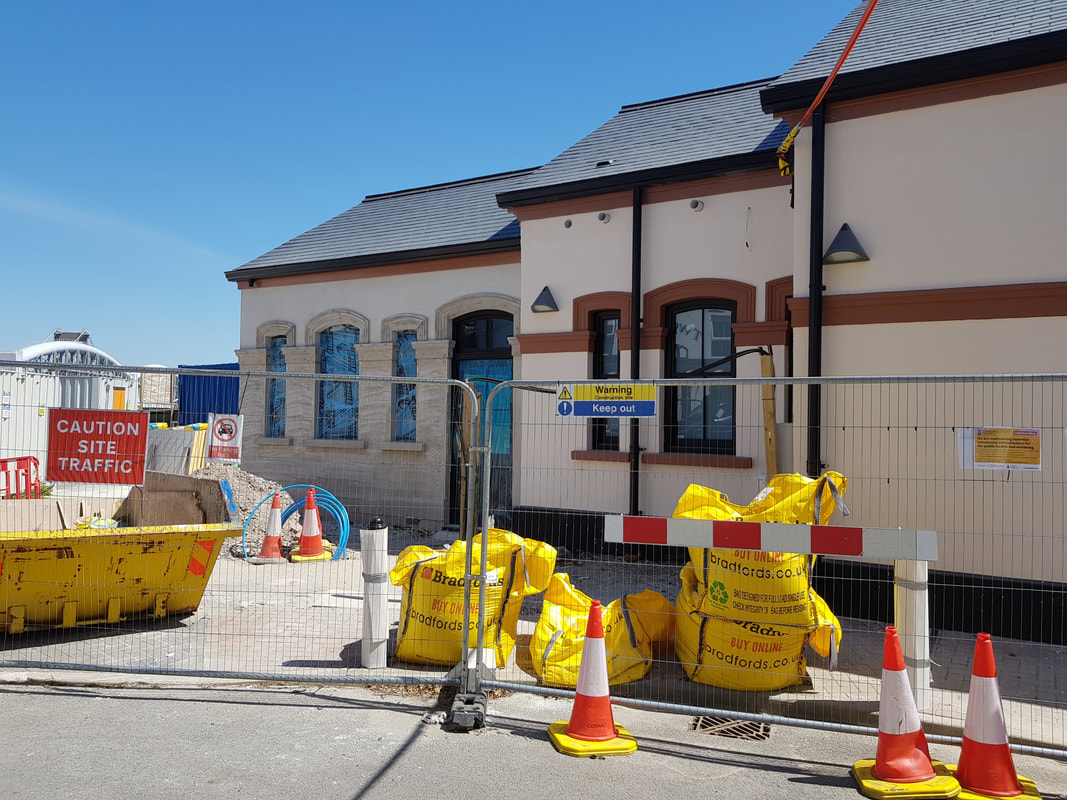
Saltash up platform nearly completed 11th October 2021
211011f Saltash Station almost complete. 11th October 2021 Copyright Roger Winnen
Saltash up platform building gets a new coat of paint in October 2016

Saltash 08.28 Pz - Glasgow 18th October 2016 Copyright Paul Burkhalter

Saltash 18th October 2016 Copyright Paul Burkhalter
Saltash - the building which has recently been a disgrace looks fine again. 18th October 2016 Copyright Paul Burkhalter
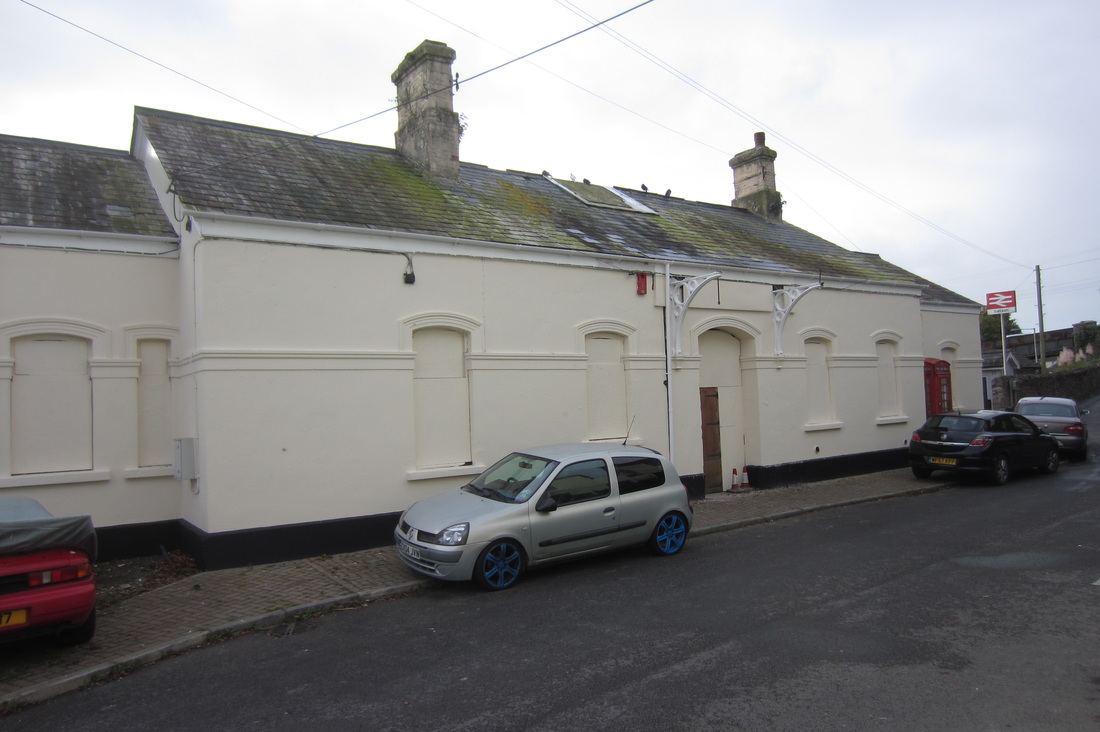
Even the back looks good. 18th October 2016 Copyright Paul Burkhalter
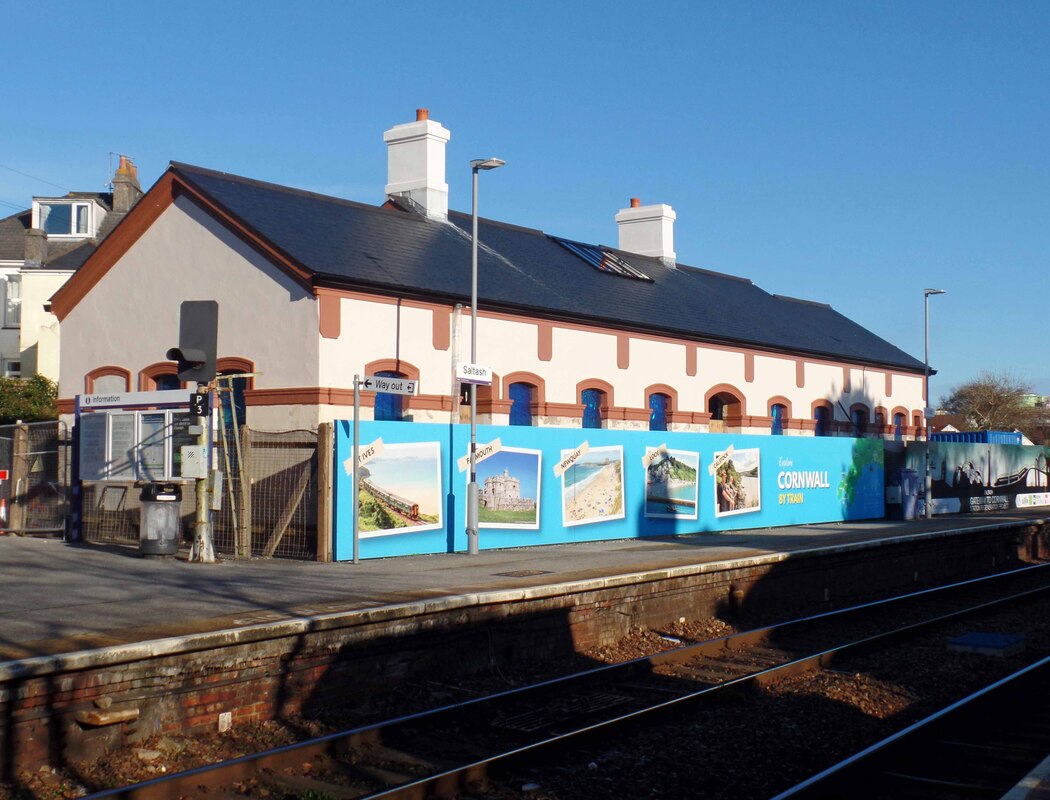
The refurbishment of Saltash station building (now owned by the town council) is going well and is looking fantastic so far, a vast improvement on it's previous state. Monday 2nd December 2019. Copyright Mark Lynam.
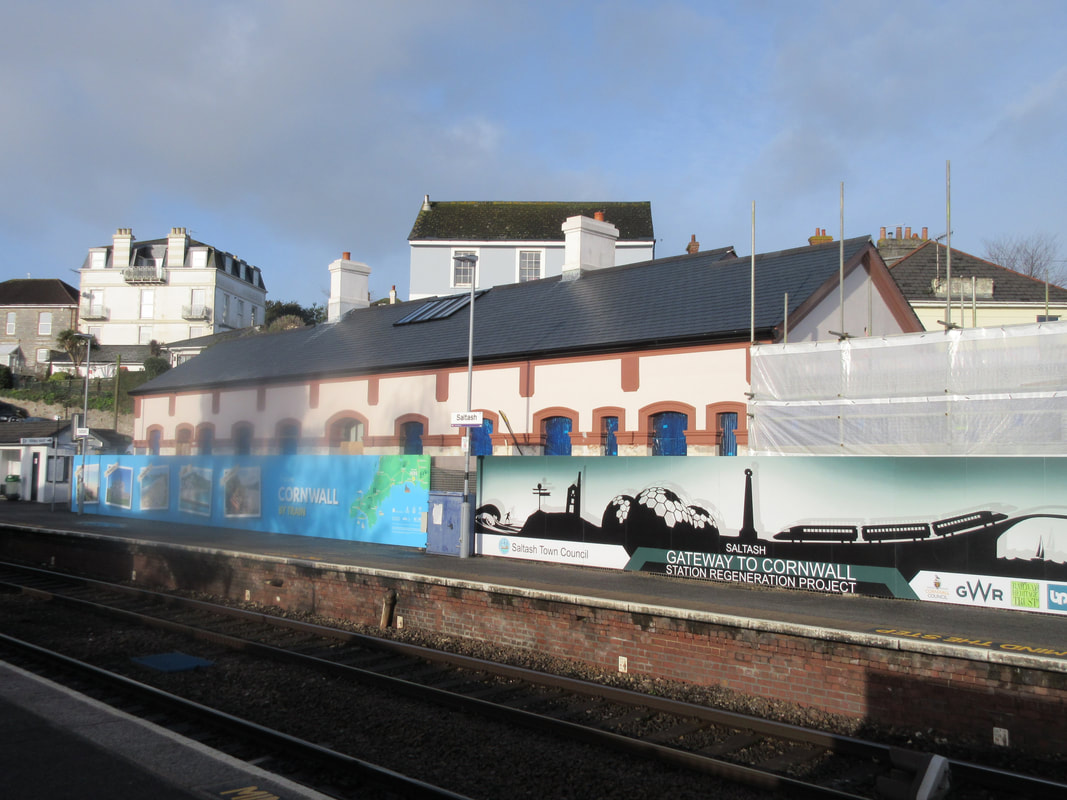
Saltash station refurbishment on the . 12th February 2020. Copyright Paul Burkhalter.
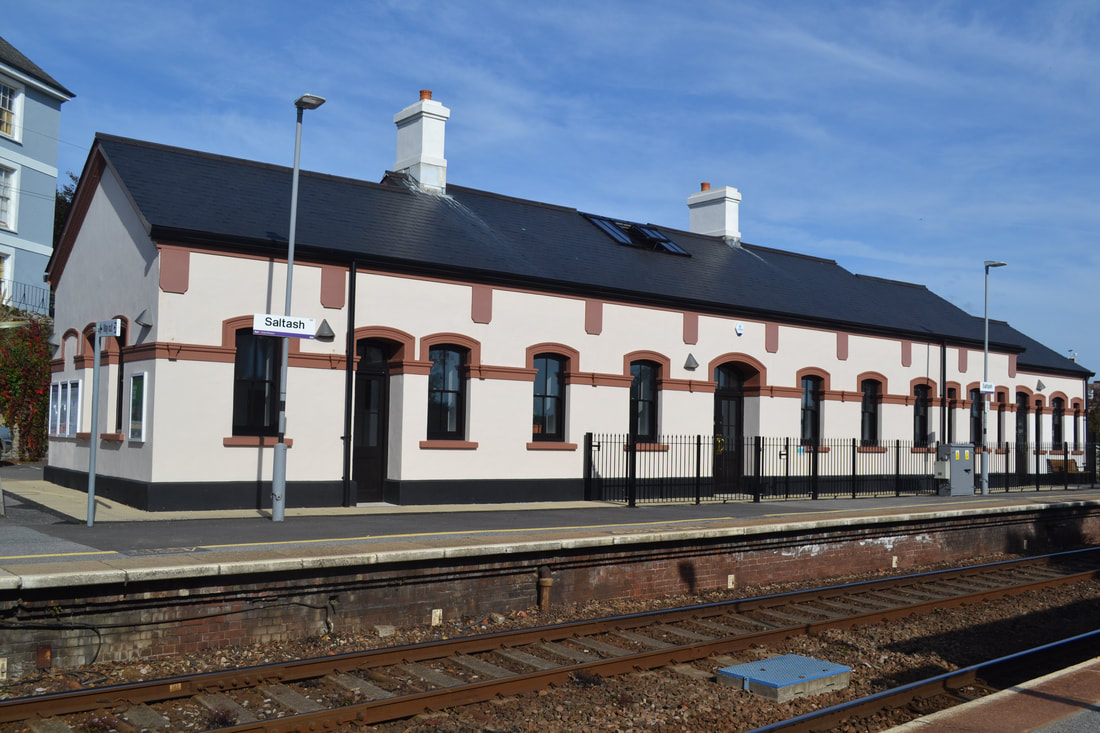
It is understood that the refurbished up platform building in now named 'Isambard House'.
Saltash station - from the roadside. 31st May 2020. Copyright Ross Griffiths.
Saltash station from the roadside. 31st May 2020. Copyright Ross Griffiths.
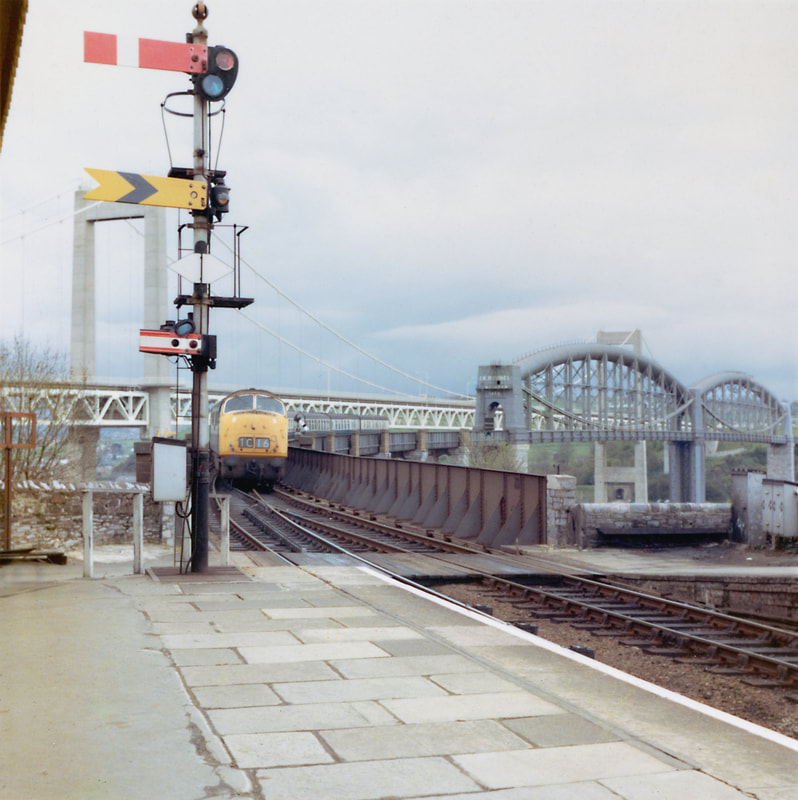
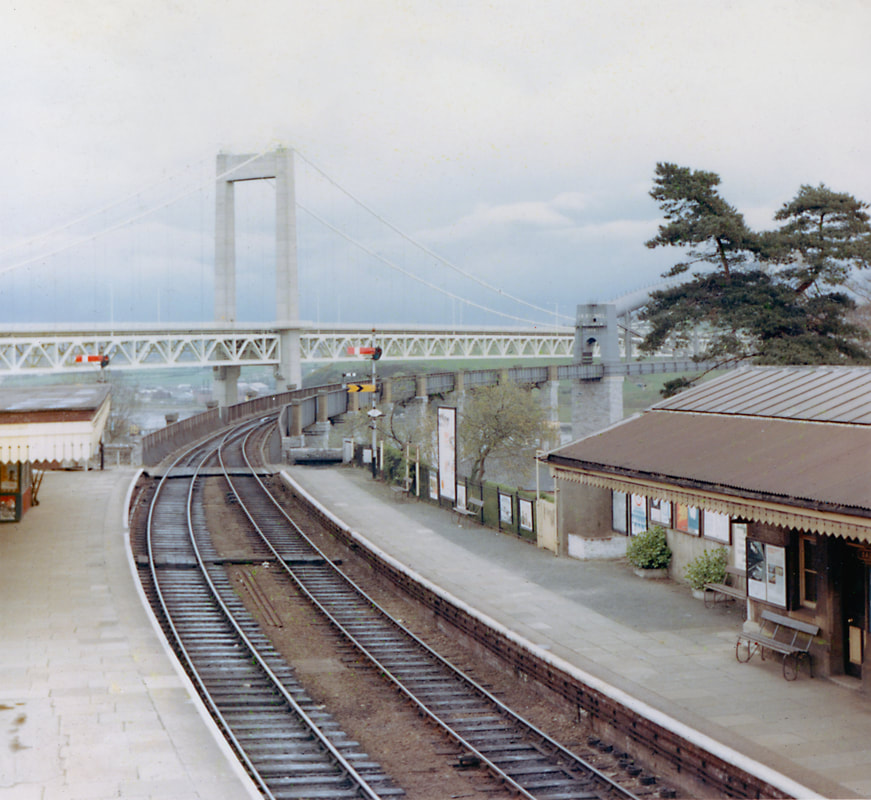
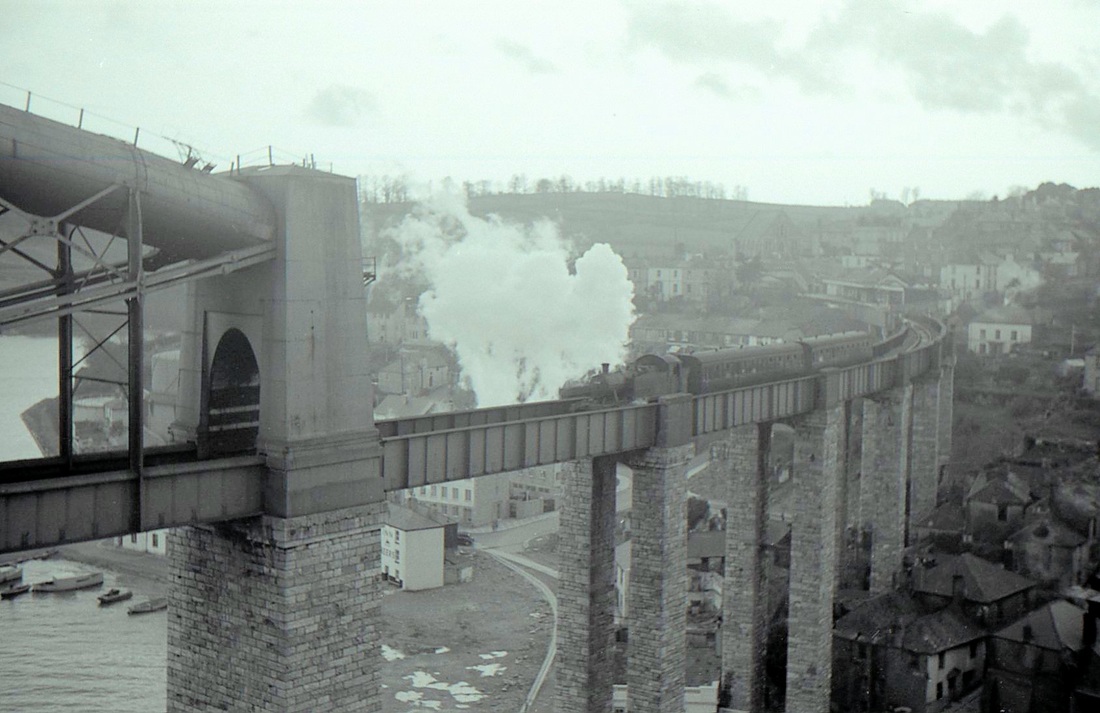
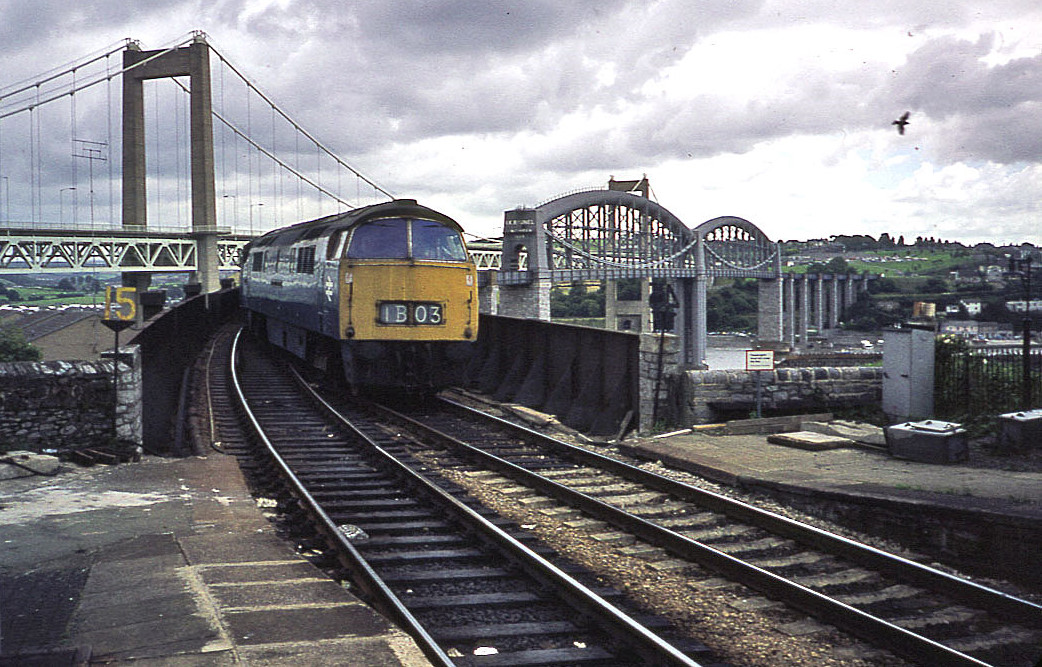
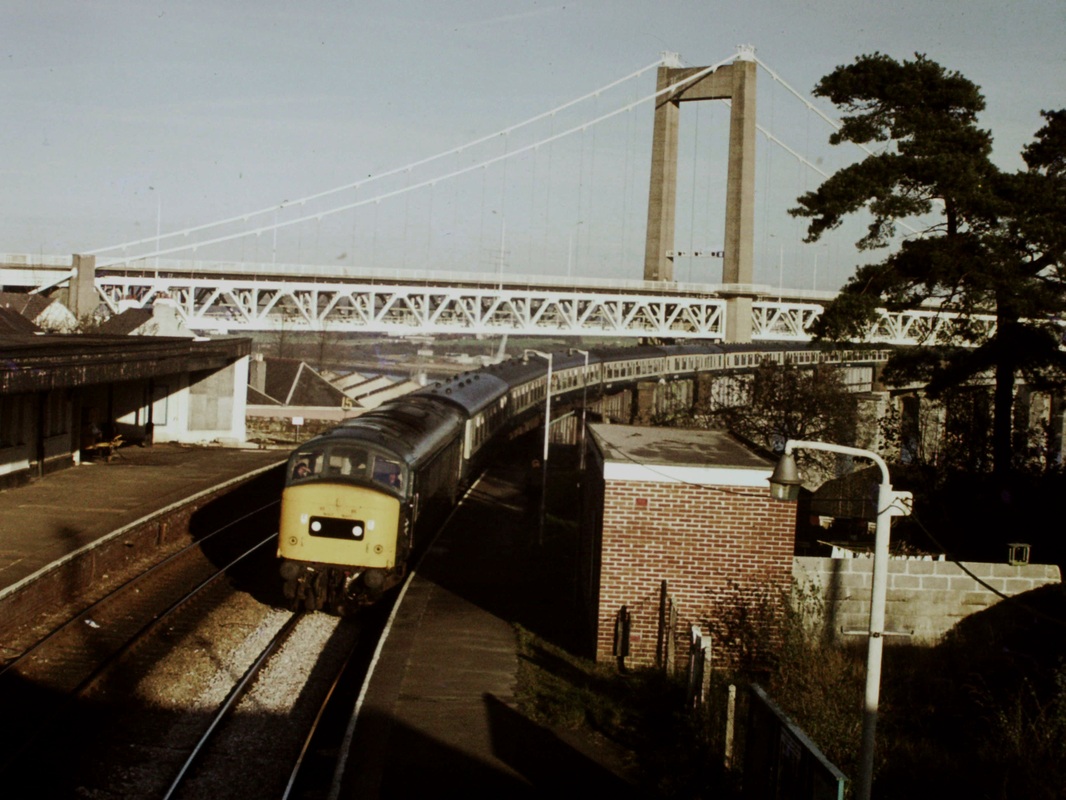
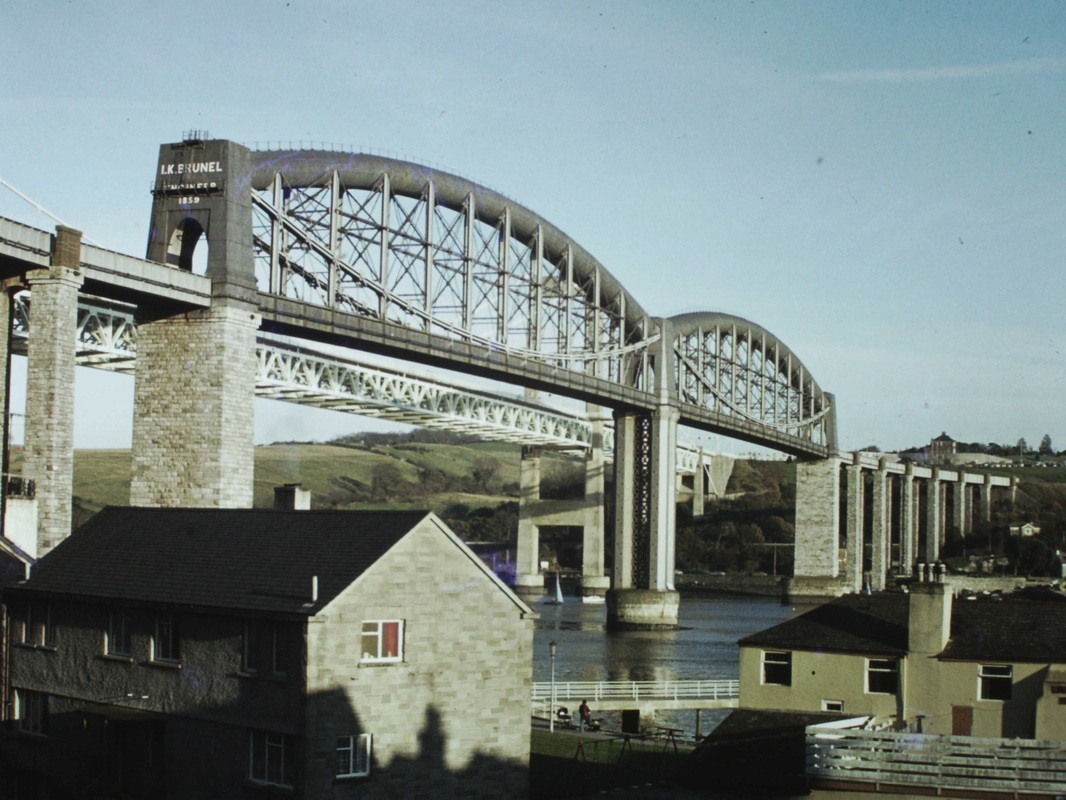
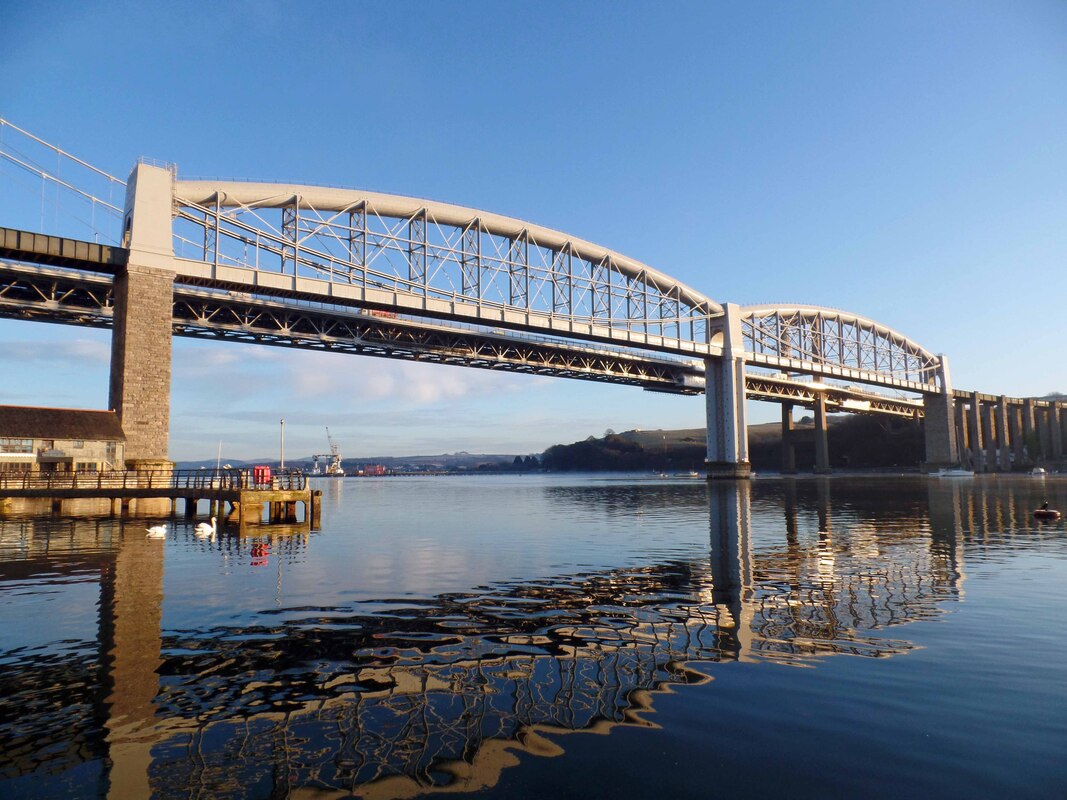
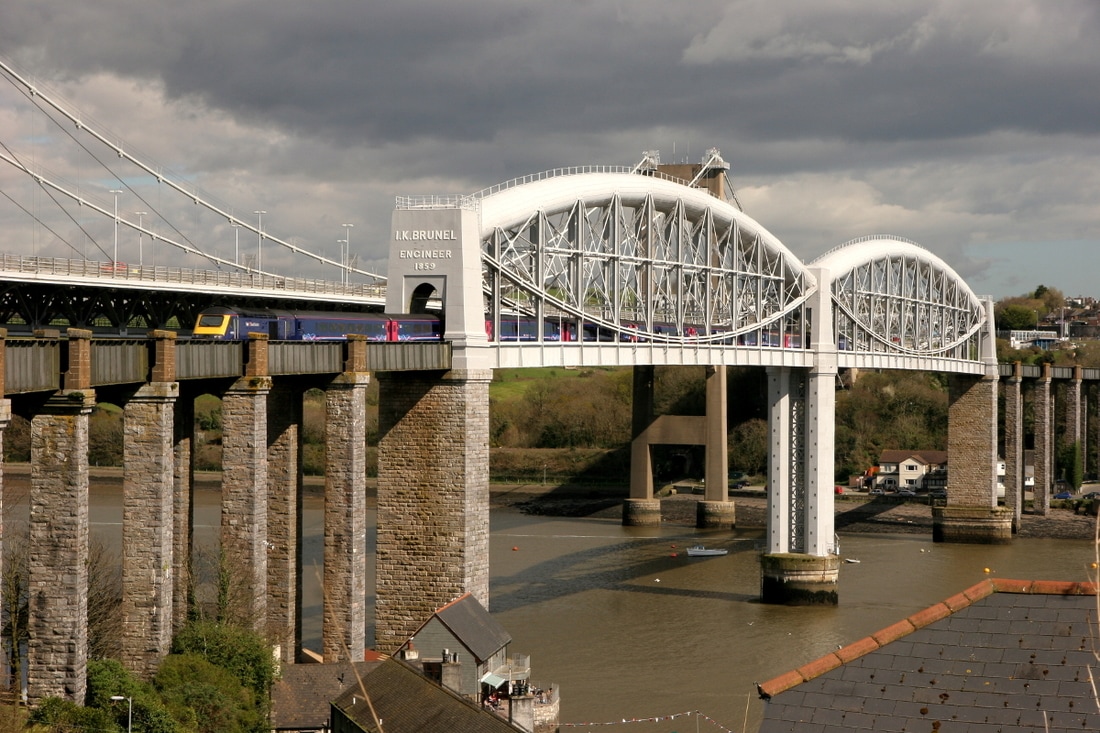
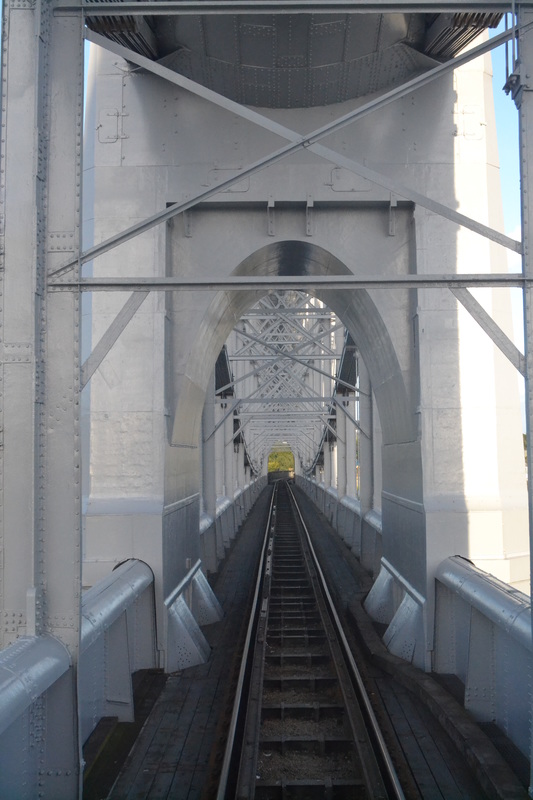
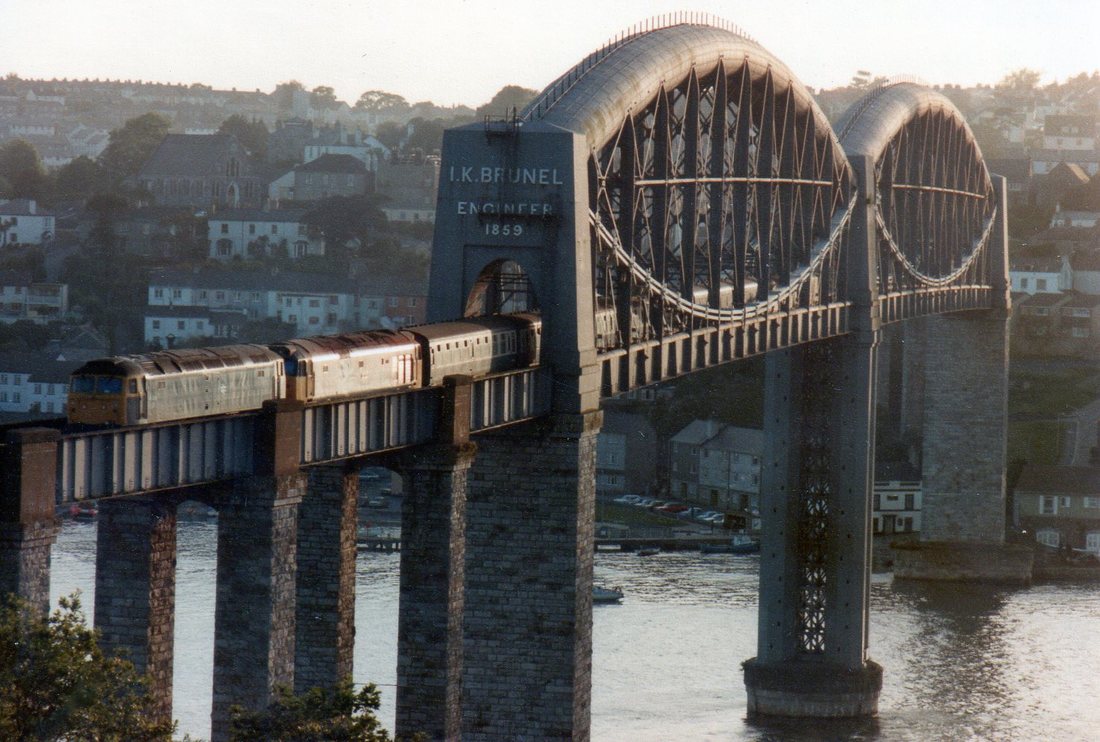
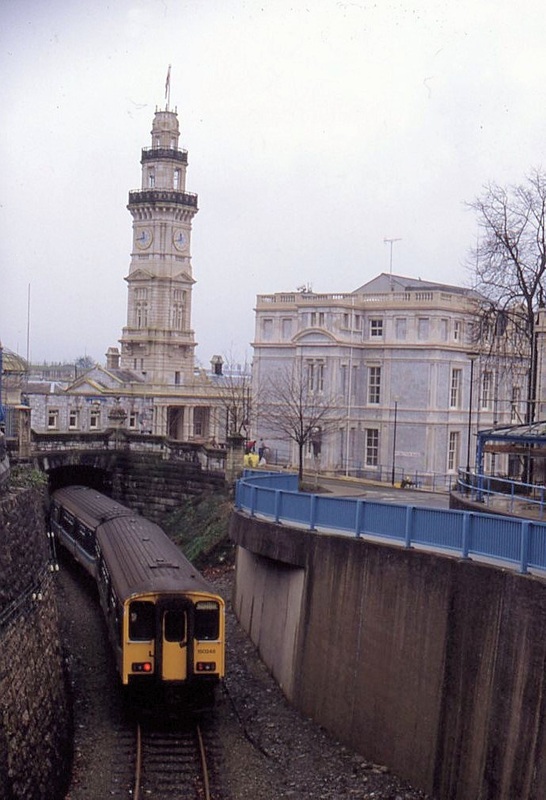
Royal Albert Bridge Take a look at the articles section for an exciting tale by Peter Butt.The article is complemented by some 'heart stopping' pictures taken from high up. Peters article details a visit to the RAB and a walk over the top.
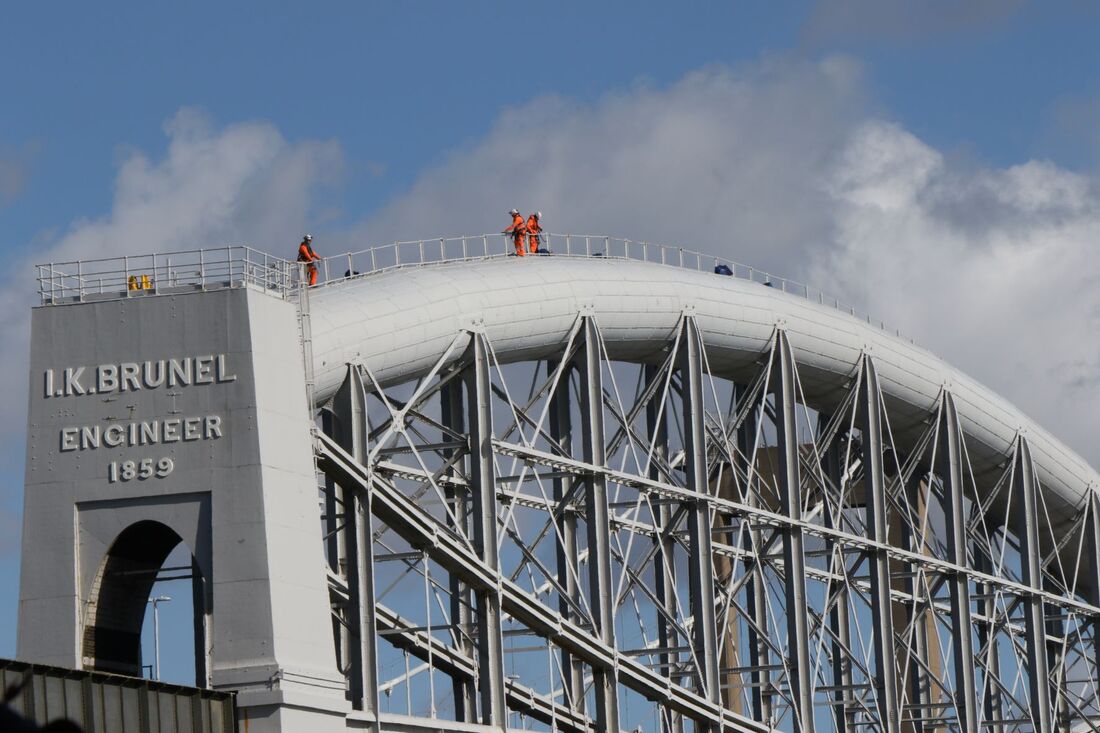
A very recent picture of engineers carrying out an inspection of the 'Cornwall end tube'. 14th March 2023. Copyright Andrew Hickson.
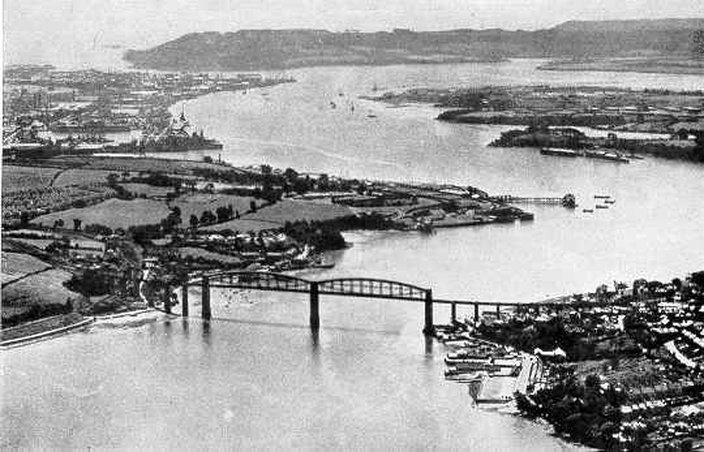
A Luftwaffe photograph of the Royal Albert Bridge taken on the 11th April 1941. From the Phil Hadley Collection. Note the lack of housing beyond the Devon end of the bridge.
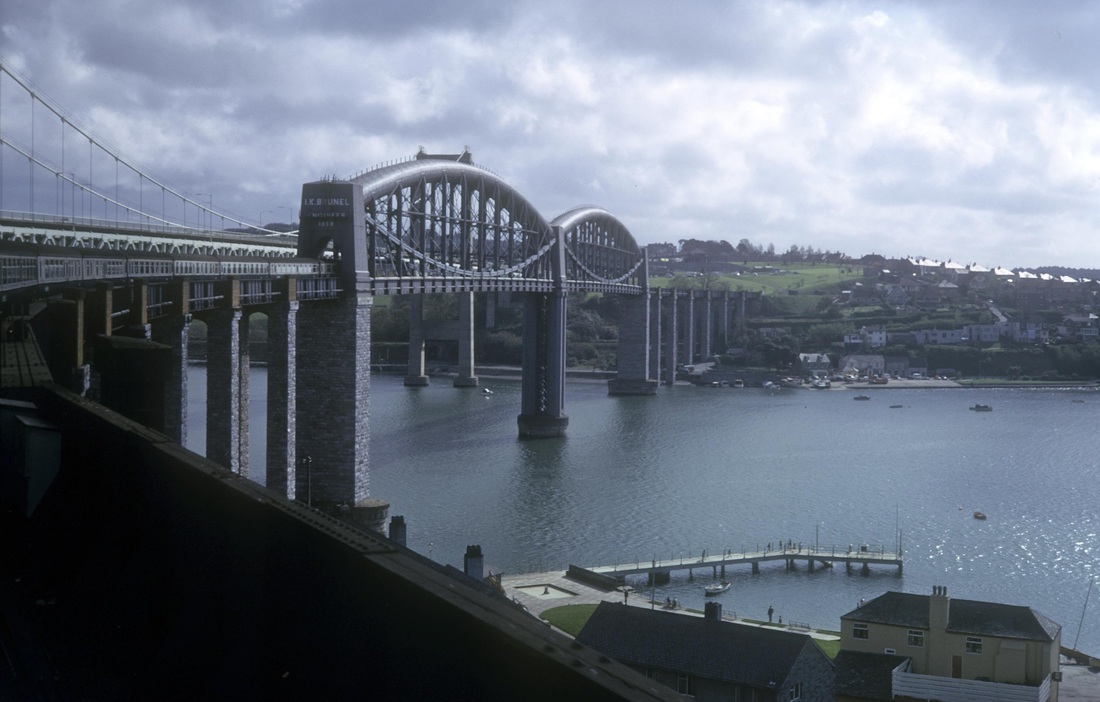
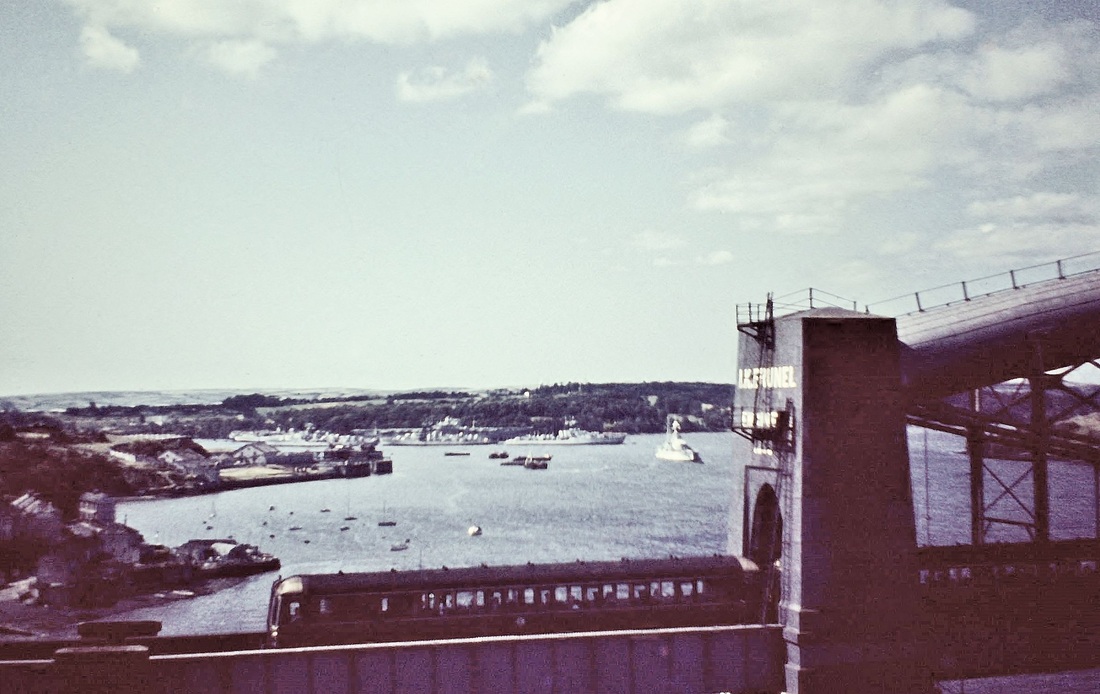
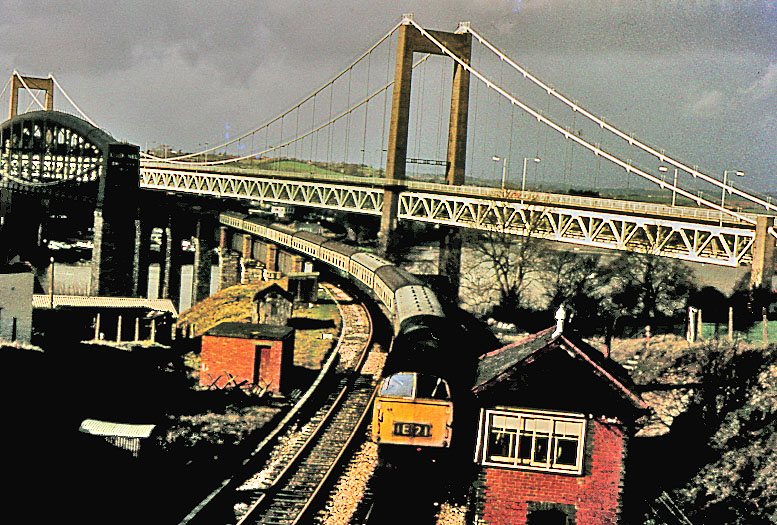
The Royal Albert Bridge - a view from the Devon side long before the road bridge which was opened on the 26th April 1962. Road traffic was carried by a ferry which landed on the slipway to be seen close by the foot of the bridge on the Cornwall side, the landing on the Devon side was somewhat to the left way off this picture. Postcard from the Paddy Bradley Collection.
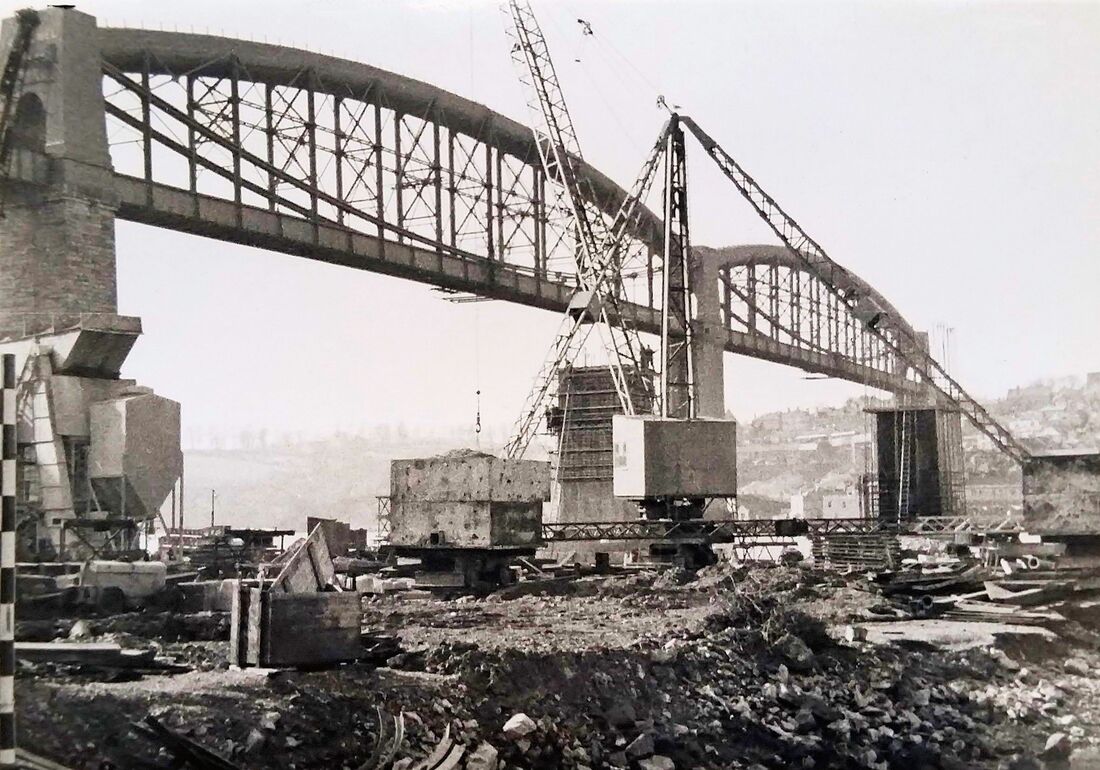
From the collection of the late David Bartlett of Bradford-on-Avon (Copyright). A b/w photo taken during the autumn of 1959 showing early preparatory works underway on the foundations of the Tamar Road Bridge which took just two years to build. Construction started in July 1959 and the bridge opened to traffic in October 1961 with a formal ceremony by Queen Elizabeth the Queen Mother taking place the following April. The Tamar Rail Bridge of course celebrated its centenary in 1959 hence David's visit.
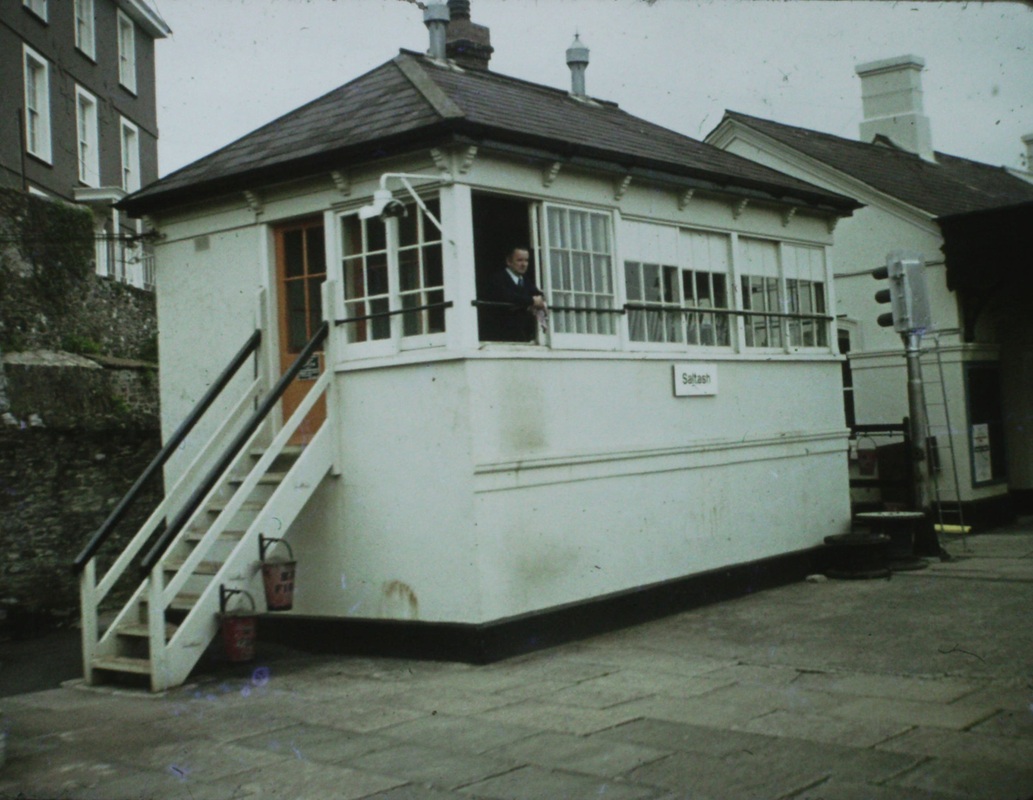
Guy Vincent.
'Gotcha', a lucky shot, a service on the Plymouth to Exeter (via Okehampton) line on the 3rd July 1964
Copyright Sid Sponheimer
Saltash bridge, a Penzance to Paddington train crossing 12 April 1974 Copyright Roger Geach
A remarkable low level view from the Cornish side taken on the 2nd December 2019. Copyright Mark Lynam.
From an e-mail sent by Peter Bragg - "Later father was signalman in a box one end of the Royal Albert as Monitor HMS Roberts was towed to a berth opposite Ernesettle, her topmast touched and bent back as she passed under, all traffic was stopped until an inspection revealed no structural damage, but paint marks.
Then there is the old saw tale that only one of H M Warships passed over the Royal Albert Bridge instead of under it!!
Then there is the old saw tale that only one of H M Warships passed over the Royal Albert Bridge instead of under it!!
This is HMS Roberts - picture kindly supplied by Sid Sponheimer
A bit of World War Two history, now it can be told.
During the war a temporary 'level crossing' was laid across the Royal Albert Bridge such that military road vehicles could use the bridge, possibly in the event of the ferry being put out of action. Courtesy of Tony Cooke we now have a copy of the works order for the removal of this decking after the war.
During the war a temporary 'level crossing' was laid across the Royal Albert Bridge such that military road vehicles could use the bridge, possibly in the event of the ferry being put out of action. Courtesy of Tony Cooke we now have a copy of the works order for the removal of this decking after the war.
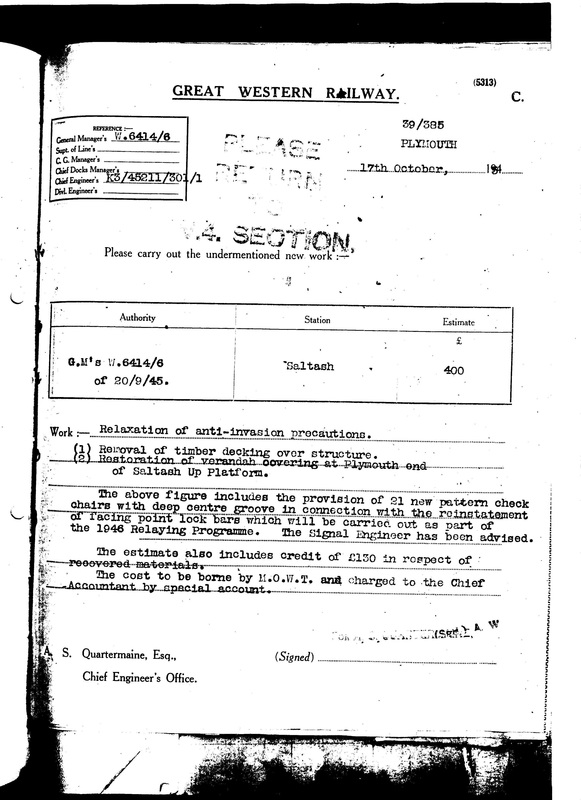
A copy of the works order for the removal of the timber decking which had been laid across the Royal Albert Bridge during World War 2 to permit the use of the bridge to provide a crossing point for military road traffic. From the Tony Cooke Collection.
Saltash – cab view from Royal Albert Bridge August 1973 Copyright Trevor Tremethick. This fine picture shows the probable exit from the decking on the Cornish side. Up the platform ramp then exiting through the position occupied by the 'replaced' building into the tarmaced parking area outside the station, thence up the hill towards the Baptist Chapel.
Saltash bridge, fresh paintwork, lovely low light and a dark cloudy background, the 1256 Penzance - Paddington heads for Dovon on the 2nd April 2017 Copyright Chris Harvey
The foreshore at Saltash is dominated by the 'Union Inn; which dates from the days of Drake and Raleigh. Here we see 43163 rolling the 11.00 Penzance - Paddington out of the Duchy towards Plymouth. 2nd April 2017 Copyright Chris Harvey
An unusual view taken from the corridor window of the back coach of the return working of the day stock from the night Riviera working back to Penzance from Exeter. 15th August 2015 Copyright Roger Winnen
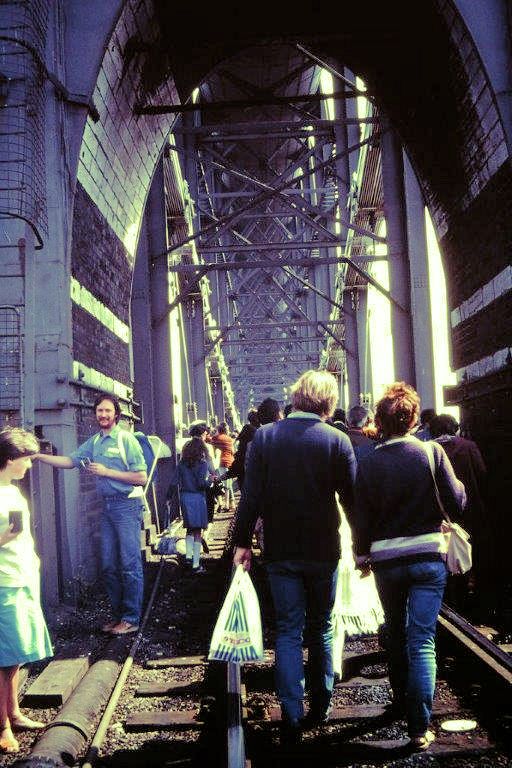
Flashback to 29th April 1984 when passengers on a 'Rusty Eplett' special were allowed to walk across the Royal Albert Bridge. Andrew Jones, the chap facing the camera carries his daughter 'Siena' in backpack, perhaps the youngest person ever to have been 'walked'' across the Royal Albert bridge! Copyright Andrew Jones
Road traffic on the Royal Albert Bridge
During WWII longitudinal sleepers were placed between the rails over the RAB to allow military road vehicles to drive across in emergency. These were signalled as a train using a pilotman and token. Were any such moves ever made? Quote John Roberts
During WWII longitudinal sleepers were placed between the rails over the RAB to allow military road vehicles to drive across in emergency. These were signalled as a train using a pilotman and token. Were any such moves ever made? Quote John Roberts

Beautifully illuminated - A Tribute to the great engineer Isambard Kingdom Brunel. 15th August 2015 Copyright Roger Winnen
Saltash W55015 + HMS Roberts 3rd July 1964 - Copyright Sid Sponhiemer
A Peak crosses over into Devon. Copyright Sid Sponheimer
Saltash bridge 28th June 1965 (An unual angle from under the road bridge) Copyright Geoff Matthews
Saltash Royal Albert Bridge Peak 46-005 draws a vans train into Devon 20th February 1976 Copyright Sid Sponheimer
Saltash Royal Albert Bridge 1948 Western Lady draws an up service off the bridge and will soon be accelerating away from the 15 MPH limit . 19th April 1976 Copyright Sid Sponheimer
Pictures taken by Graham Mann. Network Rail Programme Manager during re-ballasting operations of the Royal Albert Bridge in 2013.
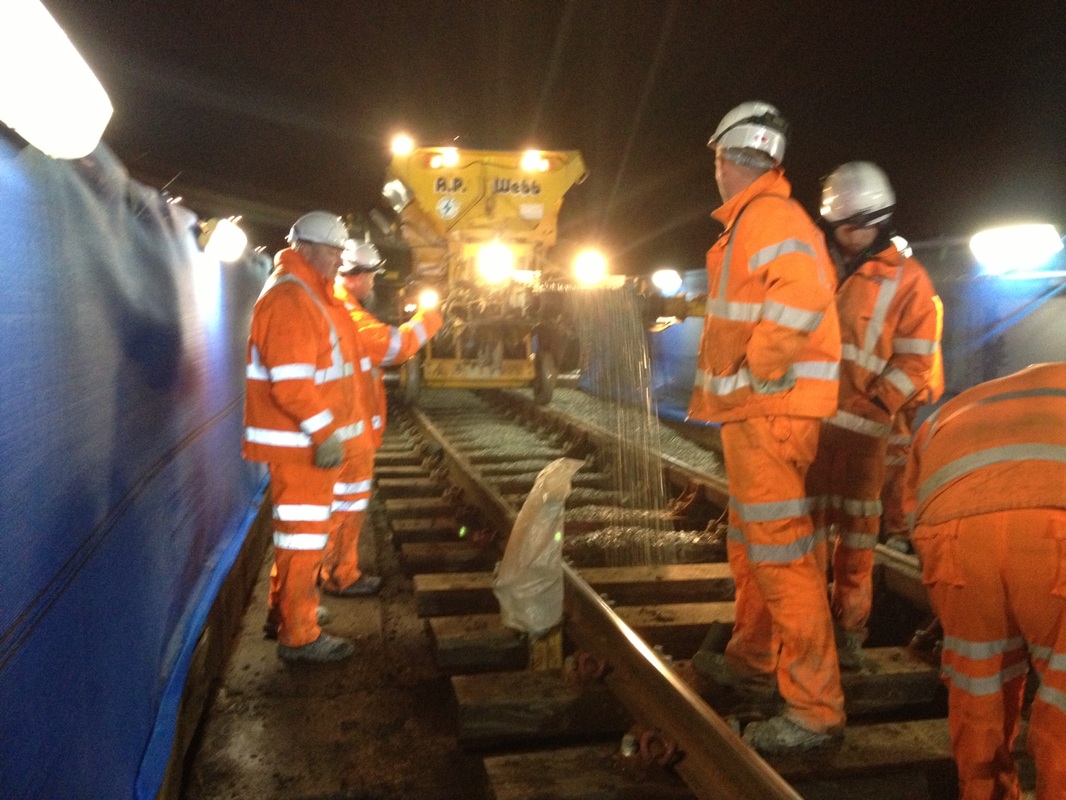

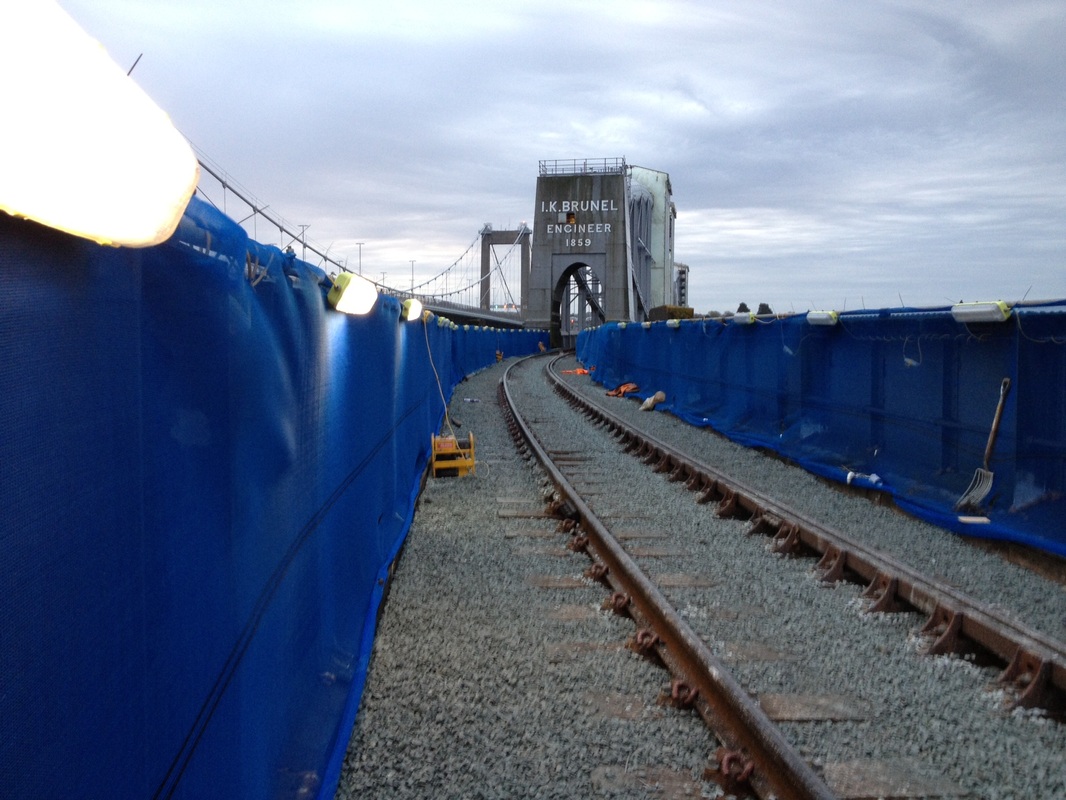

140809q The Devon Portal is now coming into view. Copyright Roger Winnen During 2013/14 the Royal Albert bridge was extensively repainted and as the summer 2014 draws on the wraps are slowly coming off.
This loco was one of the class built at Crewe. Copyright John Cornelius
This is the back cover of a new book by Bernard Mills. This will shortly be available at the CRS bookstall at meetings or direct from the publishers It is like the last one published by Pen and Ink Publishing.
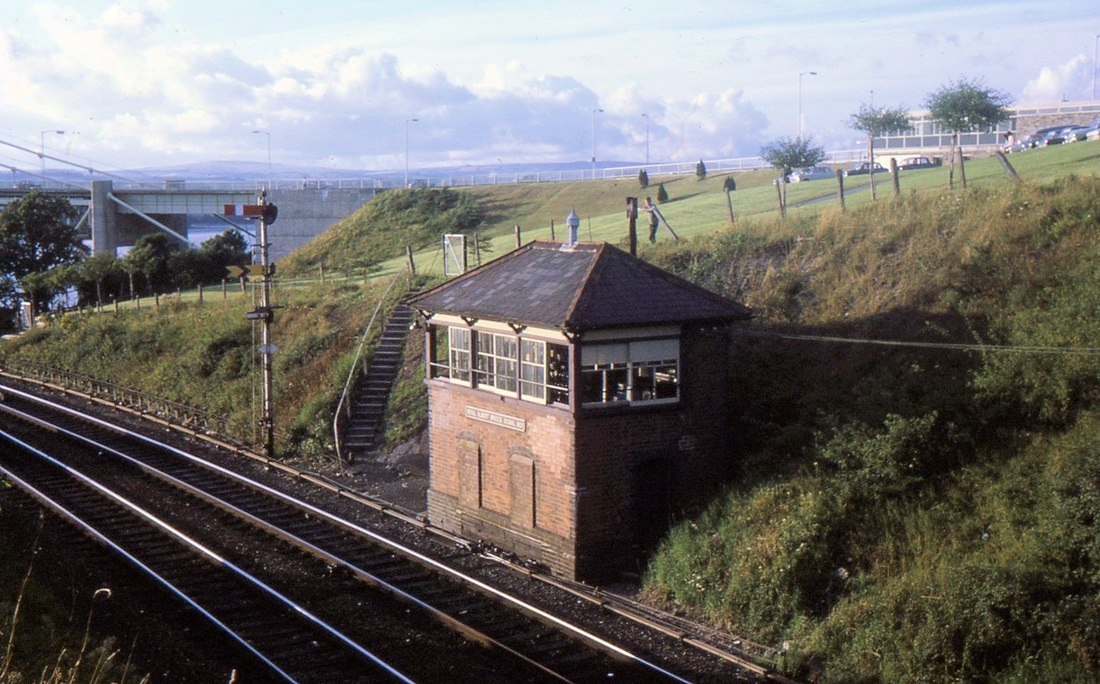
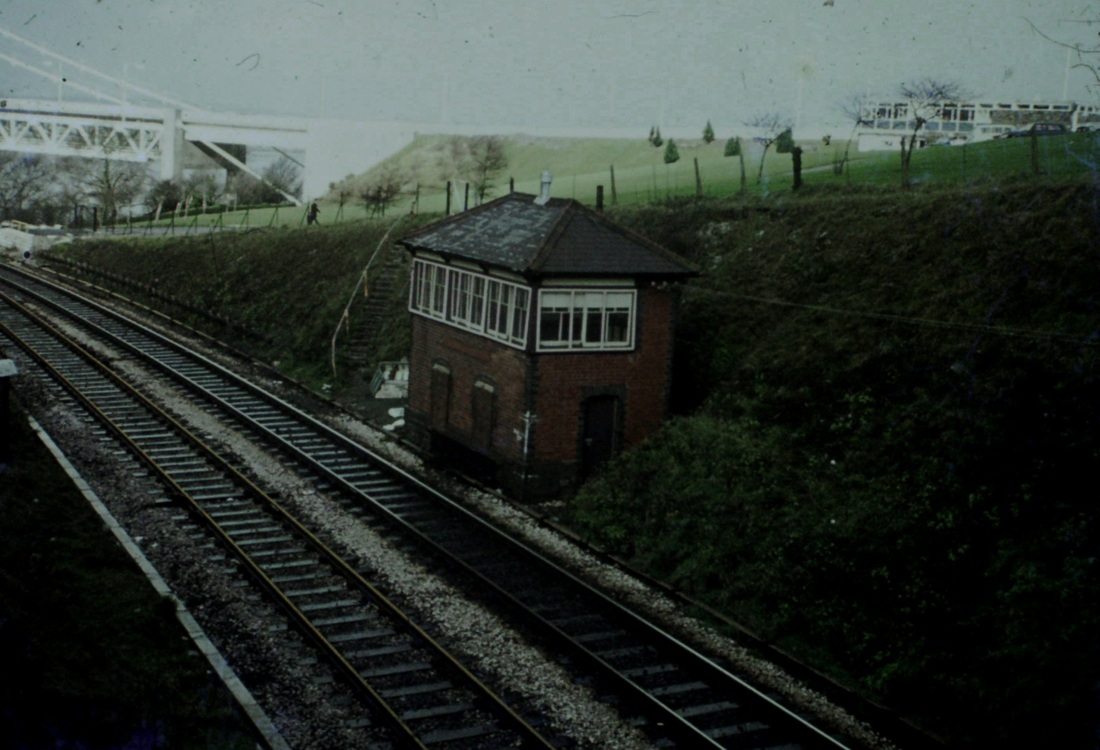
Sunlight illuminates the front of the Royal Albert Bridge signalbox. It's August 1969. It would seem that there has been a substantial repair to the brickwork on the right hand side below the window. Copyright Mike Roach
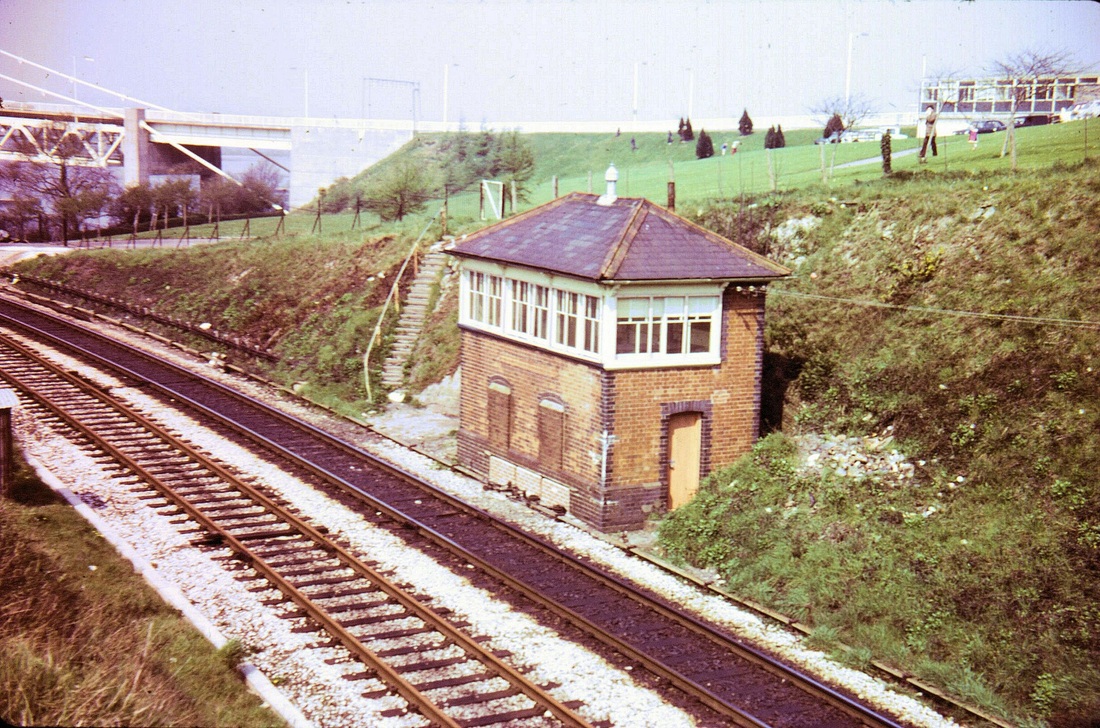
The Royal Albert bridge Signalbox in 1974. The former down line was taken out of use on the 2nd July 1973 hence it is very rusty. The box, has, of course lost its nameplate. Yet in 2019 the box is still there. Copyright Chris Osment
1026 Western Centurian creeps up to pass Royal Albert Bridge Signalbox on the 10th August 1972. Token working over the bridge ended in 1961. After that date, the interlocking was electrical between Saltash and RAB box. The box closed on the 2nd July 1973 when the line was singled back to just beyond Bow String bridge. Copyright Ron Kosys.
D1021 Western Cavalier going in the right direction one might say, entering Cornwall. Saltash June 1970 Copyright David Tozer
Before we finally leave the bridge Clive Smith sent in this almost mid-summer picture of that famous structure. 7438 and 50038 Formidable cross the Royal Albert Bridge on a glorious midsummer evening with the 18.15 Penzance to Bristol TM on the 14th June 1983. Probably not best to be pointing a camera westwards late evening but thankfully the low sunlight wonderfully illuminates the famous bridge and the train.
Copyright Clive Smith
A feature of 2018 and of several summers in the past has been the working of the day coaches from the overnight sleeper on a special run from Penzance to Exeter and back. On a particularly nice day- the 23rd June 2018 the loco 57 605 and coaches cross the Royal Albert Bridge - the time is 12.20. Copyright
A pair of Bubble Cars passing the former Royal Albert Bridge Signal Box. Copyright Roger Winnen 28th July 1990
Ron Kosys focusses on the St Budeaux end of the Royal Albert Bridge on the 10th August 1972.
Peak 084 rolls off the Royal Albert Bridge with an up freight on the 10th August 1972. Copyright Ron Kosys. Further advice from Tony Hill ;- it is working the midday Penzance to Crewe 4M05 Parcels and Perishables service ..note the wide variety of
pre- nationlisation and BR parcel vans; thought to be, from Engine:-
LMS BG, three SR PMVs, BR MKI BG, LNER six wheel Stove, BR BG, LMS BG, then possibly a Departmental bogie coach, BR CCT, BR BG, and an SR BY Bogie van. Load 12. It all goes by road now !
1026 Western Centurian passes St Budeaux signalbox and heads for Cornwall. 10th August 1972. Copyright Ron Kosys
The following two pictures are off the same negative the first in black and white the second colour. Obviously taken before the singling of the line between the RAB and St Budeaux station. Although not obvious from the first picture it is obvious from the second colour view that the down loop has not received much traffic - the rails are definitely rusty. Well done in your editing Ron. The down main line and the down loop were taken out of use w.e.ef. 2nd July 1973.
1059 Western Empire Tamar Bridge 10th August 1972 1130 Paddington - Penzance. Copyright Ron Kosys
1059 Western Empire Tamar Bridge 10th August 1972 1130 Paddington - Penzance. Copyright Ron Kosys
70000 and 47519 cross the Royal Albert Bridge and leave Cornwall on the 12.19 Penzance to Wolverhampton on the 21st October 1995. Copyright Paul Barlow
Many thanks Ron
Clive Smith focusses on the St Budeaux end of the Royal Albert Bridge on the 14th October 2021.
There has been a substantial vegetation clearance between the old signal box and the bridge in recent weeks. On my visit mist had covered the river and was just burning off at 10.15. Two 2+4 Castle HST sets were due within fifteen minutes of each other so this was ideal. There's still a few too many trees and I get the impression the clearance has taken place to provide a storage area for materials for rail bridge work. Contractors have been working on the road bridge for aeons and they have metal storage units parked in the bottom section of the car park which detracts from another potential photo location further to the right of this position.
Regards, Clive Smith
Regards, Clive Smith
43194 and 43041 form the 08.50 Penzance to Cardiff on the 14th October 2021. Copyright Clive Smith
43 005 brings up the rear of the 06.55 Gloucester to Penzance with 43 016 on the front. 14th October 2021. Copyright Clive Smith
Many thanks Clive.
Saltash Passage Present and Past
Clive Smith
N.B. Article dated 20th August 2018
As the six month countdown begins for the end of HSTs on the Londons I took the opportunity to record their crossing of the Royal Albert Bridge from the Devon side; a location I had not visited for 35 years to take pictures. The grey iconic bridge was brighter than the grey skies and the even greyer Tamar as the sun remained resolutely hidden behind clouds, a far cry from a few weeks back. At least the two services produced 'FGW Dynamic Lines' liveried examples to brighten the scene. I suspect the IETs would look quite striking in this livery.
How the location has changed since 1983. Trees have obviously grown but so too have the properties opposite St Budeaux Junction box with new builds and large extensions proliferating, a reflection of the property boom and stunning views. The Tamar Road bridge itself has changed since 2001 with widening and strengthening with extra lanes added. The 1983 trackside view of the two bridges from the bridge lower car park is now difficult to obtain with a major redevelopment of the bridge offices currently taking place. Car parking is temporarily severely restricted.
Regards, Clive Smith Many thanks Clive.
(1) 43144 leads the 10.43 Penzance to Paddington on 21st August 2018. Copyright Clive Smith.
(2) 43097 leads the slightly late 09.06 Paddington to Newquay just five minutes later . Could it be only sixteen days left before HSTs cease operating to Newquay ? Hopefully Cross Country continue their summer Saturday service in 2019...but don't bank on it . Copyright Clive Smith.
(3) 45122 with the 13.45 Penzance to Bristol TM on 4th April1983. Copyright Clive Smith
(4) 50014 Warspite with the 09.20 Liverpool to Penzance on 4th April 1983. Copyright Clive Smith.
The RAB Lost in the mist. 09.02 29th March 2019. Copyright Clive Smith
By 09.49 the mist has blown almost away but still forms a backdrop up the estuary. 29th March 2019 Copyright Clive Smith
On a beautiful 23rd April 2016, 66027 is captured on the rear of the 1231 Plymouth - Penzance Belmond British Pullman, easing off the bridge and entering Cornwall. Copyright Chris Harvey, Bodmin
RAB Saltash 1997 Up Silver Bullets head east. Copyright Andrew Thompson
------------------------------------
A pair of Bubble Cars on a service to Cornwall having crossed over Bow String Bridge is approaching the Royal Albert Bridge on the 28th July 1990. Copyright Roger Winnen
The odds of getting this shot are a chance in a million picture , or something like that. The bracket signal tells us that the GW line was also still double track at this time and consequently there are two 'bow string' bridges. This was singled and the down loop taken out of use w.e.f 2nd July 1973, also the former Southern line on which Andrew is travelling was singled w.e.f. 7th September 1970. Picture dated 1969, Copyright Andrew Jones.
140809r Crossing over the former Southern Main Line west of St Budeaux. Copyright Roger Winnen. Between the end of the Royal Albert bridge and St Budeaux the was until 2nd July 1973 double track, prior to this two virtually identical 'bow string bridges' crossed the former double track 'Southern' main line at this point. The Southern was reduced to single track in September 1970.
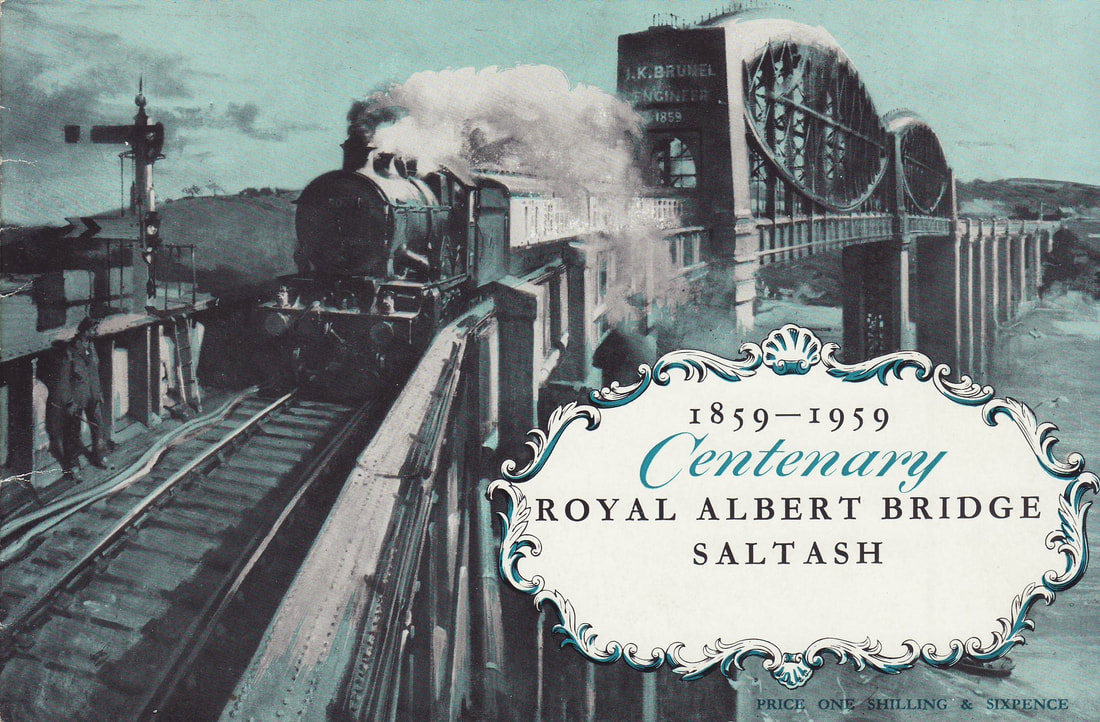
A wonderful and very powerful picture from the front cover of booklet produced to celebrate the Centenary of the Royal Albert Bridge.
St Budeaux Ferry Road
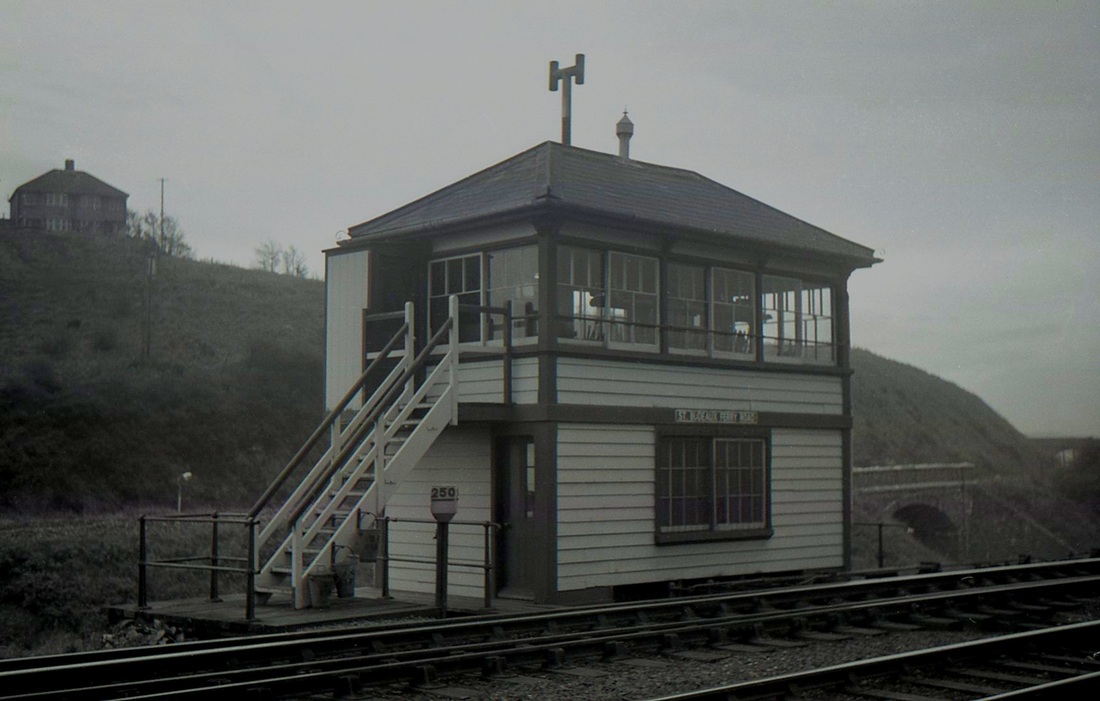
The now preserved5029 Nunney Castle runs into St Budeaux Ferry Road in 1960 - Copyright Sid Sponhiemer
6438 on the Saltash Shuttle pulls away from St Budeaux Ferry Rd for Plymouth on the 22nd August 1962 (passengers can be seen walking up to the bridge). Copyright Sid Sponheimer. The bracket repeater signal just in the picture on the left hand side is of interest. Until 2nd July 1973 the main line was double track as far as the Royal Albert Bridge and there was a down loop situated between Bow String bridge and the RAB. The signal refers to the down main and the loop. A down train is signalled through on the main line.
St Budeaux Ferry Road 1960 A single car 'bubble car' was insufficient for the traffic and had to haul an additional coach - no auto working here - the DMU had to run round at Plymouth - Copyright Sid Sponheimer Note the buildings both on the up and down sides, and in the background the Southern Railway Goods shed on 'the other line'.
140809r St Budeaux Ferry Road Station. Copyright Roger Winnen. This picture was taken as the summer Saturday loco hauled train passed through the station, hence the gentleman with a camera on the down platform. Notice also the repeater signal for the entry to the single track which lies just beyond the bridge.
6C97 at St Budeaux (Ferry Road)
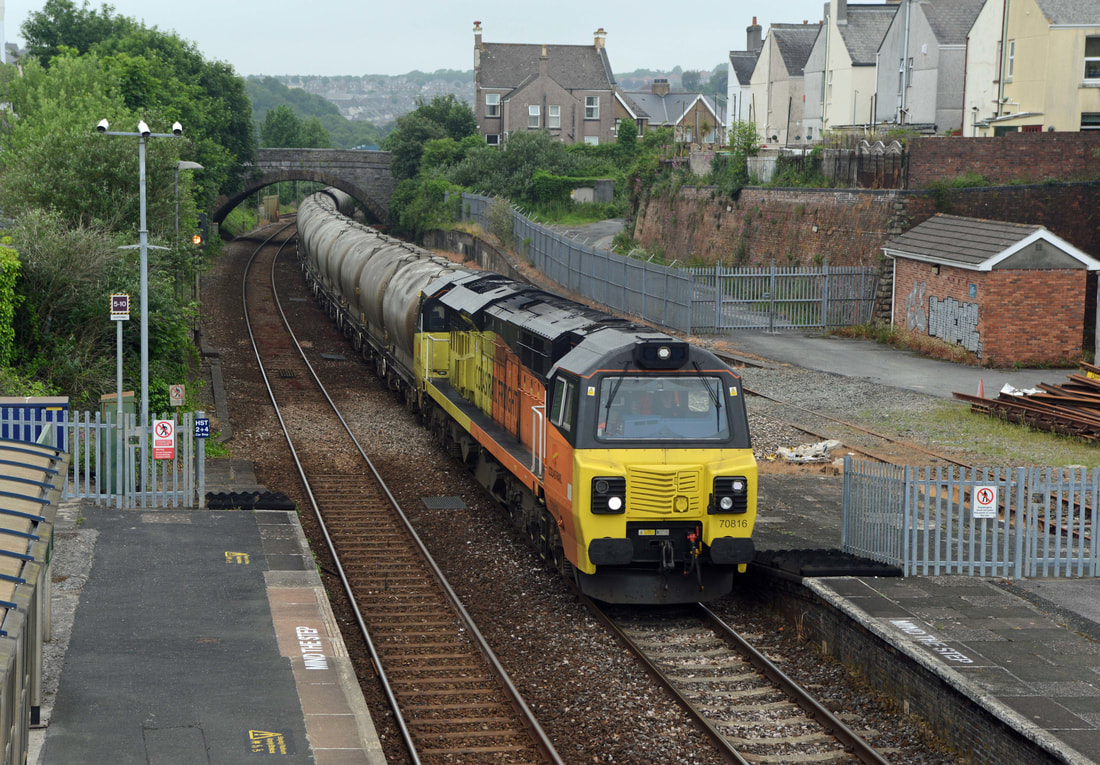
Colas Rail 70816 top and tailed with 70812 headed to Cornwall from Westbury with the RDT (Rail Delivery Train) as 6C97 for a rail drop at Shillingham between Saltash and St Germans over two nights, pictured is 70816 at St Budeaux Ferry Road awaiting the possession to be given up to return to Westbury on 23rd August 2020 - Copyright Alan Peters
St Budeaux Ferry Road Signalbox & Junction
A 1960's shot looking across the western to the Southern where we see a 'West Country' on an up service heading for Exeter and maybe Waterloo. Copyright Sid Sponheimer
73118 with a short engineers train. 29th September 1964 Copyright Sid Sponheimer Note the original line for the Southern route already appears out of use - see the warning notices on the track.
The same train proceeds on to join the WR main line towards Plymouth. Note the Bull Point branch bearing away to the right. Copyright Sid Sponheimer 29th September 1964
At the same location 80037 heads a service on to the Southern line bound for Okehampton and Exeter. 29th September 1964 - Copyright Sid Sponheimer
St Budeaux Jct a D800 pictured here is probably on the 11.30 Brighton Plymouth in 1964 Copyright Sid Sponheimer Note the pile of dismantled track in the background.
A picture full of interest. A smart timber signalbox, the milepost, the fire buckets and the 'H' type chimney. Behind lies the Southern Main Line heading, to the right, towards Ford and Plymouth, Wolseley Road bridge is in situ, now just a memory. Picture dated October 1965 is by Mike Roach - Copyright
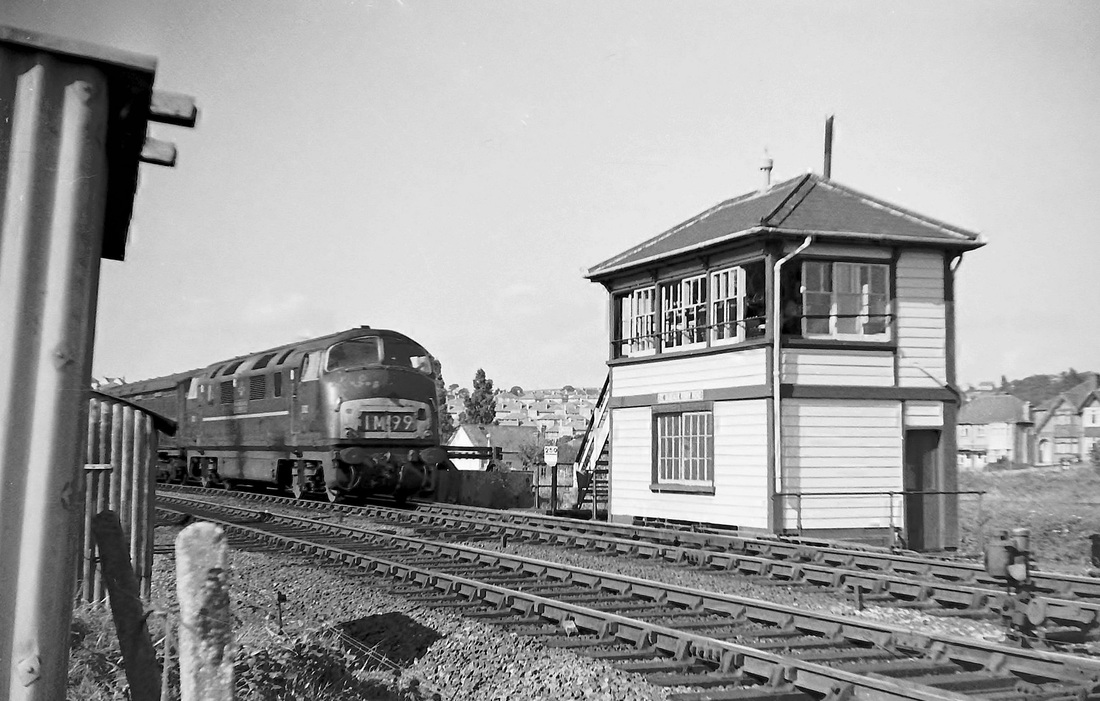
A 'warship' on an up service passes St Budeaux Signalbox in 1964. Copyright Sid Sponheimer.
A most interesting picture by Sid Sponheimer feauturing St Budeaux Ferry Road Signalbox, and also the entrance to the Bull Point branch. Note the gate across the branch metals and also the signals specifically from the Bull Point branch, these would have permitted trains from Bull point to go either on the Southern or Great Western lines. Also note the falling gradient of the Bull point branch away towards the waterside terminus. As can be seen from the main line signals this train is destined for Cornwall. Copyright Sid Sponheimer.
A down freight headed by a class 41 comes off Weston Mill viaduct and heads for St Budeaux Junction, The original alignment here was at a lower level to cross Brunel's original timber viaduct which lay slightly north of this replacement structure - the replacement took place in 1903. Weston Mill viaduct spanned Weston Mill Lake, which has relatively recently been infilled and provides another road access to the Naval Base. Again, until recently, there was a public footbridge alongside and part of Weston Mill viaduct, a handy short cut now closed on security grounds. Copyright Sid Sponheimer
An up passenger working headed by a class 41 Warship meets a down Hymeck hauled freight - the Bull Point branch can be seen in the foreground. Copyright Sid Sponheimer
A 63XX with six coaches approaches St Budeaux Junction with a service for Cornwall. A lovely action shot - note the gangers busy trimming the grass on the embankment sides, still some way to go. It looks as if the nearest ganger is using a sythe. This picture taken in 1964 by Sid Sponheimer.
Dear Keith,
I can give an approximate date for Sid's picture: The signal is St Budeaux down home with fixed distant for Royal Albert box. The lower arm reads across the wartime emergency connection to the Southern. The distant signal on the doll is for St Budeaux Victoria Road. The picture therefore pre-dates the closure of the SR line into Devonport (1964).
The D600 warships were notoriously unreliable and the decision was made (after many embarrassing failures) to confine them to west of Plymouth where, I suppose, it was thought they would do less harm.There was a rule in the early diesel years that failures could not simply be shunted into sidings ( for PR reasons, one supposes) and I recall seeing one of them shunted into Camborne goods shed after failing!
I remember seeing the whole class (I think) lined up for scrap at Laira.
Roy Hart
What a smashing colour shot from Sid Sponheimer. They say a picture is worth a thousand words, ignoring the smart warship in the foreground cast your eyes along the southern alignment in the background, you can see it disappearing away towards Camels Head and possibly see the platforms. Also there appears to be somebody standing on the 'six foot' by the rear of the locomotive. 1964 Copyright Sid Sponheimer
Bull Point branch Just after St Budeaux Junction a short branch led down to R.N.A.D site at Bull Point. The connection with the main line received a new ground frame in 1973 but the branch has been disused and was lifted some time ago. See separate section.
The junction of the Bull Point branch with the main line. 14th July 1974 Copyright Roger Winnen
Weston Mill Viaduct
140802s A 'modern' picture taken in 2014. 43163 in Plymouth livery on what seems to be the 17.26 Newquay-Paddington. The cross over which 43163 has just reached is used for Gunnislake bound trains to cross from the down main to the up main. The Gunnislake services quickly come to a turnout leading them onto the Gunnislake branch proper. Copyright Roger Winnen

A DMU heads west off Weston Mill viaduct, the branch line into Devonport Docks is off to the right just before the road over bridge seen in the distance. A 1960's picture by Sis Sponheimer . Copyright
A Warship this time heads west towards St Budeaux with a substantial train. This view, as others in this series were taken from a footpath alongside the Bull Point Branch. Sadly this view is no long possible as the river bed has been completely covered with infill and a new entry to the Naval Base and a large car park created beyond the viaduct. Copyright Sid Sponheimer
A DMU heads west. The waterways visible in this picture have completely disappeared, and in March 2014 the construction of a controversial Waste Disposal Incinerator plant over the still waters in the immediate foreground is well advanced. Sad, but true. This picture dates from the early 1960's Copyright Sid Sponheimer
An up service steam hauled heads onto the viaduct. What a memory. Beyond, through the arches lies the Camels Head district. Copyright Sid Sponheimer
Camels Head Creek taken from the shoreline in the 1960's - this area is now totally reclaimed land with a road and the entrance to the Naval Base. 1960's The white buildings seen underneath the second span of the viaduct are at Bull Point. If it were possible to take this picture from this position nowadays the majority of properties in the background would be hidden by the Giant Waste to Energy Plant. Copyright Sid Sponheimer
140802r A view from a down train of the west end of Weston Mill Viaduct. Copyright Roger Winnen
140802q Crossing Weston Mill Viaduct. Copyright Roger Winnen (Note - there used to be a very handy footpath accompanying the this bridge - it was on the left hand side in this view - you can just see it leading up the side of the cutting in the distance. Unfortunately, though understandably, as this took the general public directly over what was once mud but is now one of the entry roads into the dockyard it has been closed, for security reasons. The branch into Devonport Docks turned off to the right in the distant shadows)

750406k Weston Mill Viaduct 6th April 1975. Copyright Roger Winnen
Hi Roger,
Good to see you at Marsh Mills the other week.
Your picture on the CRS website today of WMV stirred memories! The collection of blue portacabins and two storey building behind were the first buildings put up as site offices by the contractors Kier Ltd who had just started the huge Submarine Refit Complex job in the Dockyard. Though your pic was taken on a Sunday, I was in that building the following day having just been transferred to this contract from Head Office (I was a Quantity Surveyor then).
From my desk I could see the Viaduct’s southern end so observed what passed by, particularly the shunting moves to & from the Dockyard branch. Little did I know then, how involved I was to become with that line!
Thanks for posting it and sending me down ‘memory lane’.
Cheers,
Paul Burkhalter
Weston Mill Viaduct Shakey Bridge 50 026 Indomitable on the 14.48 Penzance to Paddington Relief 4th May 1983 Copyright Clive Smith (Viewed from the east end - the route of the Bull point branch can be discerned though the trees).
Devonport Dockyard junction at Keyham
Relaying work taking place at Keyham - the main up line is being relaid across Weston Mill viaduct under an engineering occupation. 30th November 2014. Copyright Roger Winnen.

The Dockyard connection when it was a double track junction, since converted to a single turnout. Turn out out, seen here. 8th August 1990 Copyright Roger Winnen
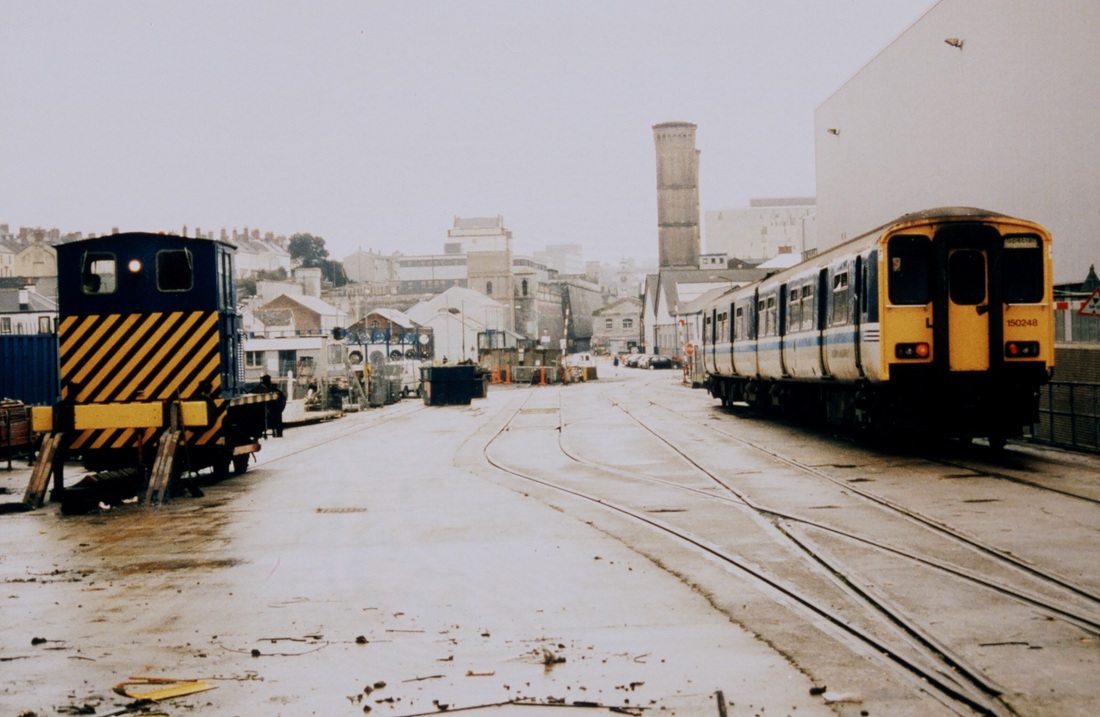
150 248 on BLS South West Rambler", disappears into the gloom under the bridge and into the base where it ran to the Exchange Sidings. No photographs were allowed inside the base with the exception of an official photograph of the DMU at the exchange sidings. This picture appears on page 92 of Paul Burkhalter’s excellent book ‘Devonport Dockyard Railway'. Recommended reading for those with a thirst for details of the once extensive Dockyard Railways. On the return run the railtour paused at Barracks Platform, before departing for Par.
11th March 1995 Copyright Roger Winnen
The junction for Devonport Dockyard taken in the 1960's' . This is particularly interesting on several counts - the run round loop on the Dockyard branch and crossover on the main line were removed in June 1973 (Ref Tony Cookes Track Diagram Section 12) . Also Camels Head Creek, before infilling, can be seen both to the left and right of the viaduct. One can imagine the Bull Point branch running from its junction with the main line on the far bank and down almost on the shore towards the left. Also notice that smashing footpath alongside Weston Mill viaduct. Copyright Sid Sponheimer
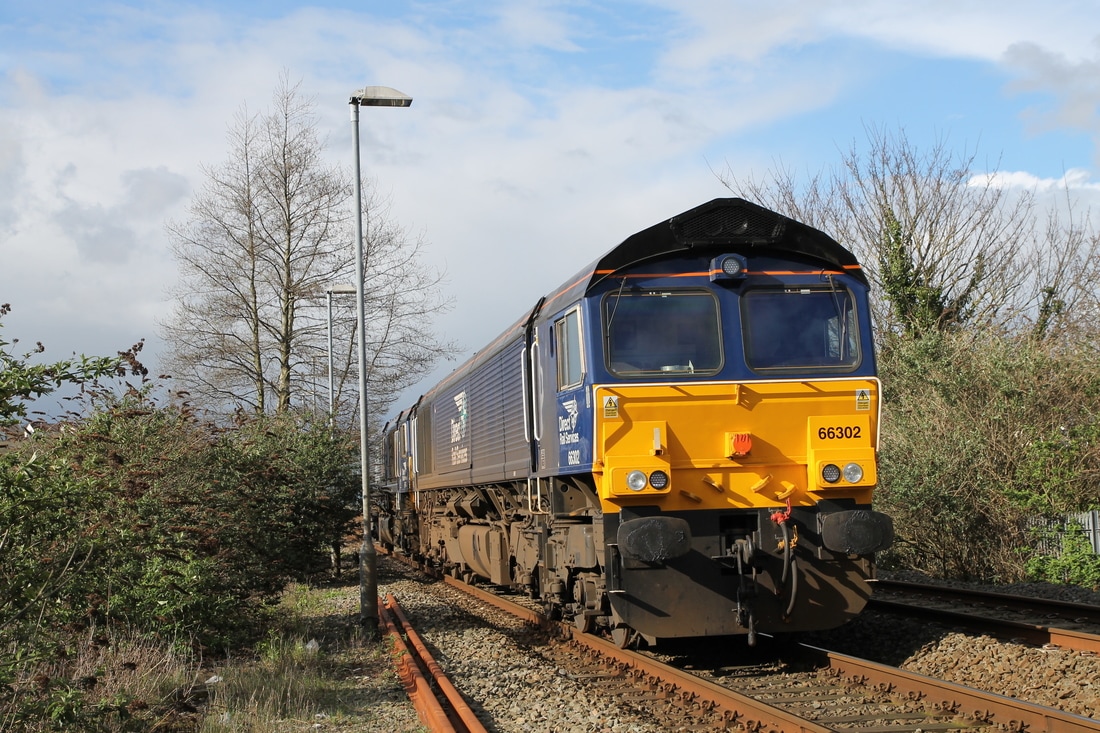
Keyham 22nd March 2017 66302 and 66341 for flask movement Copyright Craig Munday
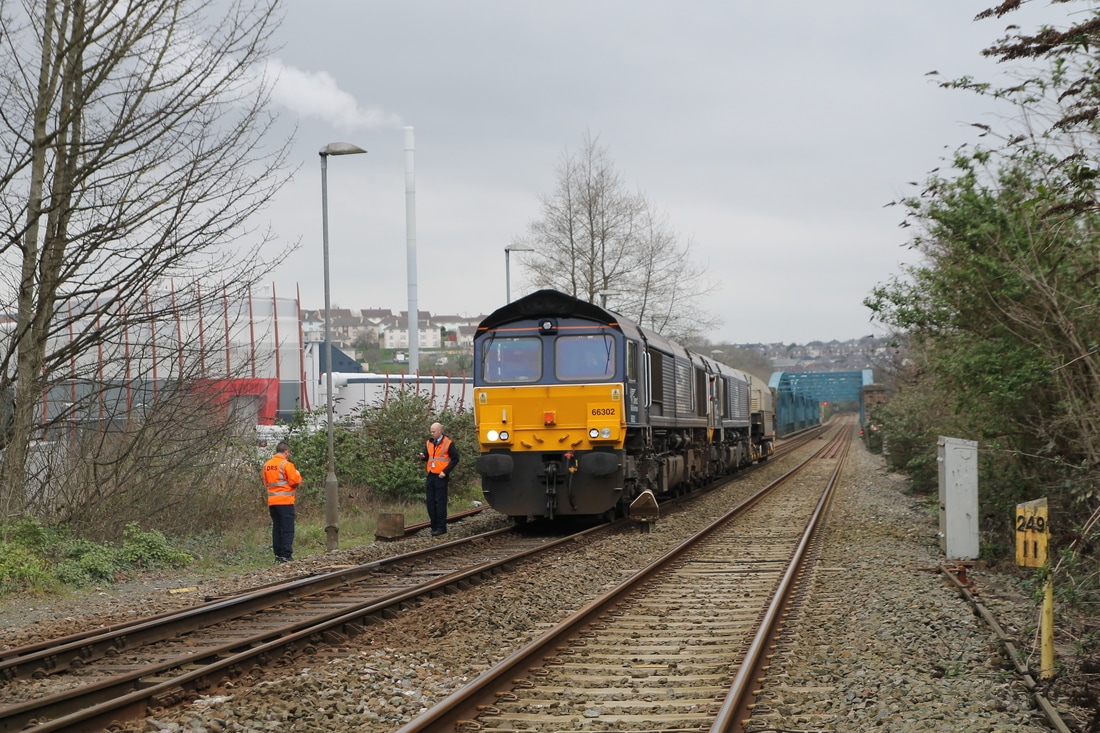
Keyham 23rd March 2017 6z63 66302 and 66341 complete with flask. Copyright Craig Munday
Additional information from Paul Burkhalter. I can add a small comment, that while the crossover to form a loop to the headshunt was removed in 1973, the headshunt itself remained in-situ (but unused) until about 1992, when I had it lifted as part of an upgrade to the branch. Every sleeper was rotten, and the rails in very poor condition, so I guess it hadn’t seen any maintenance for decades!
The footpath that went across “Shaky Bridge” was closed in the 1990s I think, as BR/Railtrack/NR didn’t want the liability of maintenance. It was finally removed when WMV was refurbed recently. Many thanks to Paul.
The footpath that went across “Shaky Bridge” was closed in the 1990s I think, as BR/Railtrack/NR didn’t want the liability of maintenance. It was finally removed when WMV was refurbed recently. Many thanks to Paul.
A pair of Class 37's head an empty train of polybulks etc to St Blazey past the Dockyard connection and on towards Weston Mill viaduct. 5th February 1994 Copyright Roger Winnen
950311 Branch Lines Society SW Rambler Railtour inside Devonport Dockyard Copyright Paul Burkhalter
Flask Traffic to Devonport Dockyard 27th January 2016
DRS Class 37s 37069 and 37609 Passing Keyham Station on route to the Royal Navel Dockyard at Devonport. 27th January 2016 Copyright Craig Munday
The flask train is seen entering the Royal Navel Dockyard. 27th January 2013 Copyright Craig Munday
The flask train is seen entering the Royal Naval Dockyard. 27th January 2016 Copyright Craig Munday
Taken from the branch into the Dockyard we see Colas 70801 passing on a crew training run to Plymouth. 27th January 2016 Copyright Craig Munday
160127e The points are still set for the Dockyard as a Class 150 Sprinter passes on a working possibly from Gunnislake. 27th January 2016 Copyright Craig Munday
1A79 the 0647 Penzance to Paddington 43xxx+43027 at Keyham on the 1st March 2018 Copyright Richard Hay
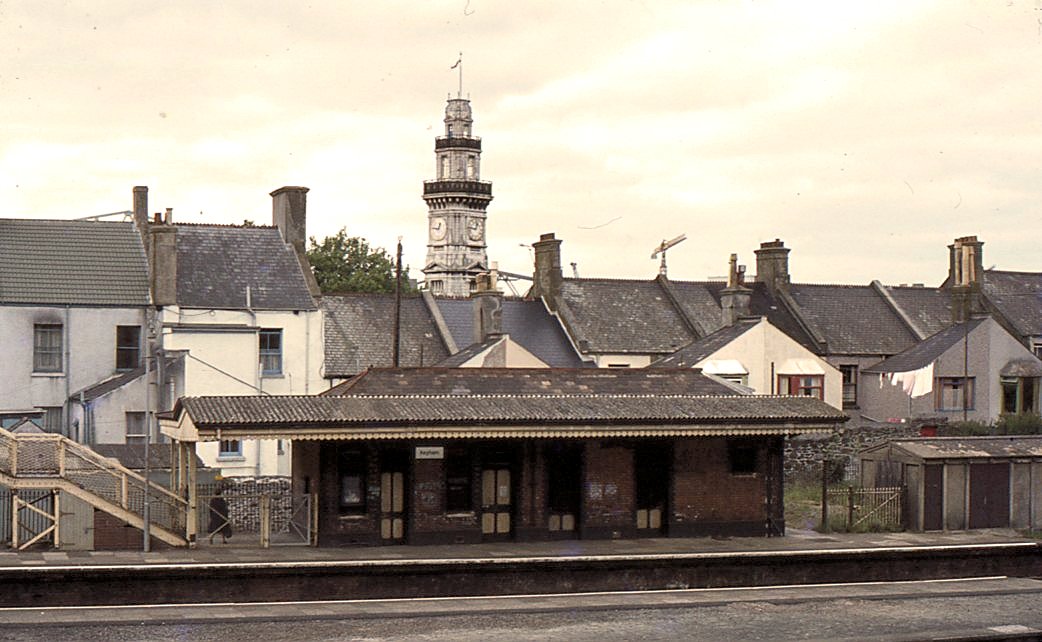
Keyham
This picture taken from a Roger Winnen News report shows the situation during an 'engineering occupation ' - the main work was taking place was the renewal of the up main line at the end of Weston Mill viaduct. The Keyham station site was once much larger than we see here - there were several loops and a shed in the goods area. For the majority of the time the one remaining loop is unoccupied and it is a rarity to see anything in the loop. It will be noted that the points in the loop have been set into the loading dock. 30th November 2014 Copyright Roger Winnen.
The remains of the old Goods Shed at Keyham, this was served by an additional loop off the goods yard tracks. A view from the footbridge. Copyright Roger Winnen 28th July 1990
Class 47 with DVT passing Keyham with Wolverhampton to Penzance. Copyright Roger Winnen 28th July 1990
750406j A Class 52 Western heads westwards through Keyham Station on 6th April 1975. Copyright Roger Winnen


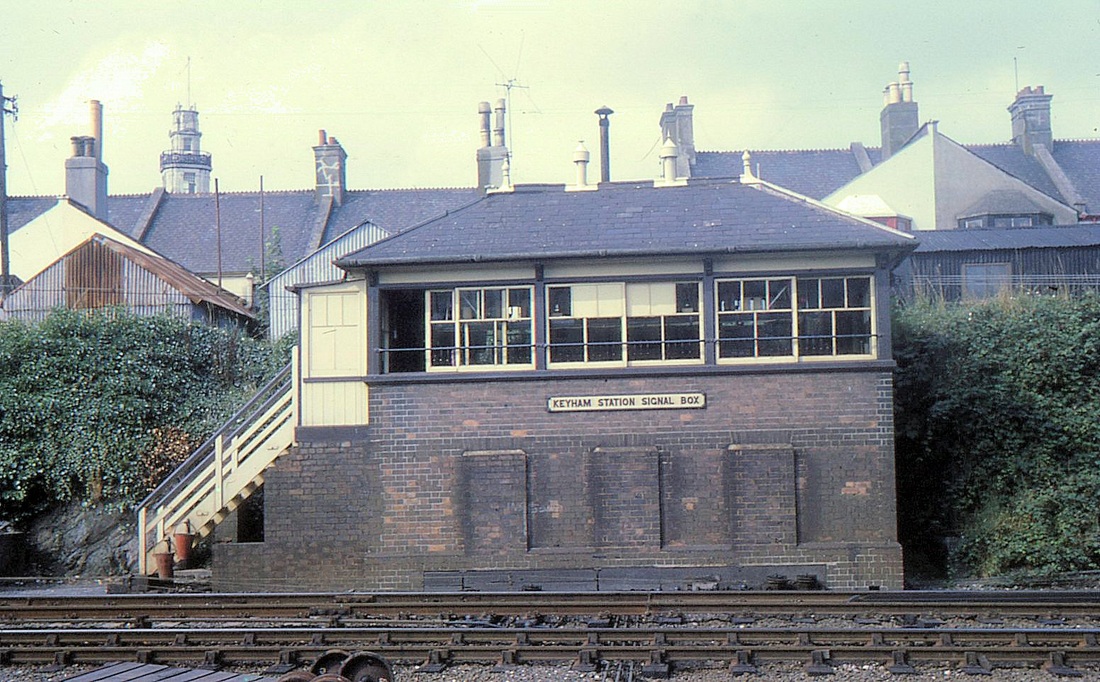
Keyham signalbox August 69 Copyright Mike Roach
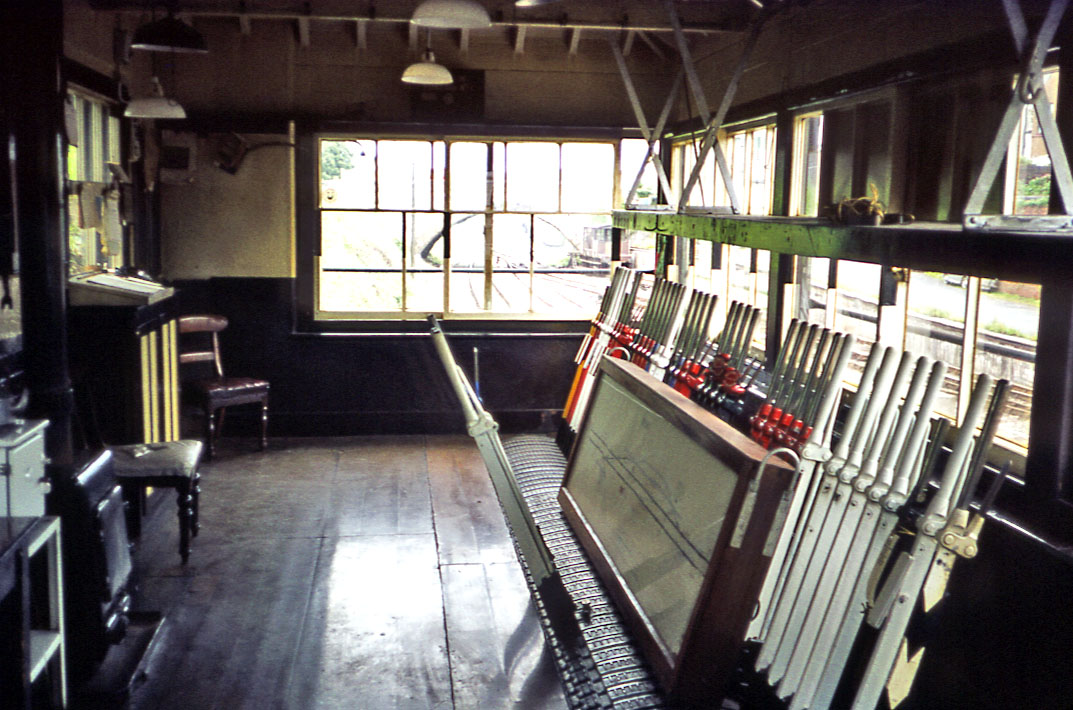
Keyham Signal Box interior 8 August 1973 Copyright Trevor Tremethick
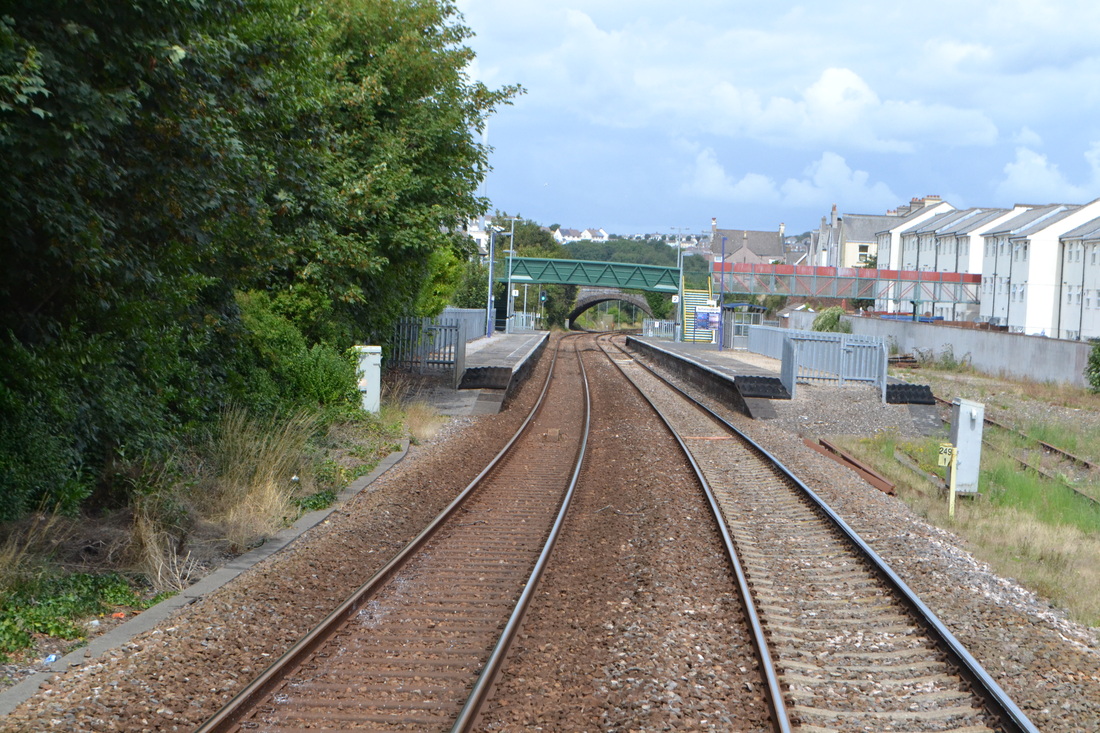
140809s Looking back at Keyham Station Station. There was once a large goods shed on the right which lay on one of three loops which passed behind the up platform. Copyright Roger Winnen
1110 Penzance-Stoke Gifford 800xxx
Keyham 28th February 2018 Copyright Richard Hay
1C76 1003 Paddington-Penzance-43094+43092 passing Keyham 28th February 2018 Copyright Richard Hay

2G69 1255 Plymouth-Gunnislake-150243 passes through Keyham. on 28th February 2018 Copyright Richard Hay
Keyham 627Y 1506 St Blazey to Exeter Riverside 66106 at Keyham 1st March 2018 Copyright Richard Hay
Keyham the 0800 Moorswater to Aberthaw Tarmac headed by 70816 on the 31st May 2018 Copyright Richard Hay
Ford Halt Closure w.e.f. 6th October 1941 due to enemy action.
140809t Ford Halt (Great Western) Copyright Roger Winnen. It is quite amazing that any trace of this Halt closed 73 years prior to this picture remains. Keyham is in the distance through the deep cutting.
2C50 the 1701 Plymouth to Liskeard formed of 150232 passes the site of Ford Halton the 1st March 2018 Copyright Richard Hay
Keyham Viaduct
Looking north at Keyham viaduct a structure 432 feet long and 90 feet high. Originally timber but later replaced by the current structure erected on the original piers which had been heightened by brickwork. This picture 5th April 2005 Copyright Roger Winnen
Crossing Keyham Viaduct which was reconsructed in 1900 and rebuilt with steel girders in 1937. ( A view from the back corridor window of the down working of the day time sleeper stock. Saturday 15th August 2015 Copyright Roger Winnen
The viaduct over St Levan Road with the 1506 St Blazey to Exeter Riverside headed by 66112 on the 31st May 2018 Copyright Richard Hay
Dockyard Halt
140809t Dockyard Halt framed by the wide arch of the road overbridge . Copyright Roger Winnen
Its the 19th August 1986. We're looking across at Ford viaduct on the old Southern line. Demolition is in progress. Copyright Keith Jenkin
Its now the 22nd August 1986 and perhaps a little more the east end of the viaduct has been nibbled away. Demolition of the viaduct proved to be a hard job as a considerable amount of concrete had been used in the fill. Copyright Keith Jenkin
140809zb Devonport Tunnel, west end. Copyright Roger Winnen
Further notes on Devonport tunnel kindly supplied by Colin Burges. On the walls near the east end of Devonport Tunnel are vertical white lines indicating the position of Ford Tunnel beneath. In Ford Tunnel are similar marks and trains can be heard overhead, just like on the Underground.
Devonport
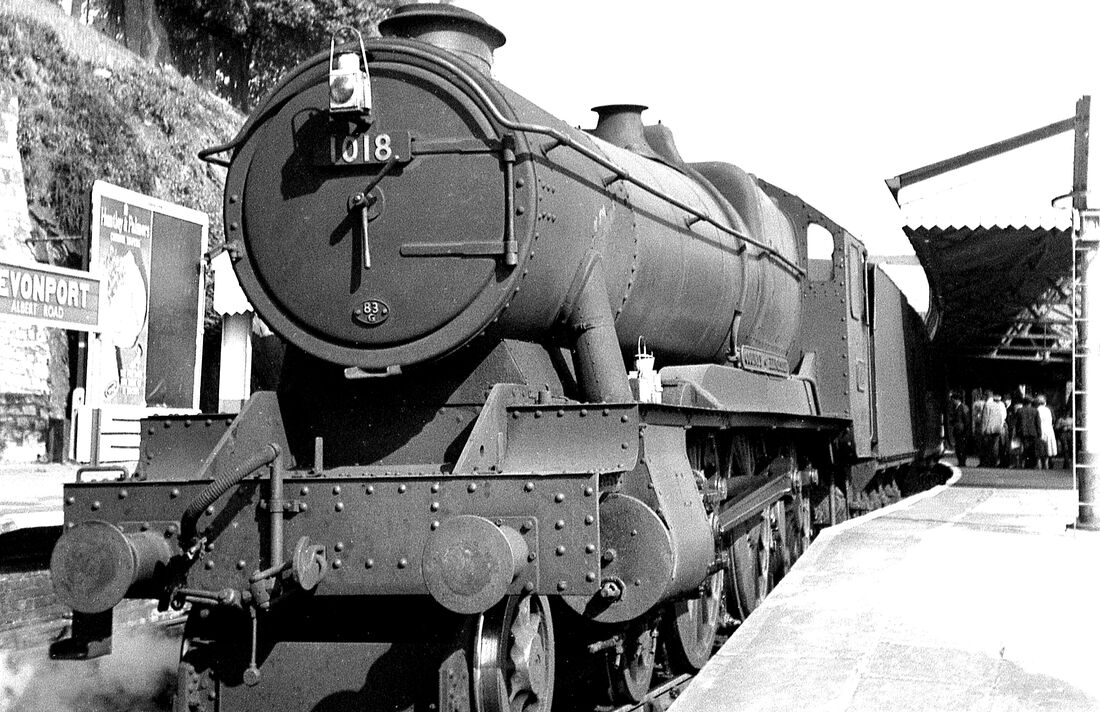
Penzance Long Rock engine 1018 'County of Leicester' calls at Devonport Albert Road on the 28th August 1959 with the 3.40 PM Plymouth to Penzance where it was due to arrive at 6.55PM. This train called at every Station other than Dockyard Halt - a total of 23 stops. Copyright Mike Roach
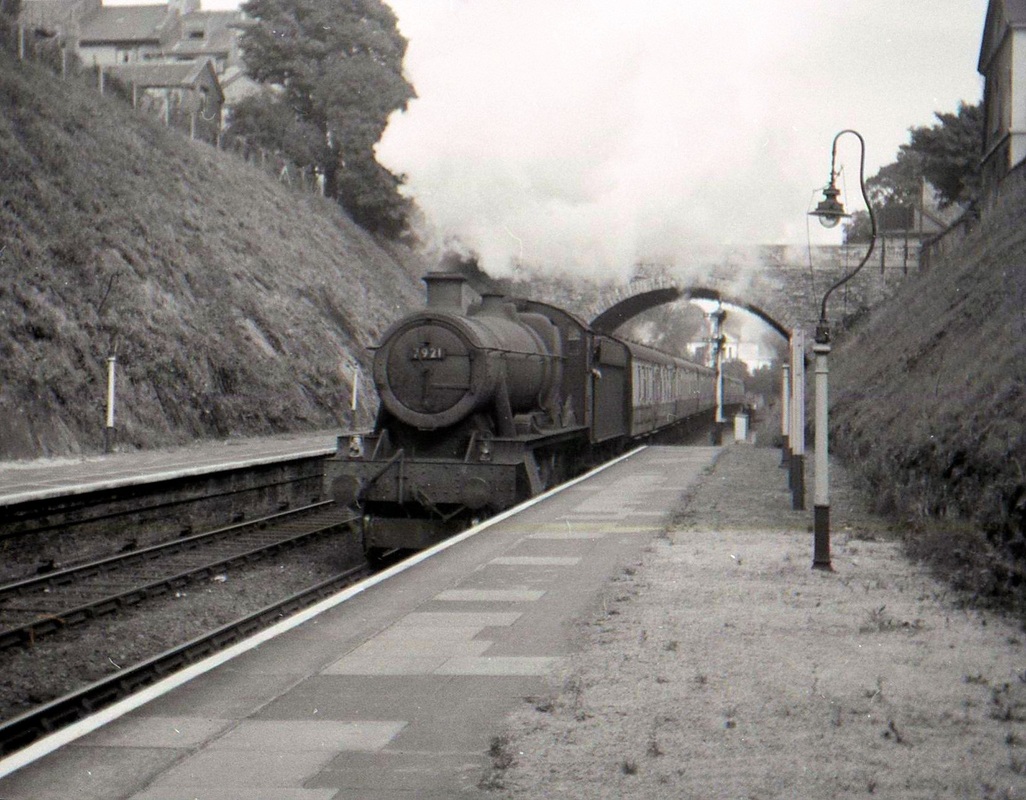
7921 Edstone Hall built 1948-1949. at Devonport 21st Sep 1959 - Copyright Mike Roach
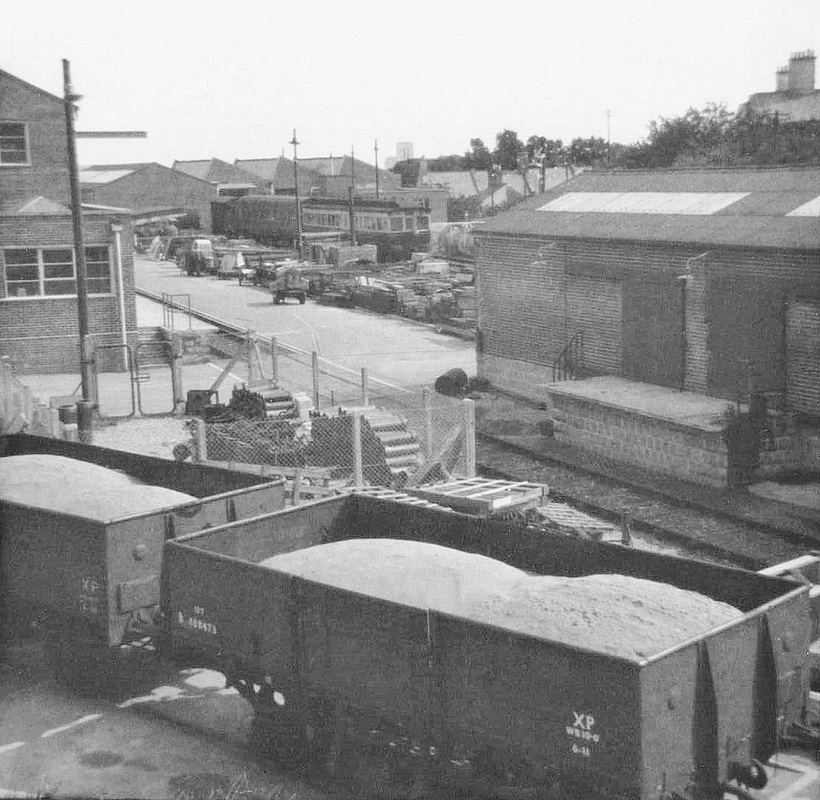
Just to the east of Devonport Albert Road a couple of lines dived off to the right under a road bridge into the Goods Yard which in fact closed 15th April 1957. However the yard saw re-use as a Civil Engineers depot. This view was taken by poking a camera over the rather high side of the bridge. The rails into the depot were removed in 1971. Copyright Sid Sponheimer
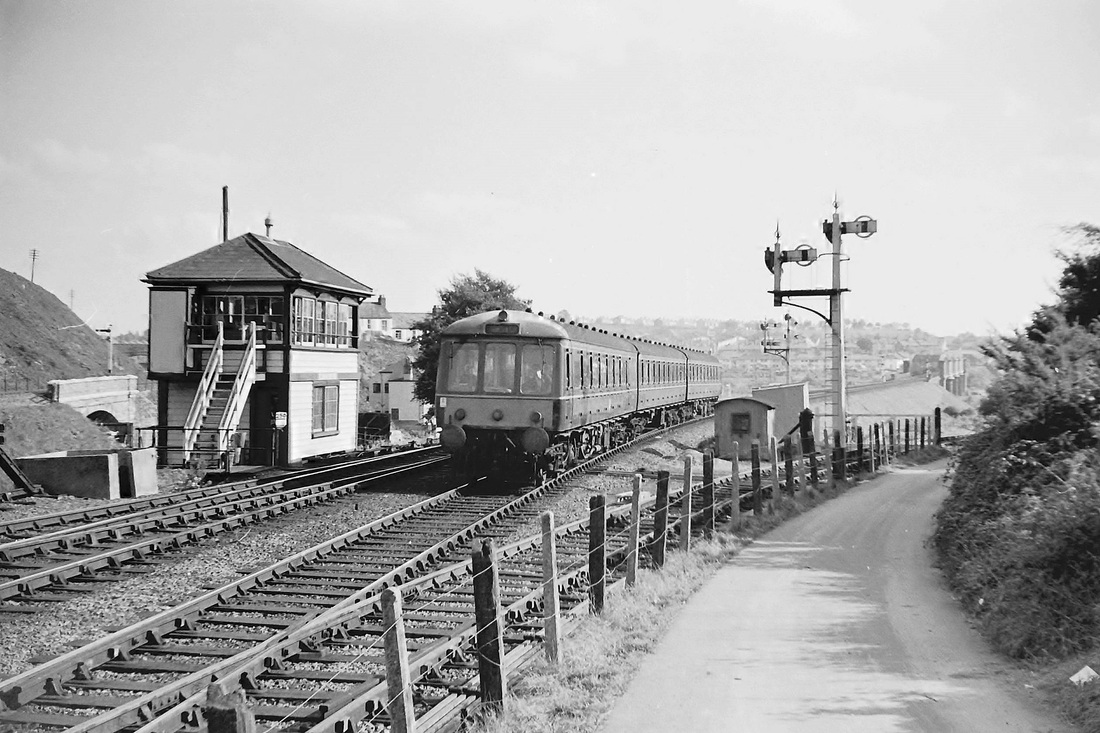
140809u Devonport Albert Road Station. Copyright Roger Winnen

47565 and 50021 At Devonport 20th June 1983. Copyright Clive Smith
Devonport Junction.
Devonport Kings Road closed to passengers 7th Sept 1964, the first picture below was taken by Mike Roach during the following week. All passenger trains for the 'southern route' were diverted over the wartime connection at St Budeaux on to the former Southern Main Line onwards to Okehampton and Exeter. The section beyond Kings Road through Ford and onto just east of St Budeaux being closed to all traffic wef 7th September 1964. Kings Road remained in use for good traffic until 4th January 71.
A most interesting picture from Sid Sponheimer. Taken looking west - the GW and Southern lines have just parted company at Devonport Junction. Both road bridges carry Molesworth Road. On the Southern line, to the left, the next stop is Devonport Kings Road, on the GW line the next stop is Devonport. However just before the bridge until June 1921 lay Wingfield Villas Halt. The loco is 31857. The Southern lines were closed completely, having served Devonport King Road Goods depot after closure to passengers, in March 1971 and removed in May 1971. The cutting was completely filled in. Copyright


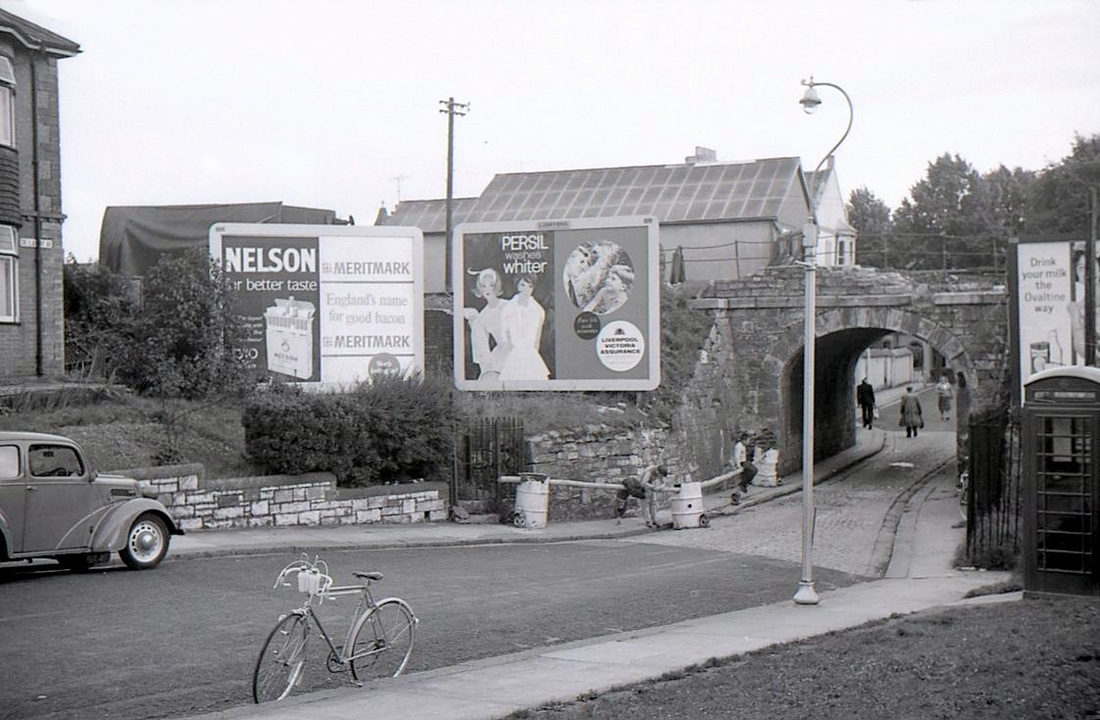
De la Hey Avenue bridge. Plymouth. Jul62. Copyright Mike Roach. You may wonder why this is included? This bridge is just to the east of Devonport Jct. The signalbox, out of sight to the left, controlled both Cornwall and Devonport Jcts. Take a closer look at this picture. There was a derailment here in summer 62. The parapet of the bridge has been damaged - a wagon fell in the street here. Look behind the 'Nelson' hoarding. you'll see a van on its side. Yet, it was reported in the paper, that despite this happening in the middle of the night nobody in number 55, just visible left, nobody woke up!!
Cornwall Junction - Stonehouse or Victoria Park Viaduct
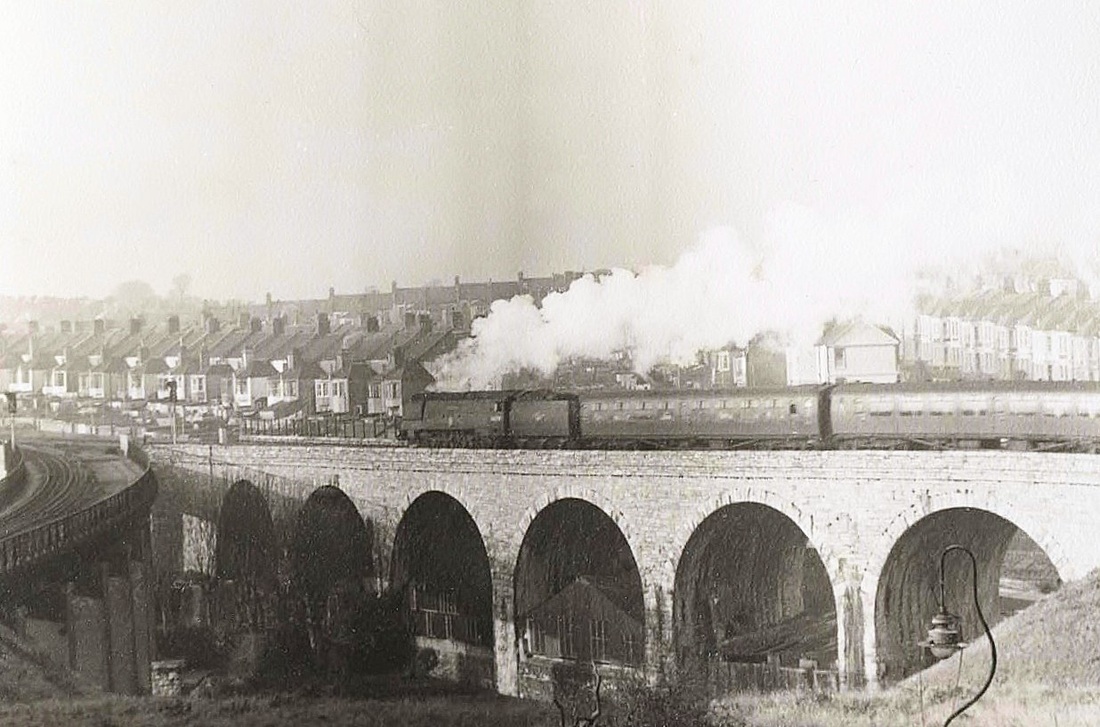
Victoria Park or Stonehouse Pool viaduct. Atop the piers of this structure which carried the line from Cornwall Junction to Millbay has been placed an enormous piece of 'steel art'. However, look a bit more. This picture represents a moment in history, the original viaduct is being dismantled - the spans to the left have already gone. Beyond this viaduct lies Cornwall Loop Viaduct. This picture captured by Mike Roach in October 1965 - Copyright
Cornwall Junction with the piers of the viaduct to Millbay in the foreground. The date is 20th October 1990 Copyright Roger Winnen
Battle of Britain class 34078 '222 Squadron' leaving North Road in January 1964. This picture is of great interest as it shows the former locomotive stabling point located in the triangle created by the lines to Millbay, the polished track on the right hand side and the Cornwall loop on which the loco is travelling and the direct curve over Stonehouse Park. Of the rusty metals in the stabling area three of these led to a turntable, there were two holding sidings. Most of these lines were taken out of use in 1963/4 and the turntable taken out of use in 1964. The metals to Millbay ceased to be used in September 1971. Copyright Sid Sponhiemer.
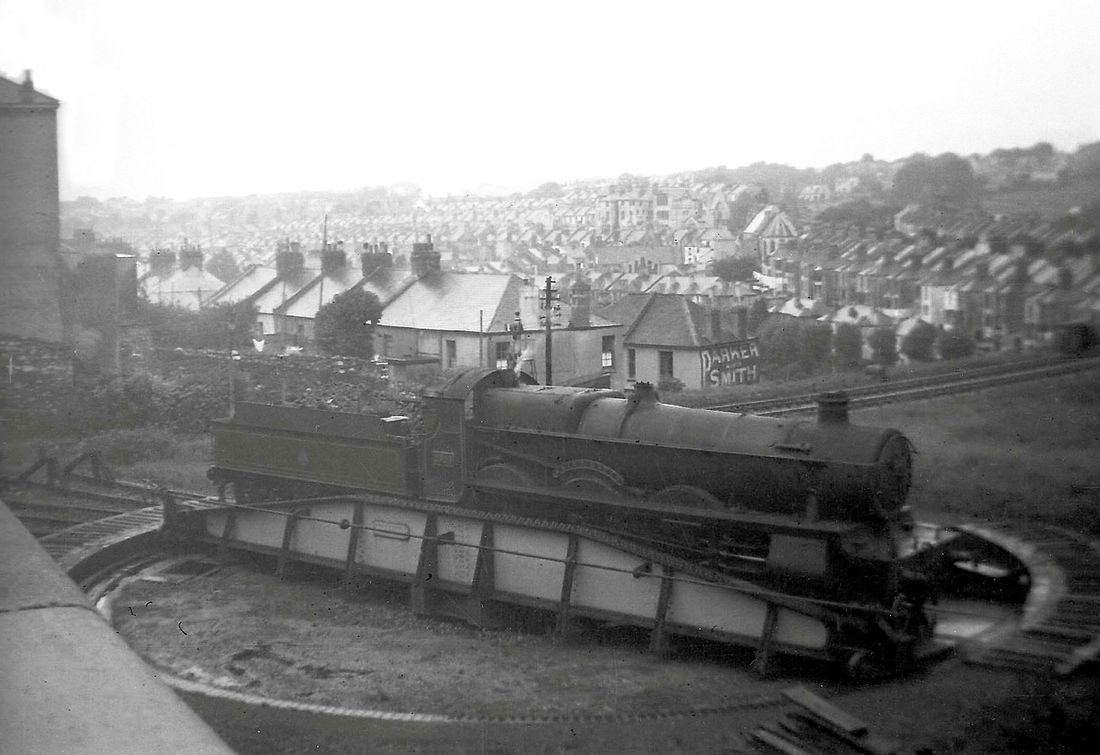
This photograph was kindly supplied by Andy Miller, unfortunately, we do not have any copyright information. Nevertheless a most interesting picture. Access to the up main from the turntable was removed in October 1963 and the turntable was completely isolated March 1964 when the turntable was officially taken out of use. Ref Track Layout Diagrams Sect. 12 Plymouth by R.A. Cooke. Further information kindly supplied by Roger Winnen - The engine on the turntable at Plymouth is a Saint Class Engine numbered in the 29xx series, these were built without side windows to the cabs.
The last one in that class which survived was 2920 Saint David and it was withdrawn in October 1953.This engine is possibly Saint David, this photo was taken after nationalisation from 1948.
From the same position as above but turning to look further west Battle of Britain class 34078 '222 Squadron' continues over the viaduct which linked the Cornwall Railway metals with North Road station. Of great interest are the metals of the direct route from Cornwall to Millbay station over the former viaduct. These lines were closed on the 16th January 1964 and lifted in the following June. It can be seen that colour light signals for Cornwall Loop Junction, to the extreme left are still in position. Copyright Sid Sponheimer. Note the ancient gas light in the foreground with the on/off chains to the gas tap awaiting a hook on a pole!!
A striking picture as 50011-'Centurion',leaves Plymouth North Road with 9 coaches including a
parcels Mk1 BG. Copyright Nick Trugian.
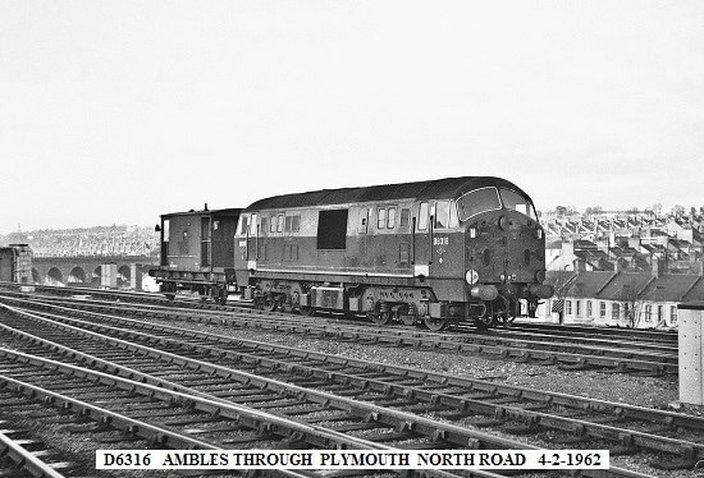
Class 22 D6316 tows a brake van through Plymouth with the arches of Cornwall Loop viaduct clearly visible in the background. Copyright John Cornelius
Copyright John Cornelius
Obscure details!
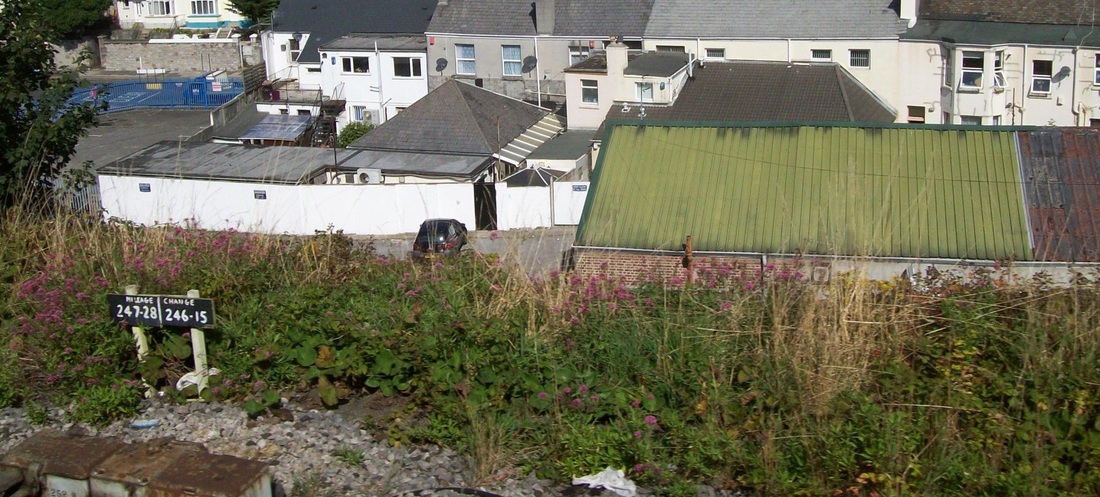
It is one of those obscure details which tends to catch my eye while I miss the obvious. I don't recall any mention of the mileage anomaly caused by the closure of Millbay, which is denoted by the boundary marker on the Cornwall Loop adjacent to the Pennycomequick staff club. I only have it on a Publisher file which includes a picture of some Brutes in a Newton Abbot car park.
Cheers, Colin Burges See below
Copyright Colin Burges
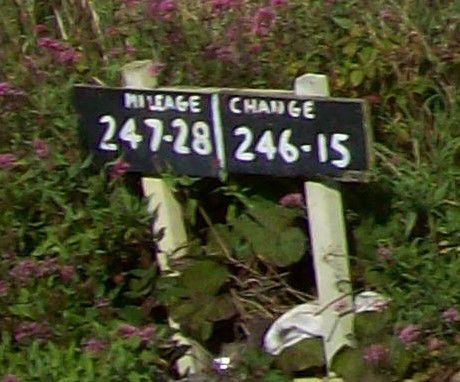
One mile 286 yards difference. Copyright Colin Burgess

1035 Western Yeoman makes a slow approach to Plymouth station . An unusual view seen from Alma Road on the 20th July 1964 Copyright Sid Sponheimer
Plymouth North Road
Courtesy Julian Stephens Collection
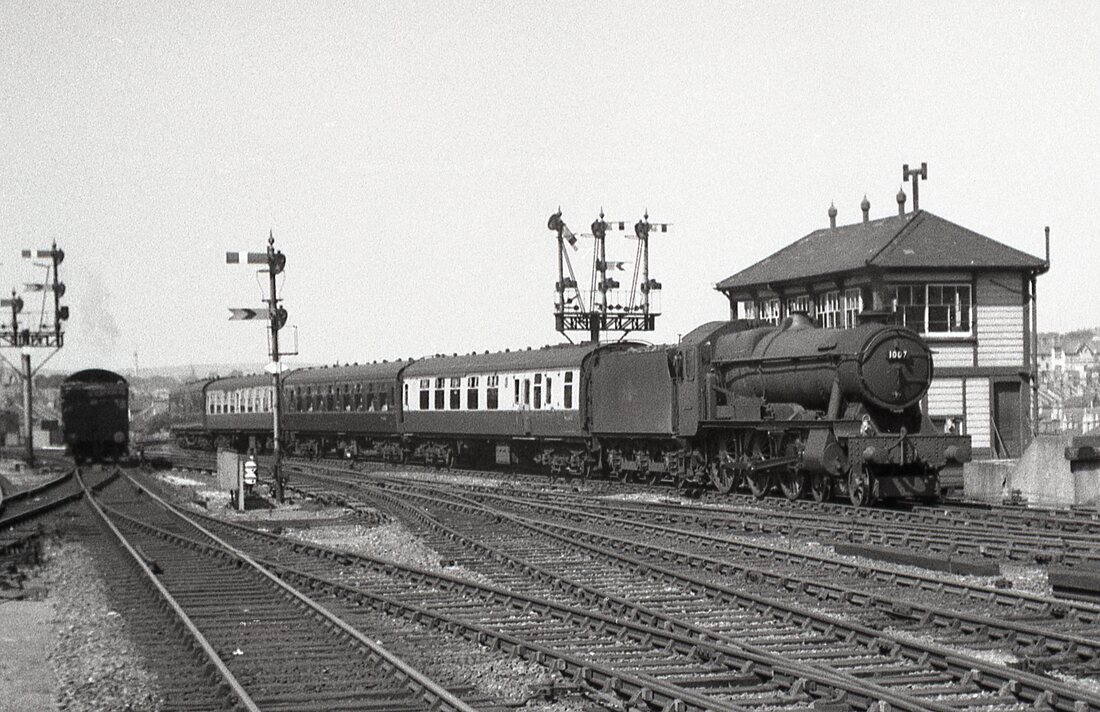
2900 County class 1007 of Truro shed enters Plymouth Station with a train from Cornwall past the West Signal Box and its wonderful array of semaphore signals. Copyright Mike Roach. A classic picture from the Mike Roach collection.
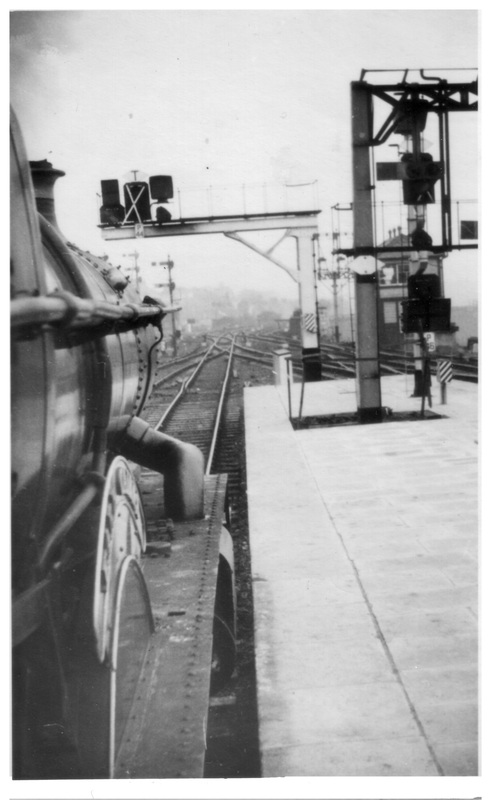
A Castle waits to set off from Plymouth North Road. Roger Tabb is the fireman but has just time enough to take this quick snap shot from the cab on a rather misty day. Note the colour light signals have been installed but the white cross indicates that they are not in use yet. Just visible though the metalwork of the semaphore gantry on the platform is the roof of North Road West signalbox. Copyright Roger Tabb.
Highly recommended film . click on the link below for fascinating footage from the BBC of a journey from Plymouth North Road - it was called that then, to King Tor Platform on the Princetown branch. Note the exterior of the old North Road station, the Devonian accents, and when on the platform the North Road West Signalbox.
http://news.bbc.co.uk/local/devon/hi/people_and_places/history/newsid_8473000/8473201.stm
http://news.bbc.co.uk/local/devon/hi/people_and_places/history/newsid_8473000/8473201.stm
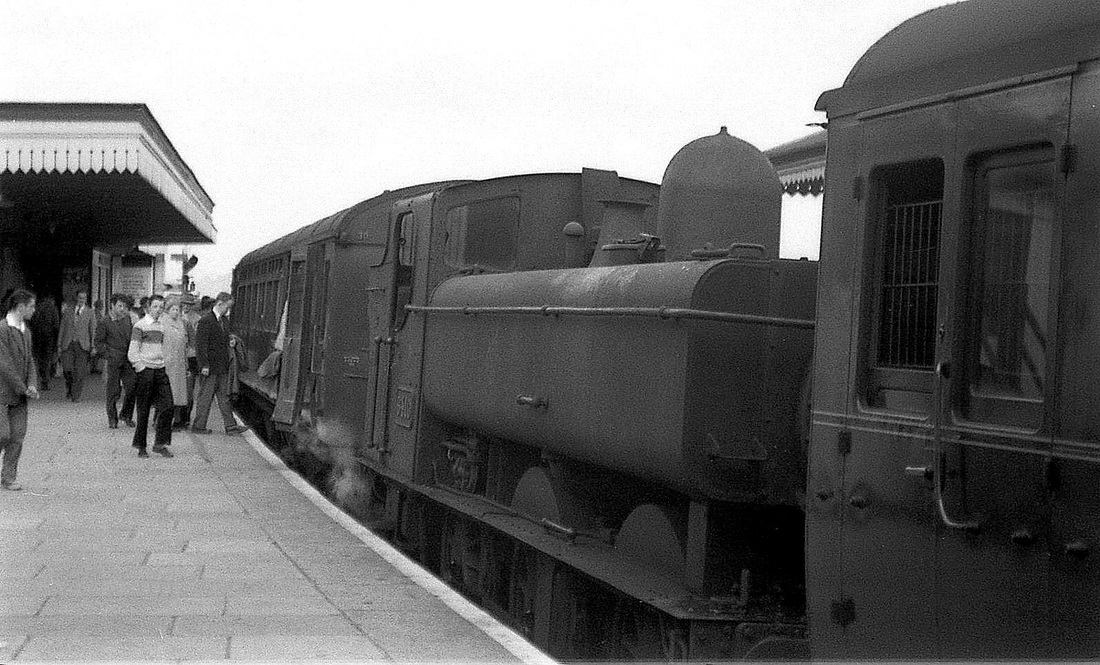
14th May 1960, the end is nigh for the Plymouth to Saltash Auto trains one of which is seen here at platform 7 at Plymouth. The driver operated the warning gong by means of a foot pedal. Copyright Mike Roach
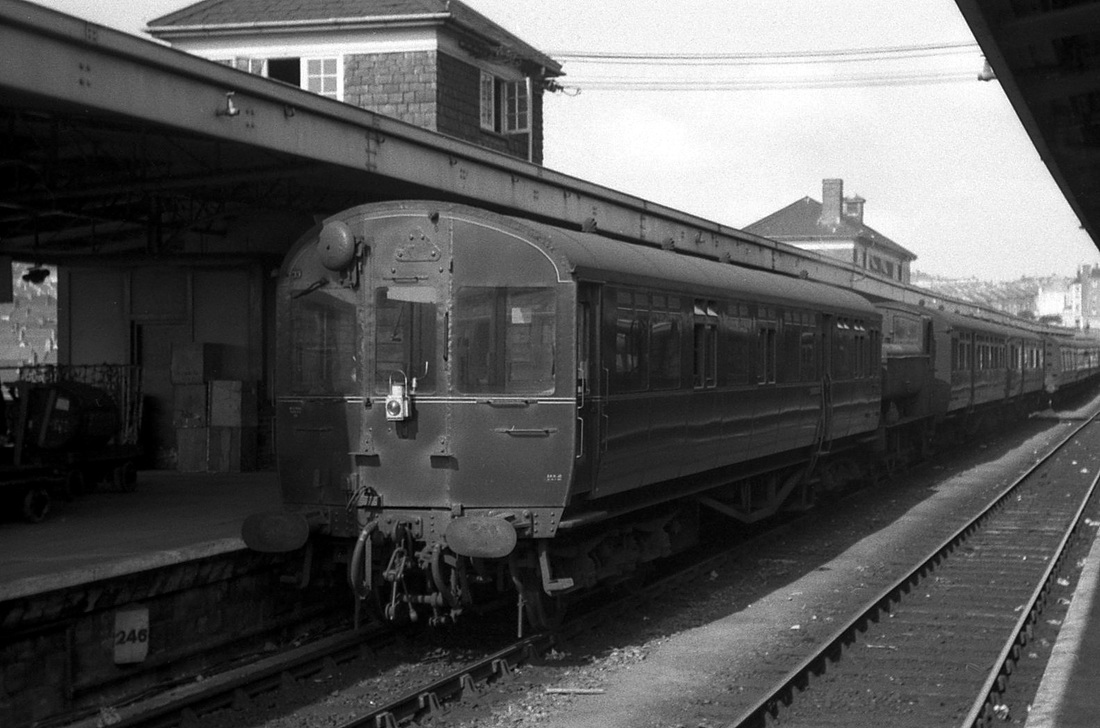
Copyright John Cornelius N.B, Plymouth friary had closed 15th September 1958 so all trains over the Southern Route, via Okehampton started at North Road. As a result of the closure of Friary in 1958 the term 'North Road' was dropped, however it is still to this day known by some as 'North Road'! The train is standing at a one time through platform converted to being a terminal platform in 1974.
Plymouth North Road, a train from Friary to Waterloo 11.46 4th May 1963 Copyright Mike Roach
Here on 14th May 1960 one can see almost the full length of the 'auto', whether it was proceeding to or from Laira or merely changing platforms is not known. The location is just east of the main station complex. Mutley, once served by these trains, is just round the corner. May 1960. Copyright Mike Roach.
D870 Zulu on the Cornishman at Plymouth 16th August 1962. From the album of the late Adrian Hoblyn. Adrian maybe one of those young men in the picture. Copyright
Another very ancient auto trailer caught by Sid Sponheimer at Plymouth in the early 60's - it is obviously part of an Engineers Consist. Copyright.
Plymouth Millbay branch 4570 to the left 4555 right Millbay train May 1962 - Copyright Sid Sponheimer
At the start of the lines down to Millbay - probably taken from the footbridge looking towards Millbay. 4555 nearest 4570 behind and 6348. Copyright Sid Sponheimer
Plymouth - Gallery 1
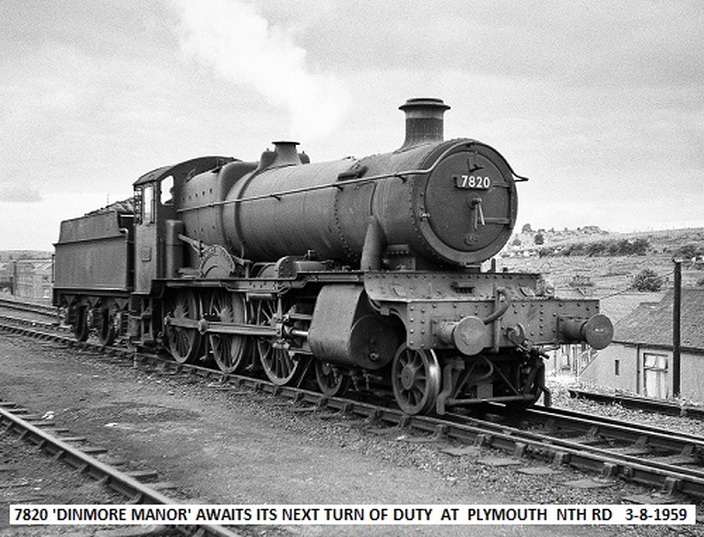
Dinmore Manor lives on - it's based on the Gloucestershire and Warwickshire Railway. Copyright John Cornelius
Copyright John Cornelius
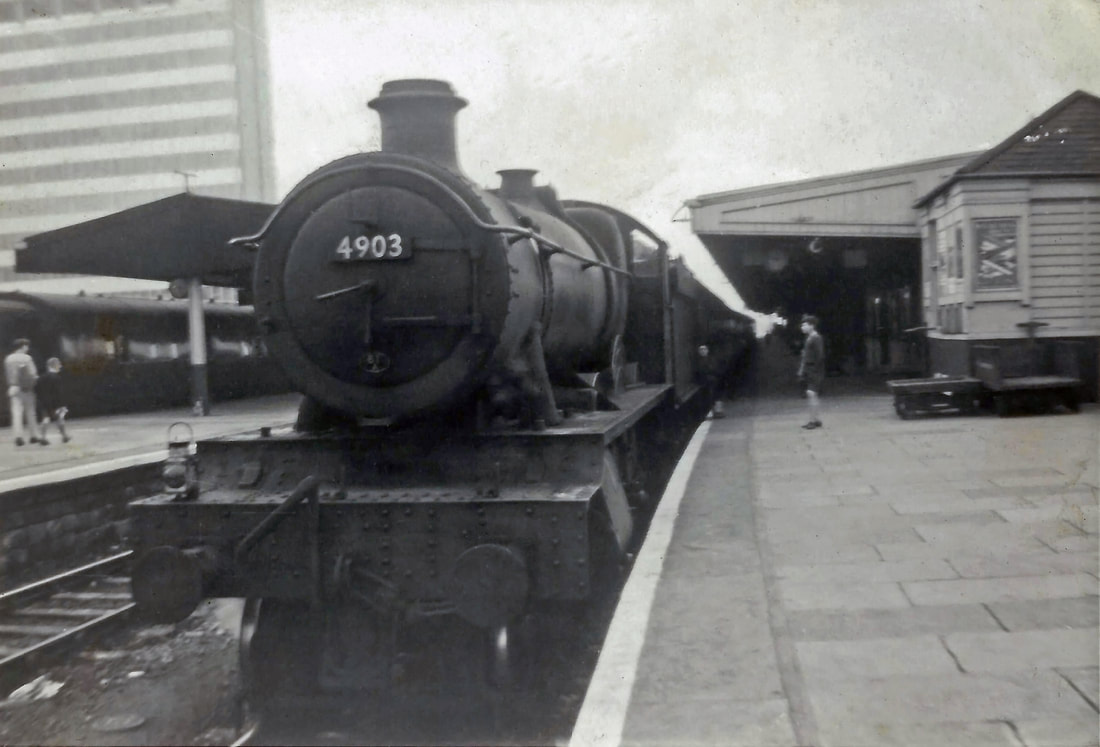
4903 Astley Hall at Plymouth 1st December 1962 Copyright the late Adrian Hoblyn Courtesy Sharon Hoblyn
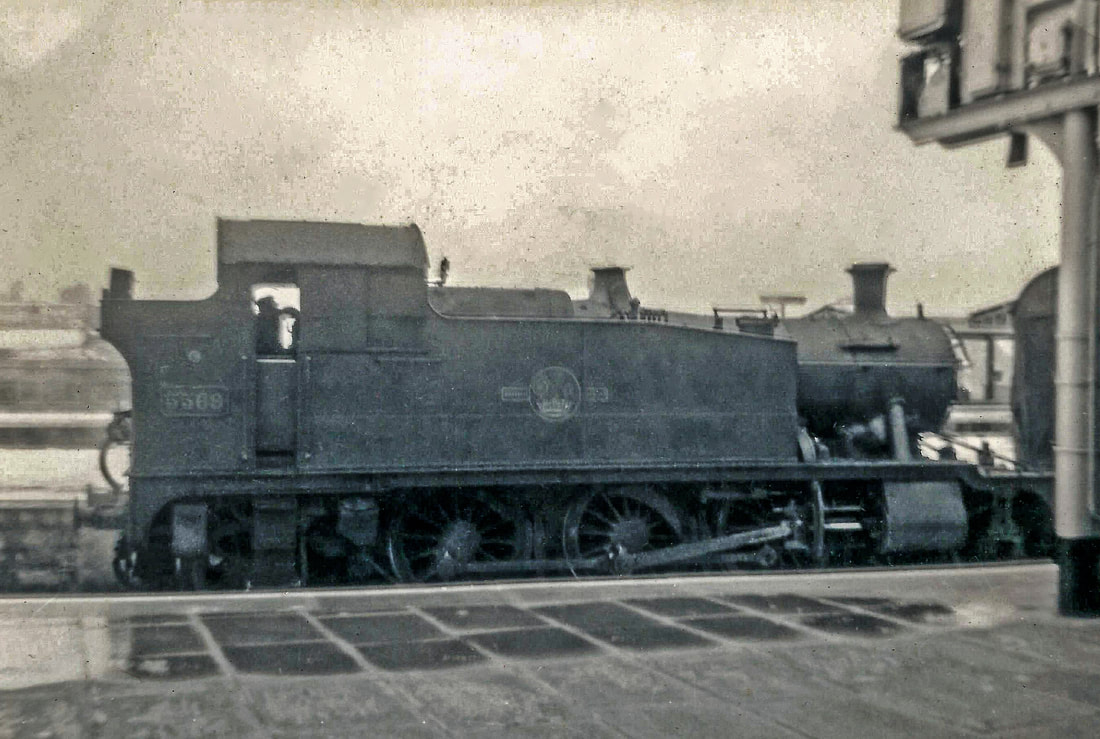
5569 Plymouth 29th December 1962 Copyright the late Adrain Hoblyn
Its July 1962 and we've arrived just in time to see a Warship relieved of its train heading back towards Laira.
Copyright Adrian King
D835 Pegasus has its train loaded at Plymouth North Road in 1961 Copyright Mike Morant

Plymouth D600 Active arrives at Plymouth with the down Cornish Riviera in August 1958. (D600 entered service January 1968, all the class were withdrawn in December 1967). Courtesy the Mike Morant Collection
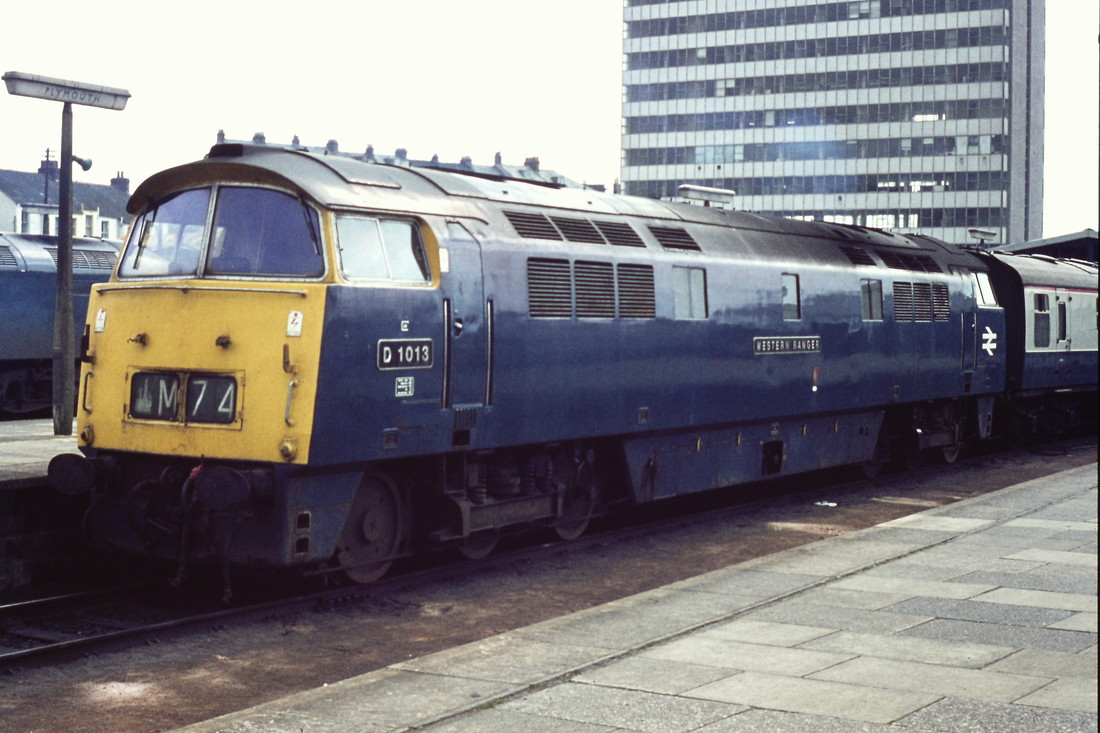
D1013 Western Ranger at Plymouth on the 14.00 service from Penzance to Birmingham. 5th April 1975 Copyright Roger Winnen
See next two pictures :- Not content with a very rare passenger appearance the previous weekend on a York - Plymouth relief train, 37024 decided it would pay a second visit to the west country, this time going all the way to Penzance. The loco makes a splendid site and noise at Plymouth on the 10.30 York - Penzance relief on a very wet 27th July 1985. I believe the loco was allocated to March depot at the time and is still going strong as 37714 on the Great Central Railway. Unfortunately relief trains are by and large a thing of the past and overcrowding sadly the accepted norm at busy times.
Regards Clive Smith
Regards Clive Smith
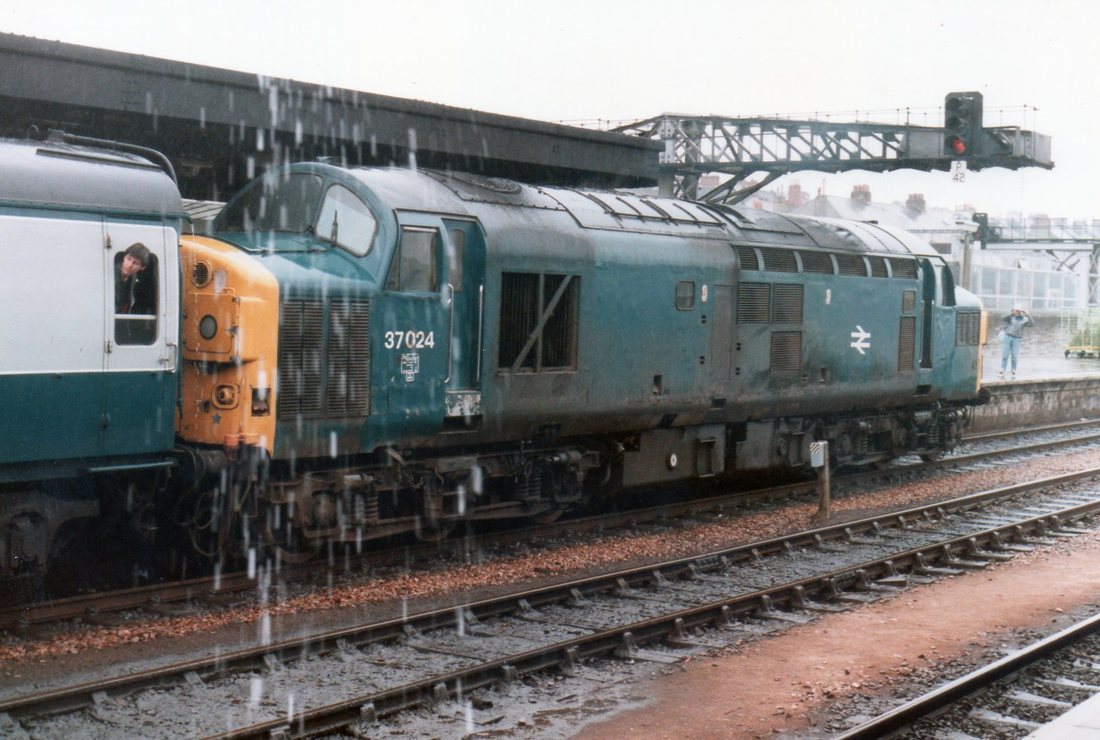
Plymouth 37 024 on relief train. 27th July 1985 Copyright Clive Smith

37024 on a relief train leaving Plymouth for Penzance. 27th July 1985. 50041 Bulwark stands at platform 4. Copyright Clive Smith
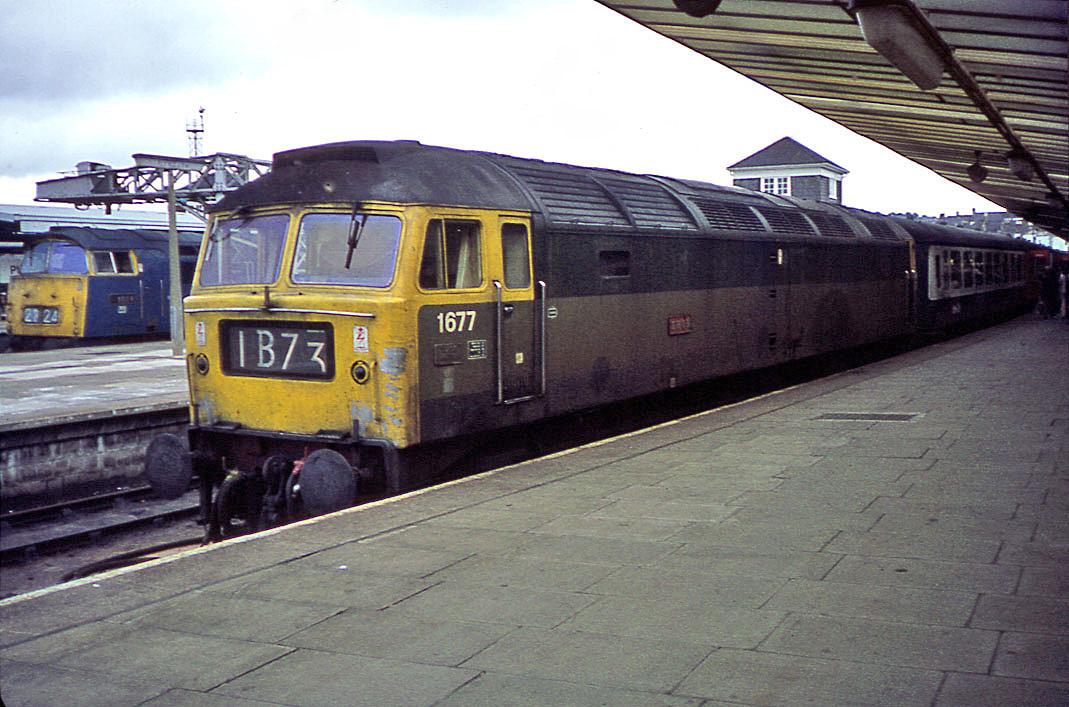


With reference to photo 10 above. Trevor Tremethick writes : - The 'Thor' nameplates were transferred to D1677 after the
original 'Thor', D1671, was scrapped in 1966 following a fatal accident. 1677
was a Landore engine and I rode down from Plymouth to Truro on the train
pictured.
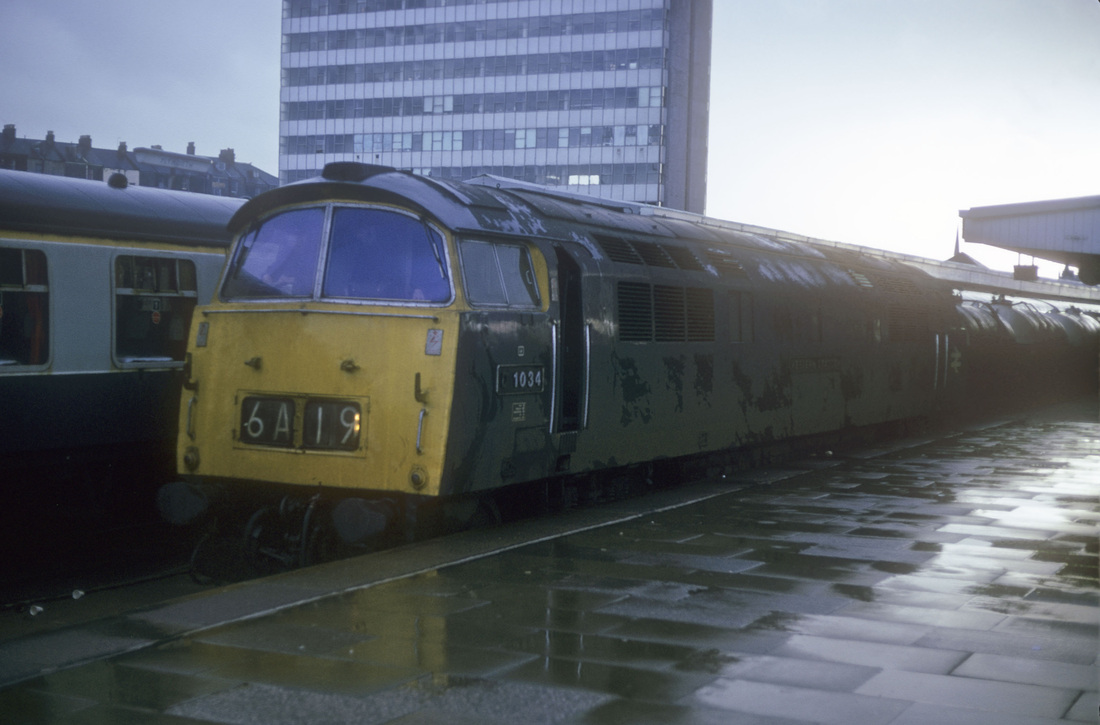
Reference picture 18 Roger Geach writes - A picture for you of a wet Plymouth at 1655 hrs with 1034 on the first up milk 6A19 1350 St Erth - Acton with 17 milk tanks during a shower. This service only ran for a few weeks in the Spring and Autumn as a relief service to the main train.The main milk train 6a21 1640 St Erth - Acton milk was worked by 1058 that day and conveyed 12 milk tanks at Plymouth arriving at 1900 hrs .
Reference picture 18 Roger Geach writes - A picture for you of a wet Plymouth at 1655 hrs with 1034 on the first up milk 6A19 1350 St Erth - Acton with 17 milk tanks during a shower. This service only ran for a few weeks in the Spring and Autumn as a relief service to the main train.The main milk train 6a21 1640 St Erth - Acton milk was worked by 1058 that day and conveyed 12 milk tanks at Plymouth arriving at 1900 hrs .
Plymouth Gallery 2
Due to the ever increasing number of Plymouth station pictures we've had to expand to a second gallery. With reference to the first picture below - John Geach writes - Due to late running D1033 Western Trooper stands at platform 6 with the 0845 Paddington to Plymouth via Bristol service. D1027 Western Lancer stands on the right with the 1045 Pd -Plymouth. On platform 4, out of view 1072, Western Glory has arrived with the 1030 Paddington - Penzance all between 1459 and 1515 hrs on a dull Sunday 4 Aug 1974.
Due to the ever increasing number of Plymouth station pictures we've had to expand to a second gallery. With reference to the first picture below - John Geach writes - Due to late running D1033 Western Trooper stands at platform 6 with the 0845 Paddington to Plymouth via Bristol service. D1027 Western Lancer stands on the right with the 1045 Pd -Plymouth. On platform 4, out of view 1072, Western Glory has arrived with the 1030 Paddington - Penzance all between 1459 and 1515 hrs on a dull Sunday 4 Aug 1974.


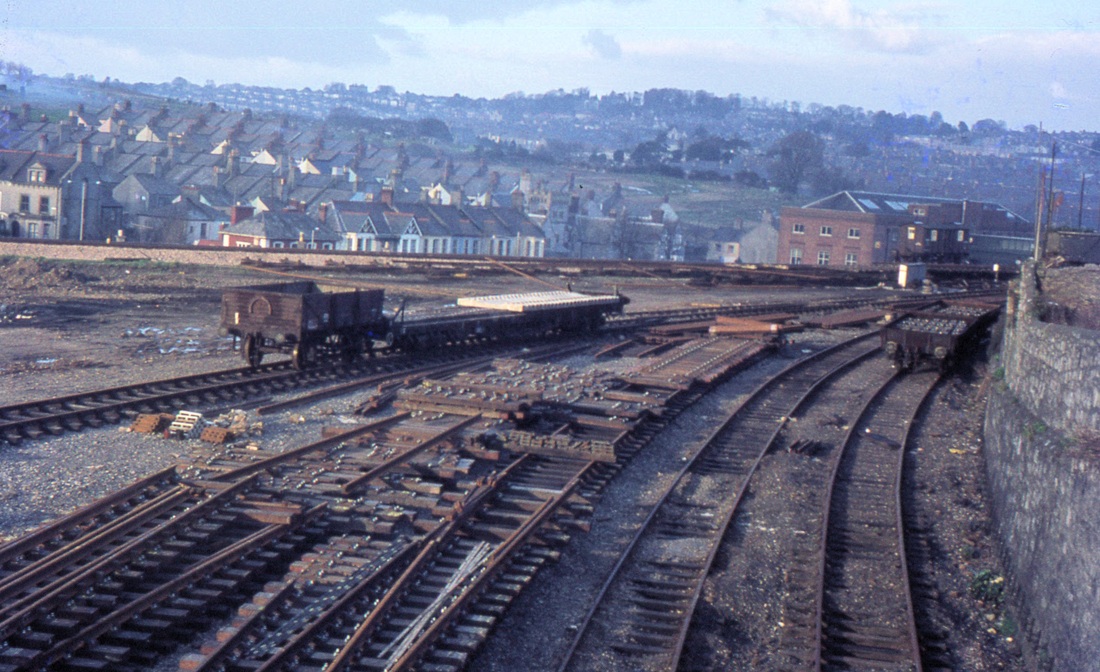
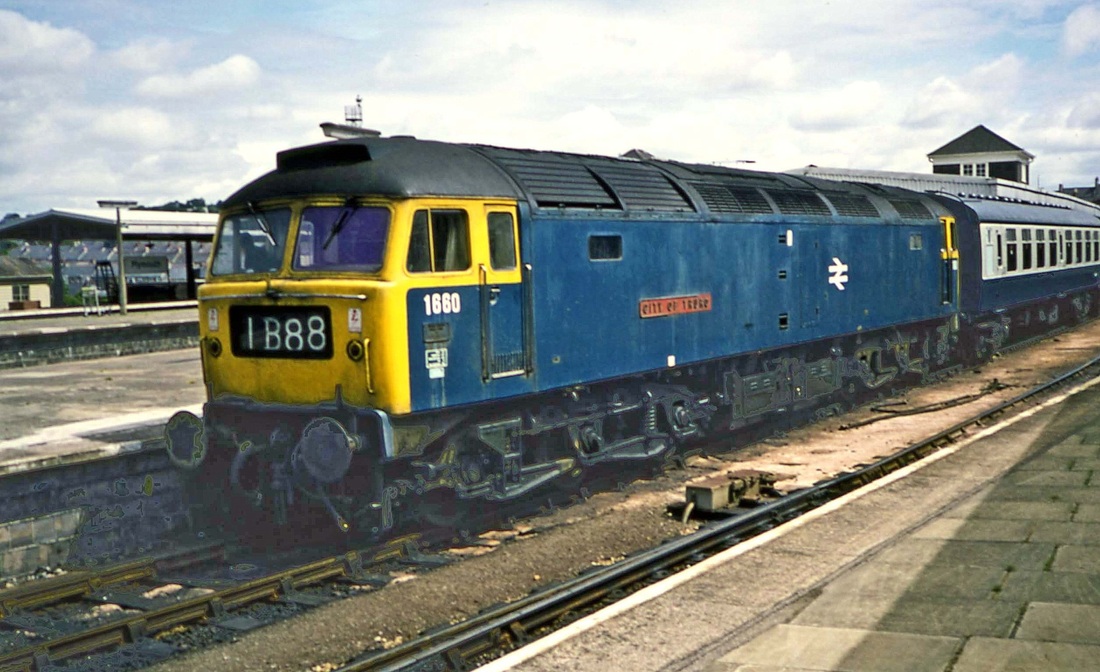
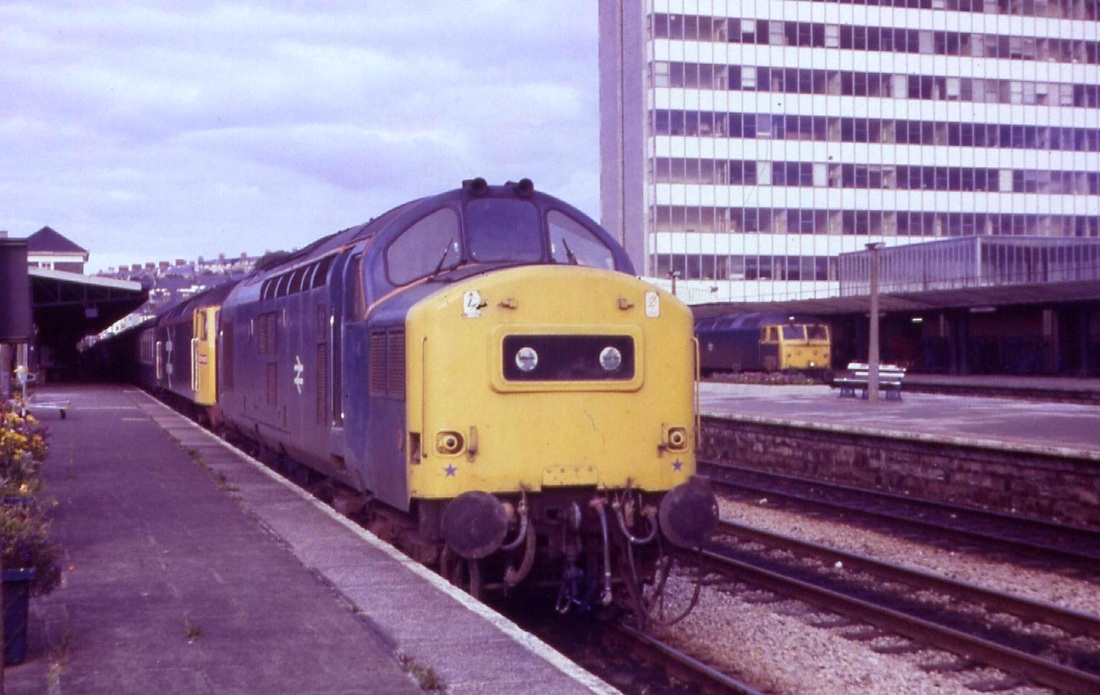
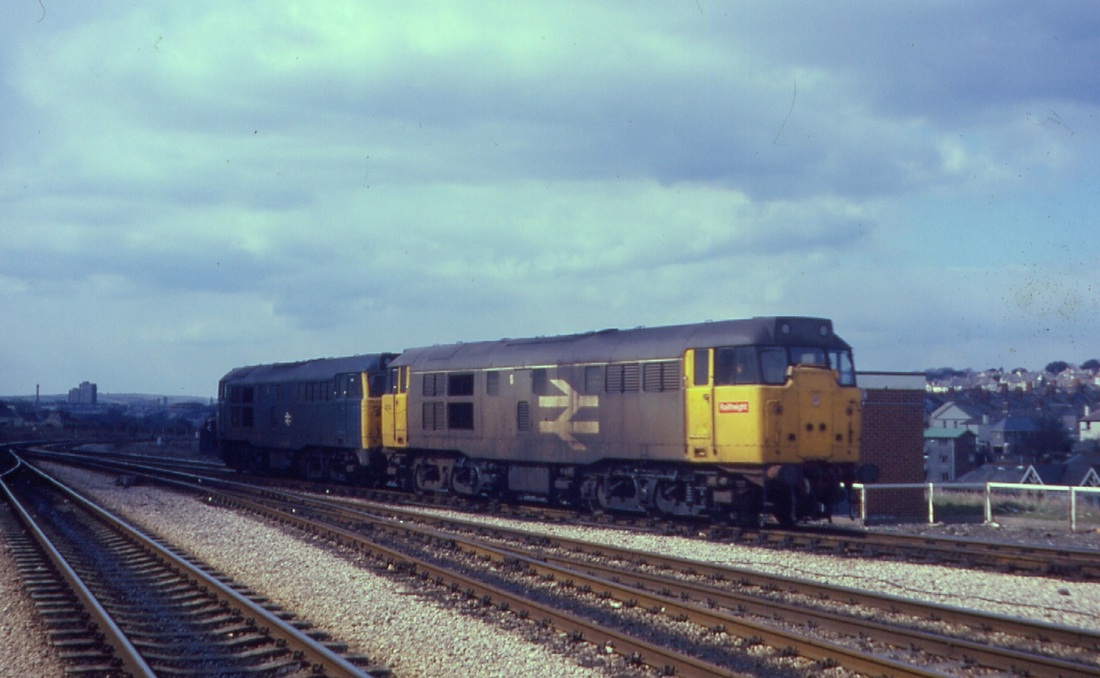

Plymouth North Road, East box.
The first box opened 1876 with 19 levers, it closed Nov 1908 being replaced by a new box - this box with 48 levers lasted until 25 August 1939 when it was replaced by the box seen here which had 185 levers. This box lasted until 26 Nov 1960 when replaced by the Plymouth Panel. Credit for this information to the late Larry Crosier. Trevor Tremethick asks that we note the interesting stock in the siding adjacent to the box.
The first box opened 1876 with 19 levers, it closed Nov 1908 being replaced by a new box - this box with 48 levers lasted until 25 August 1939 when it was replaced by the box seen here which had 185 levers. This box lasted until 26 Nov 1960 when replaced by the Plymouth Panel. Credit for this information to the late Larry Crosier. Trevor Tremethick asks that we note the interesting stock in the siding adjacent to the box.
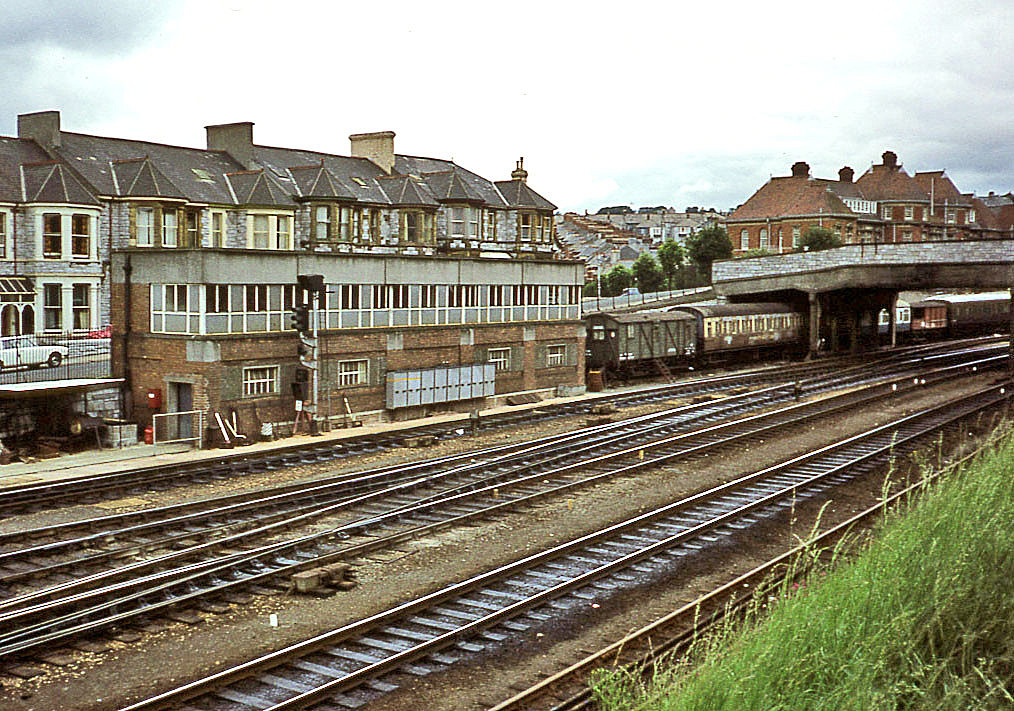
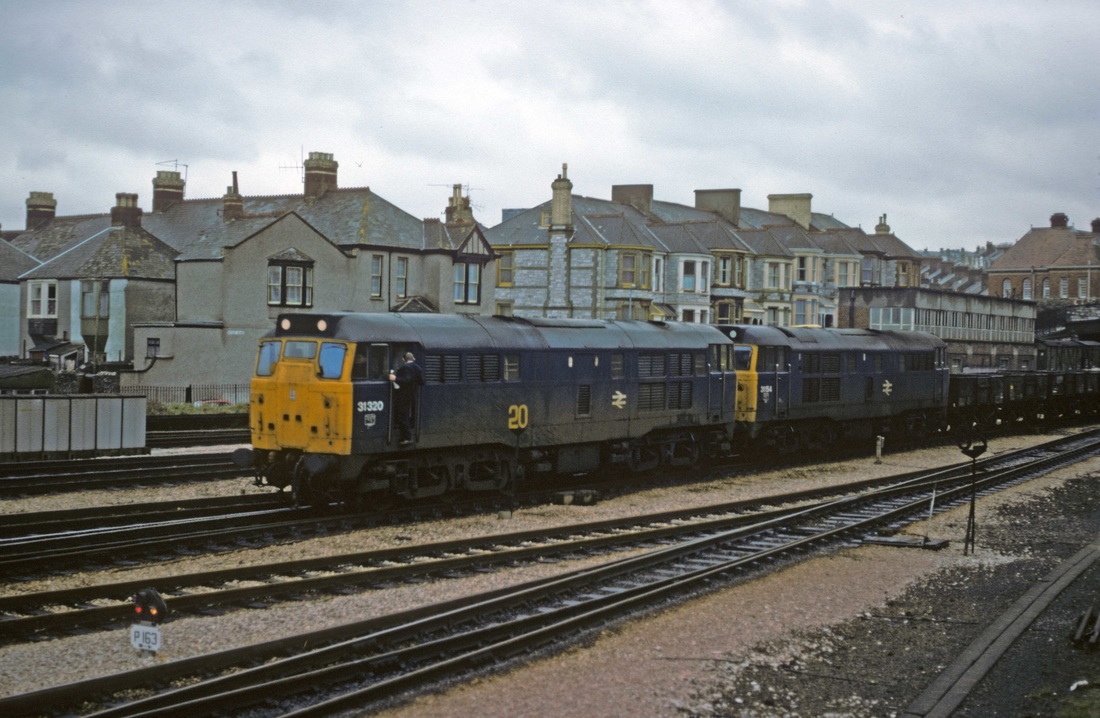
31320 and 31154 at Plymouth 2nd March 1978 Copyright Roger Geach
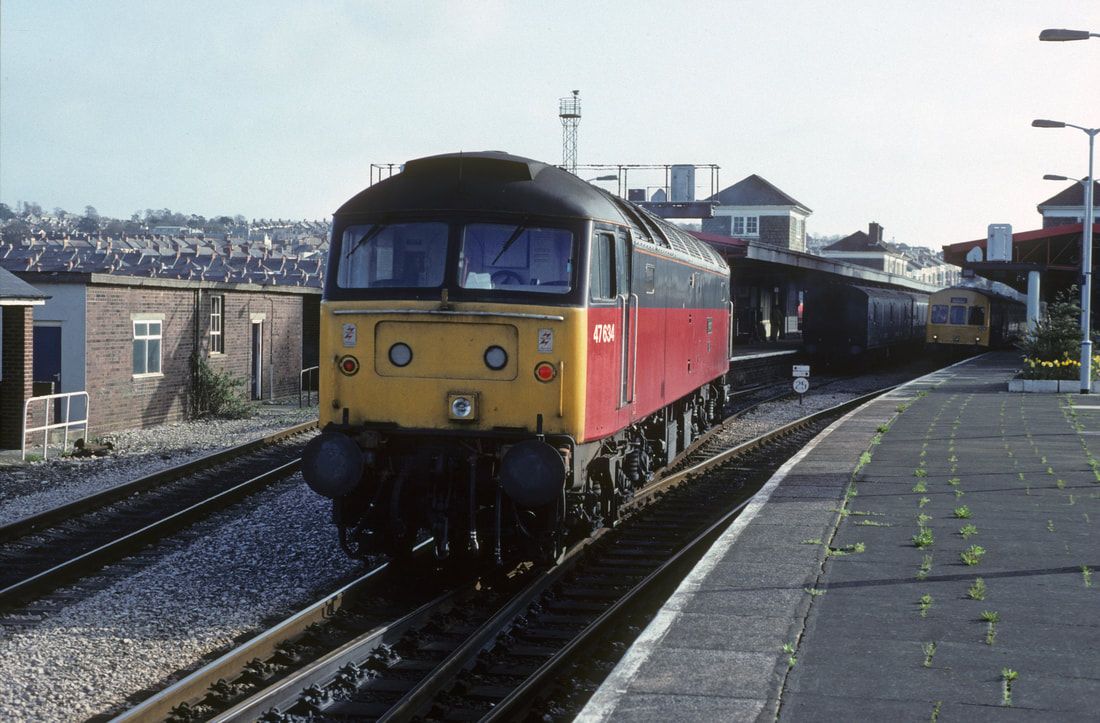
It's the 21st March 1992 at Plymouth station as 47634 backs in light diesel for the 08.30 vans. Note Met Cam DMU in adjacent platform. Copyright Roger Geach
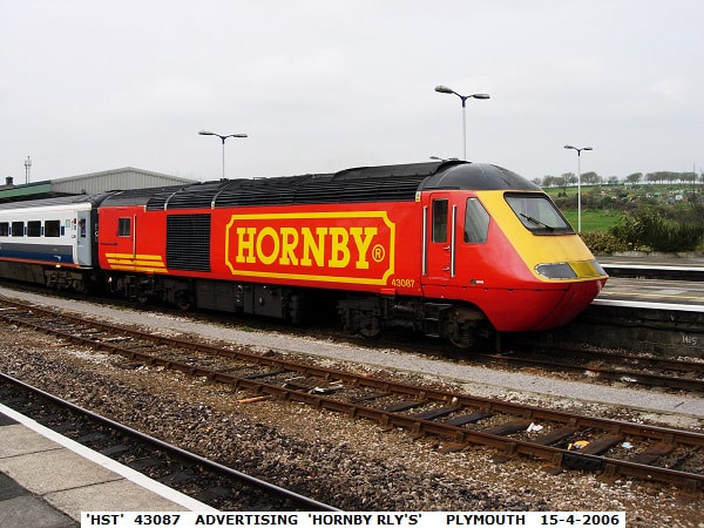
A splash of red, a 'model; picture. Copyright John Cornelius
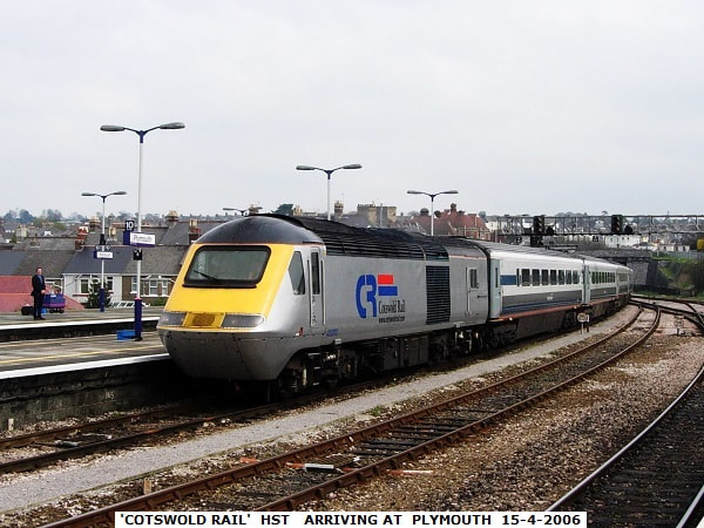
Copyright John Cornelius
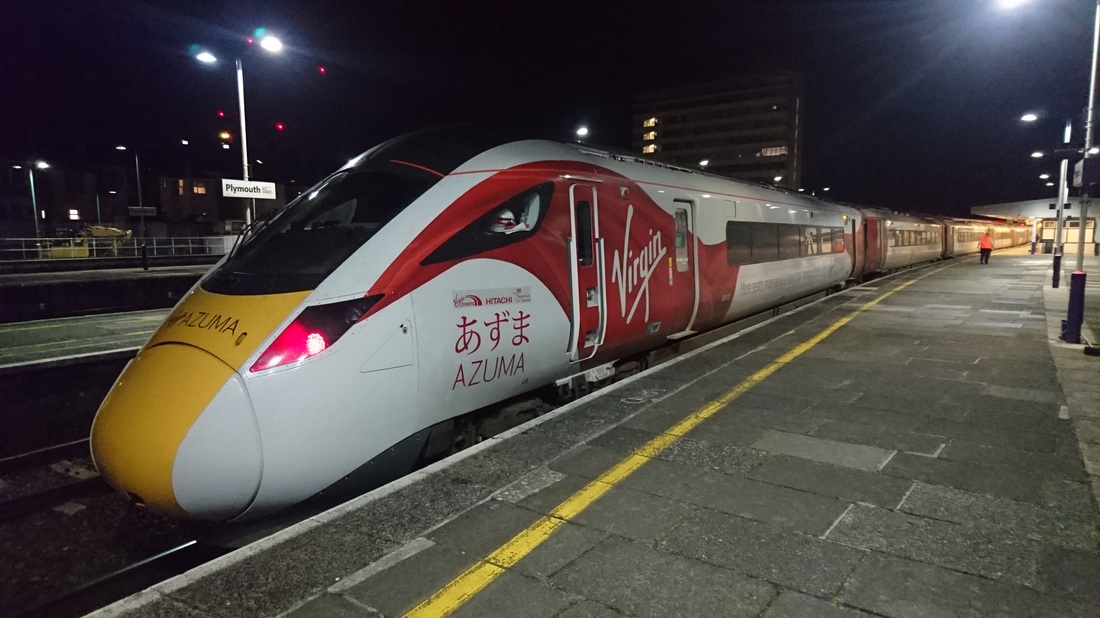
IEP visit to Plymouth 4th Oct 2016 Copyright Nick Dyke
And finally - Bernard Mills is a well known photographer particularly in the Plymouth district and also throughout the 'Empire' - he was also a Western Fan and decorated his car as seen below.
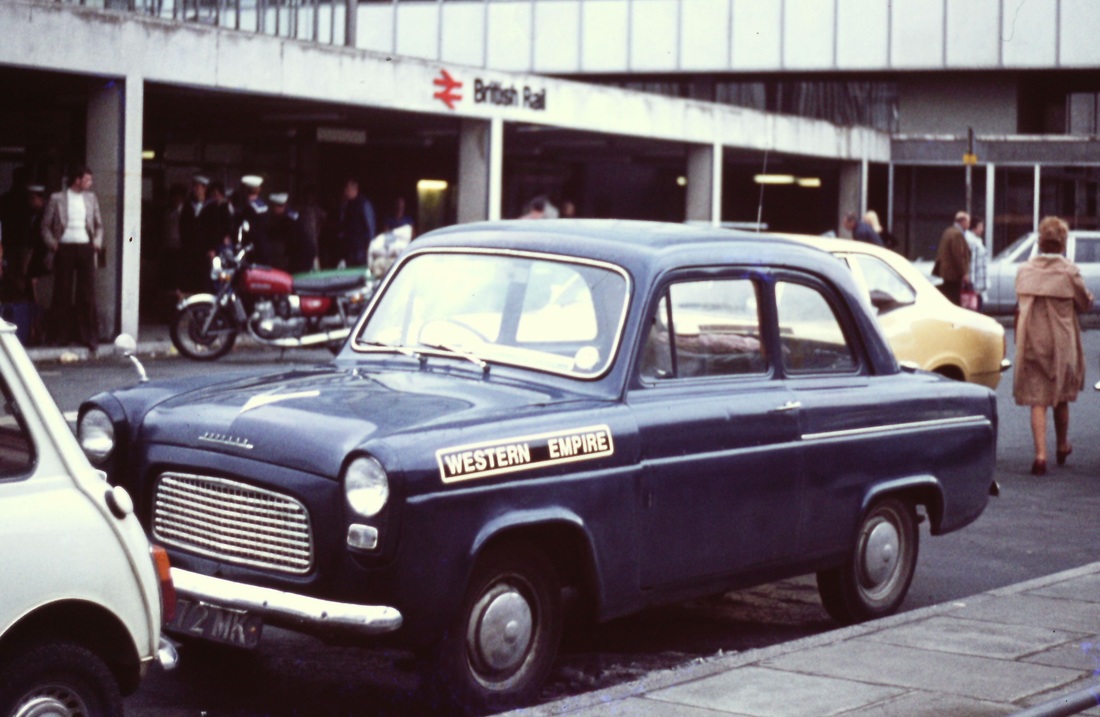
Western Empire 30th August 1976 Copyright Roger Winnen
Tailpiece - Plymouth in the snow 1985 Clive Smith
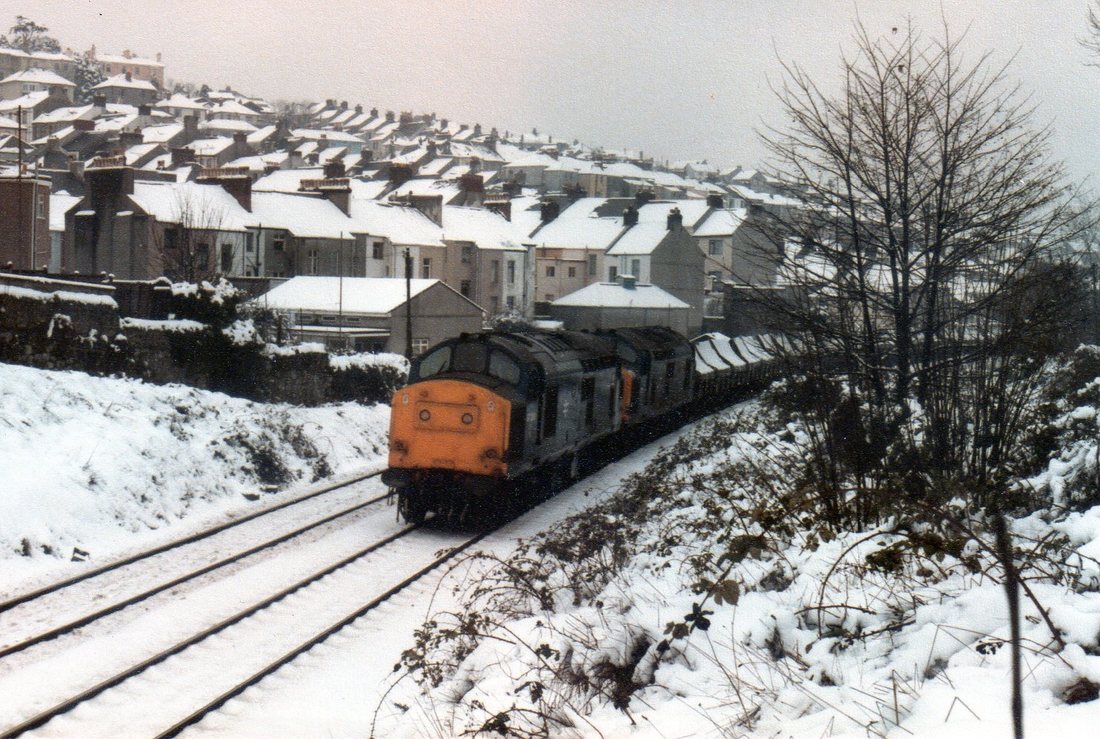
1 Mutley tunnel - approaching from Lipson 37230 & 37247 on down Clay Hoods. 19th January 1985 Copyright Clive Smith
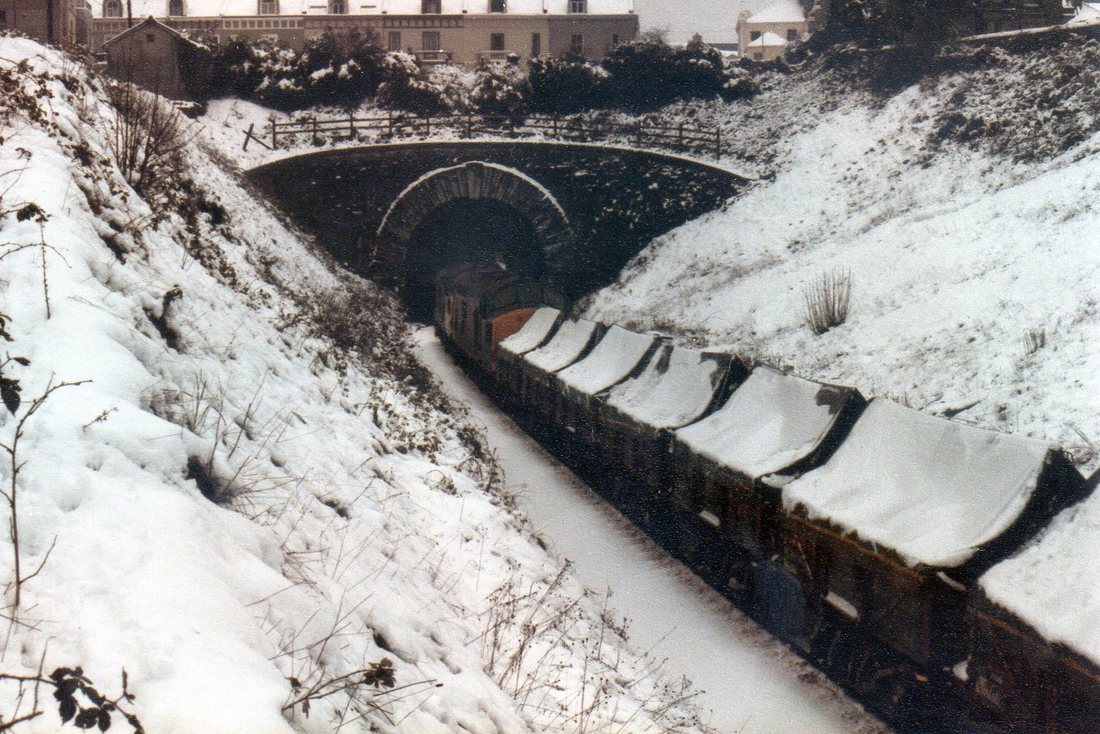
02 Mutley tunnel 37230 & 37247 on a down clay hoods 19th January 1985 Copyright Clive Smith
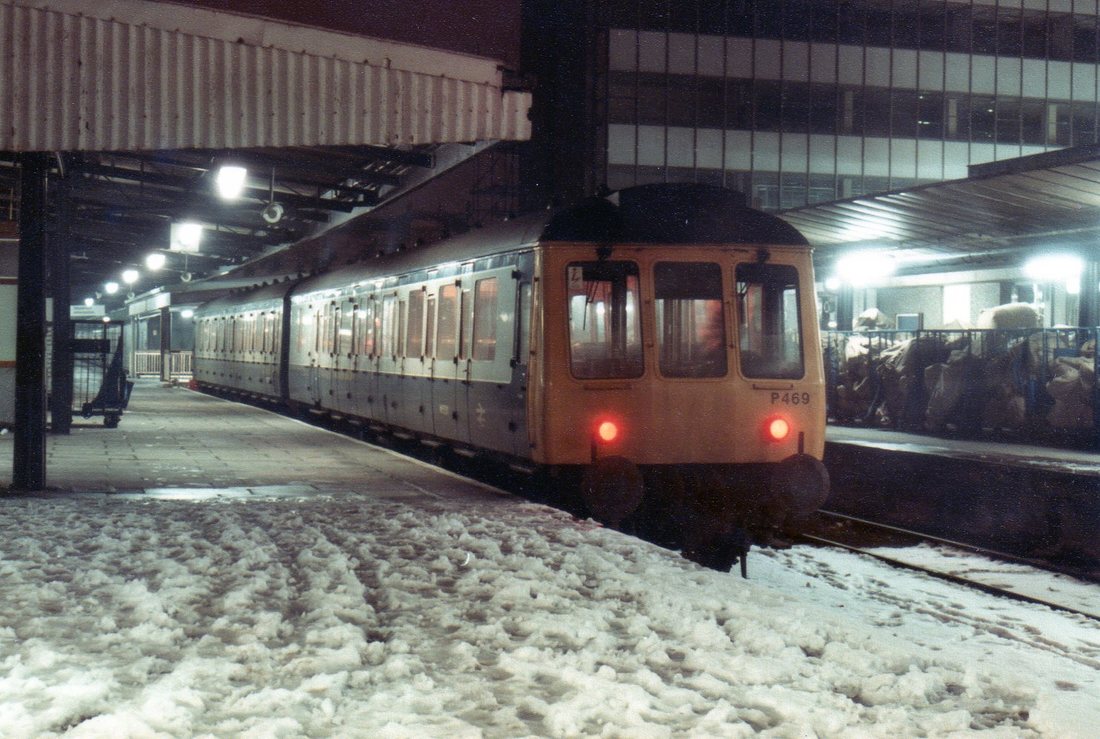
03 Plymouth P469 on the 21.05 Plymouth to Gunnislake 19th January 1985 Copyright Clive Smith
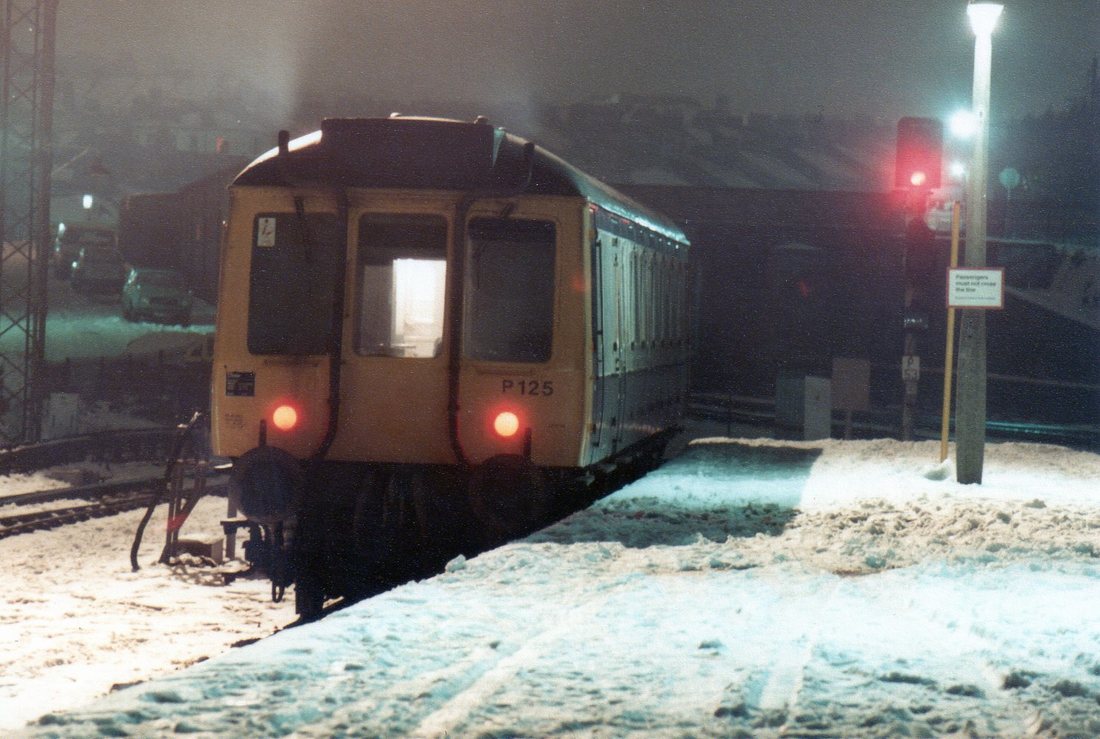
Plymouth W55025 awaiting the road for Laira after working the 19.45 Liskeard to Plymouth 19th January 1985 Copyright Clive Smith
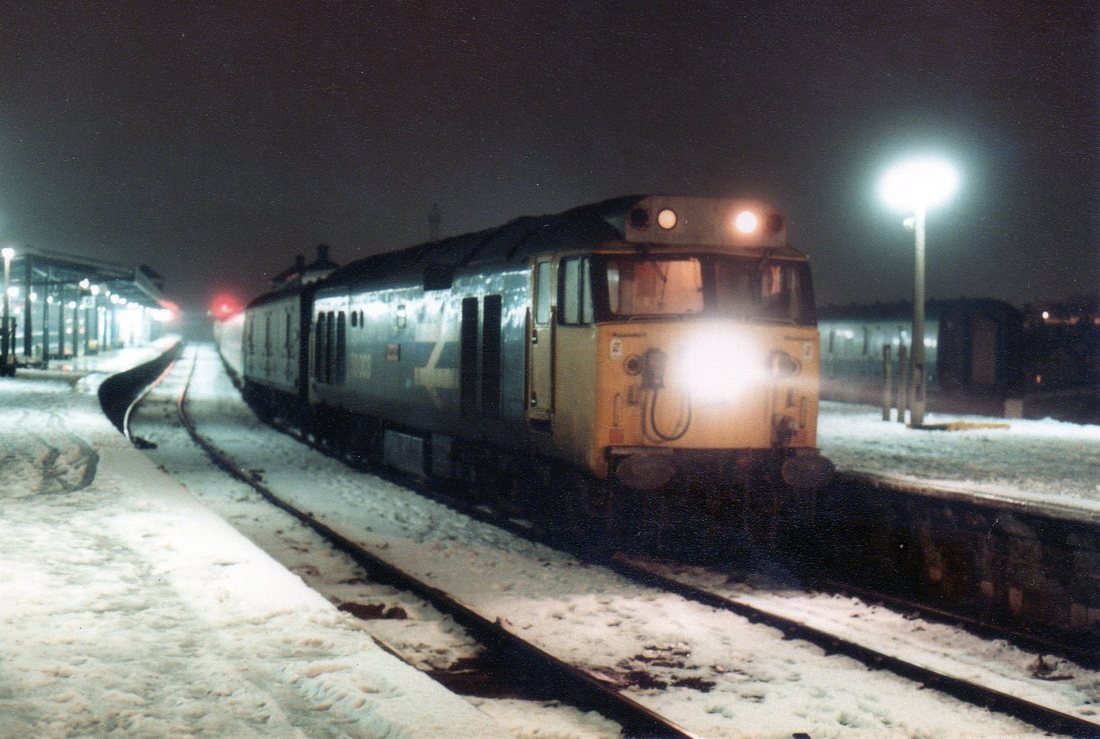
05 The 1A02 50003 Temeraire 19.15 Penzance to Paddington sleeper. 19th January 1985 The sleepers still ran Saturdays then and left much earlier. Copyright Clive Smith
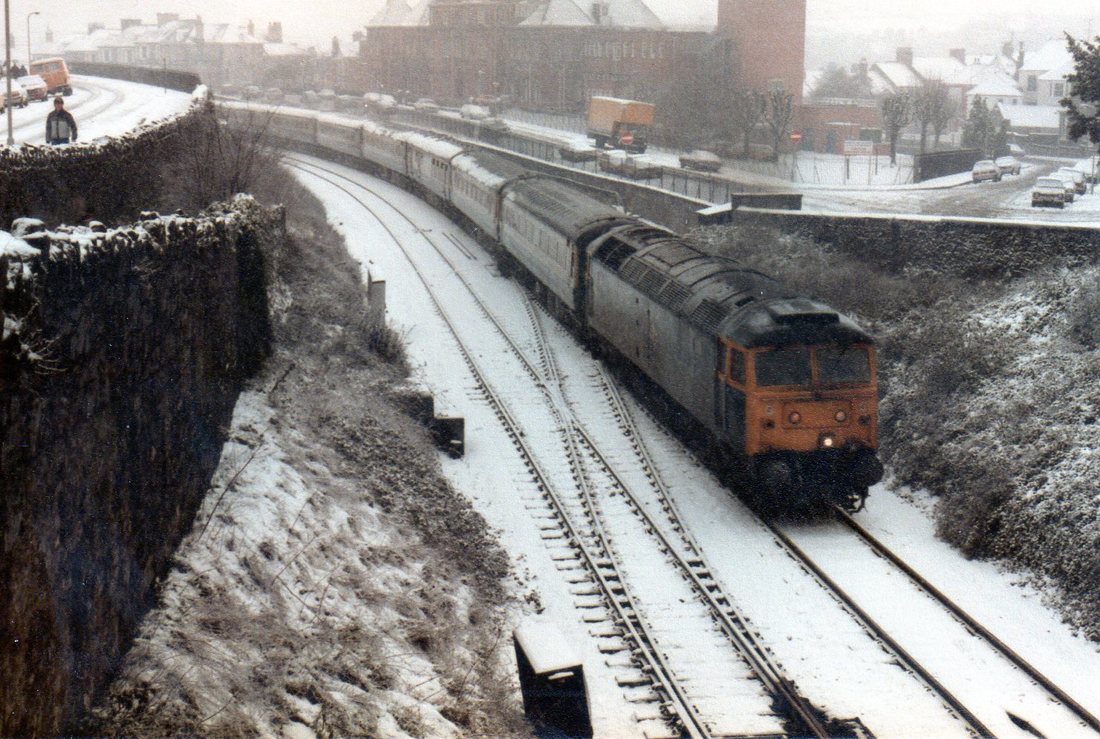
06 Mutley 47528 1E91 08.53 Penzance -Newcastle 18th January 1985 Copyright Clive Smith
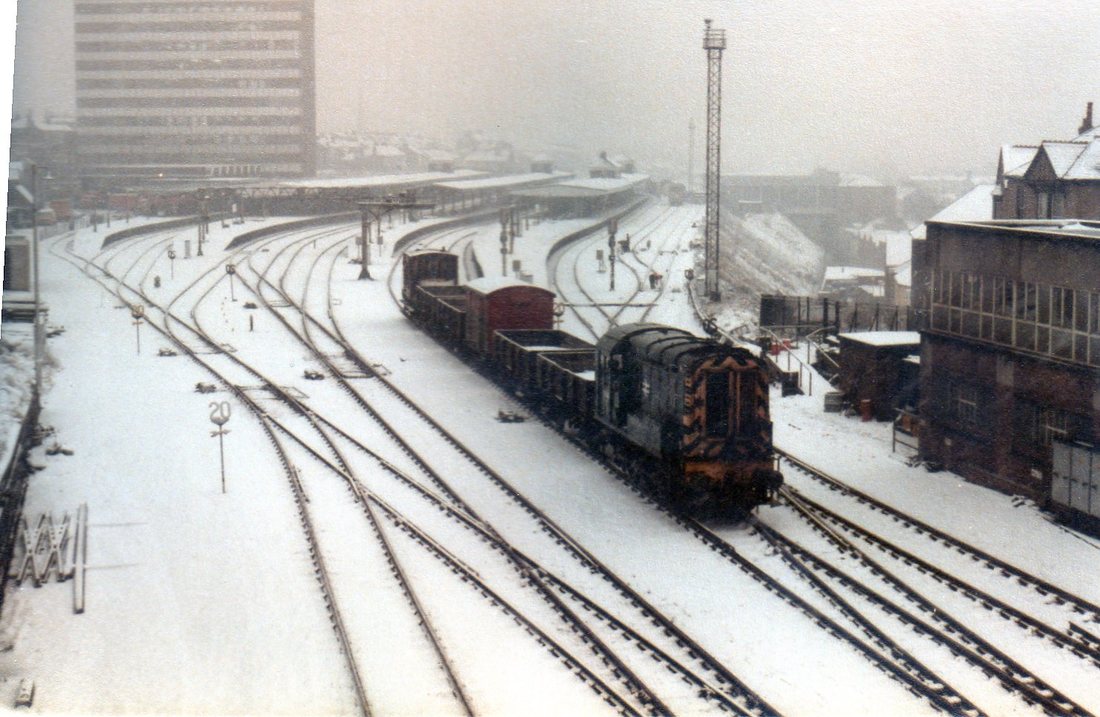
07 Plymouth 08941 7B71 11.12 Keyham -Friary 'DOCKYARD GOODS' 18th January 1985 Copyright Clive Smith
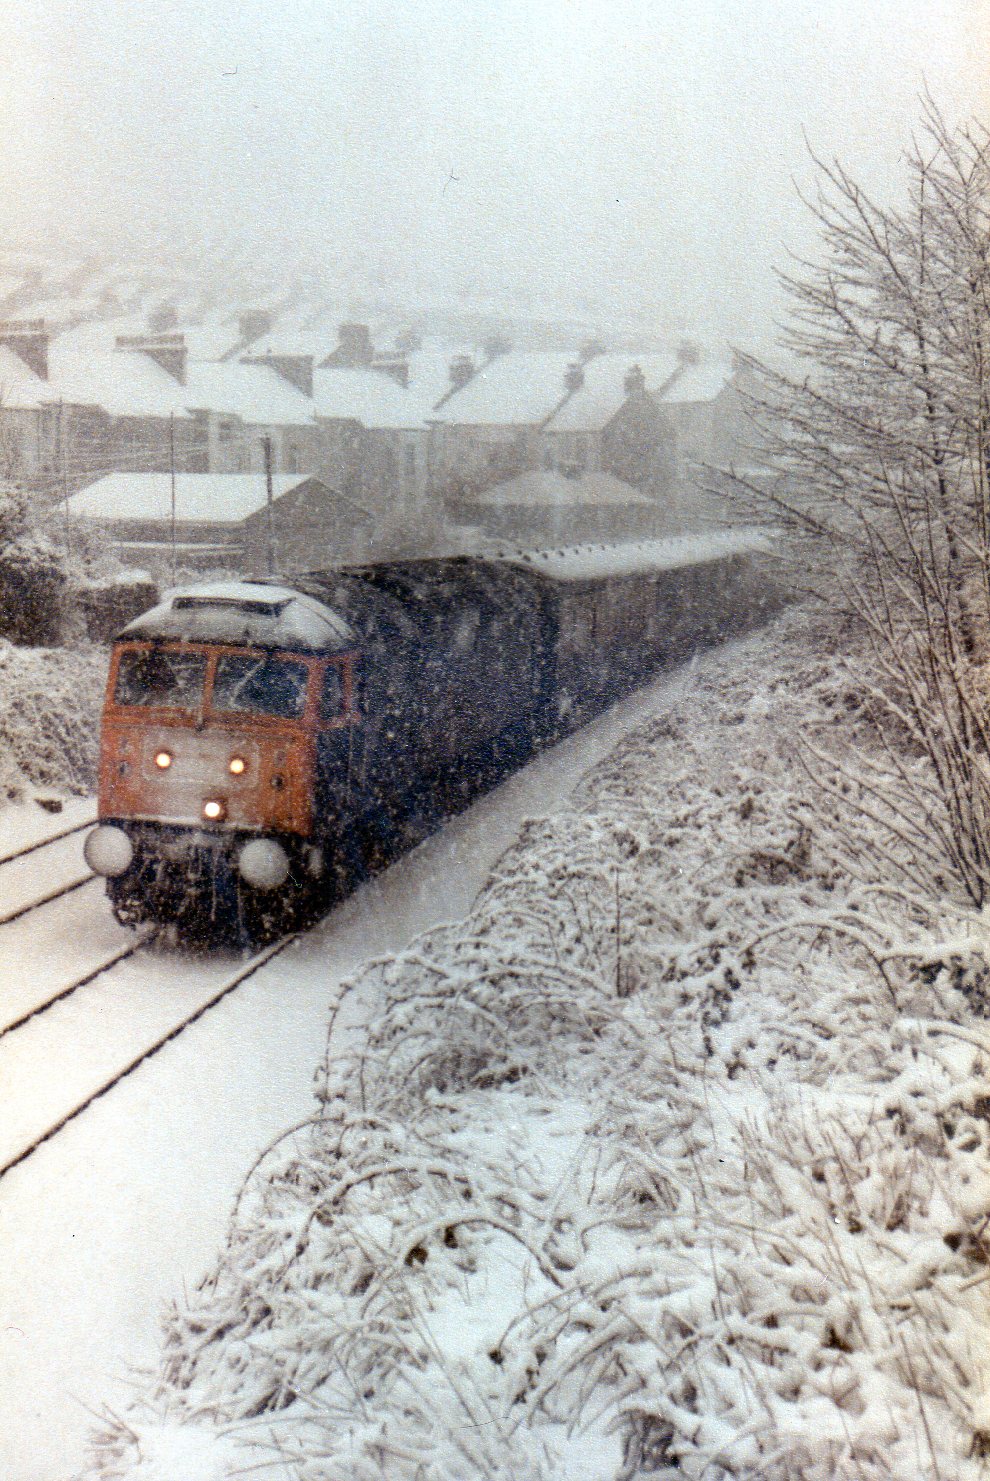
08 Lipson 47094 3C20 05.15 Paddington - Plymouth parcels 18th January 1985 Copyright Clive Smith
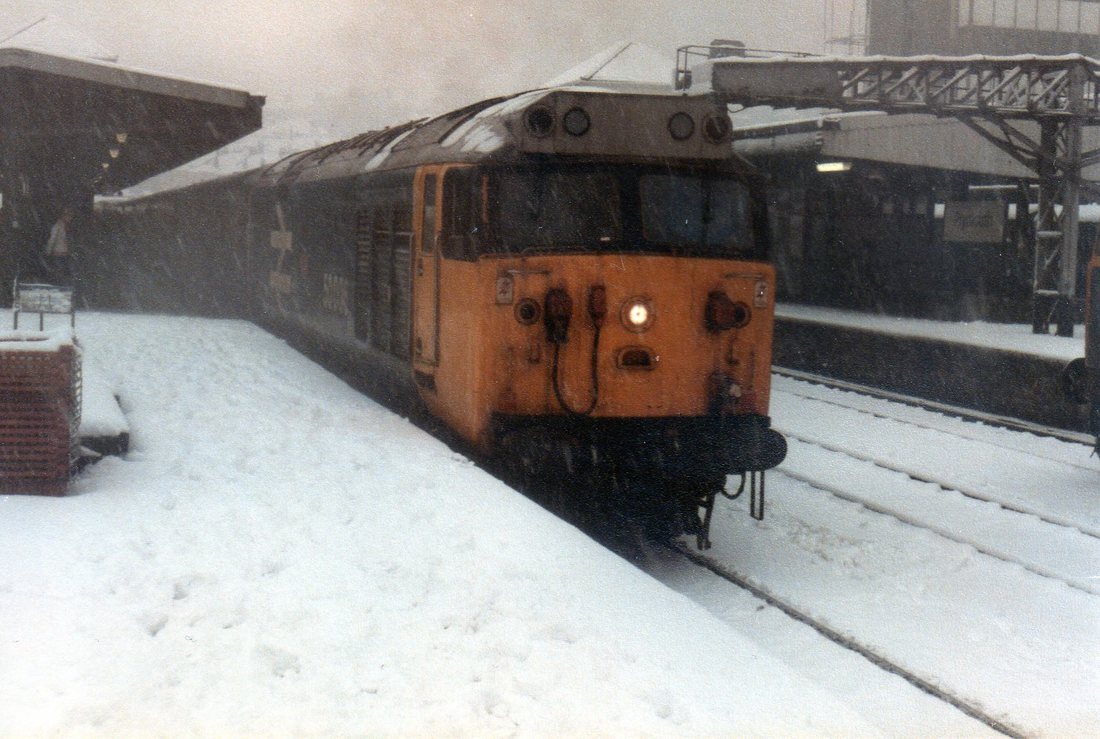
09 Plymouth 50006 Departing 1C27 09.40 Paddington to Penzance 18th January 1985 Copyright Clive Smith
Aerial views of Plymouth Station from the 7th Floor - Clive Smith
Now here's somewhere you'd all like to get, however its very security conscious and only those who work there or who have business there can gain entry.
Clive Smith who worked at intercity House from 1999 to 2012 was one of those lucky people who during lunch and tea breaks could go to a window and get those high level shots we all dream of. Many thanks for taking and sharing your pictures with us Clive.
Earlier in his career Clive had worked in London in 1987 working for BR at Paddington in what was called the Telephone Enquiry Bureau (T.E.B.). He then worked at the platform information office and ticket office.
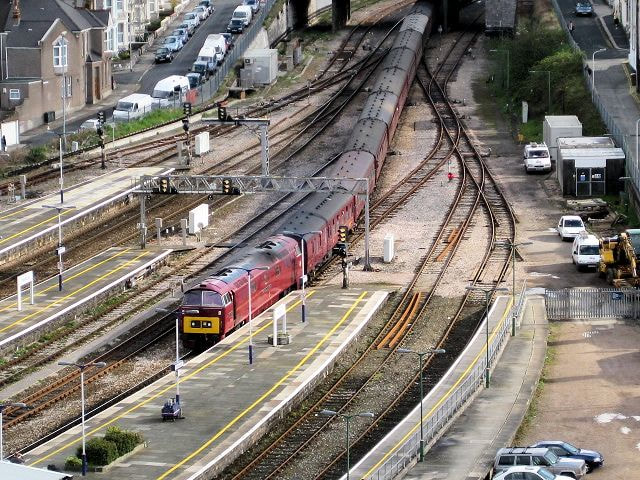
D1015 W Champion arrives at Plymouth with the Great Briton 11 Railtour 7th April 2009 Copyright Clive Smith
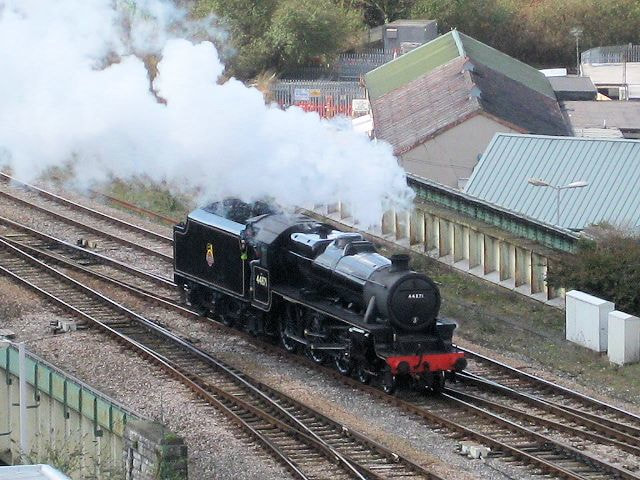
44871 seen here during a complex marshalling of the support coach and 70013 on the GB 11 railtour 7th April 2010 Copyright Clive Smith
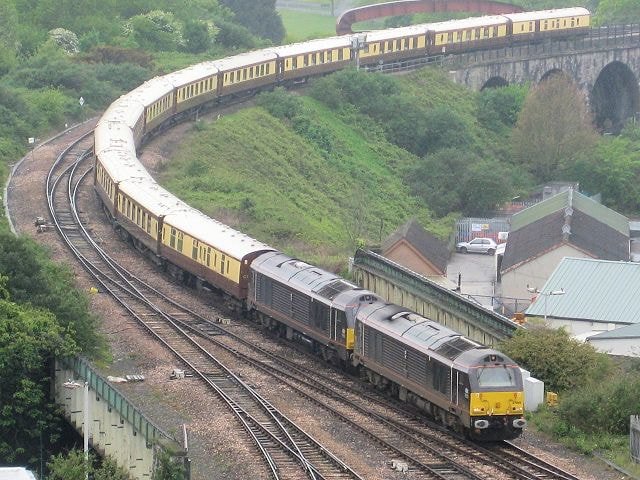
67005 Queens Messenger and 67006 Royal Sovereign arrive with the Truro to London Victoria VSEO Pullman 16th My 2010. Copyright Clive Smith

40145 on the rear of East Lancs Champion Railtour to Crewe 16th May 2010 Copyright Clive Smith
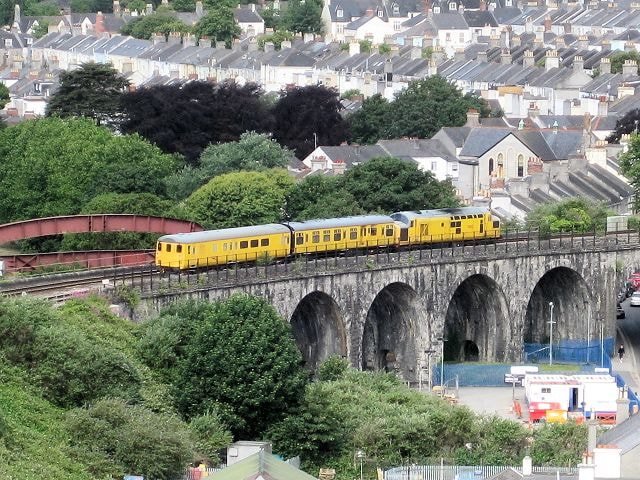
97301 (Ex37100) crosses Pennycomequick Viaduct 9th June 2011 Copyright Clive Smith
Many thanks Clive