Plymouth to Launceston GWR
Credits, Many thanks to all contributors - please see a list on the home page.
USEFUL MAPS
Members and general visitors to the CRS site will be interested in visiting http://www.railmaponline.com From the opening page a full map of the UK can be accessed which can then be enlarged to show every railway line in the UK. Not just today's network but lines from the past have been overlaid. As you zoom in sidings and even tramways become visible.
A valuable tip from Guy Vincent.
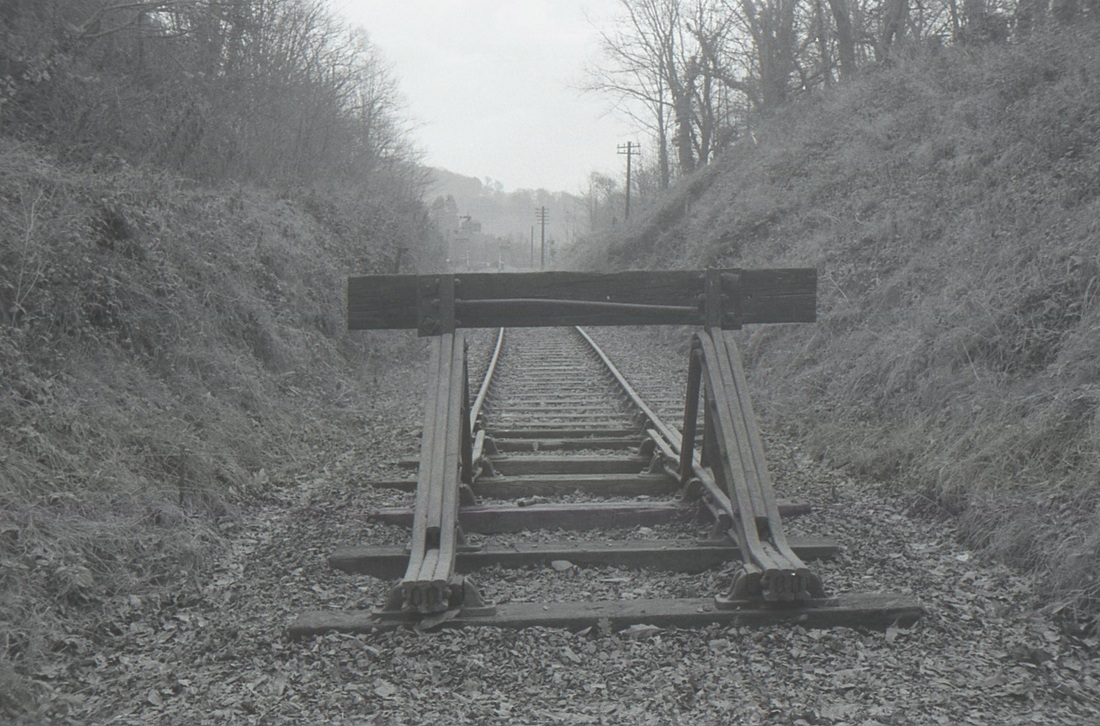
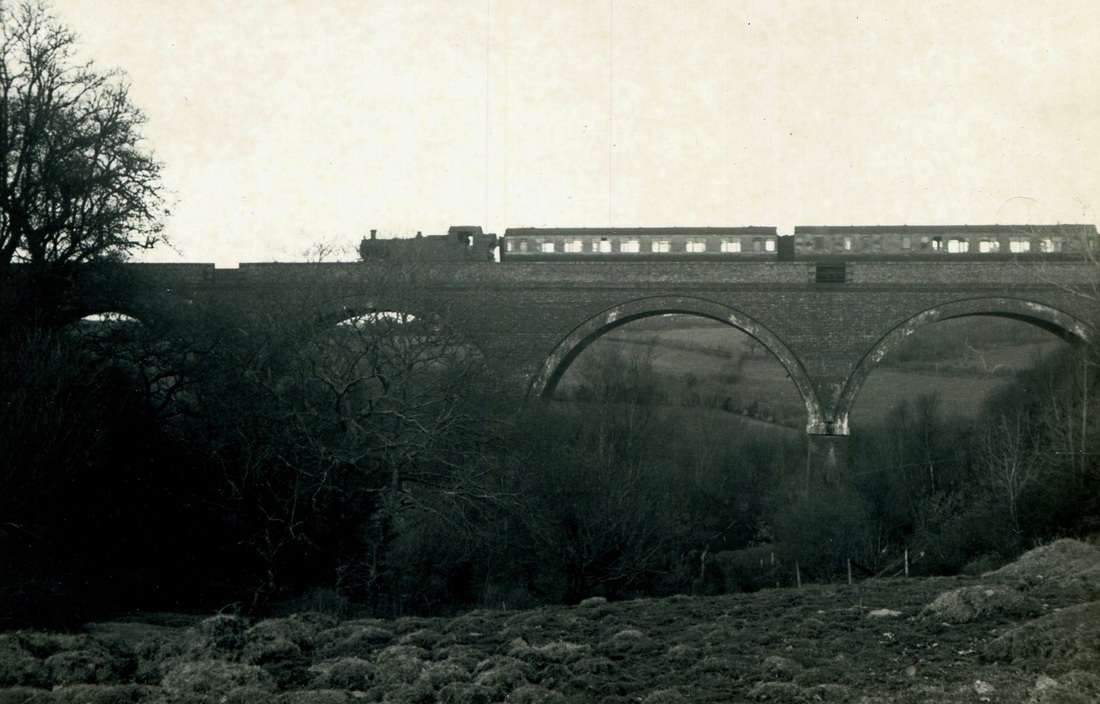
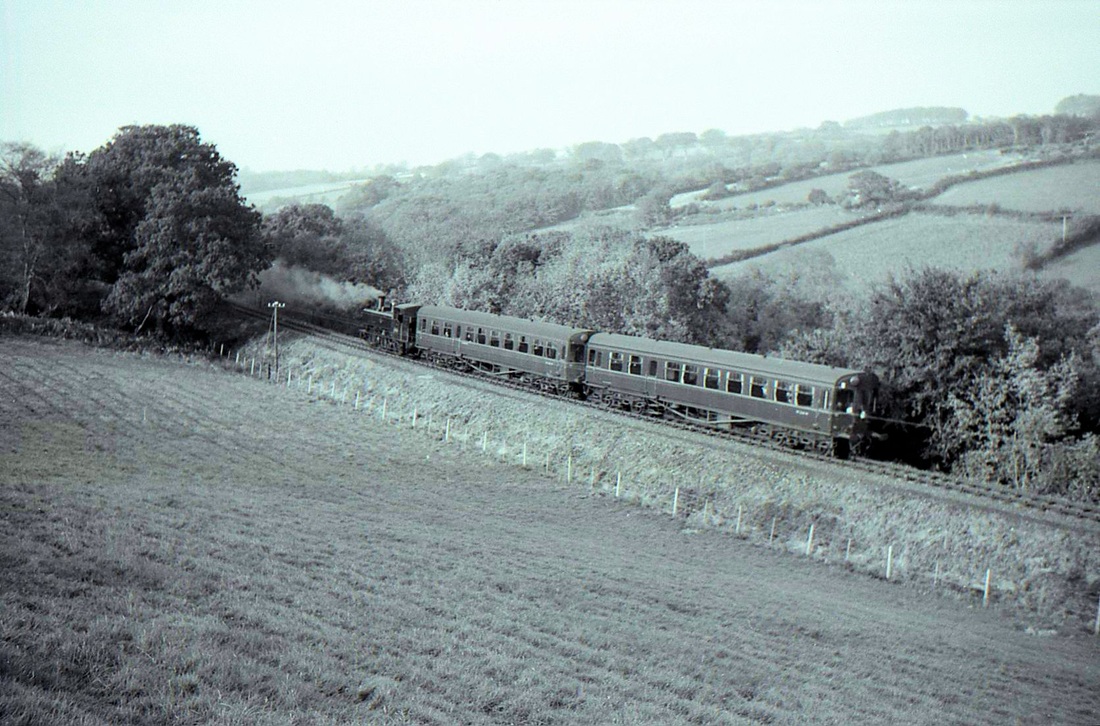
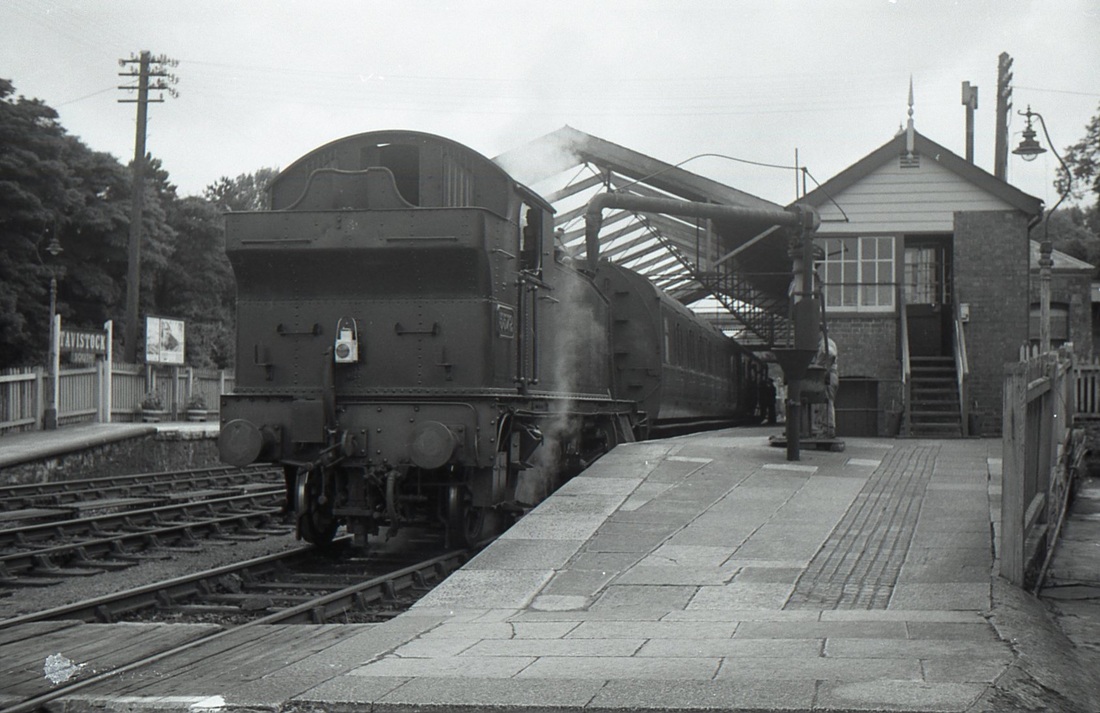
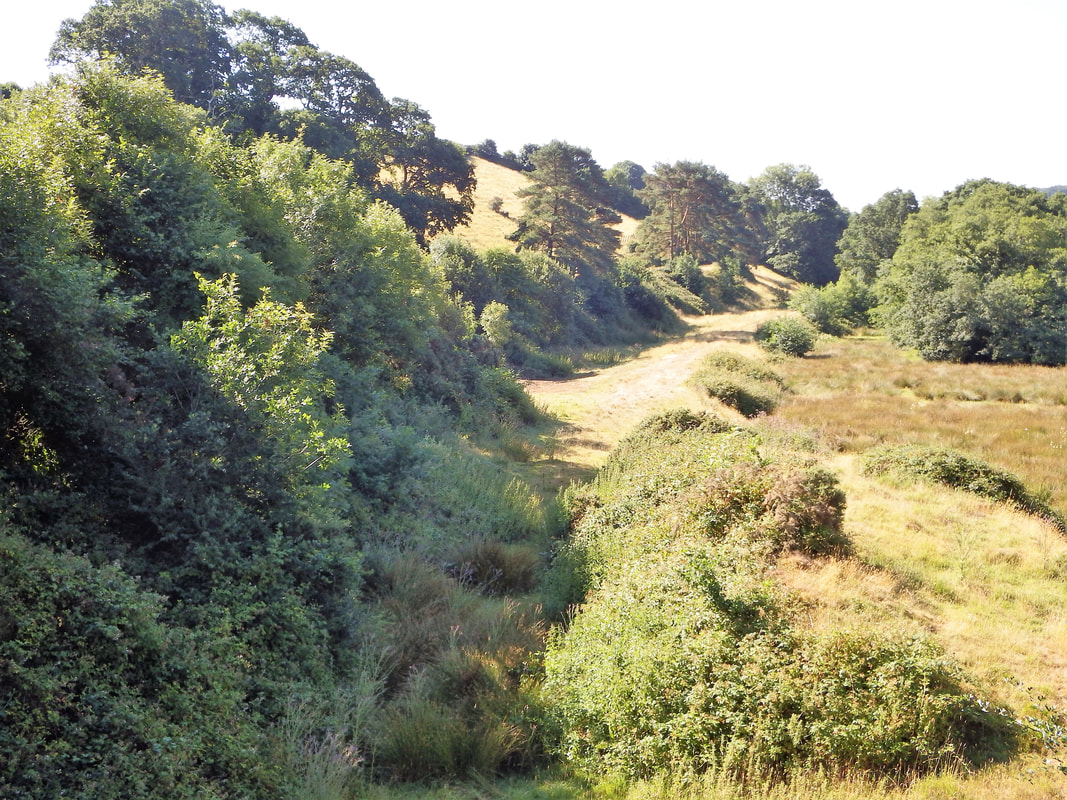
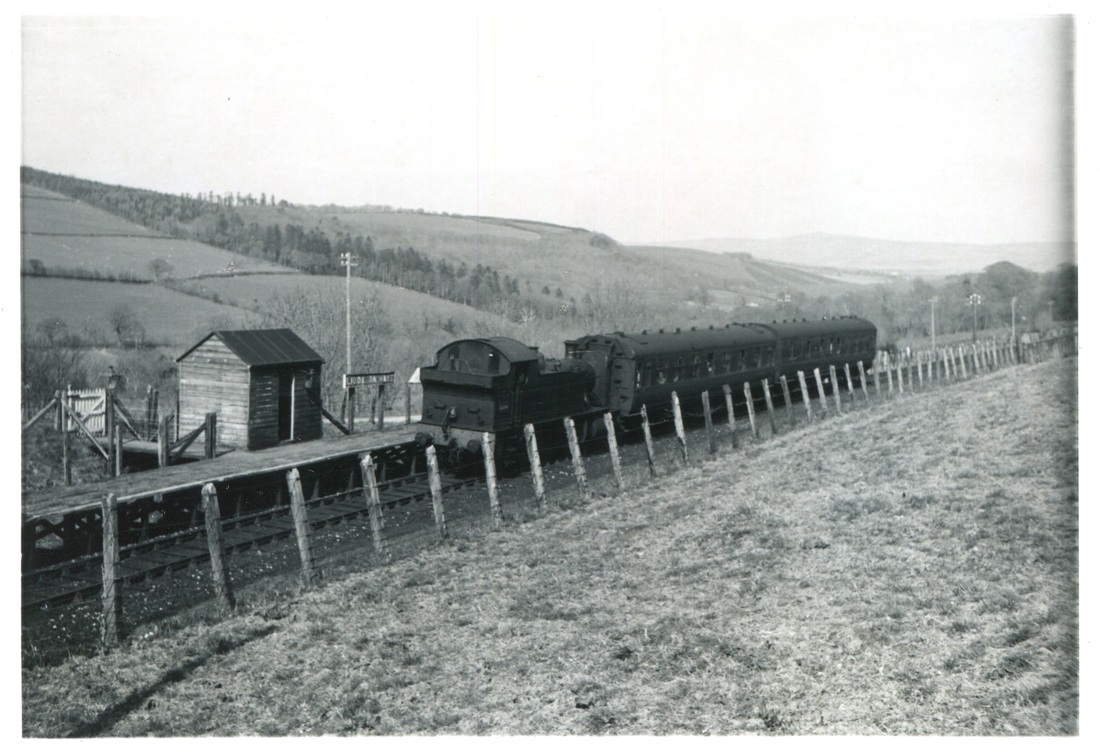
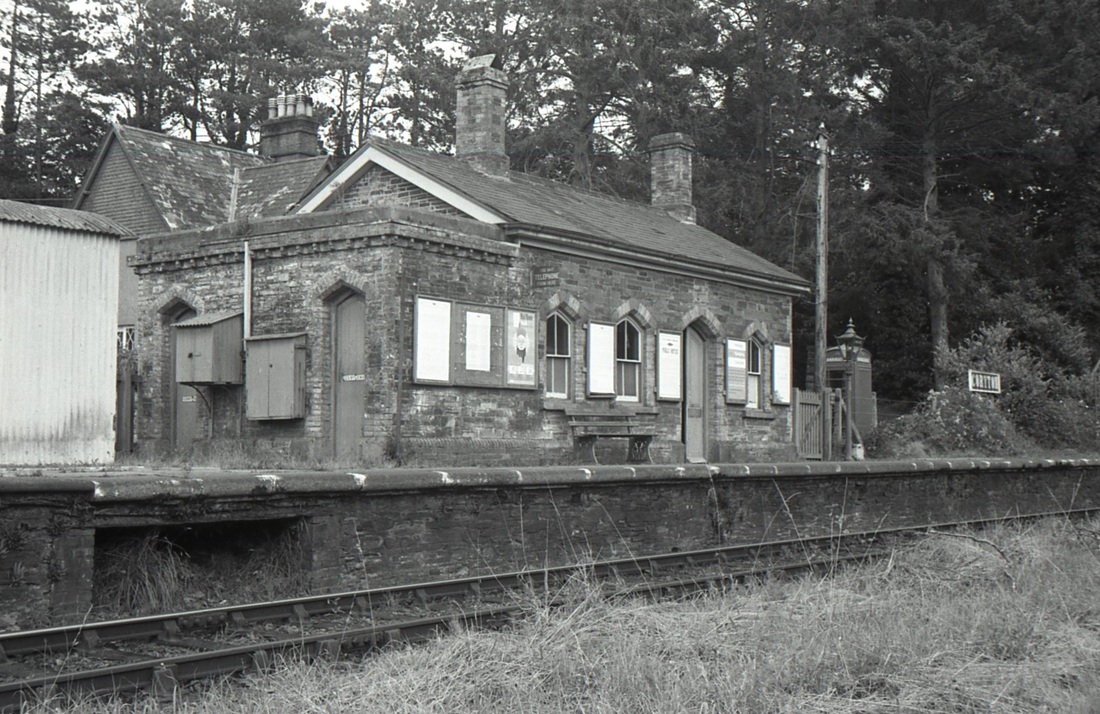
This branch line suffered a memorable closure on December 31st 1962 with trains not recovered off the branch until early January 63.
Sid Sponheimer travelled the branch on the very last day - to see his pictures click here
Sid Sponheimer travelled the branch on the very last day - to see his pictures click here
Timetable - Plymouth, Tavistock S and Launceston Winter 1962/63

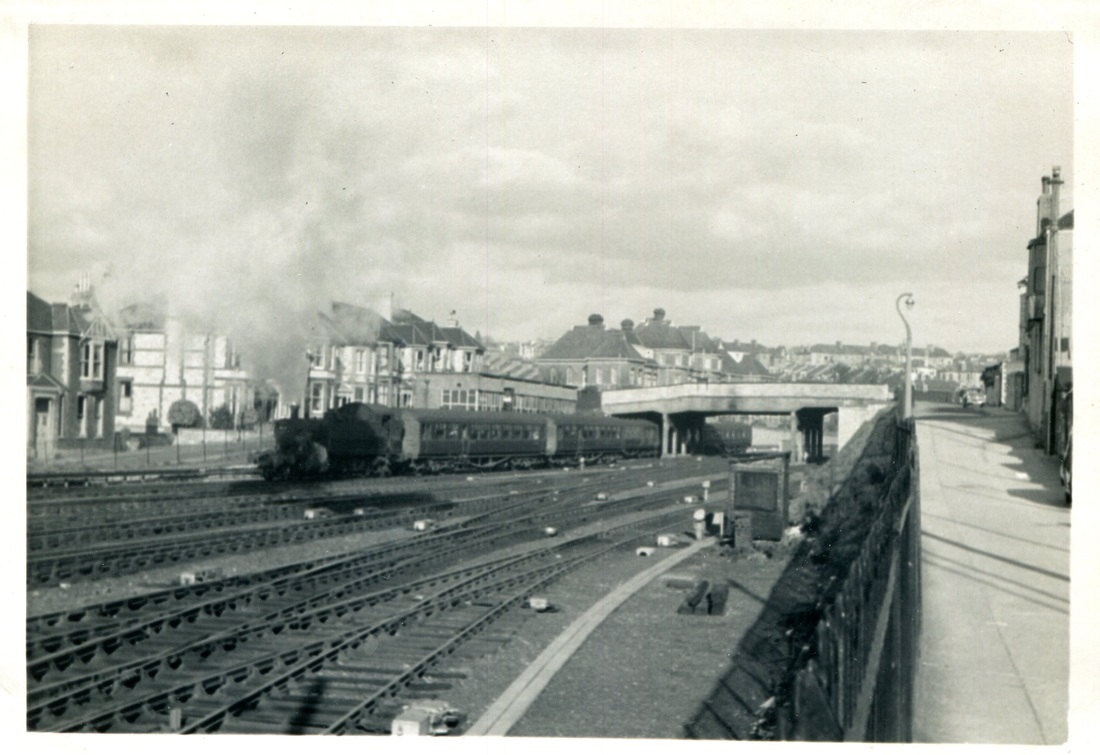
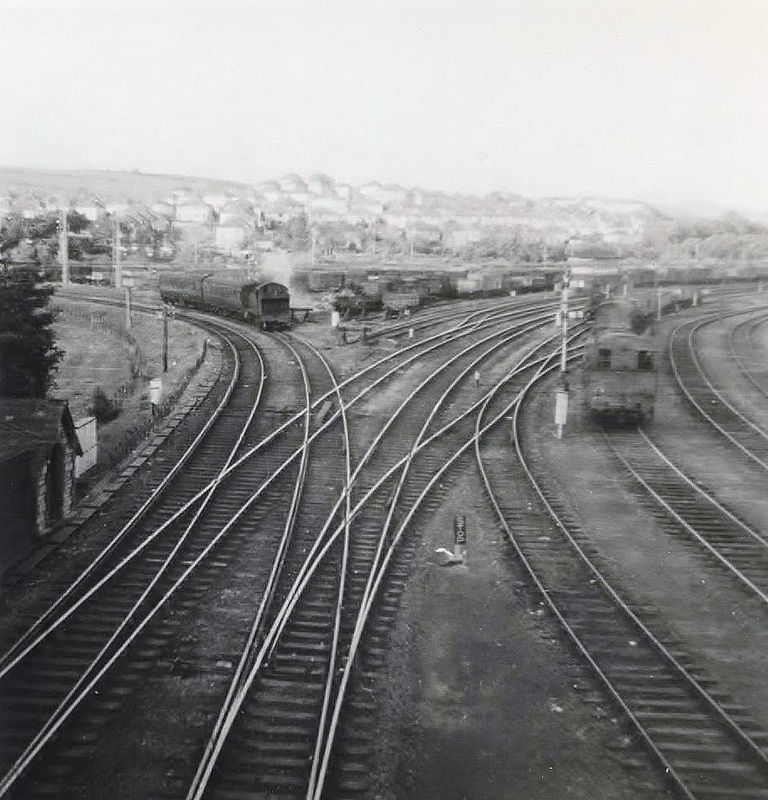
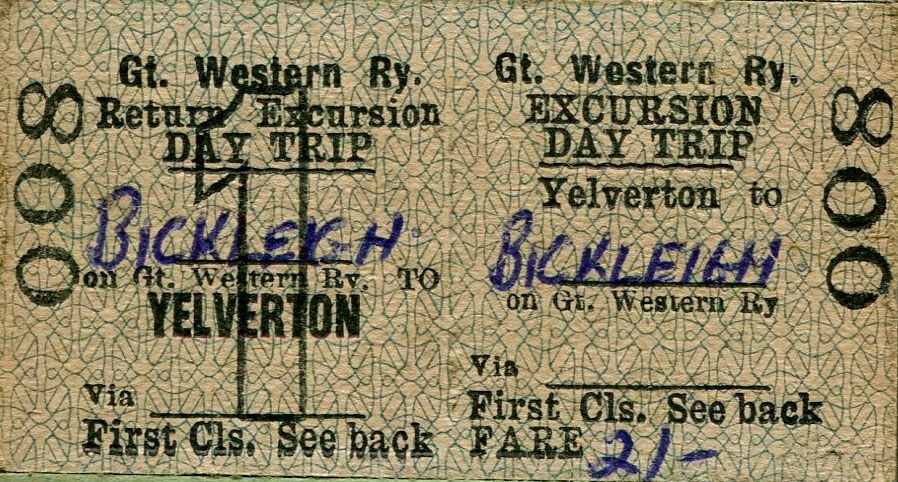
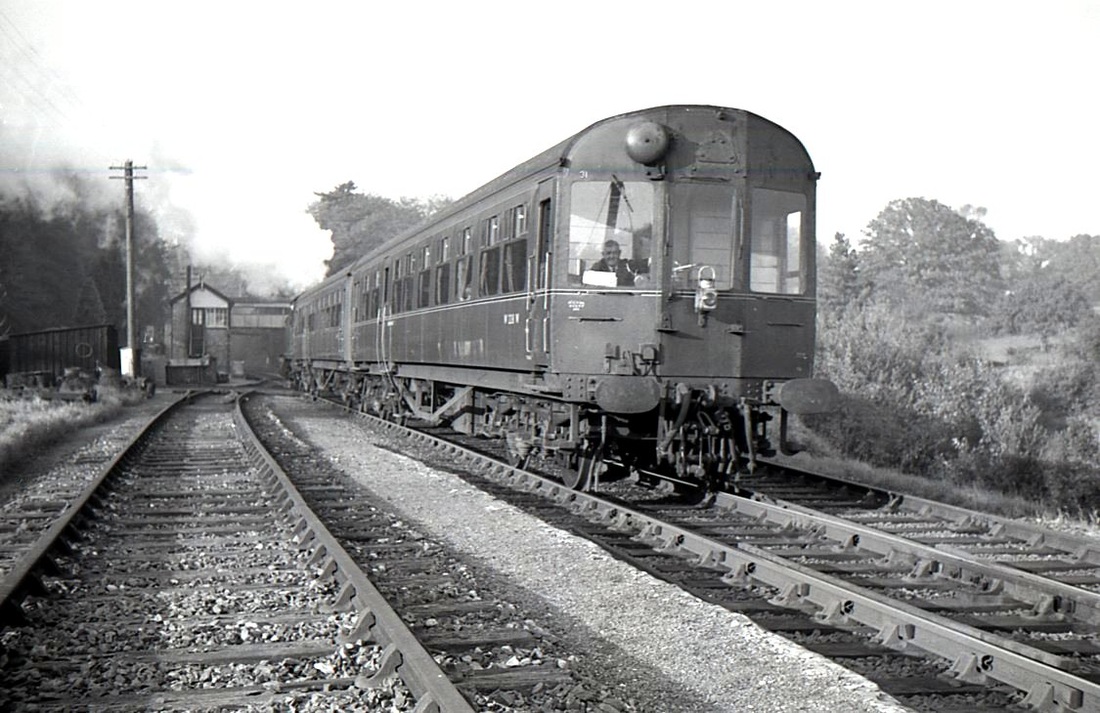
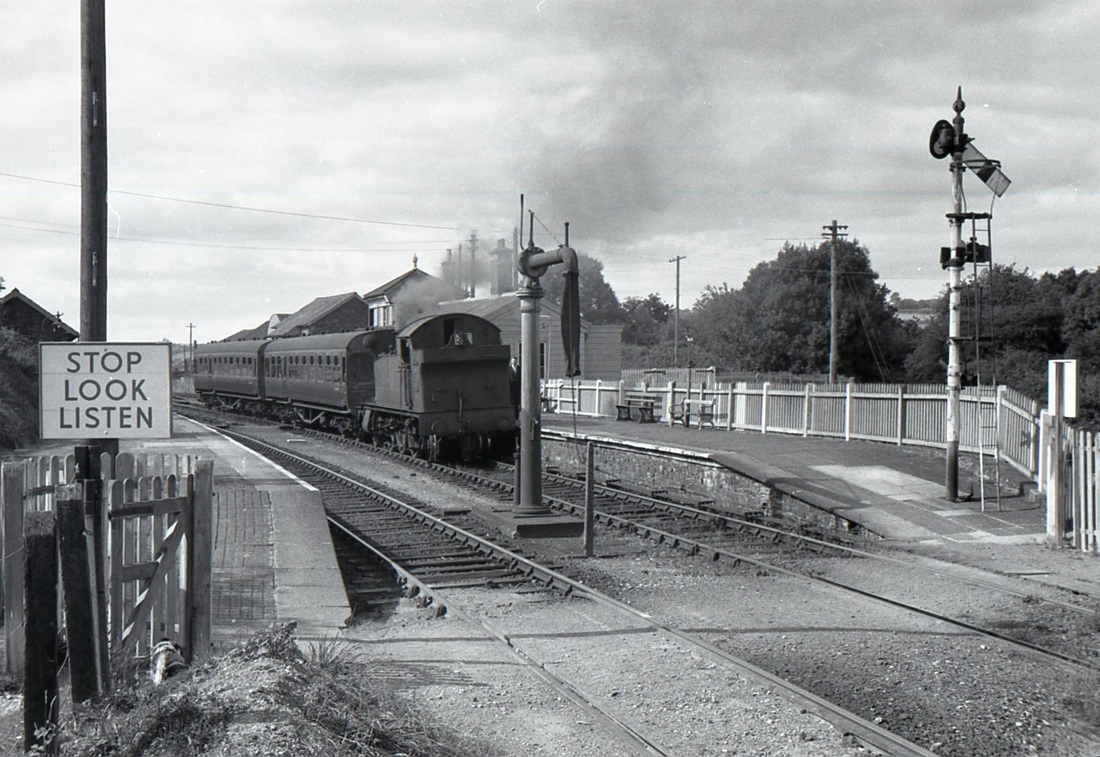
Plymouth
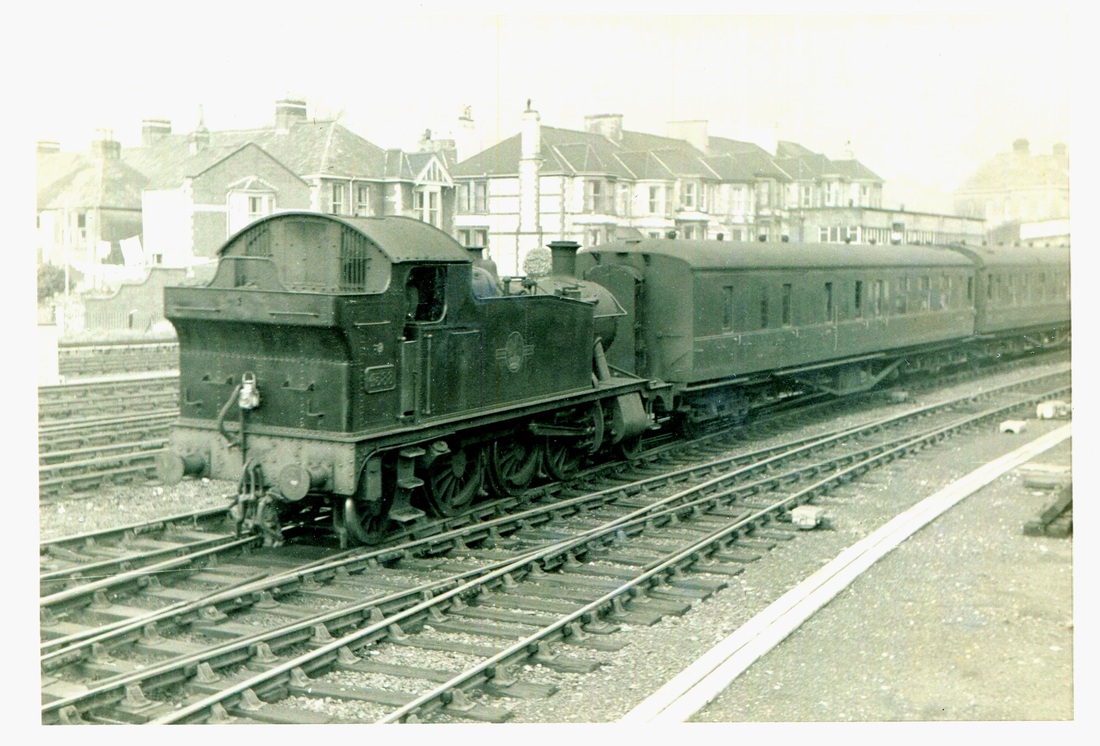

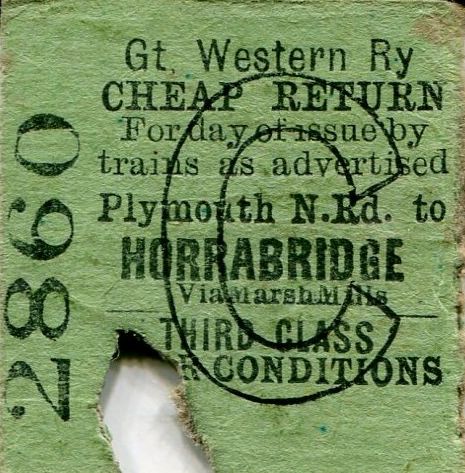
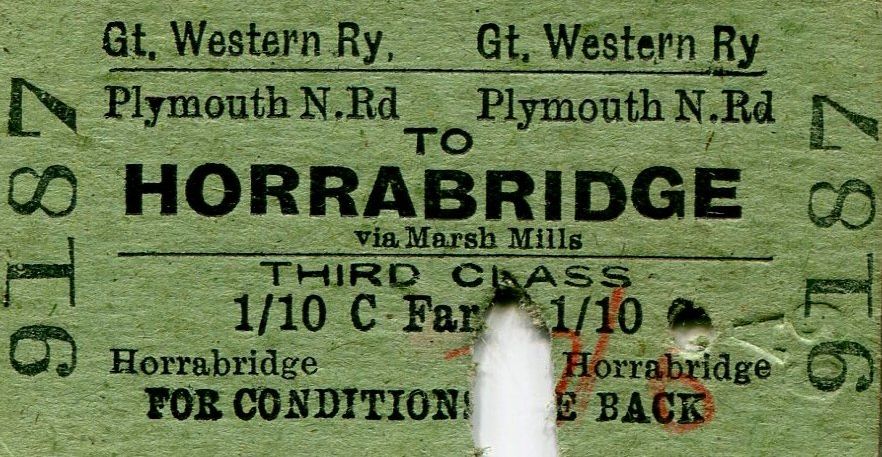
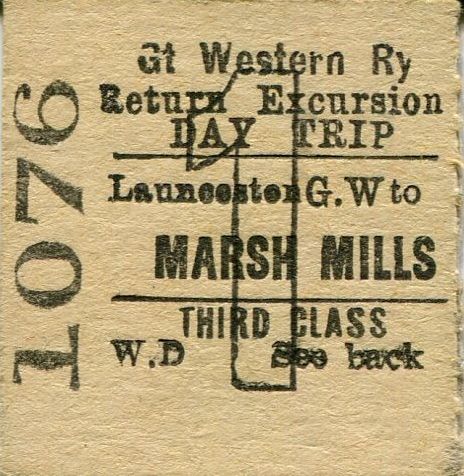
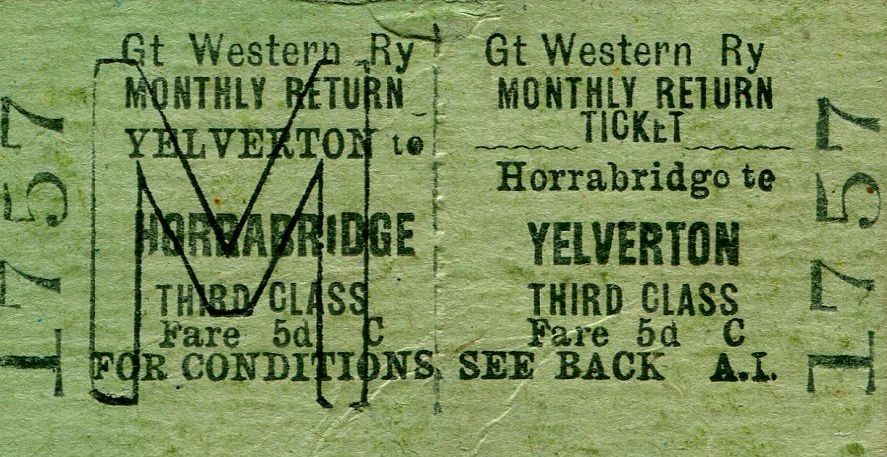
Mike Roach ticket collection
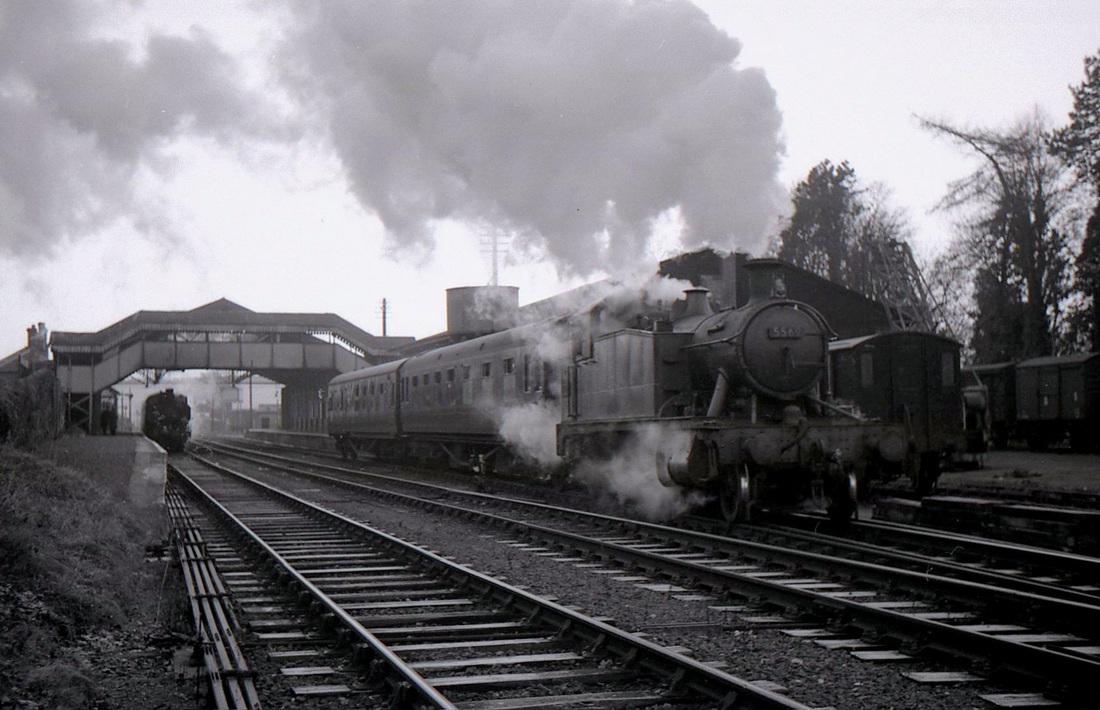
Passing Laira steam shed
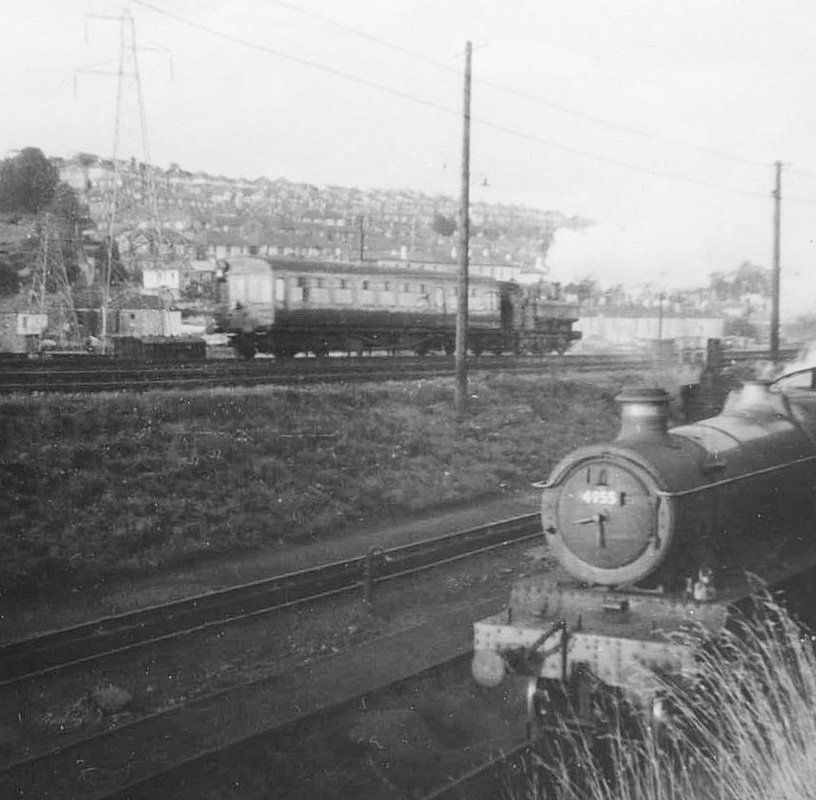
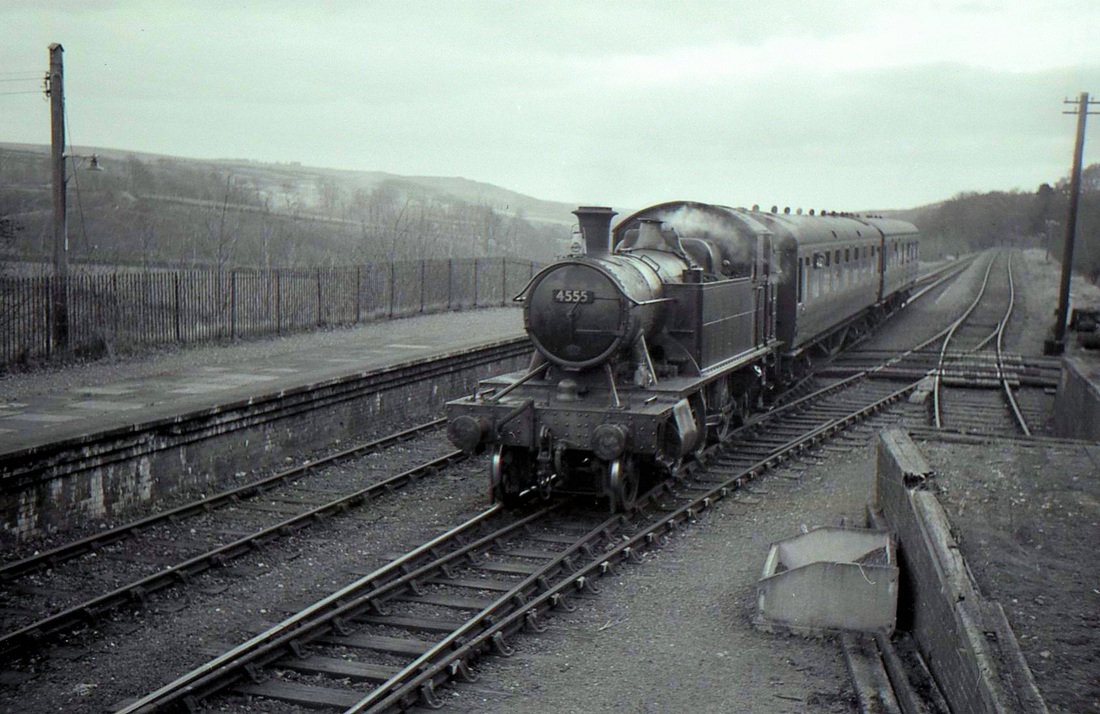
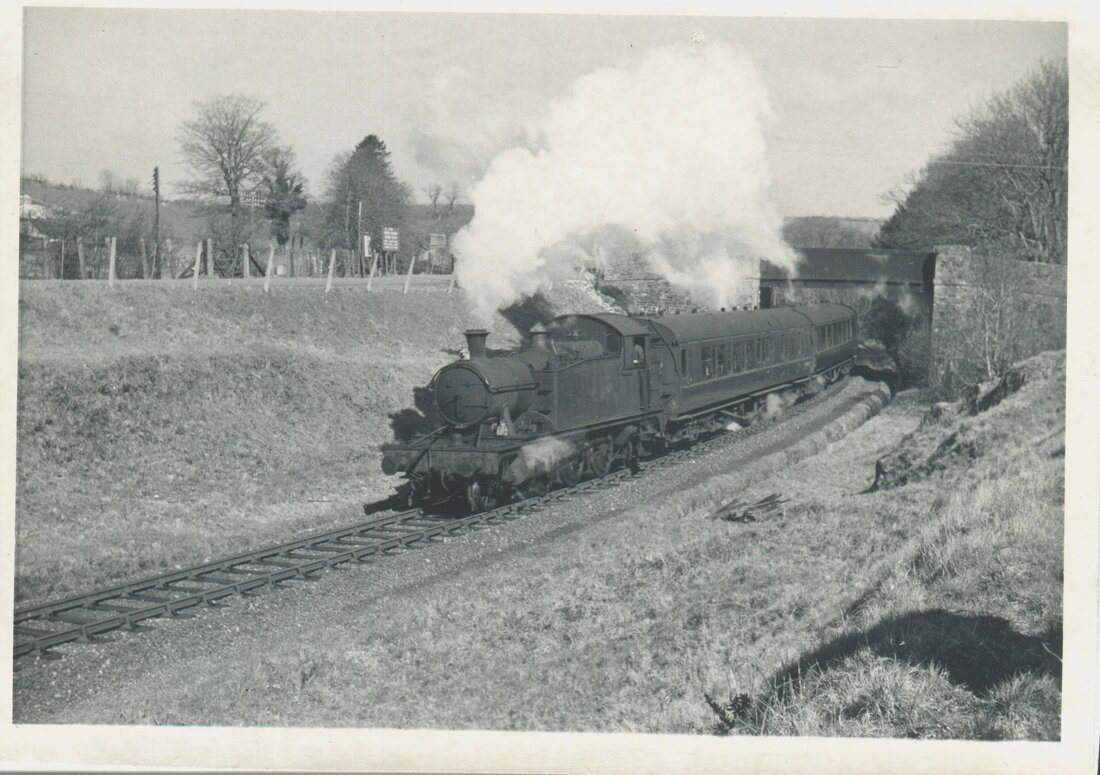
4955 Plaspower Hall stands at the coaling facility as the Tavistock Auto hammer up the bank towards Plymouth. Copyright Sid Sponheimer

A Warship diesel stands at the throat of Laira shed whilst a 55 makes its way to Plymouth North Road. Copyright Sid Sponheimer
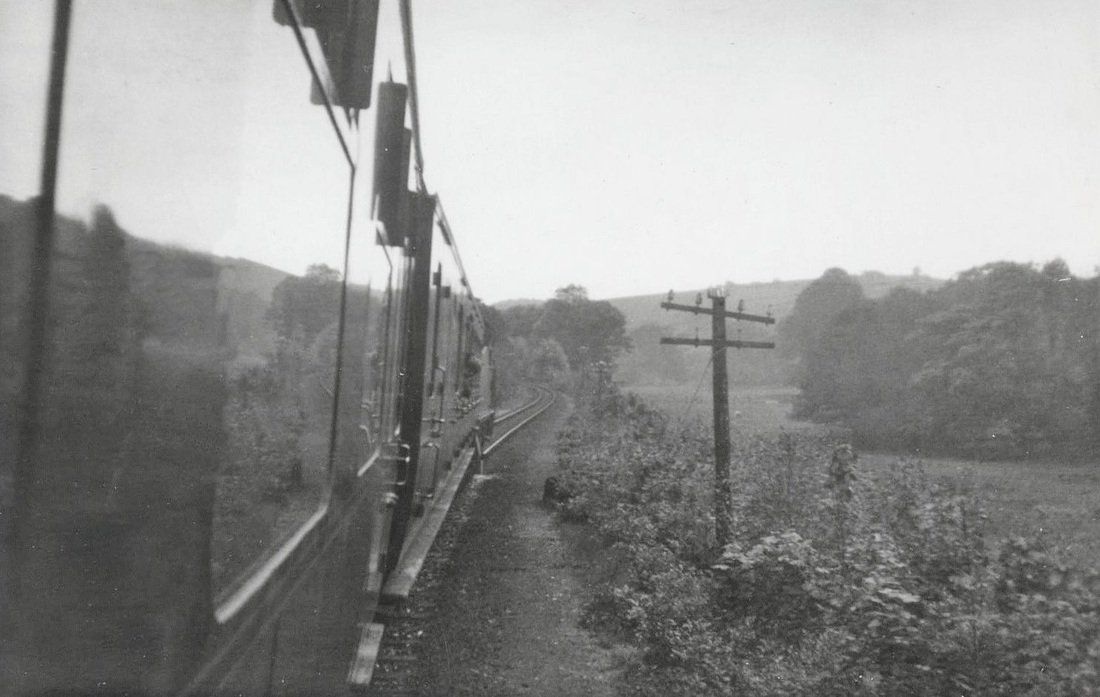
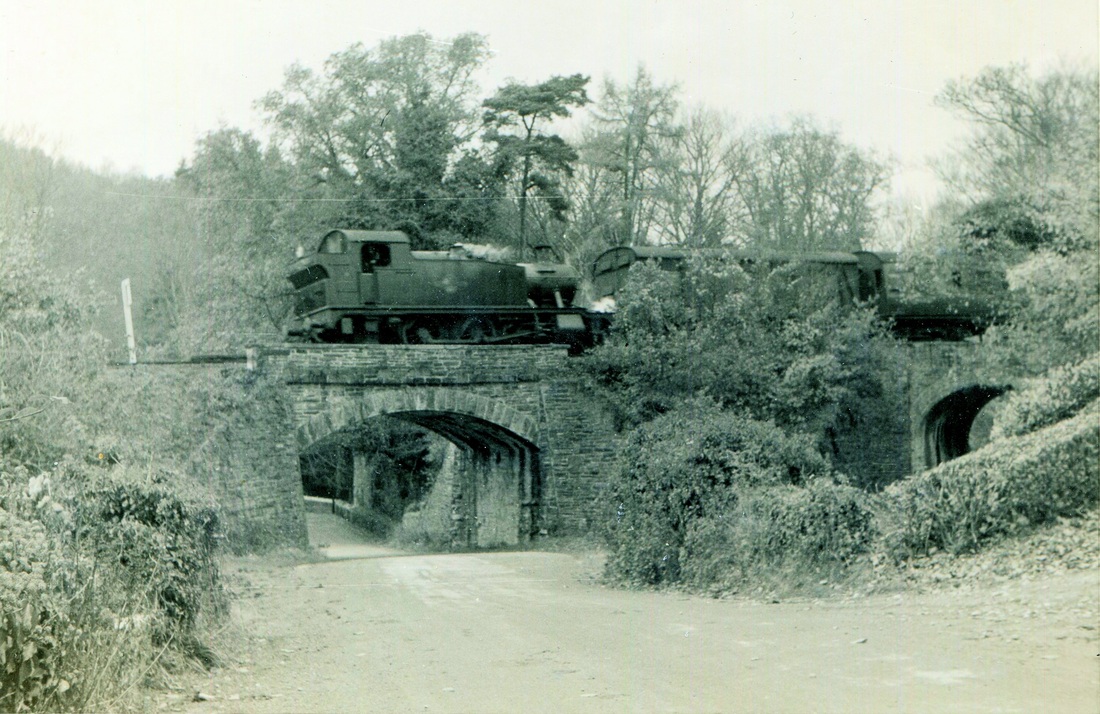
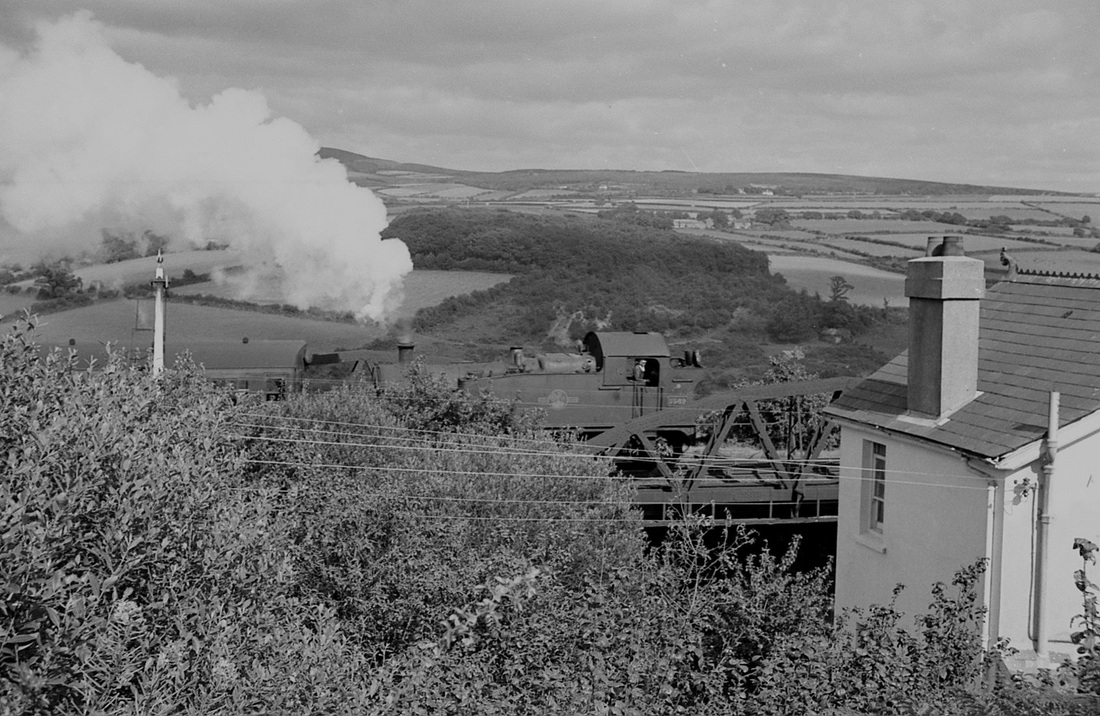
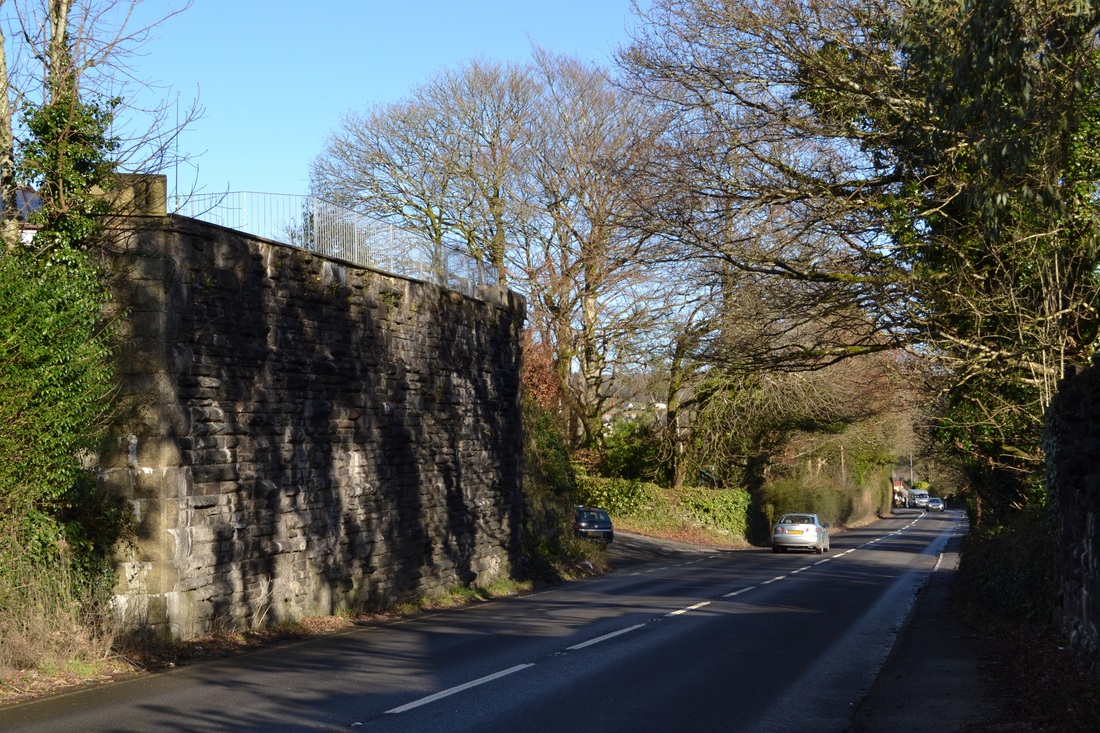
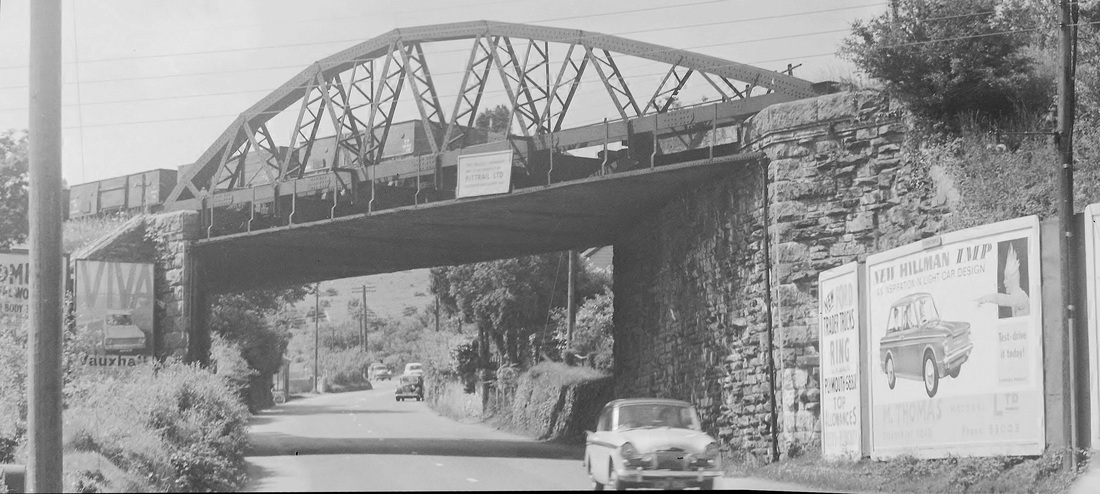
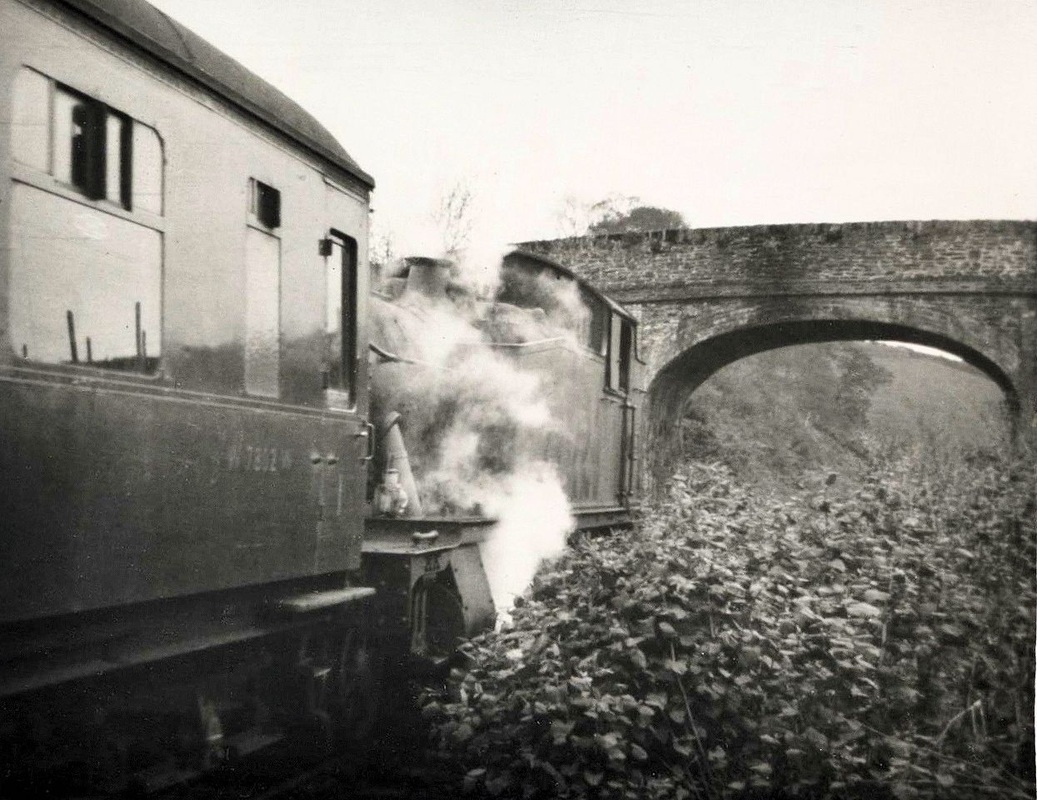
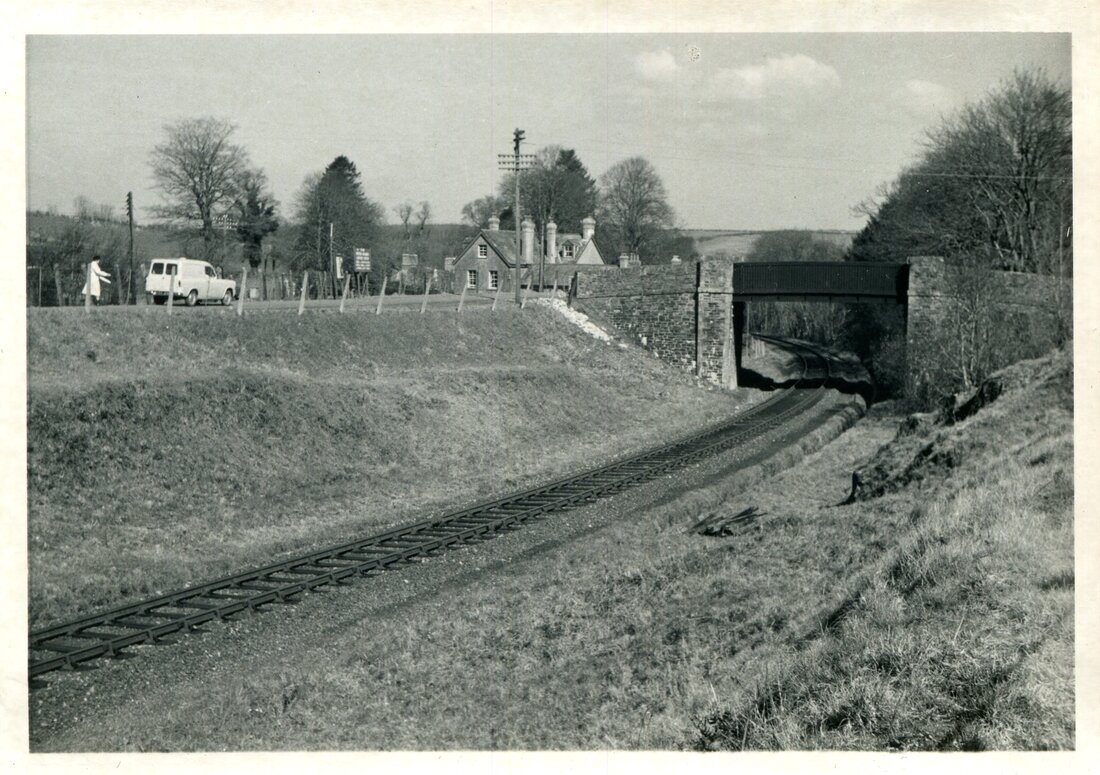
From the Lee Moor tramway. Heading east having passed Laira sheds the main line passe under a road overbridge, just before this the Lee Moor tramway crossed the main line to parallel it for some distance as it headed east. This section is now buried under a new roadway Thus the picture below, taken from the tramway is no longer possible, not that it is likely that an Auto Train will come past anyway!
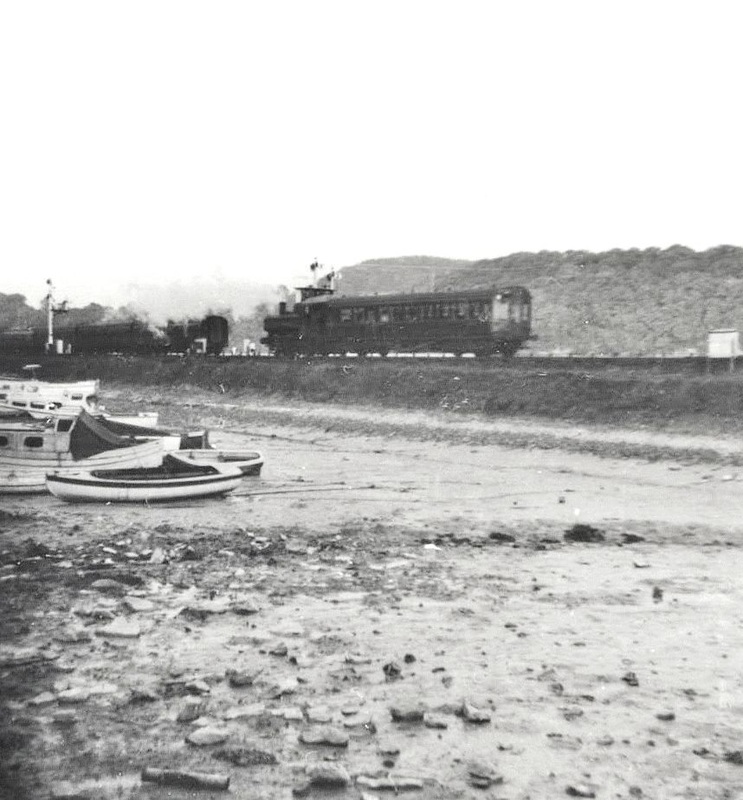
As can be seen a small sheltered backwater lay to the north of the main line, this was accessed by a bridge under the line. This picture from the tramway shows an 'Auto' on its way towards Plymouth. The Saltram Estate lies on the distant hill across the river Plym. Copyright Sid Sponheimer.
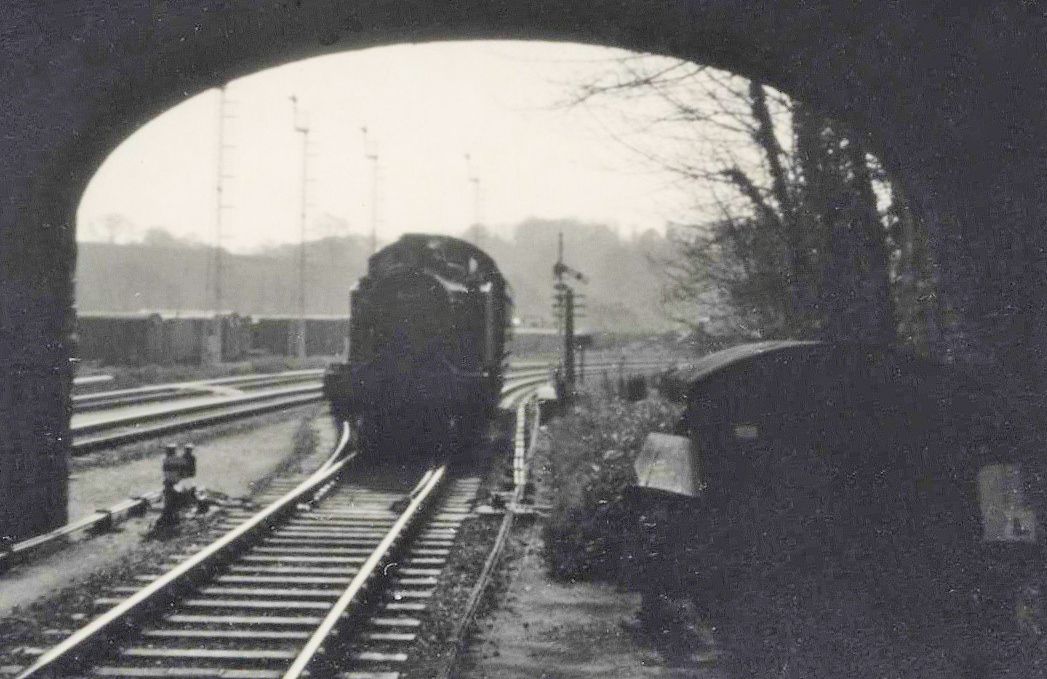
Tavistock Junction
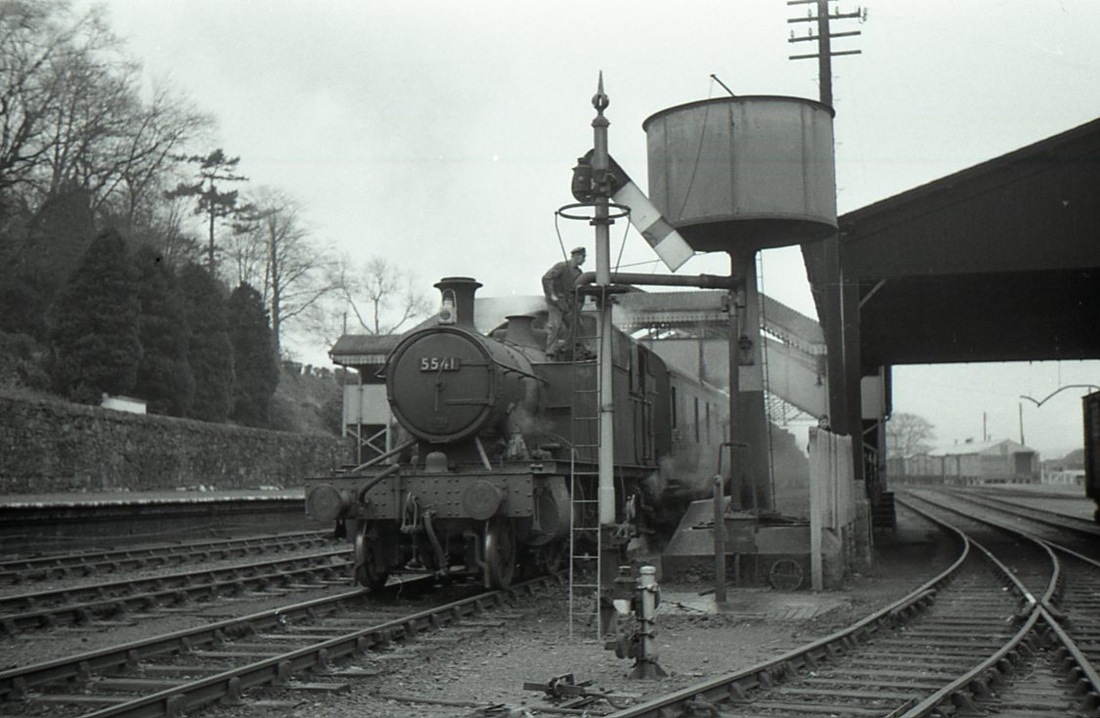
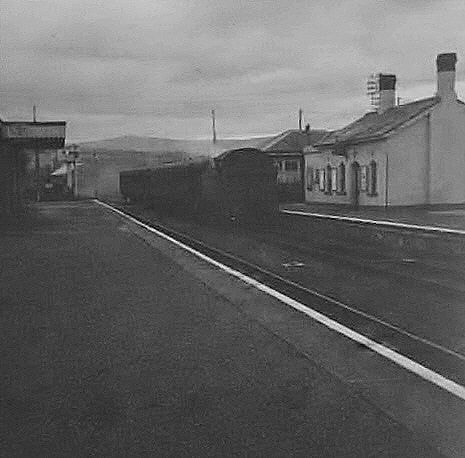
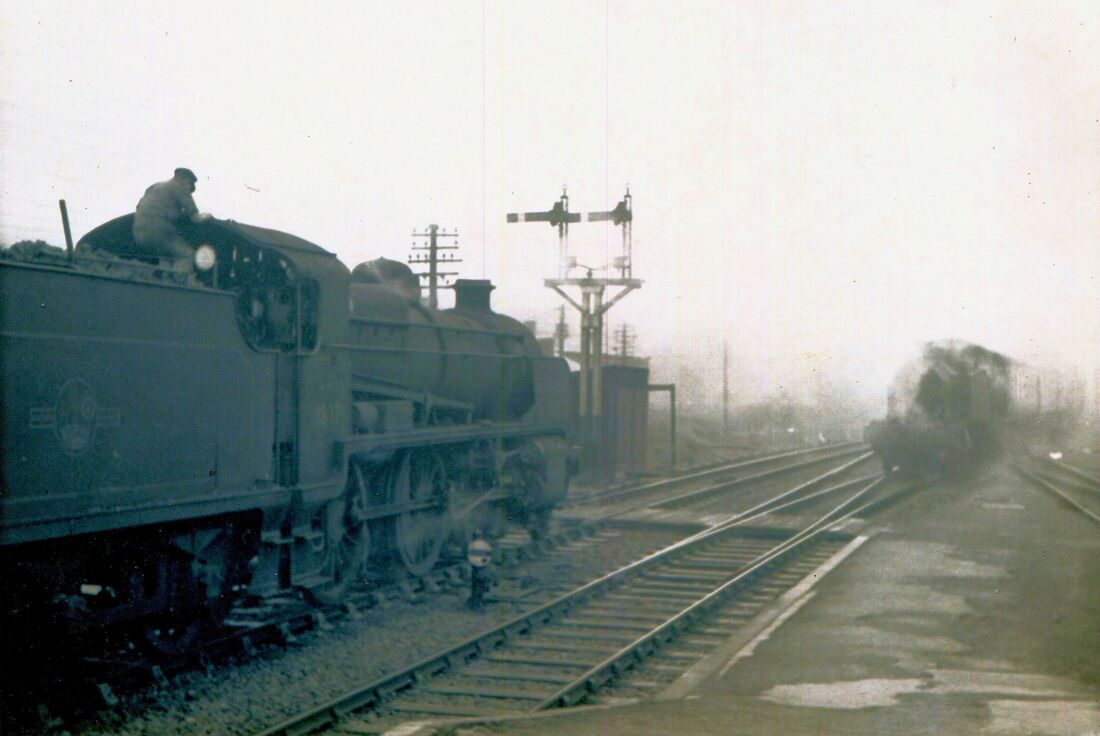
Tavistock Junction 1st August 1962 a '64' with a single coach probably just from Tavistock coming off branch Copyright Mike Roach
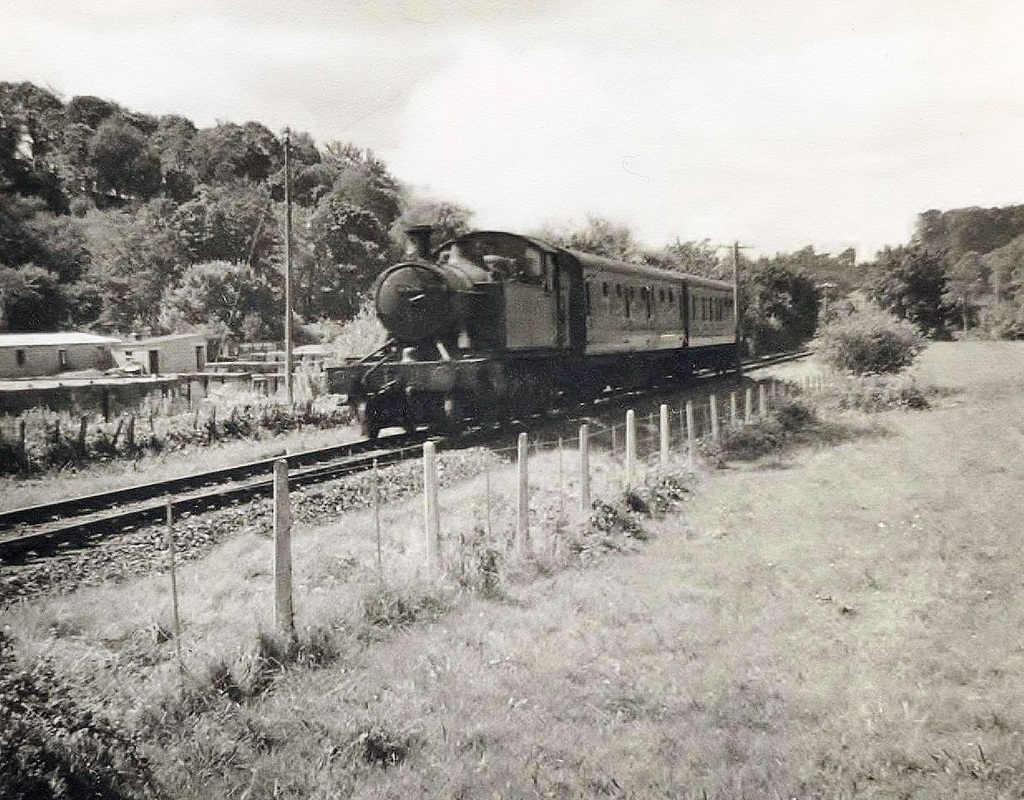
A '55' come from Marsh Mills to join the main line for the run up to Plymouth. Copyright Sid Sponheimer
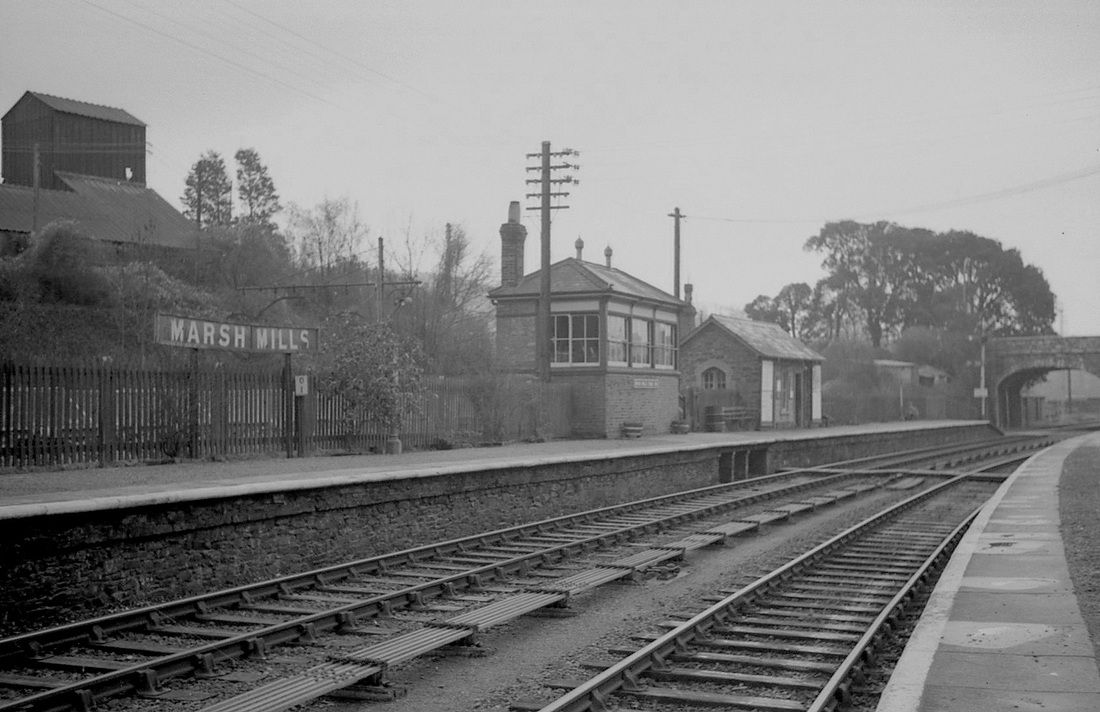
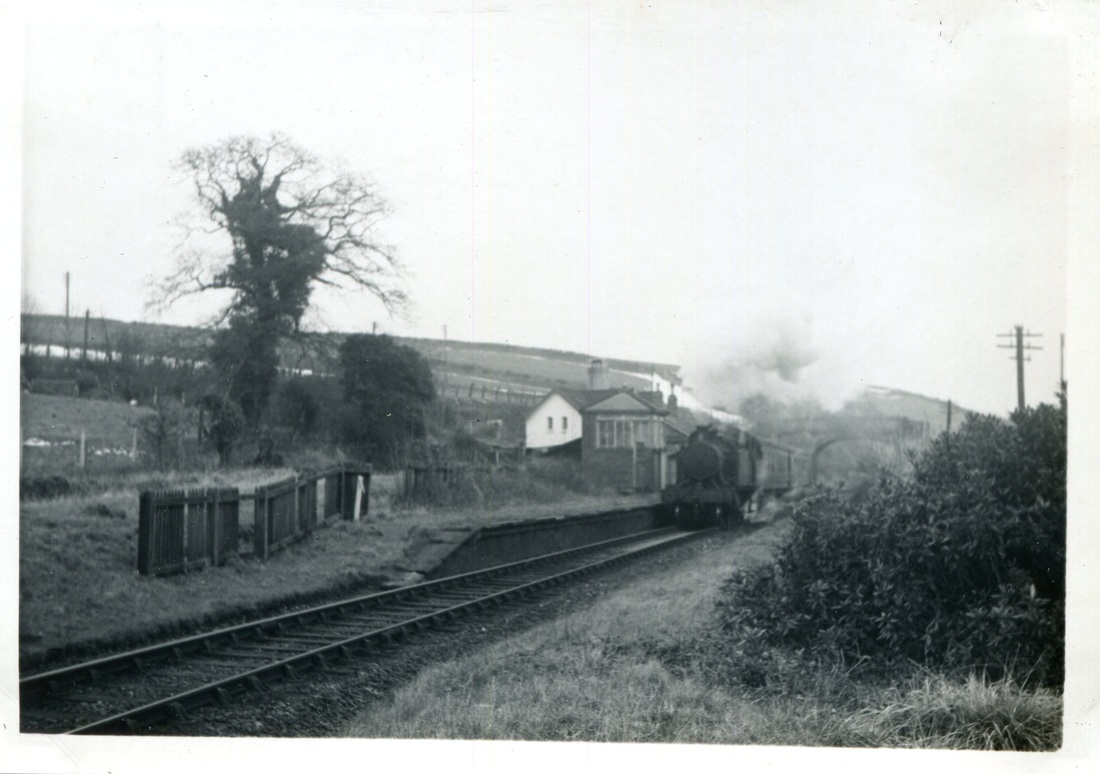
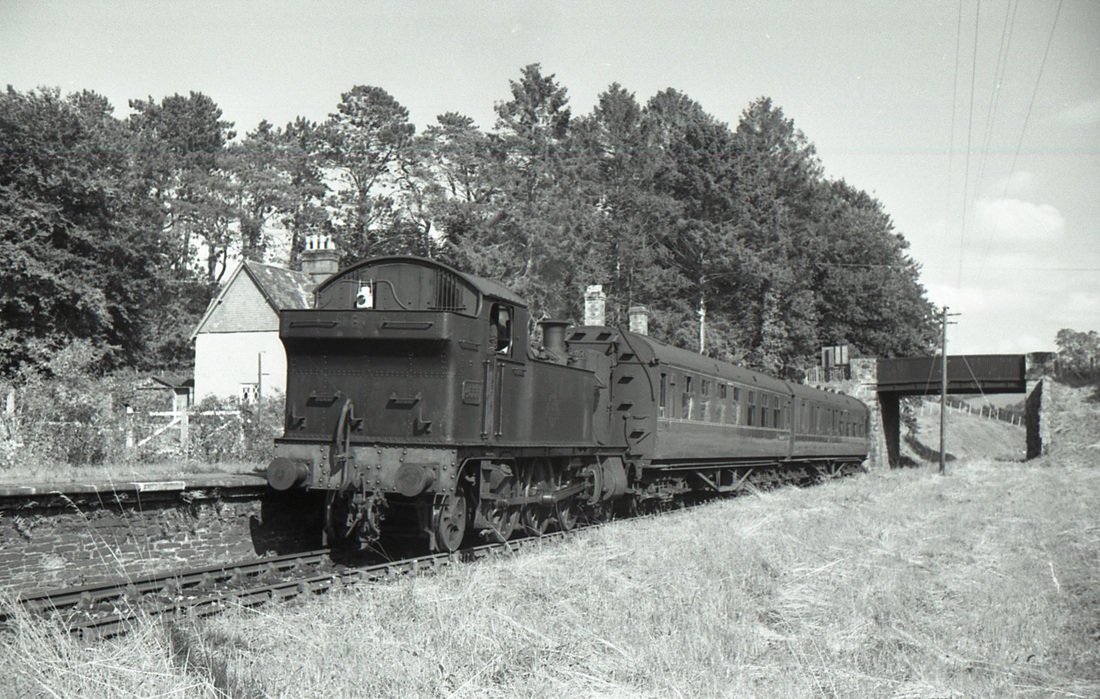
Marsh Mills
Courtesy the Mike Morant collection
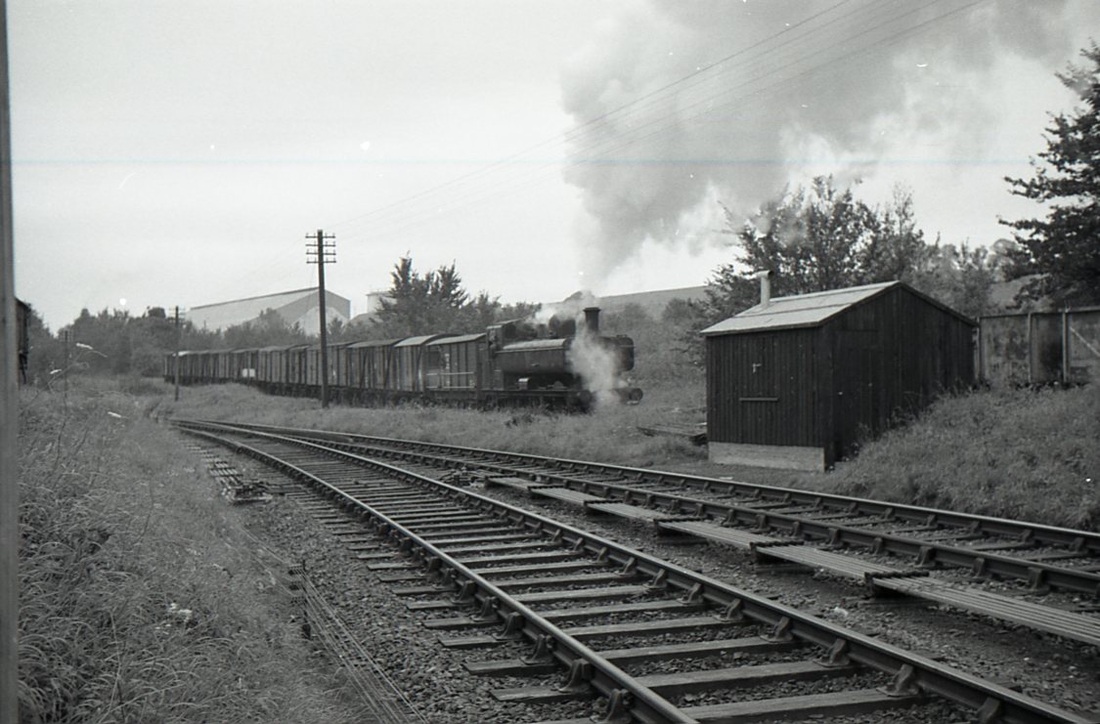
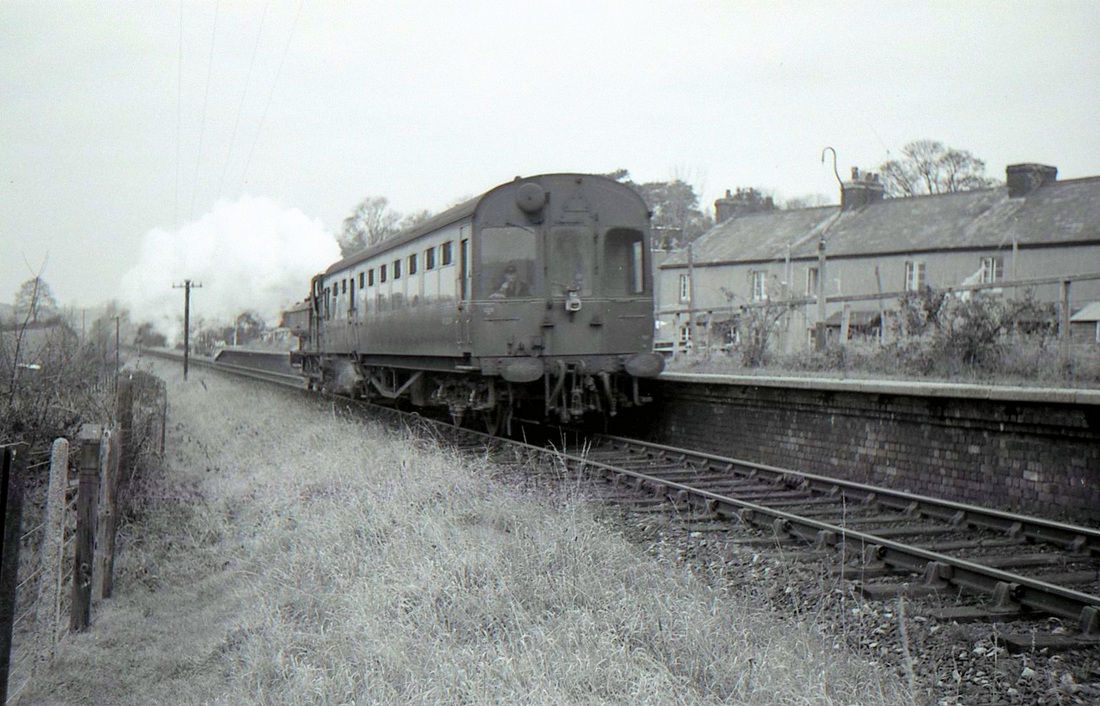
5568 comes in off the main line to pass under this bridge and into Marsh Mills station. Note the large amount of stock parking in the sidings a Tavy Junction Yard. Copyright Sid Sponheimer
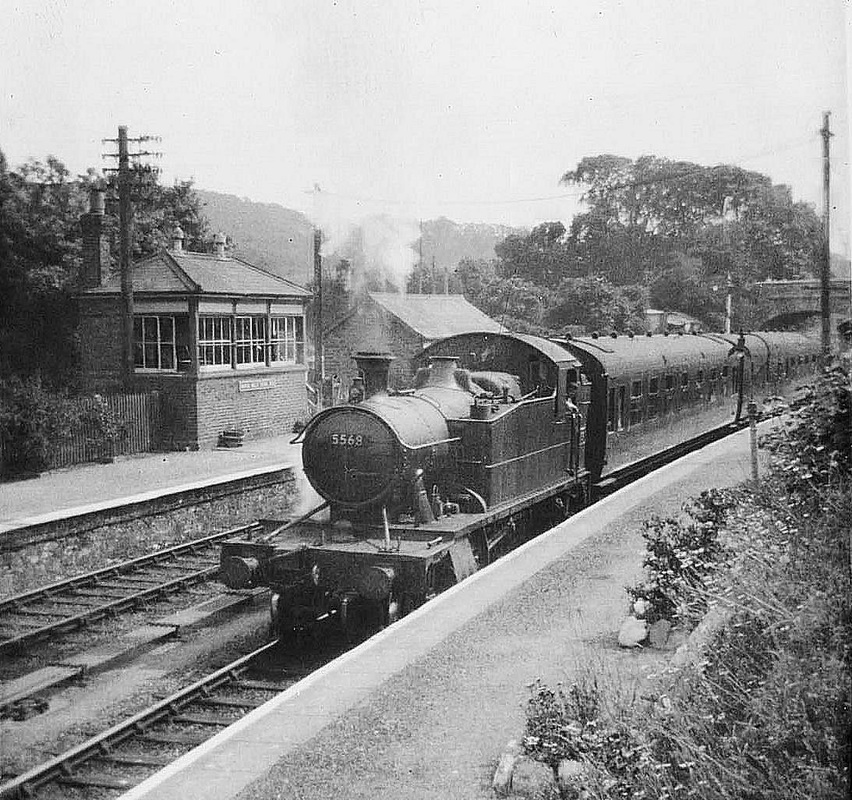
5568 now stationary at the platform. Copyright Sid Sponheimer
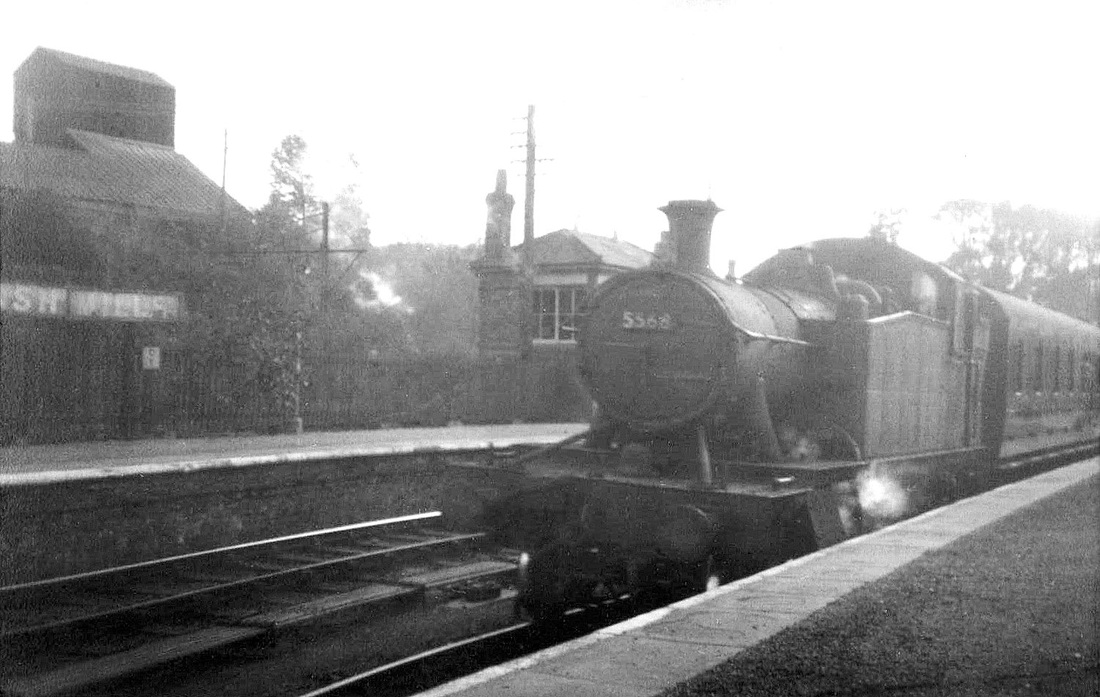
A 'low view' of 5568. Copyright Sid Sponheimer.
5568 was held at Marsh Mills until this train again headed by a 55 runs in probably with a service from Launceston. Copyright Sid Sponheimer
Marsh Mills 1962. The wide space between the tracks tells you that this line was once broad-guage. Copyright Mike Roach
5562 completes its descent from the moors and runs into Marsh Mills. March 1962 Copyright Mike Roach
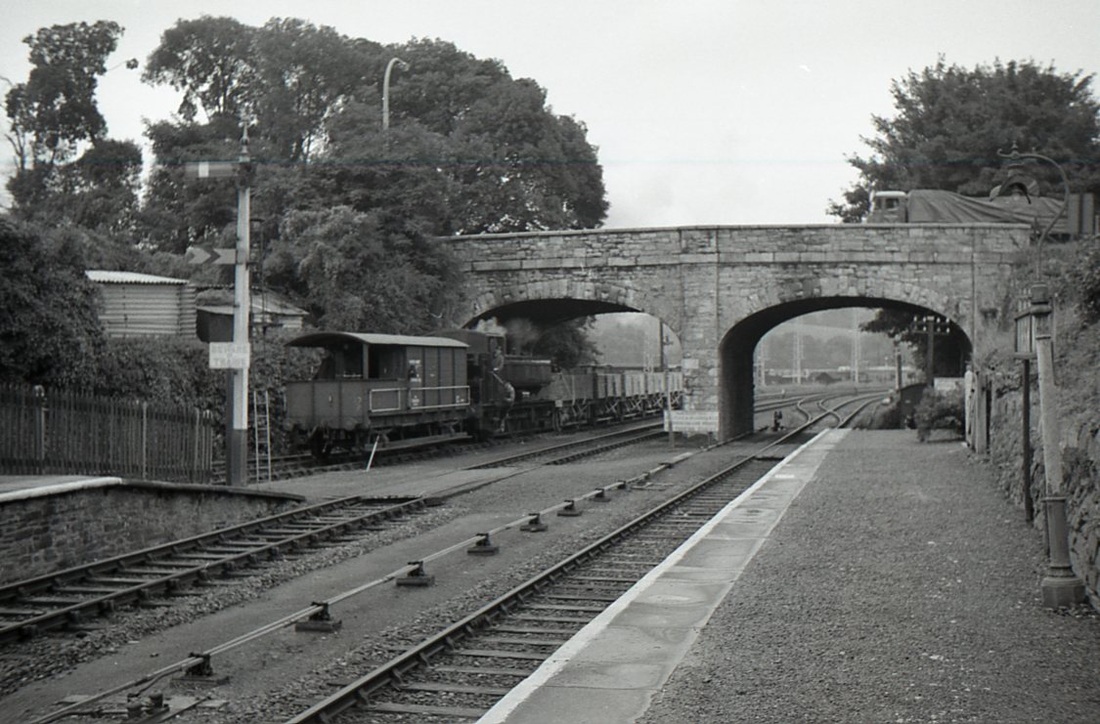
This Marsh Mills study was taken sometime later when there was no longer a need for a line to be alongside the platform any longer, a single track led to Tavistock junction yards. Plenty of vans are in evidence. Copyright Sid Sponheimer
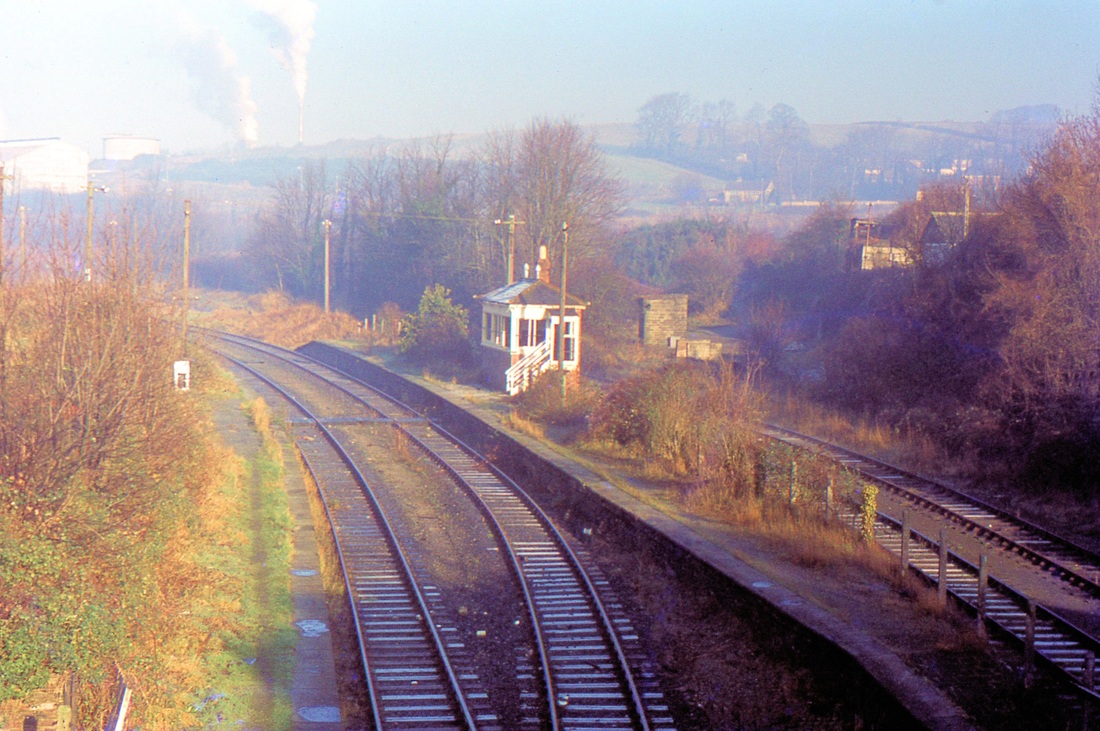
Marsh Mills, a view in 1973. Copyright Chris Osment
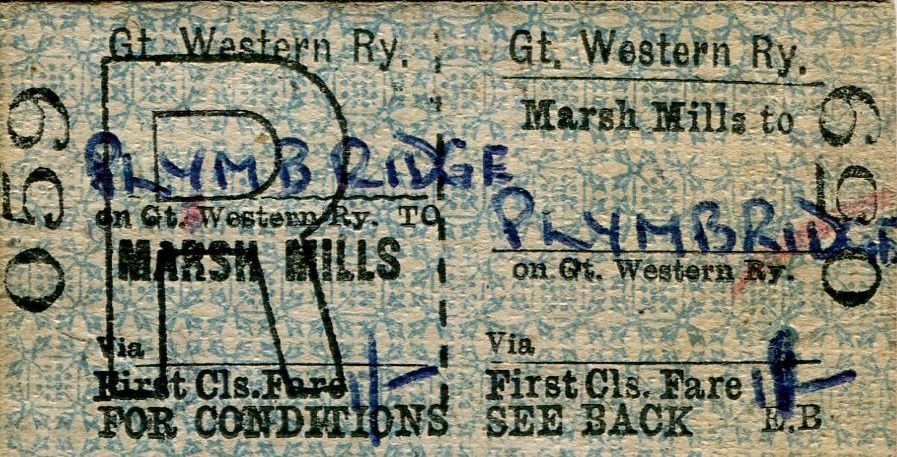
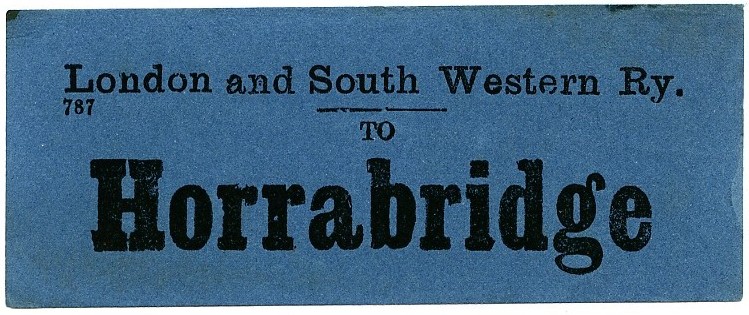
Mike Roach ticket collection
Mike Roach Ticket Collection
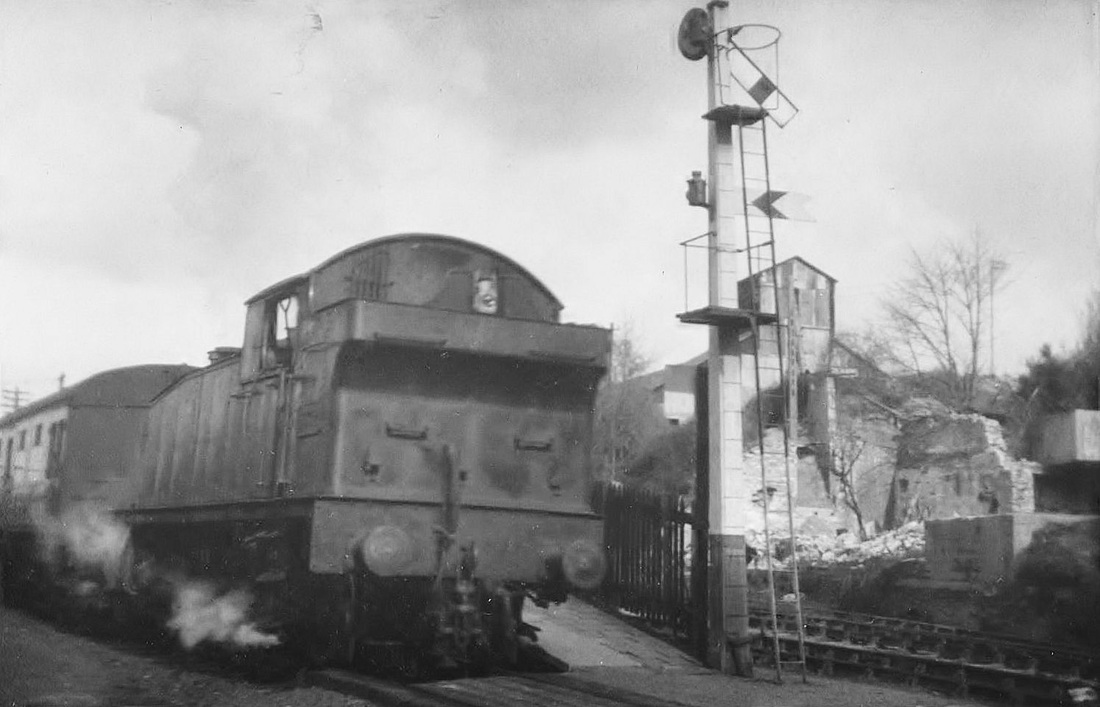
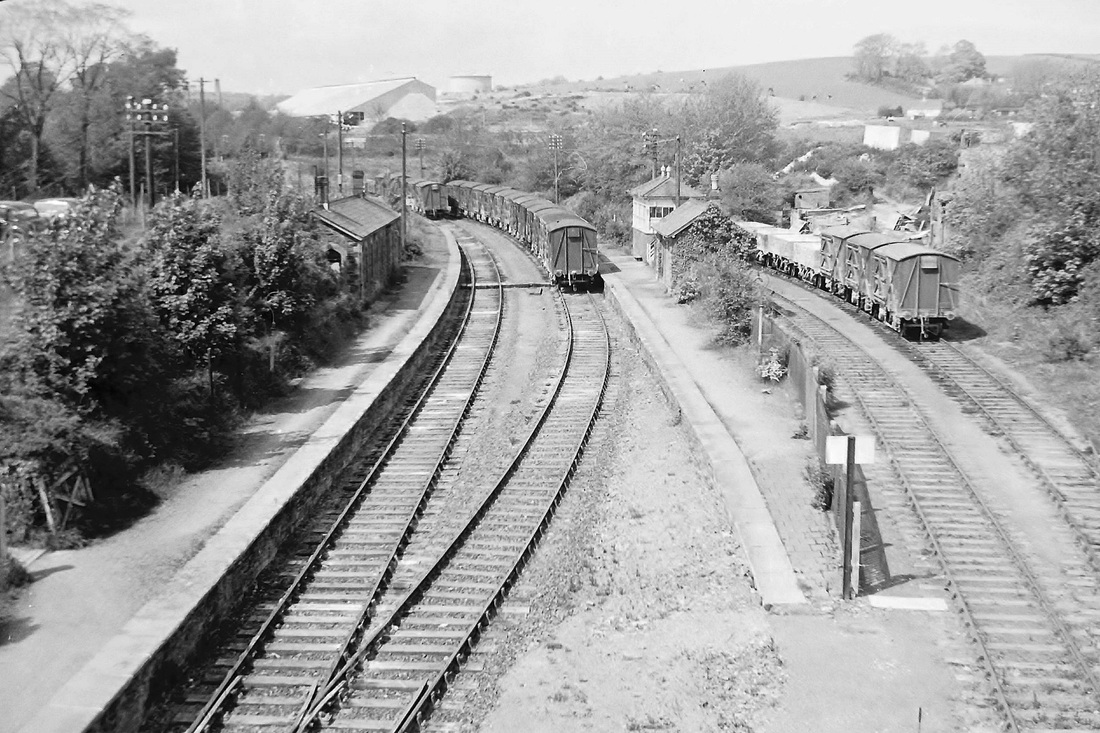
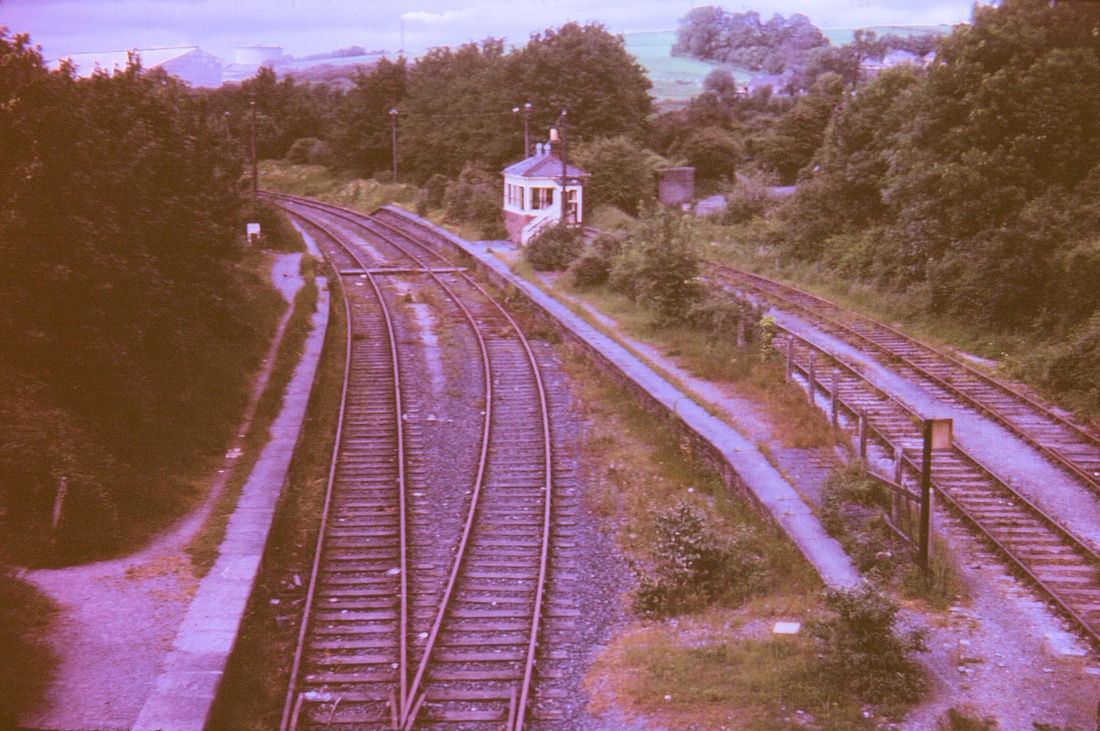
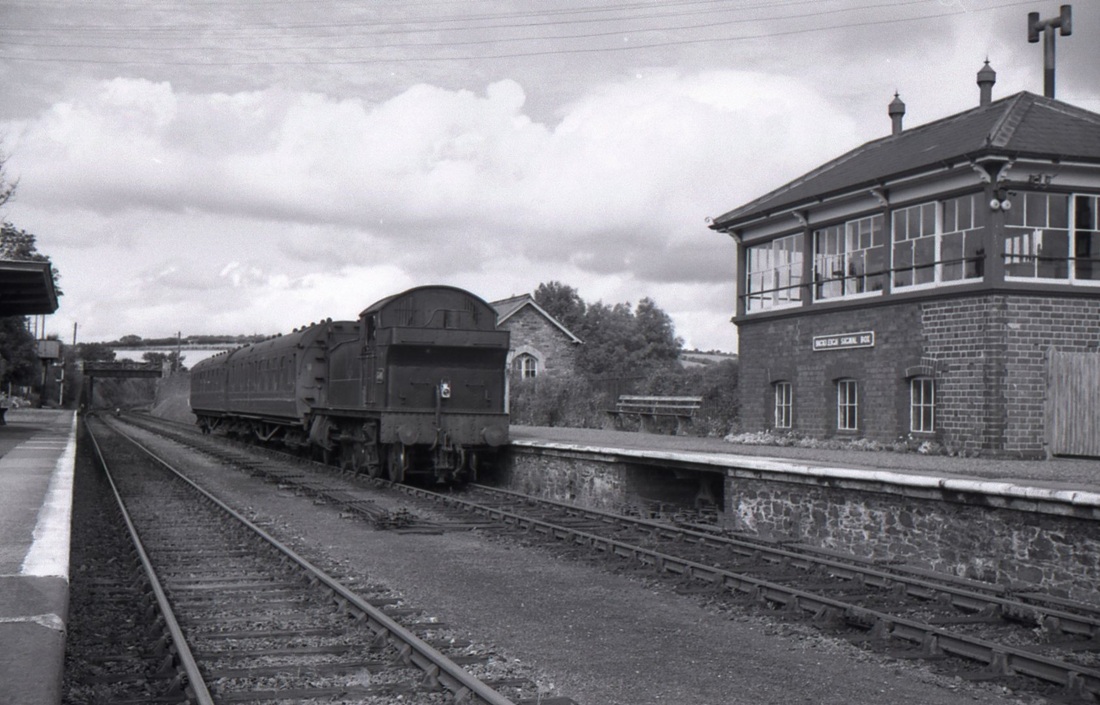
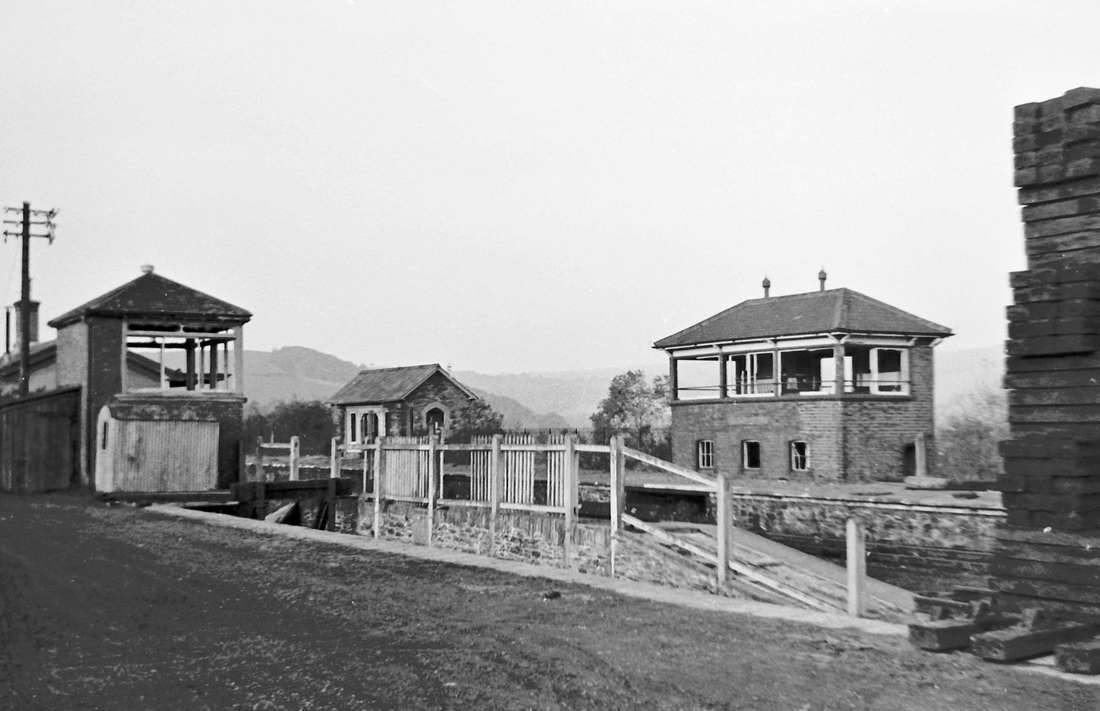
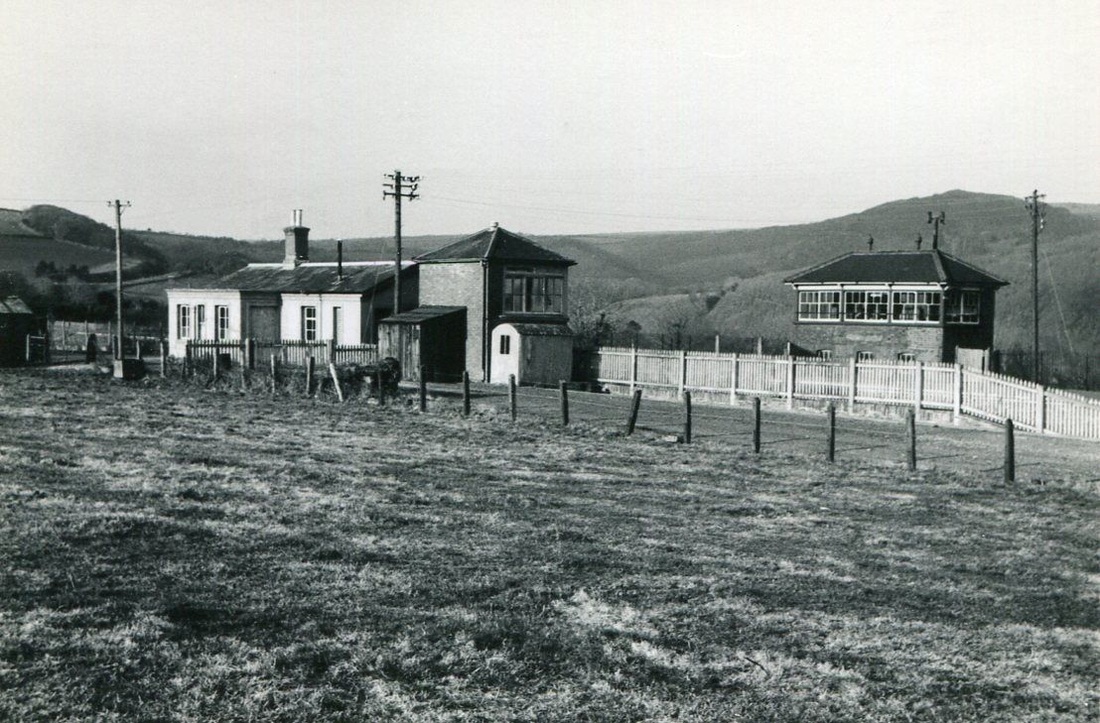
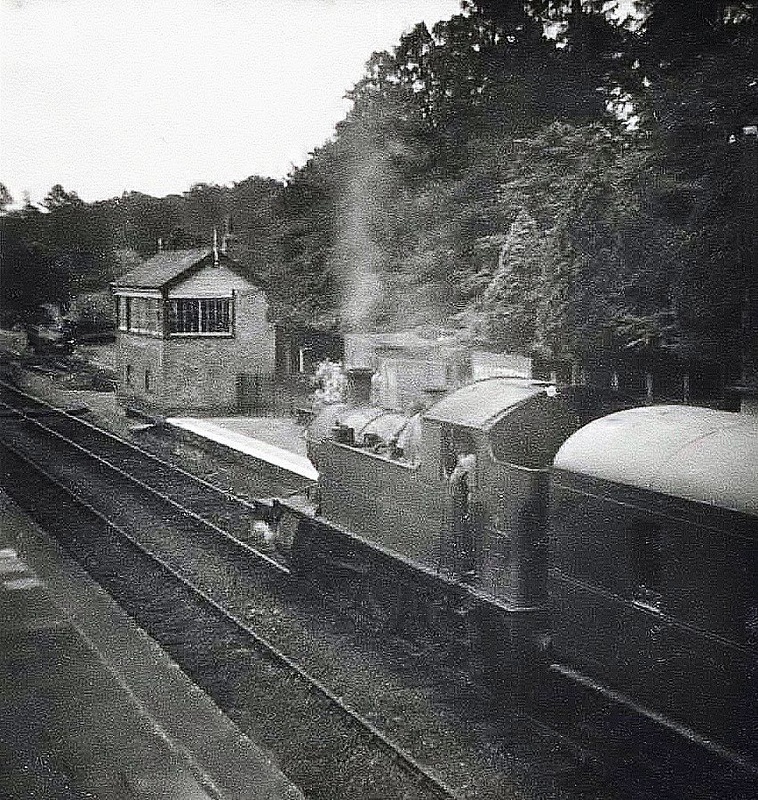
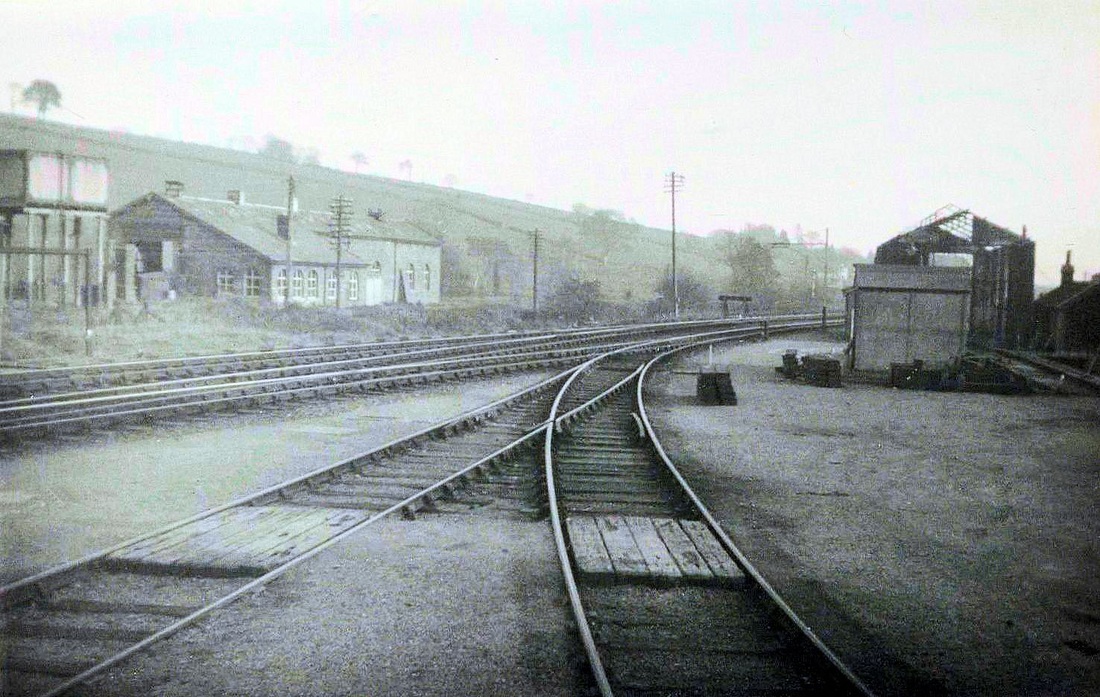
Lee Moor Crossing
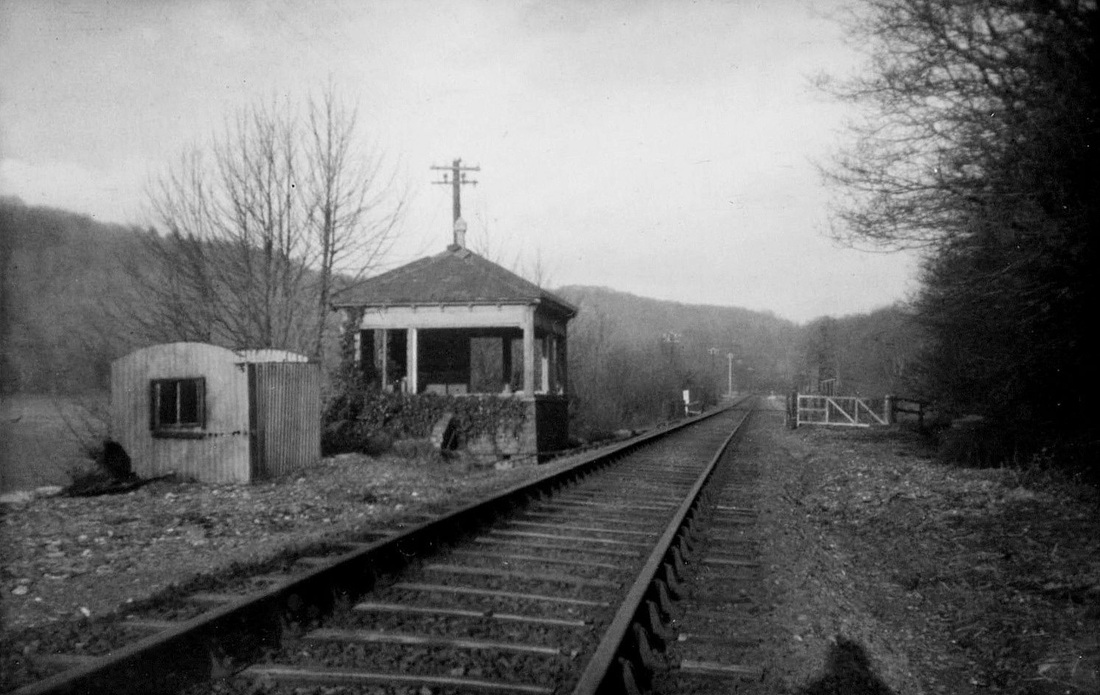
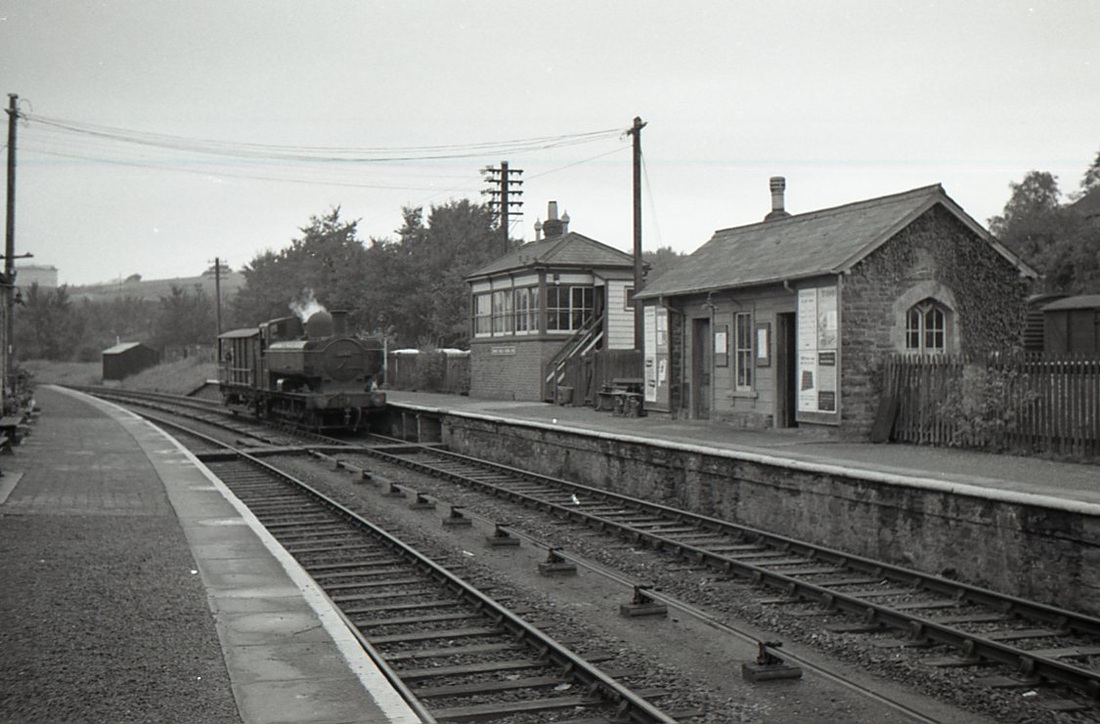
Lee Moor Crossing Signalbox. Looking pretty deserted.
Copyright Sid Sponheimer
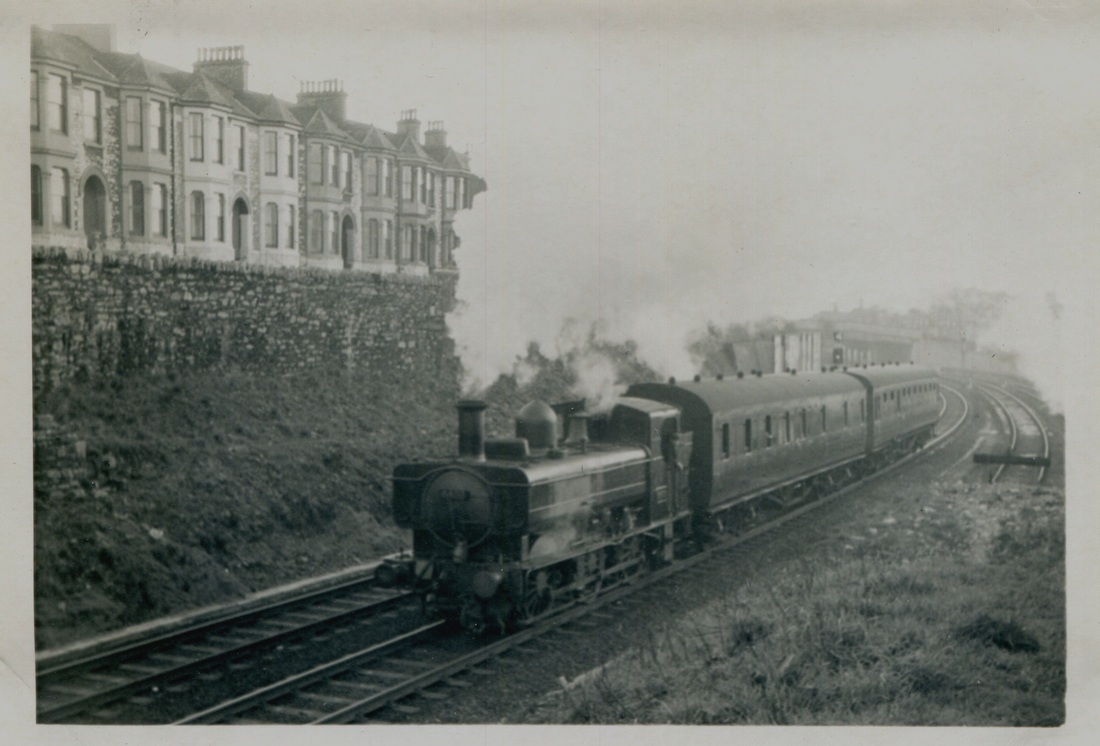
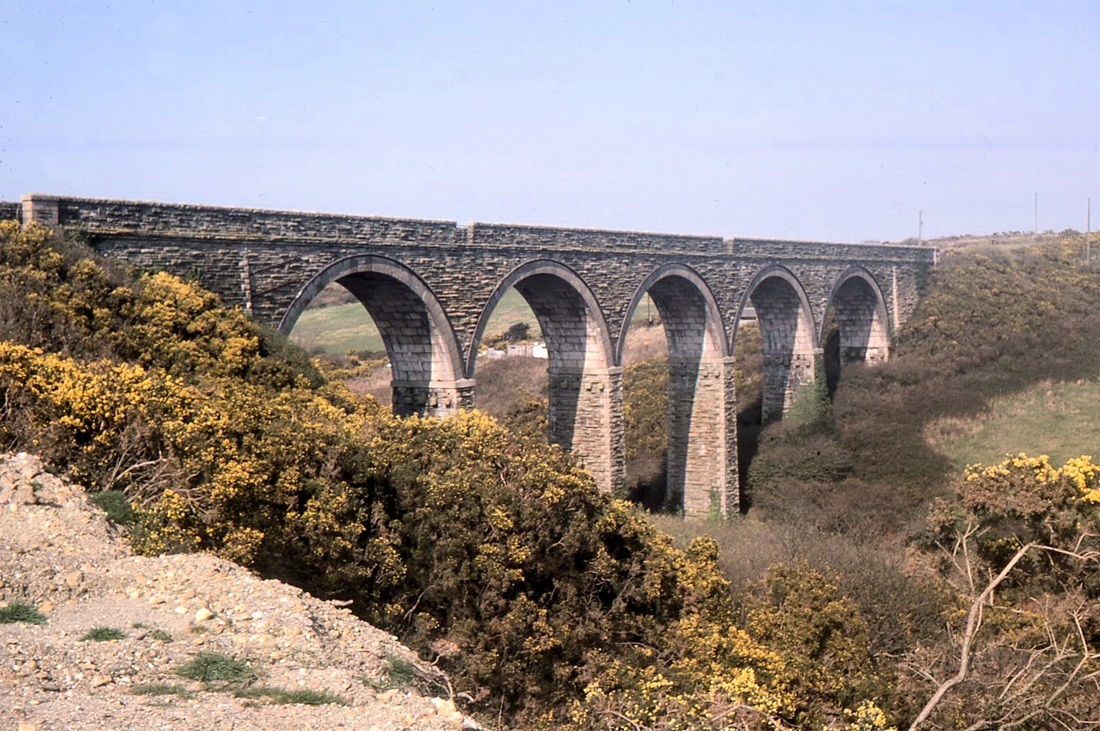
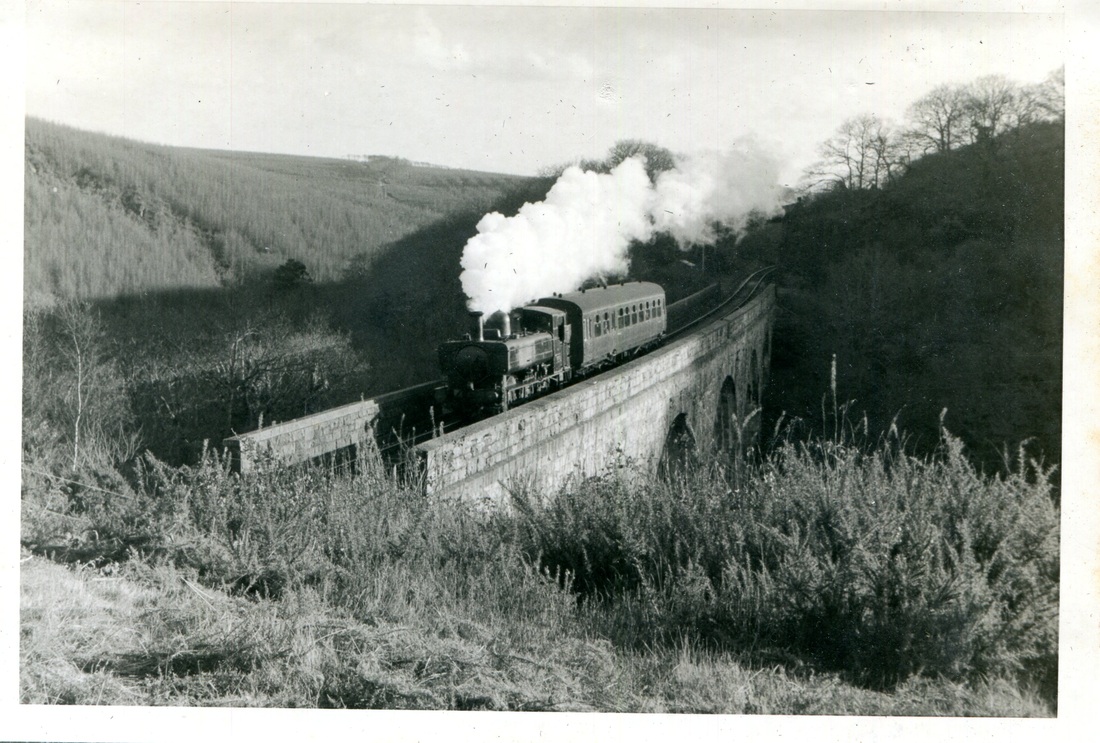
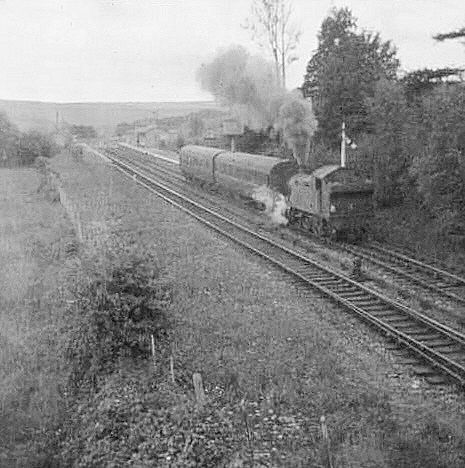
On route south of Plym Bridge
Heading South from Plym Bridge. Copyright Sid Sponheimer
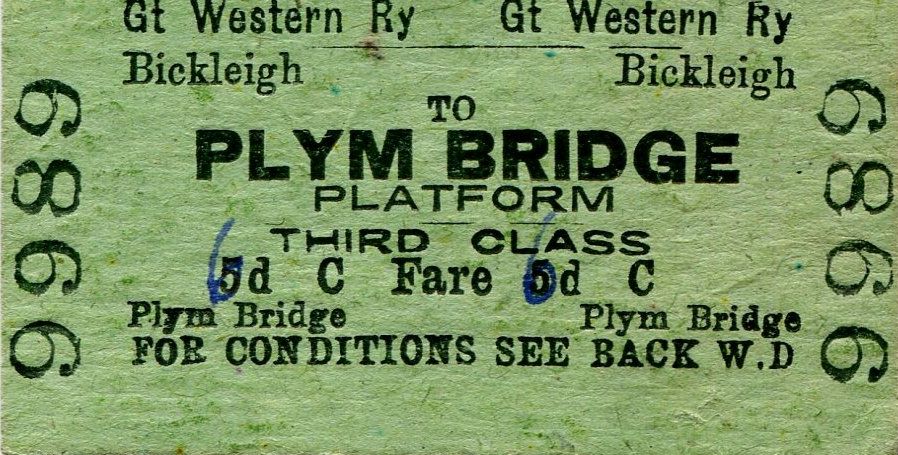
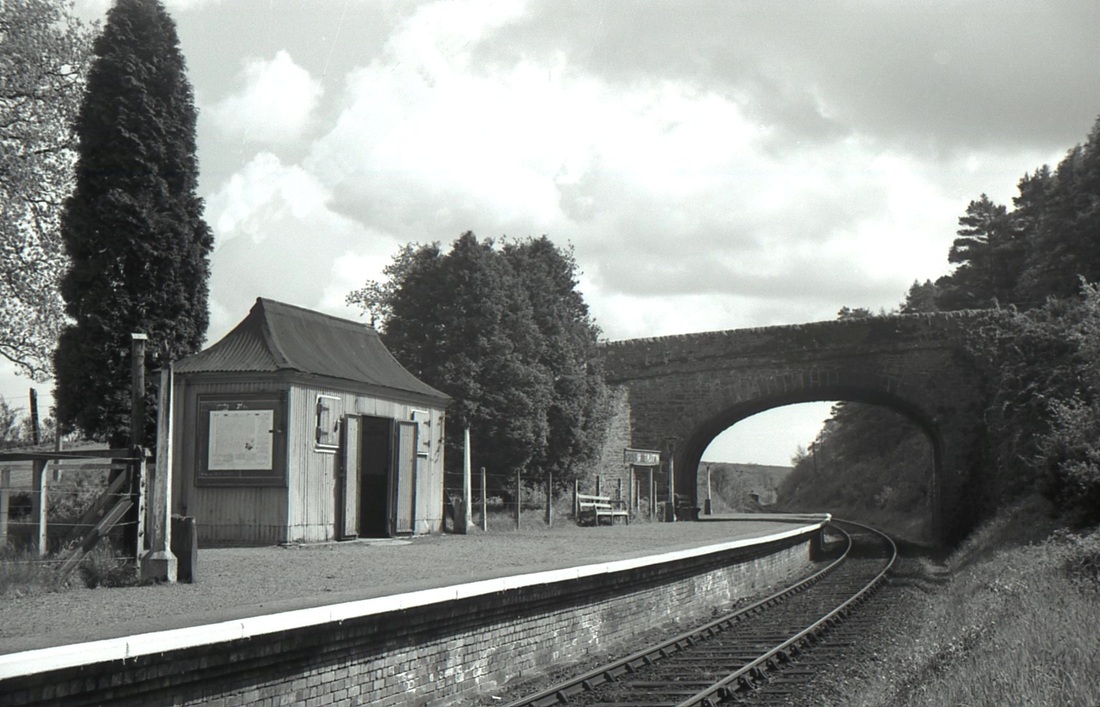
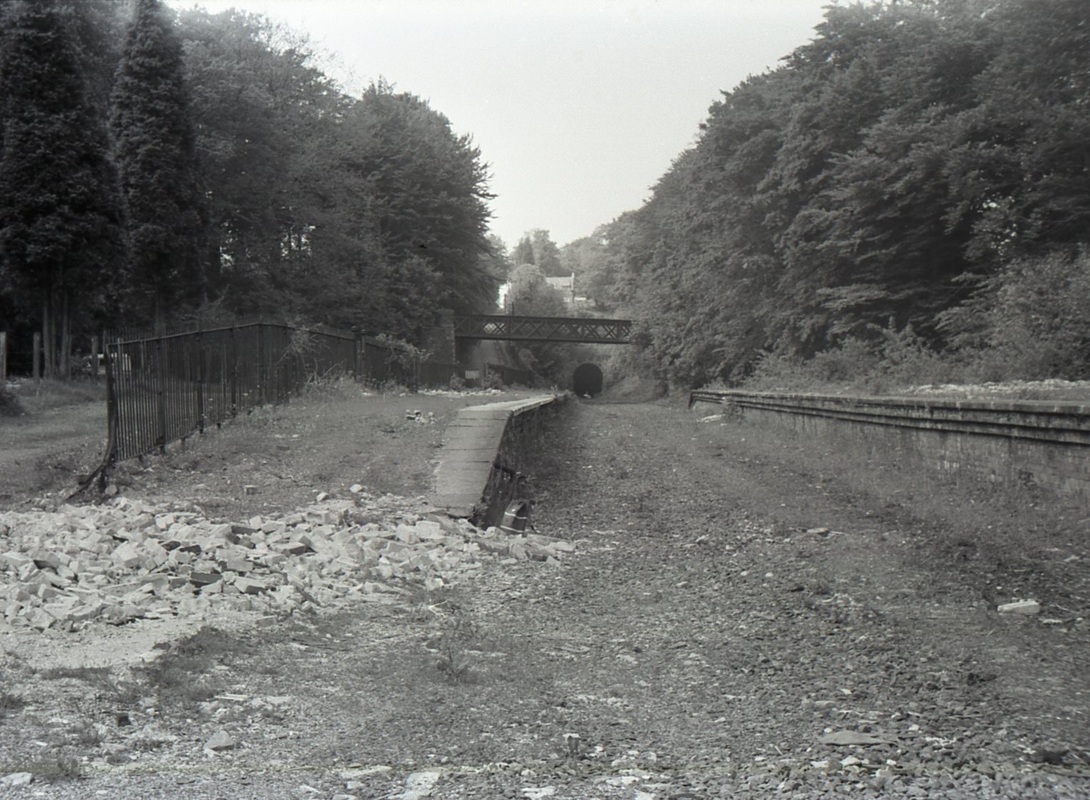
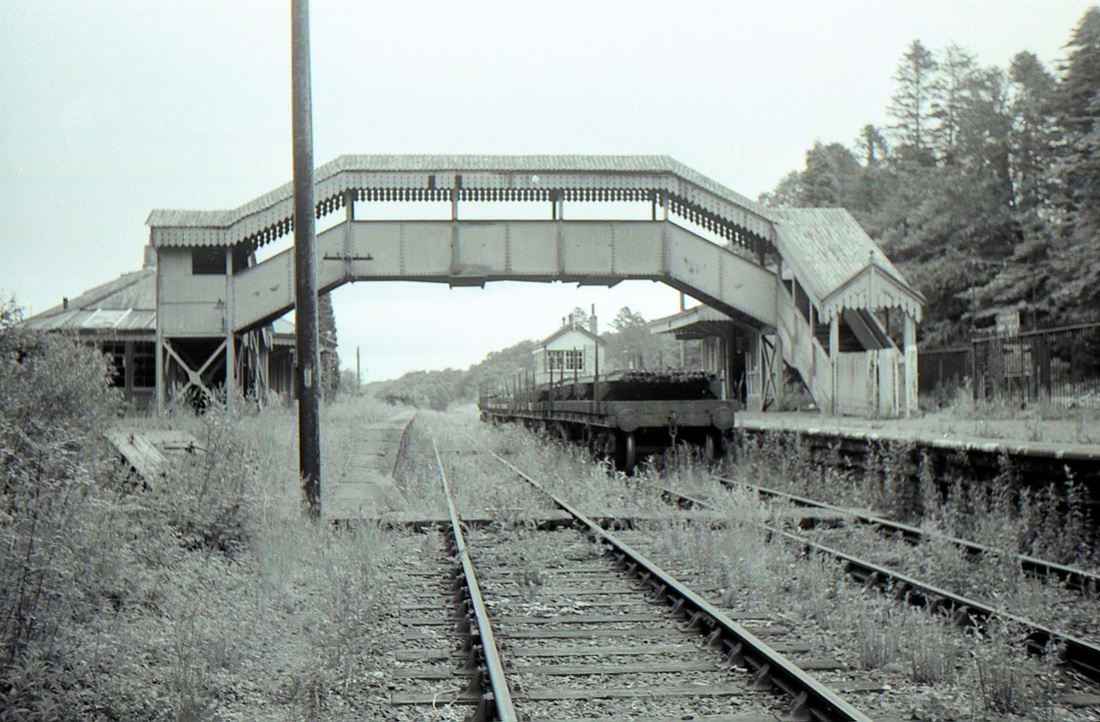
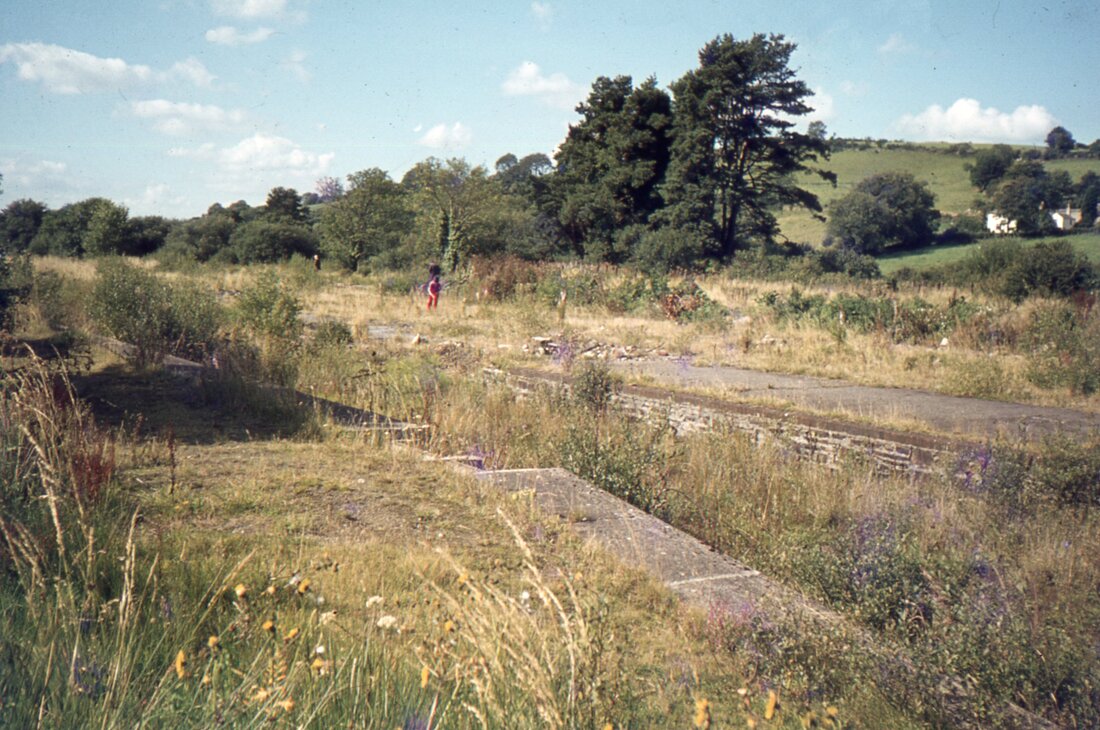
Plym Bridge Platform 1Ml. 39C
A view from Plym Bridge platform of a train heading south. Copyright Sid Sponheimer.

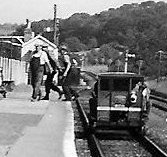
A couple of passengers await the service to Marsh Mills and Plymouth. Copyright Sid Sponheimer
A 45 runs into Plym Bridge Platform. Copyright Sid Sponheimer
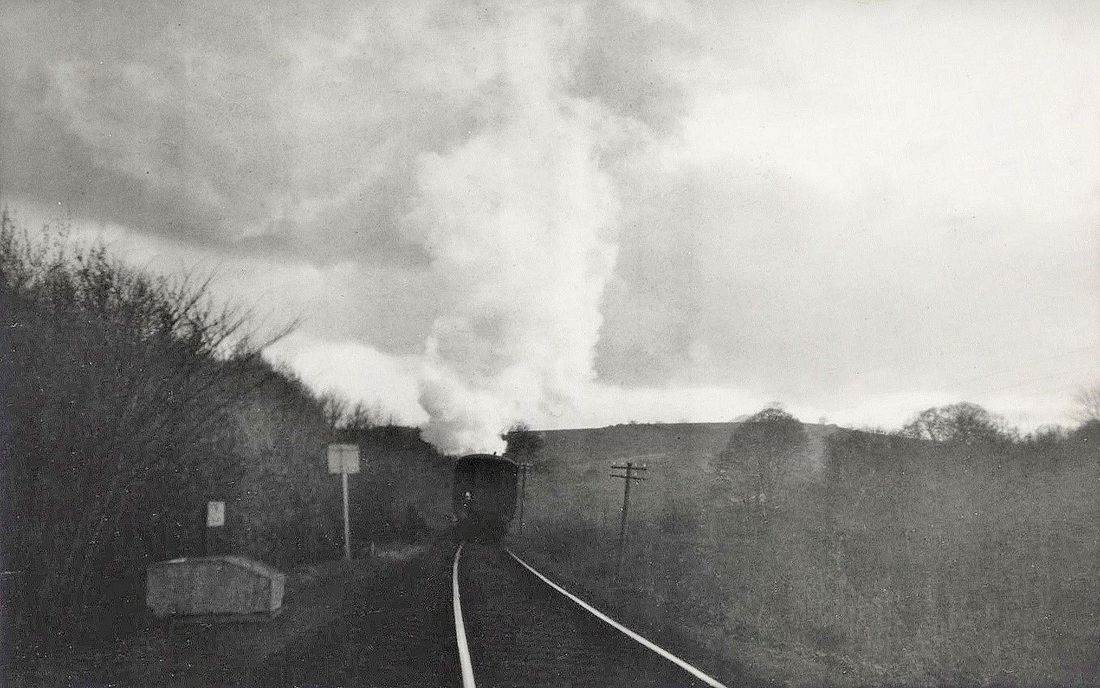
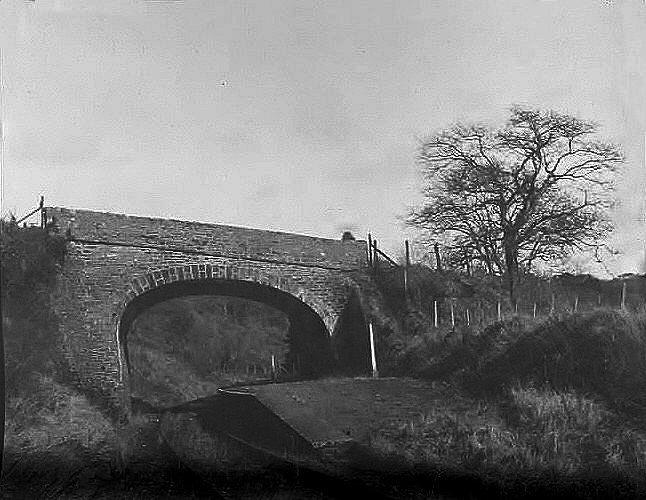
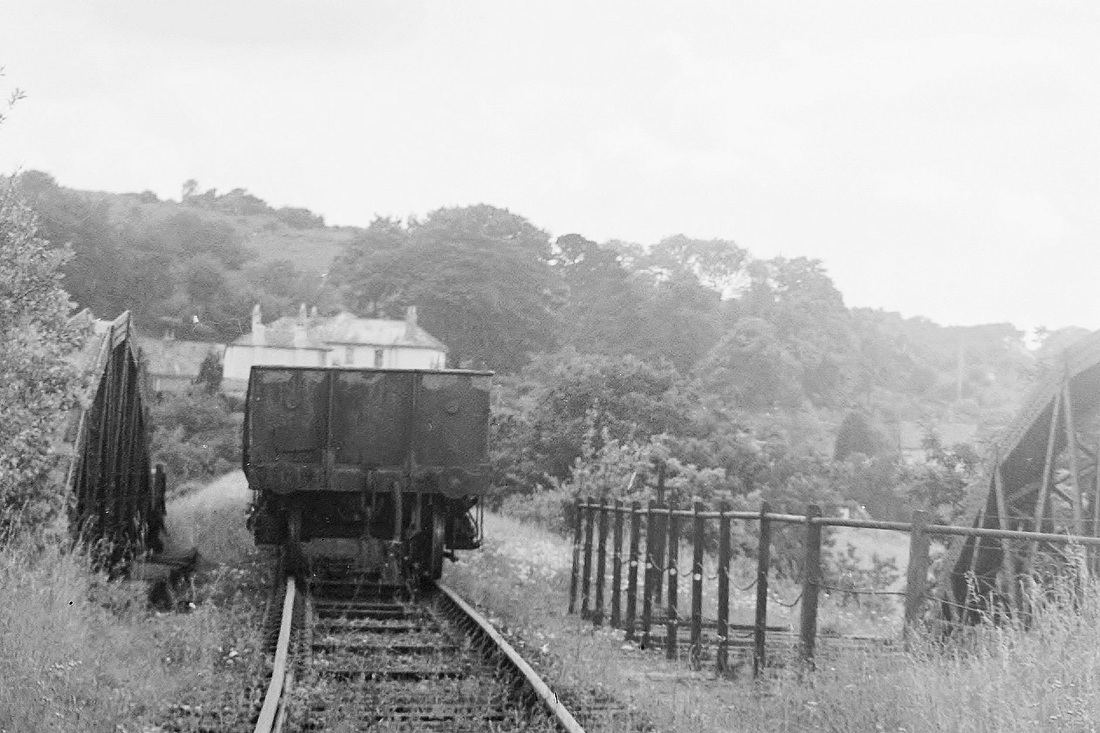
Plym Bridge, Freight from north 1961 the railway passed over the road and also canal at this location. The platform was up to the left. Copyright Mike Roach.

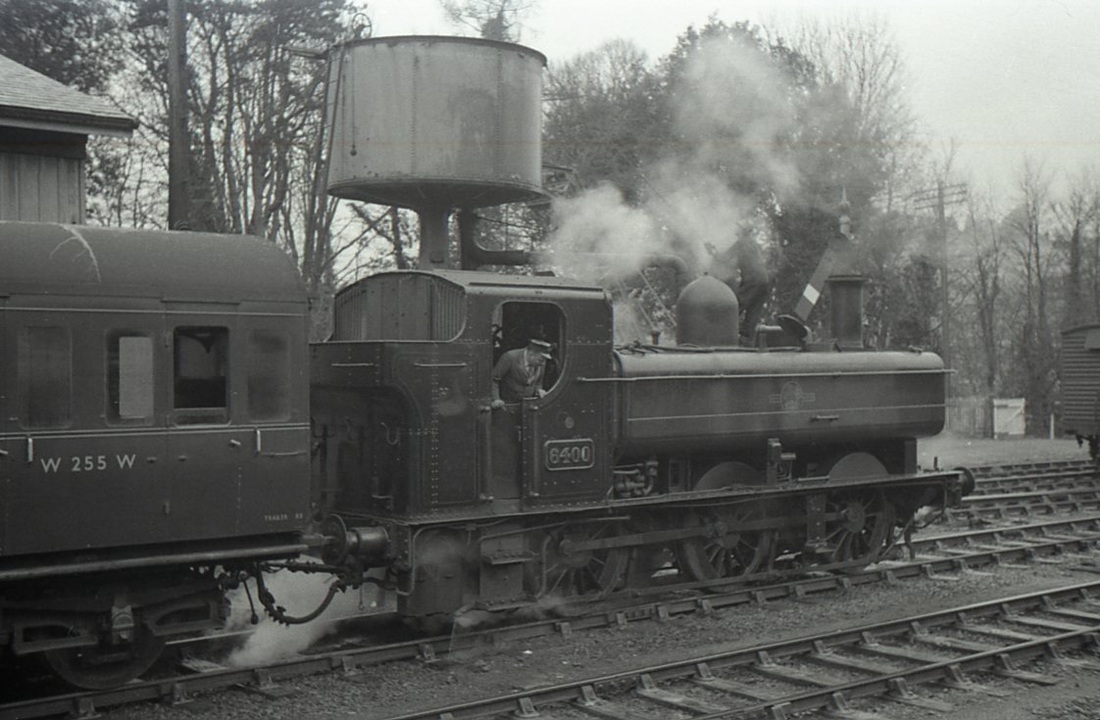
The 2.10pm auto-train from Plymouth to Tavistock South, hauled by 6400, restarts from Plym Bridge Platform. The loco had arrived at Laira from Pontypool Road in April 1959. It had been at Pontypool Road for no less than 24 years. 6400 ended its days at Yeovil Town being withdrawn in April 1964. December 1962 Copyright Mike Roach
6400 pounds out of Plym Bridge Halt at 2.21pm with the 2.10pm Plymouth to Tavistock auto. The Halt was located up a sloping path to the left. All the stations and halts in the Plym Valley were popular destinations for Plymothians in the years before the Second World War.
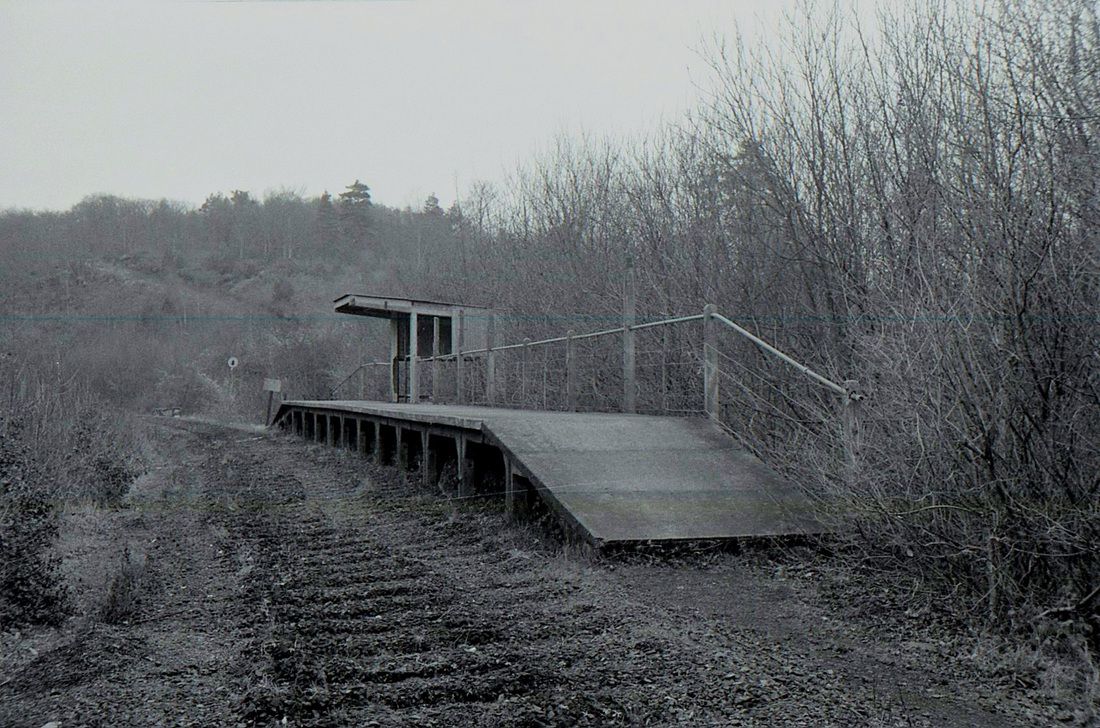
Plym Bridge Platform as it was in October 1964. What a shame it was removed, the re-establishment of the platform has required a lot of effort and expense by the Plym Valley Railway who are to be congratulated on a fine achievement. Copyright Mike Roach
A service probably for Launceston pulls away from Ply Bridge. Copyright Sid Sponheimer
A journey one again possible thanks to the Plym Valley Railway. Mike Roach Ticket Collection
Mike Roach Ticket Collection
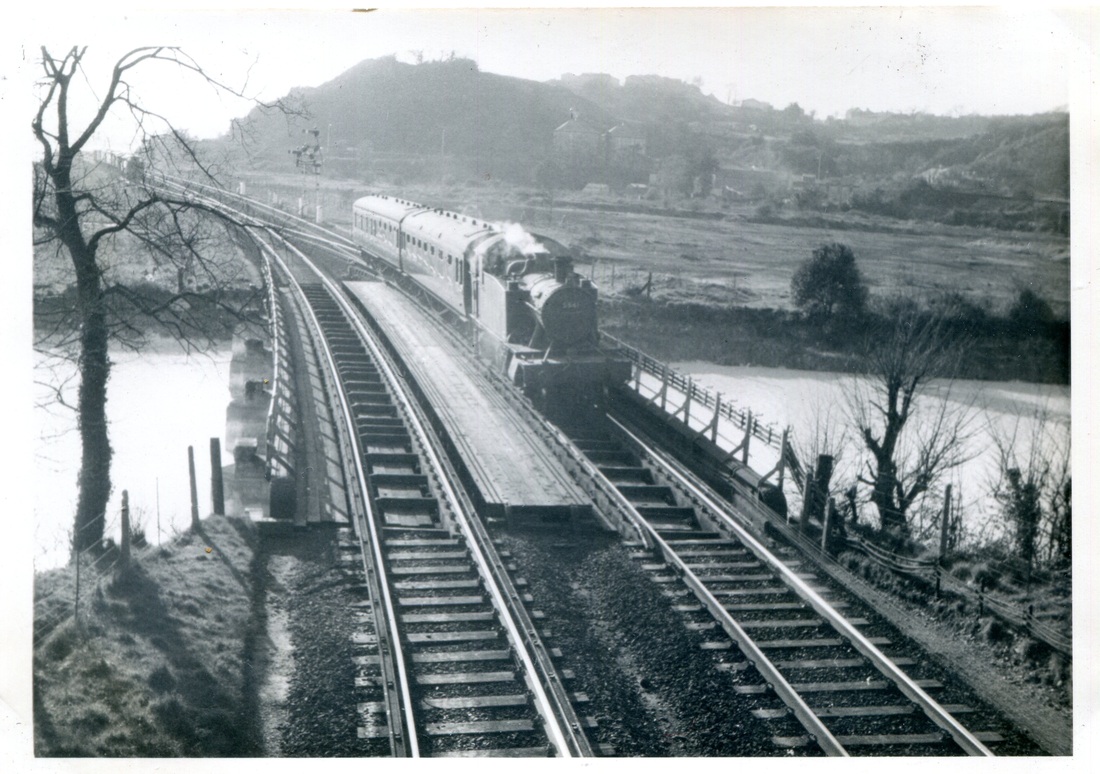
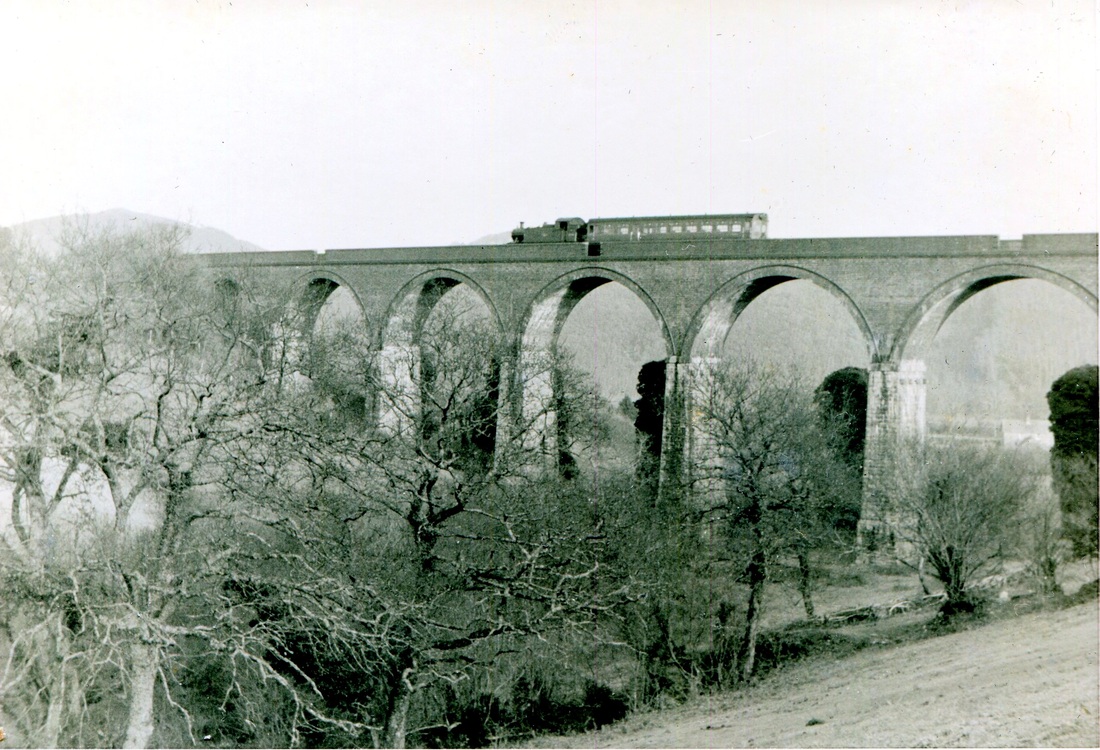
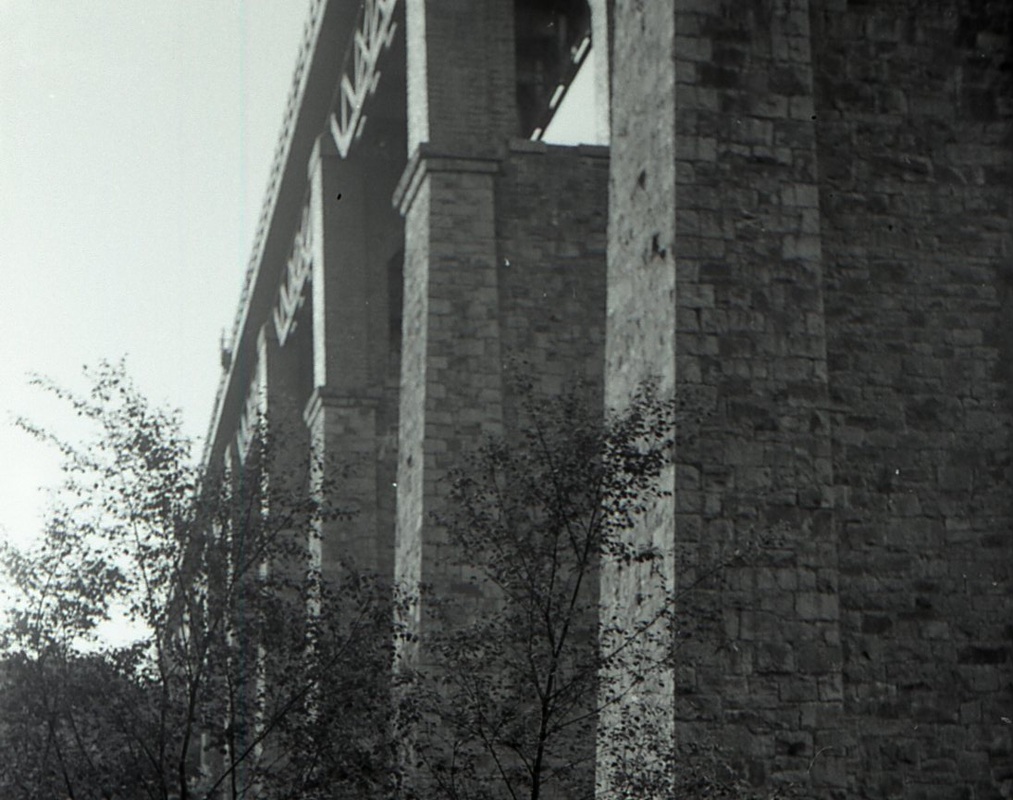
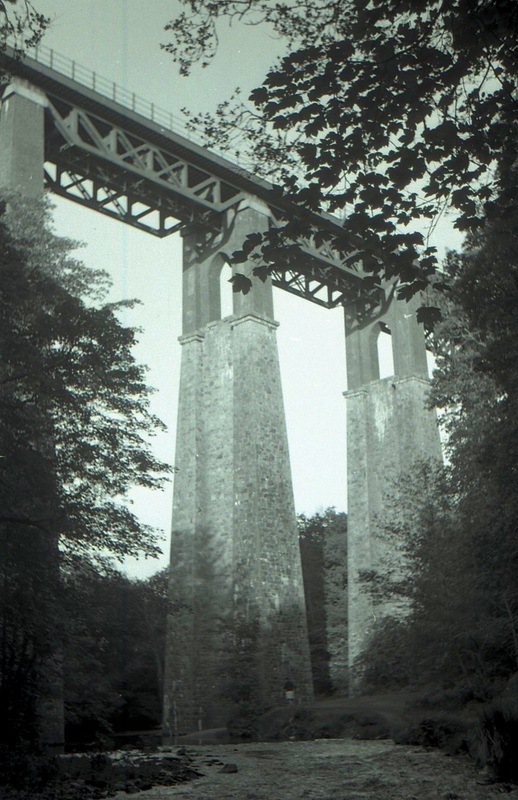
Cann Viaduct 2Ml. 18Ch
Cann viaduct 130 yrds long
Cann viaduct 130 yrds long
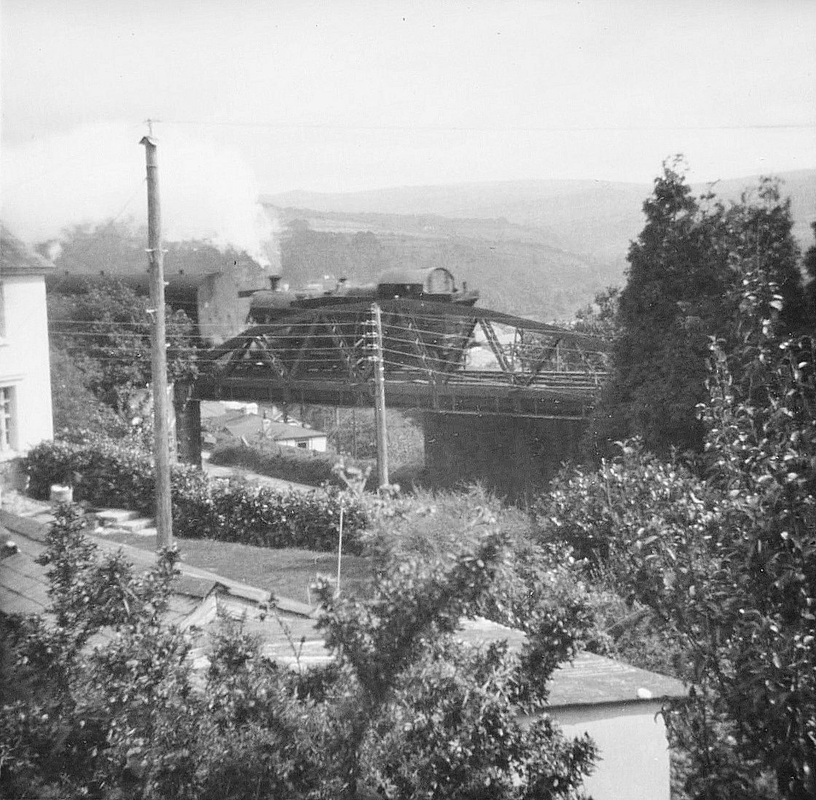
Cann Viaduct in 1962 Copyright Mike Roach
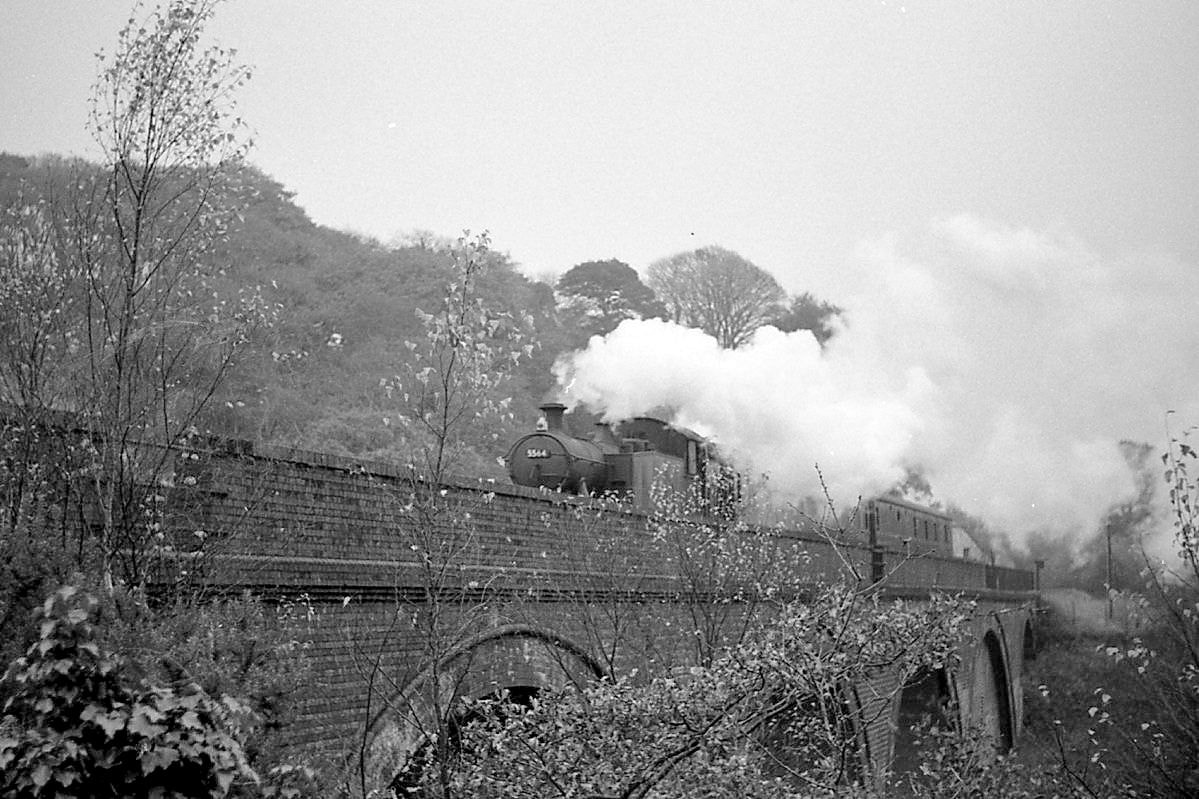
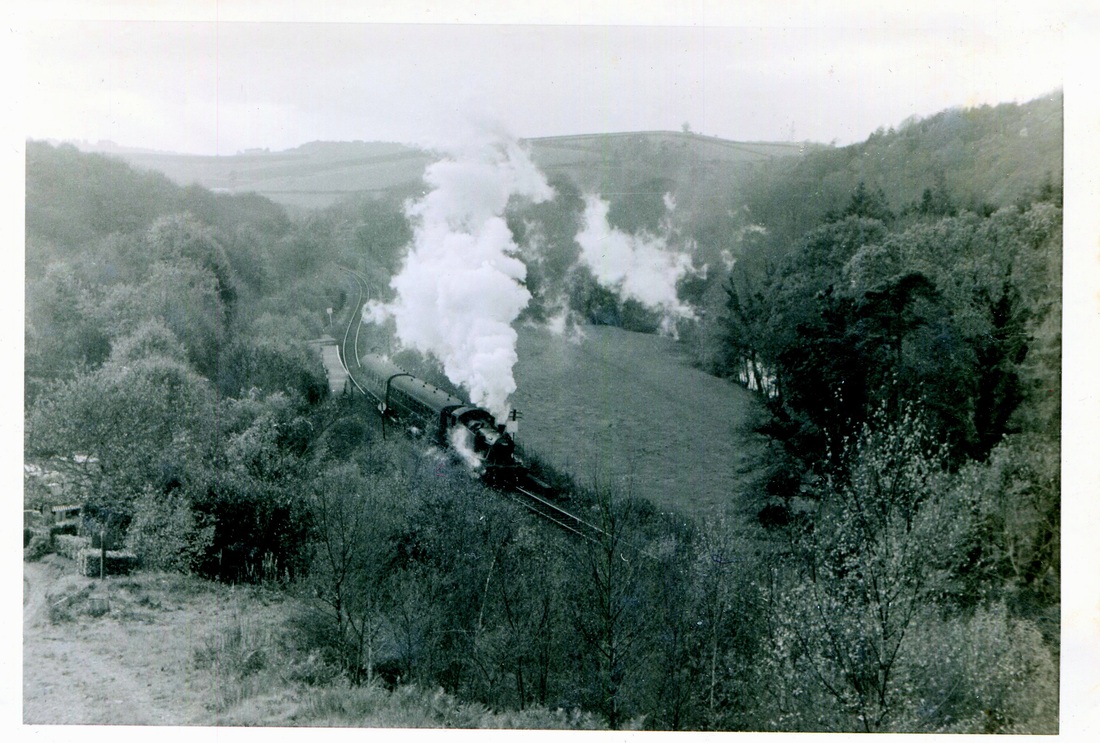
5564 crosses Cann Viaduct with two coaches on the 3.05pm Plymouth to Launceston. It can be seen that there are still a few leaves on the trees. The viaduct was three quarters of a mile north of Plym Bridge Halt and I had walked there. 10th November 1962. Copyright Mike Roach.
In the woods somewhere between Bickleigh and Plym Bridge
Somewhere between Bickleigh and Plym Bridge. Sid adds though there is snow about it is not the last day. Copyright Sid Sponheimer
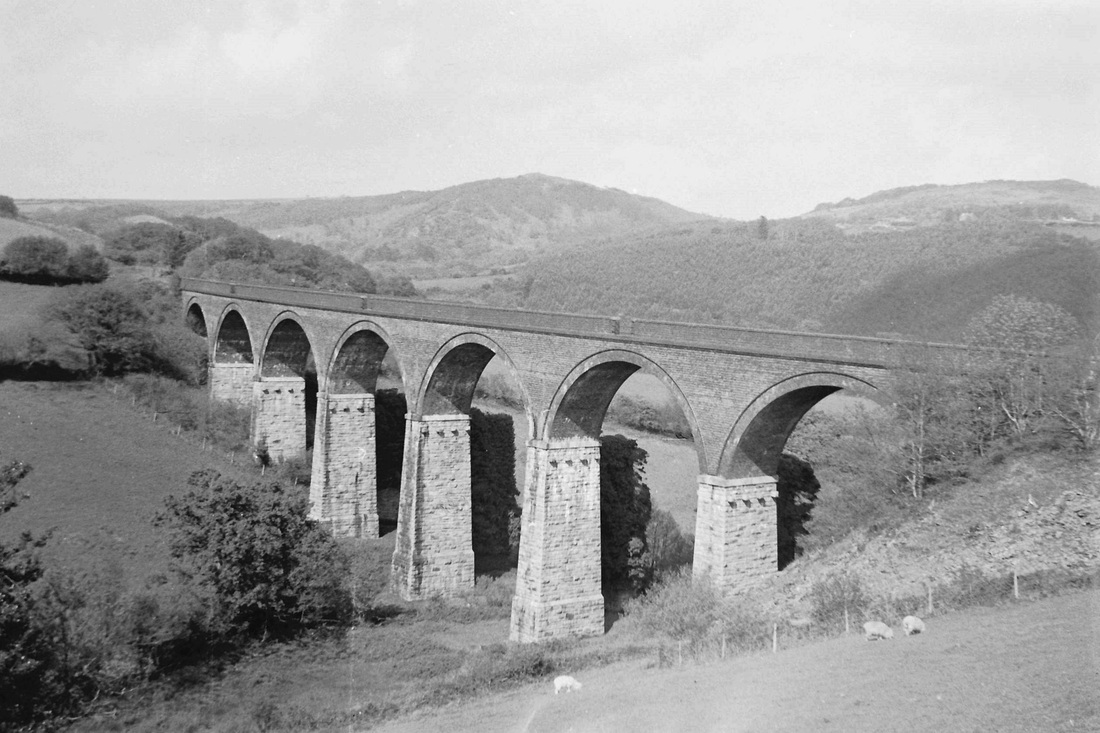
Riverford Viaduct 2Ml. 68Ch
Riverford viaduct is 117 yards long
Riverford viaduct is 117 yards long
An unknown '55' heads its train up towards the moorland over Riverford Viaduct. Copyright Sid Sponheimer
Bickleigh Viaduct 3Ml 61 Ch
Bickleigh Viaduct is 159 yards
Bickleigh Viaduct is 159 yards
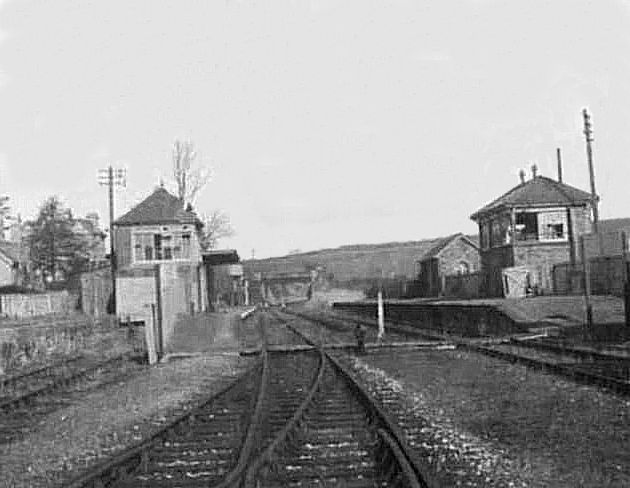
Bickleigh 4Ml. 09Ch
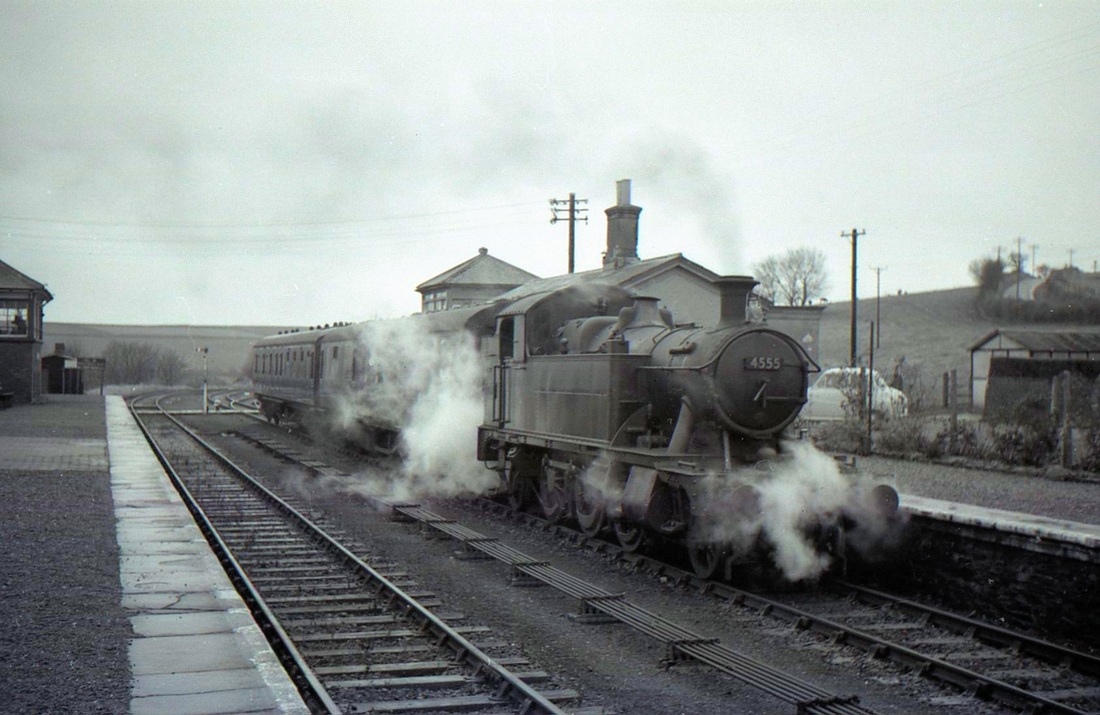
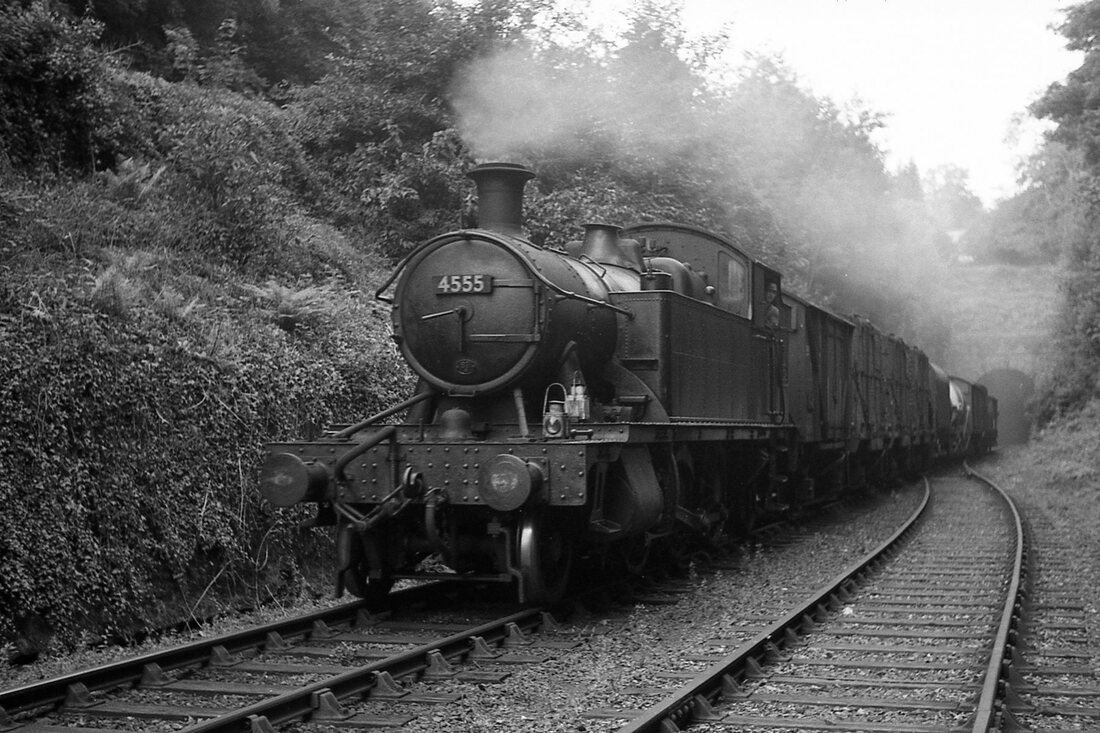
Bickleigh 4555 enters. Note the two signalboxes - the most recent is occupied by the signalman. Dec62 - Copyright Mike Roach
A Class 55 takes its train away in July 1961. Copyright Mike Roach.
Bickleigh 4555 leaving 17.8.62 - Copyright Sid Sponheimer
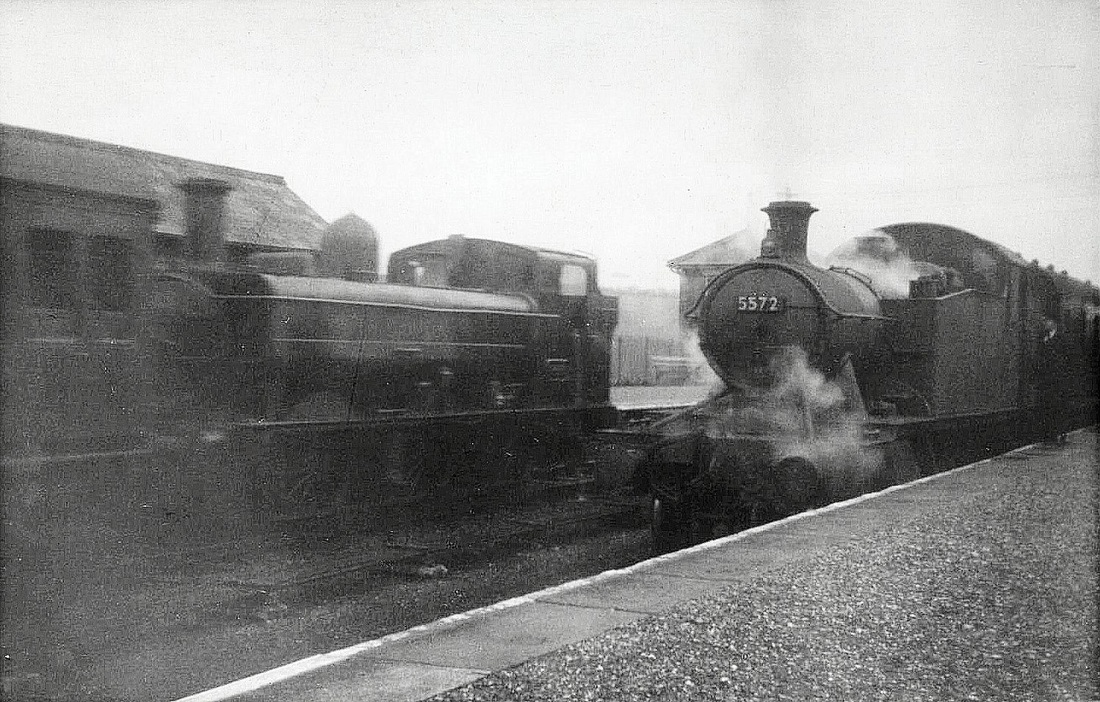
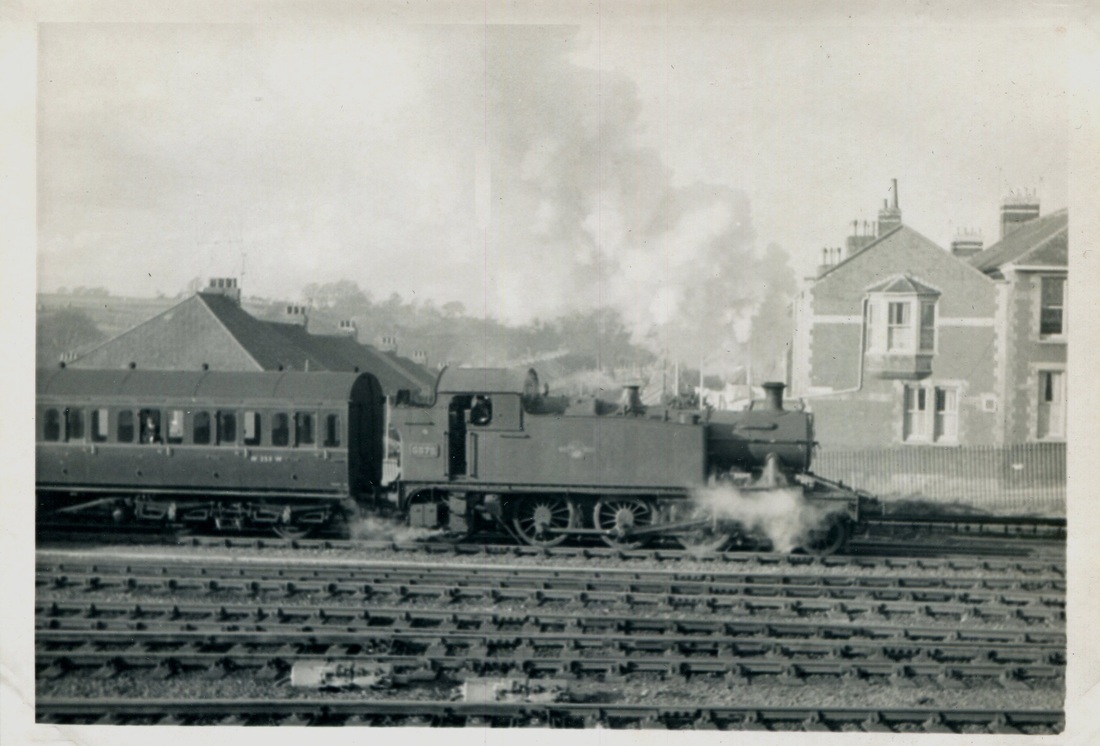
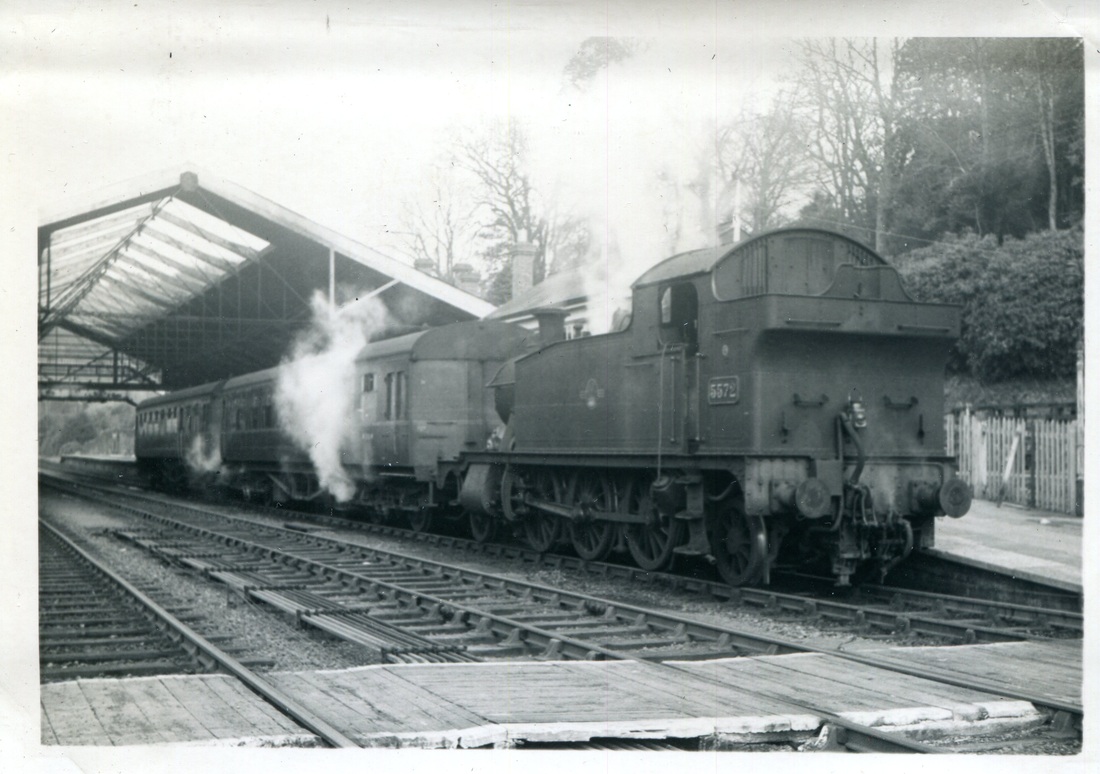
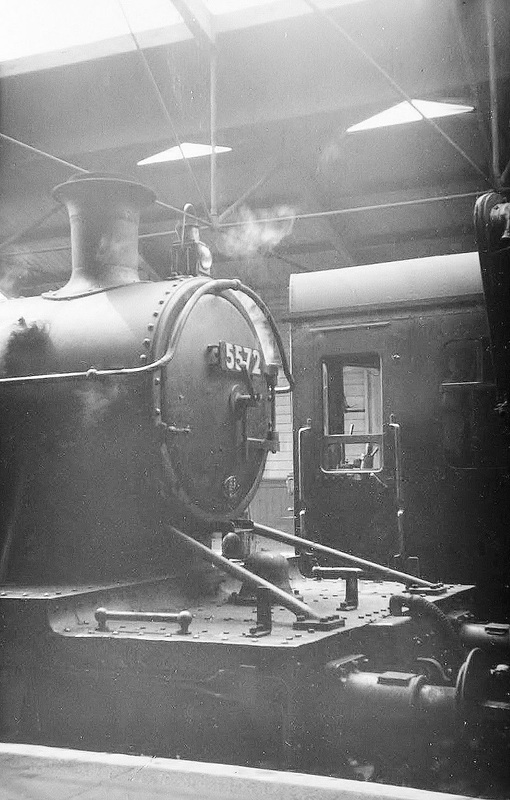
Having arrived from Launceston 5572 waits while a '64' runs in with a service probably to Tavistock. Copyright Sid Sponheimer
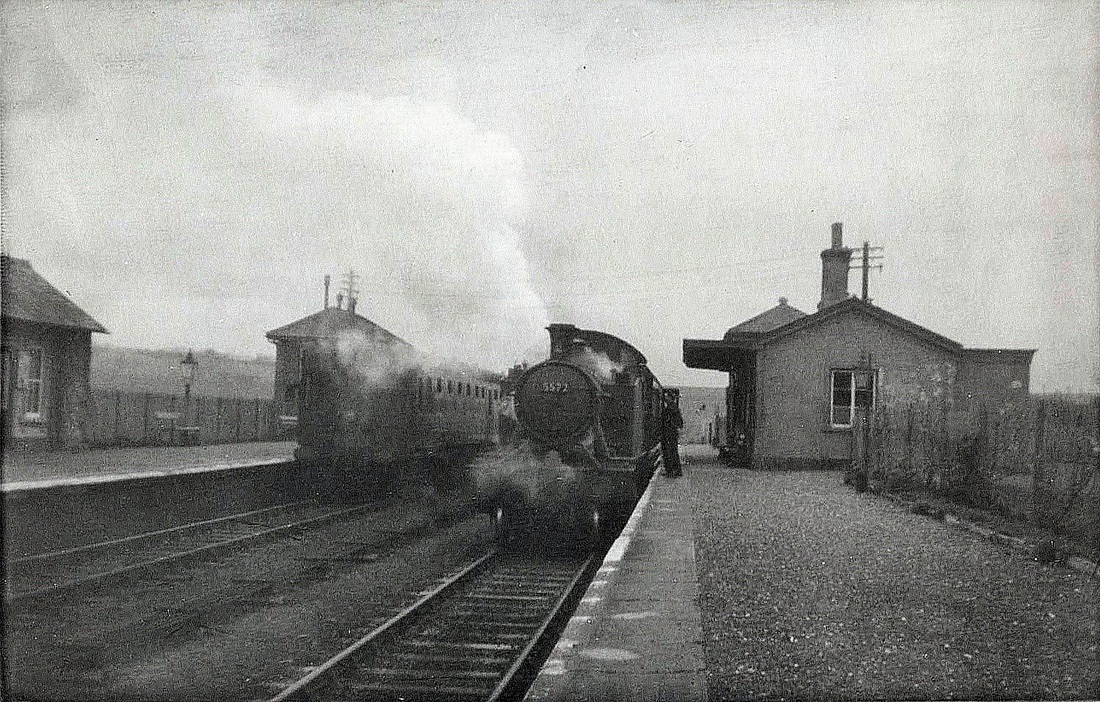
5572 at Bickleigh. N.B. this is the locomotive which was derailed at St Agnes due to driver not checking his signals. Copyright Sid Sponheimer


Bickleigh November 1960 Copyright Mike Roach
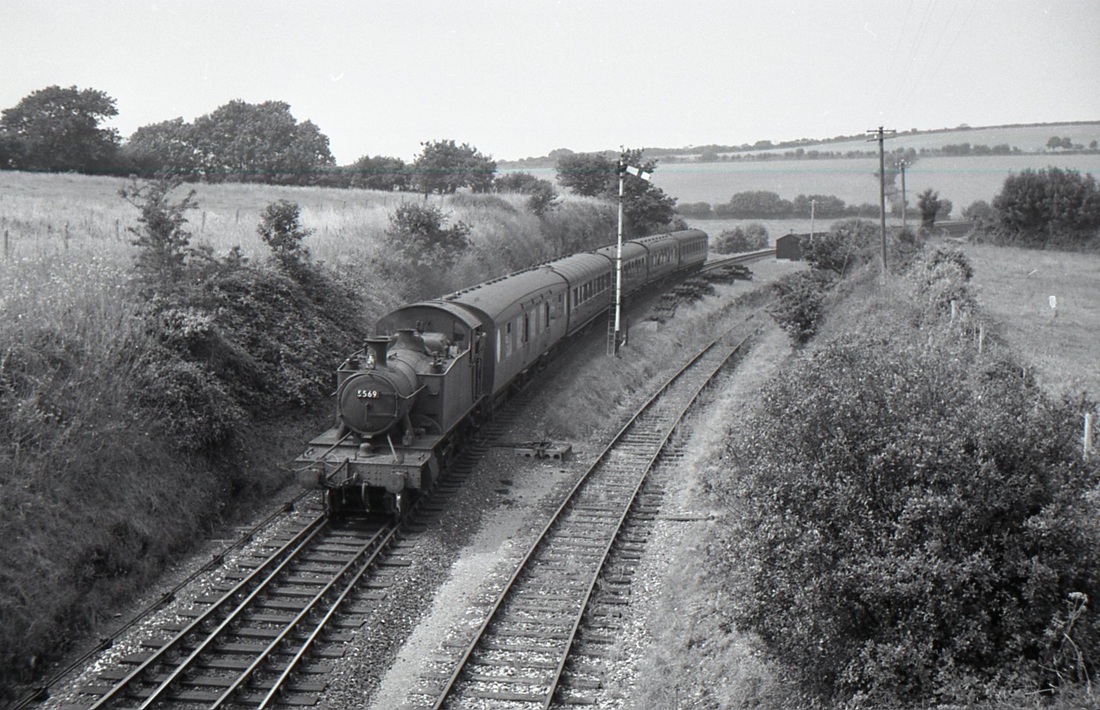
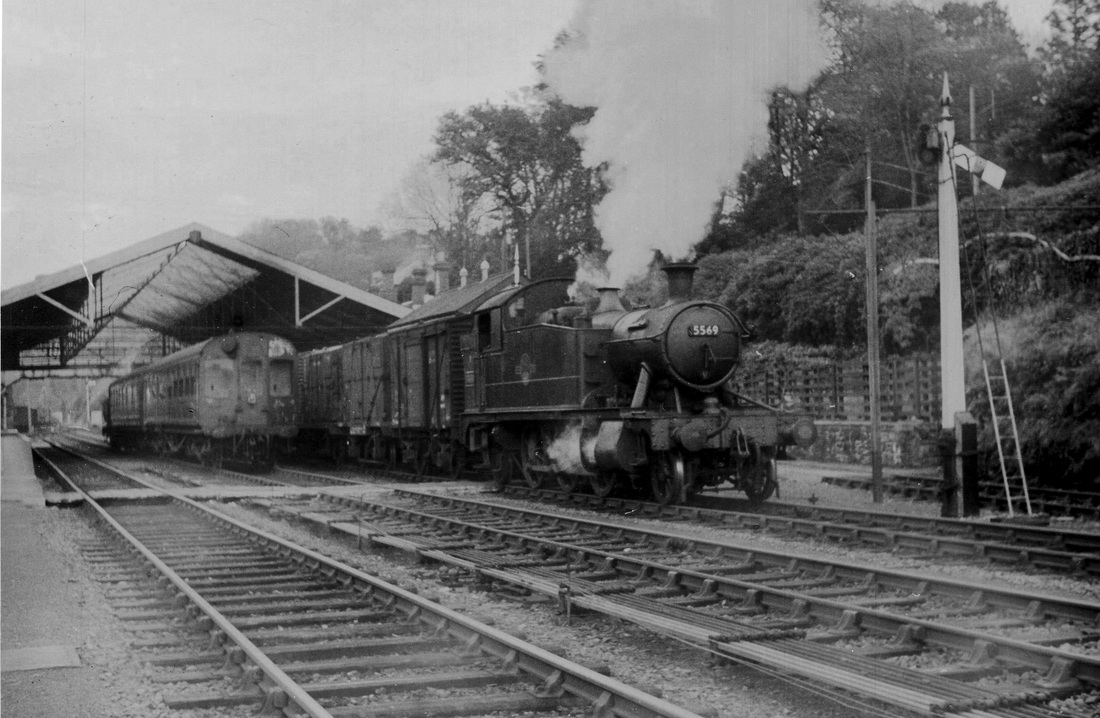
A most unusual train - 5569 heads the 10.15am from Launceston into Bickleigh. On Saturdays in the summers of 1961 and 1962 only the train became an (unadvertised) through train to Redruth, and an extra three coaches were added. The only clue in the timetable was that the train was allowed extra time from Marsh Mills to Plymouth to change locomotives en route. Normally a 4-6-0 tender loco would take over for the second leg. However on at least one occasion no larger loco was available, and the 55xx continued all the way to Redruth - an epic 4-hour journey for a small Prairie tank. In the summer of 1962 the train was looped after Saltash (presumably at Wearde) to allow the 7.30am Paddington to Penzance to pass. What happened to the train when it finally reached Redruth at 2.45pm ? Captured by Mike Roach, Copyright.
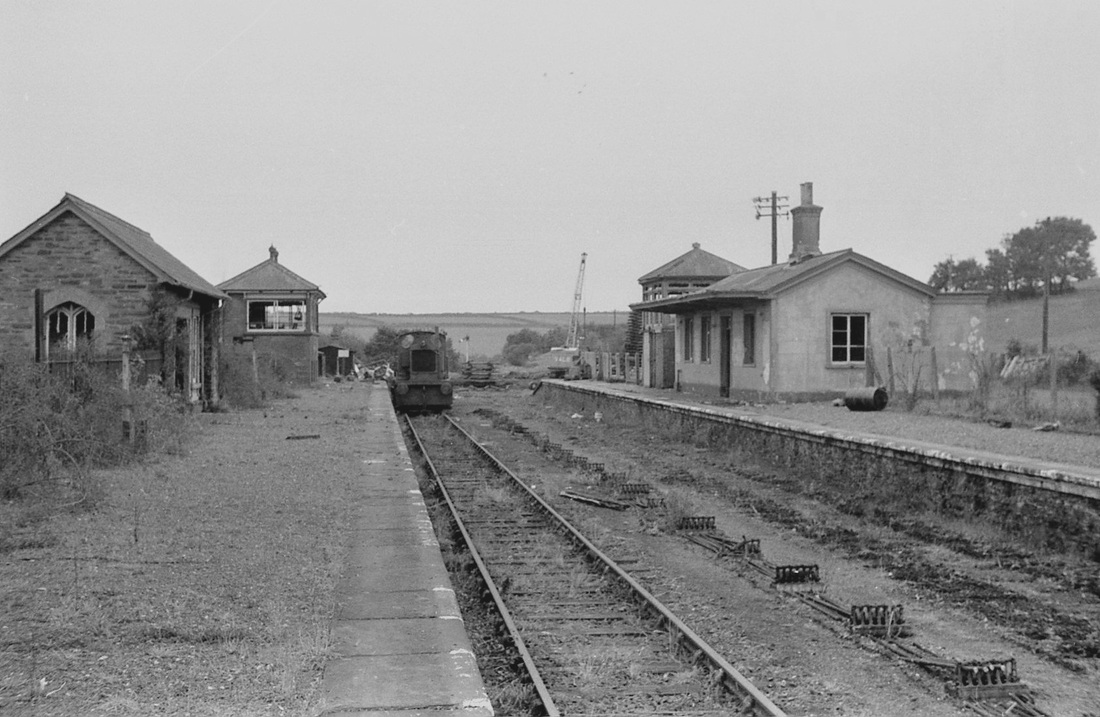
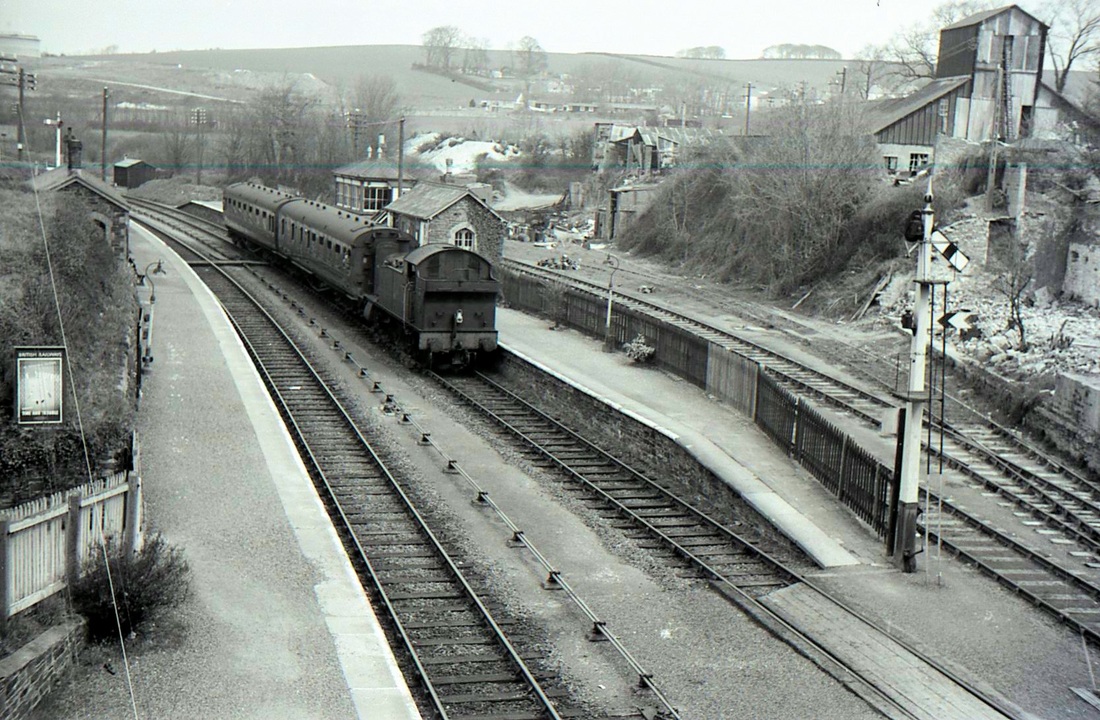
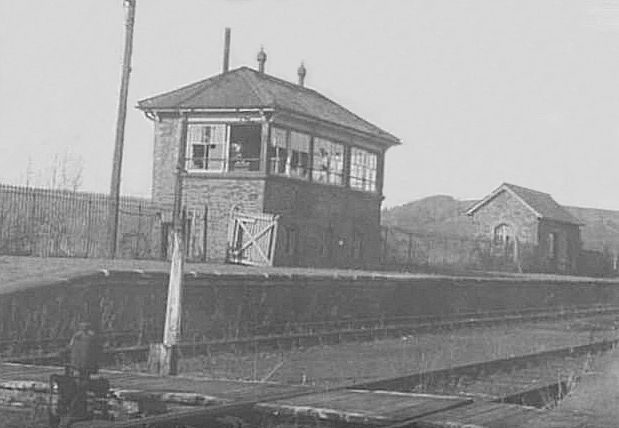
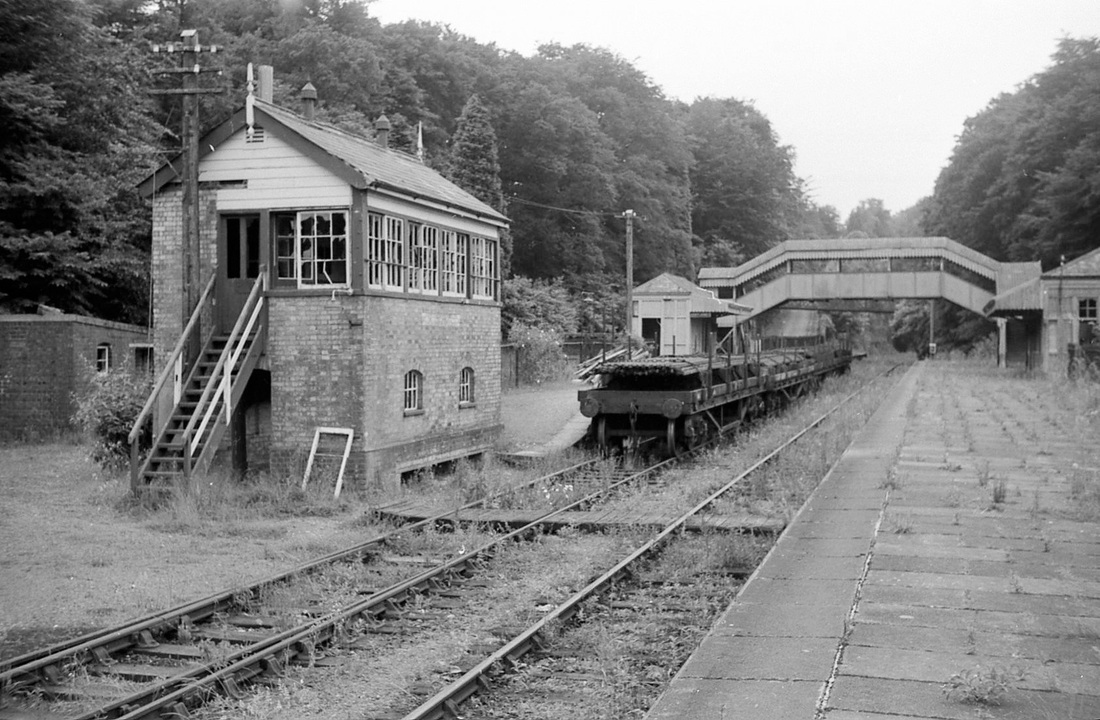
Bickleigh looking towards Tavistock October 1964 Copyright Mike Roach Sadly the demolition gang are at work, It is suspected that the signal box windows were smashed earlier, however, all the point rodding has been cut into neat little pieces and the crane is busy sorting material in the yard.
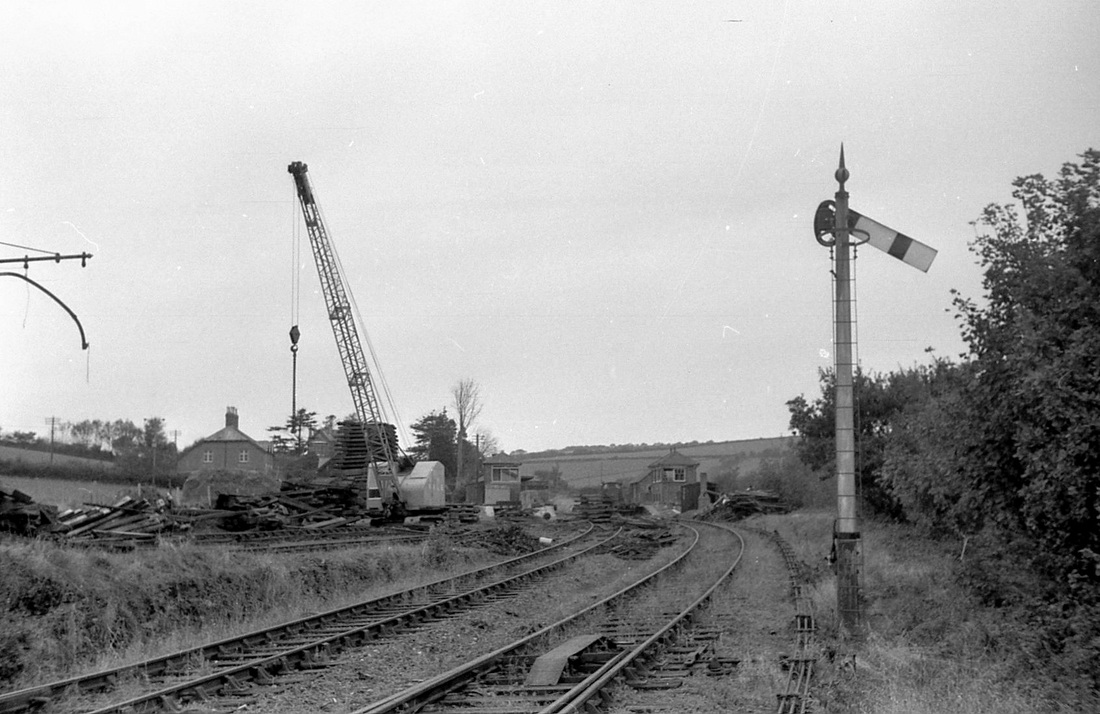
Bickleigh in October 1964. The crane is busy piling up sleepers. The signal forlornly welcomes trains. Note the two signalboxes opposite one another - the orginal box is on the left. Copyright Mike Roach
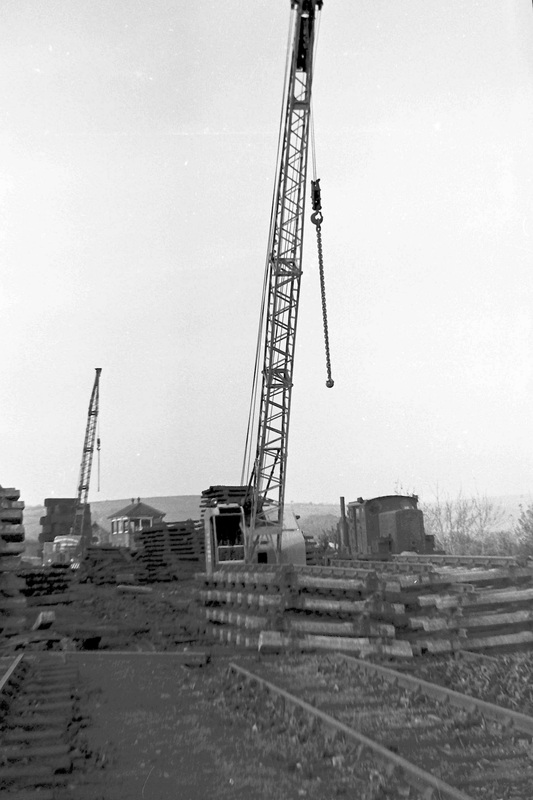
Bickleigh Another view of demolition work in progress. Copyright Sid Sponheimer
Demolition, windowless both signalboxes glare at each other - the newer one on the right. Copyright Sid Sponhiemer
Bickleigh The approach from the north after closure and during demolition. Copyright Sid Sponheimer
Bickleigh January 1963. Copyright Mike Roach. Note (1) the two signal boxes facing each other! (2) This must have been taken from the top of a signal

Another study, this time from ground level. January 1963 Copyright Mike Roach
The waiting shelter, no effort spared in its construction. January 1963 Copyright Mike Roach
A very interesting shot of Bickleigh station with Dewerstone Rock in the background. January 1963 Copyright Mike Roach
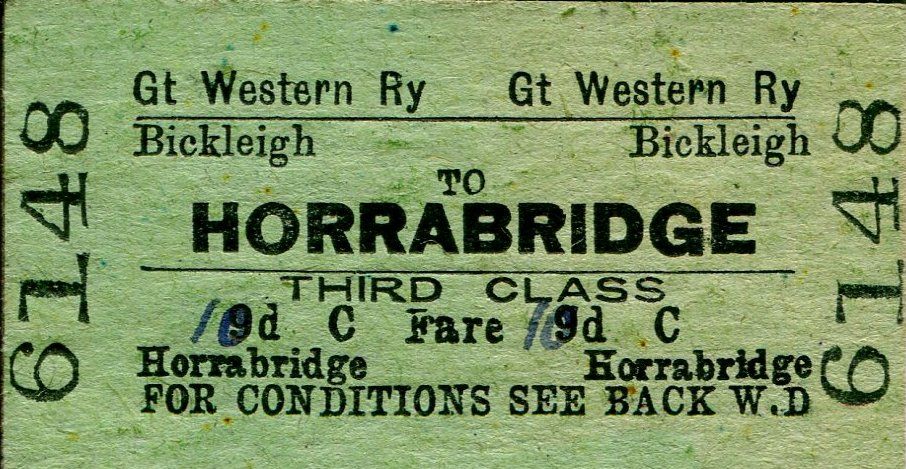
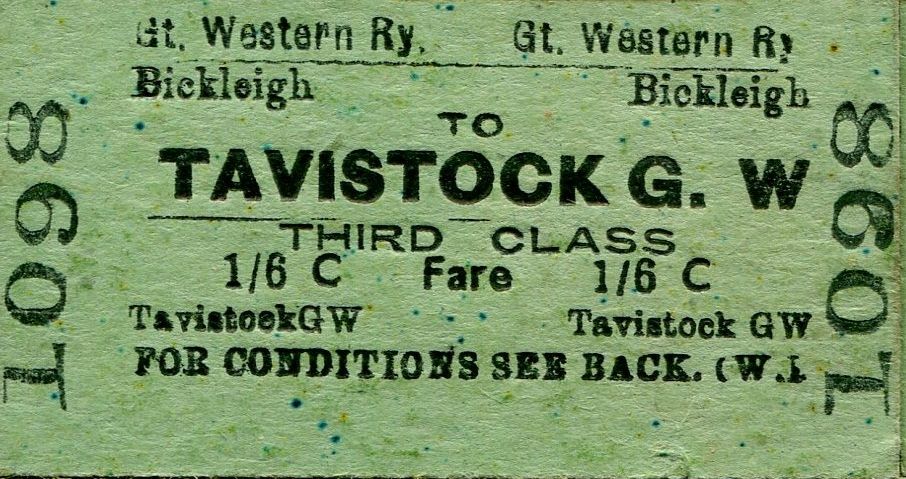
Mike Roach Ticket Collection

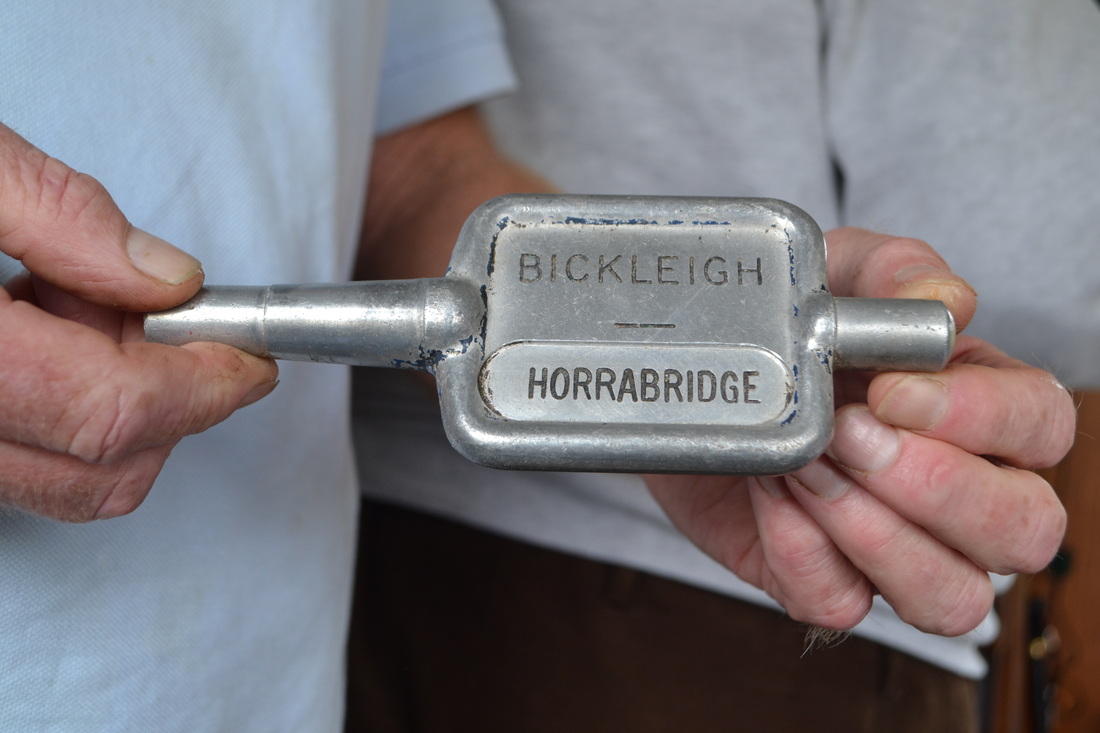
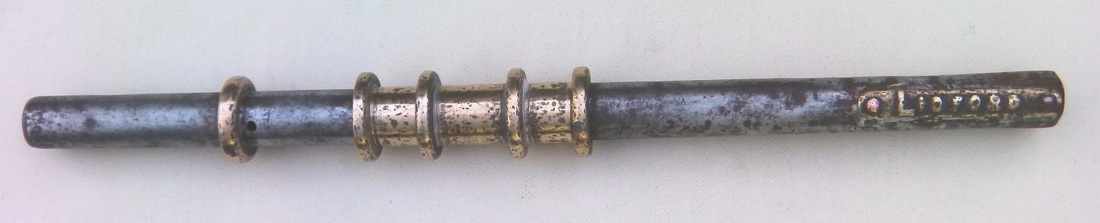
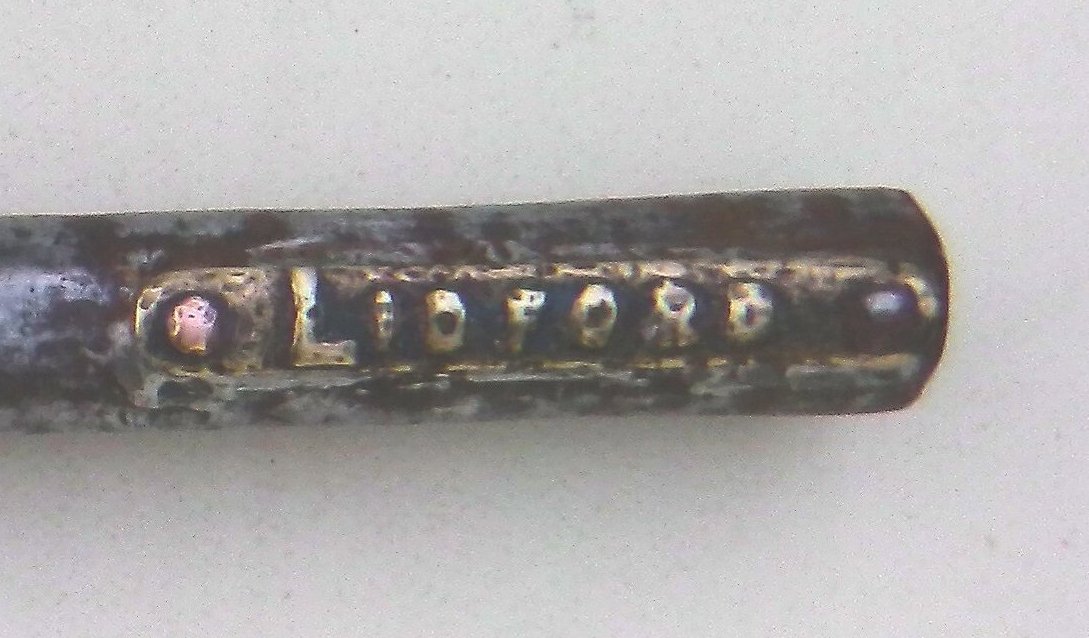
140830f The Bickleigh to Horrabridge Token. This would only have been used from the closure of Yelverton Signal Box until the closure of the line. Property of Chris Groves Bere Ferrers Copyright Roger Winnen
Ham Green Viaduct 4Ml. 31Ch
171 Yards long
171 Yards long
A '45' crosses the 171 yard long Ham Green Viaduct seen here in 1961. Copyright Mike Roach
Ham Green viaduct - Sid Sponheimers view. Copyright
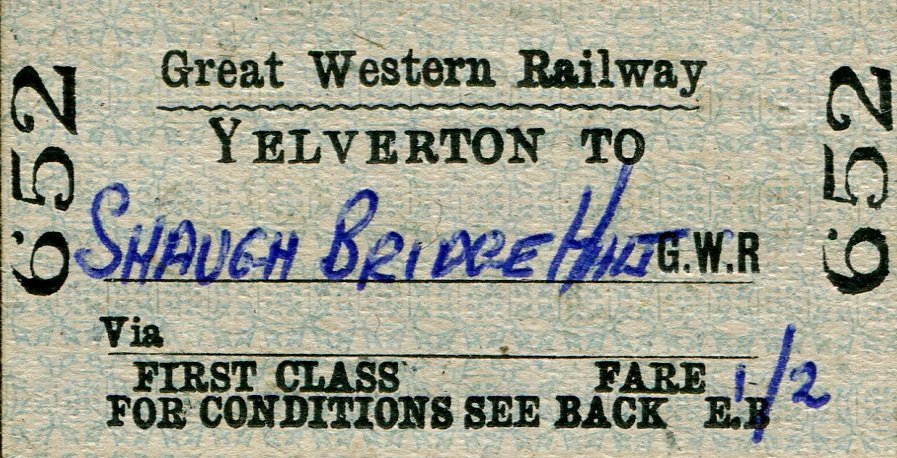
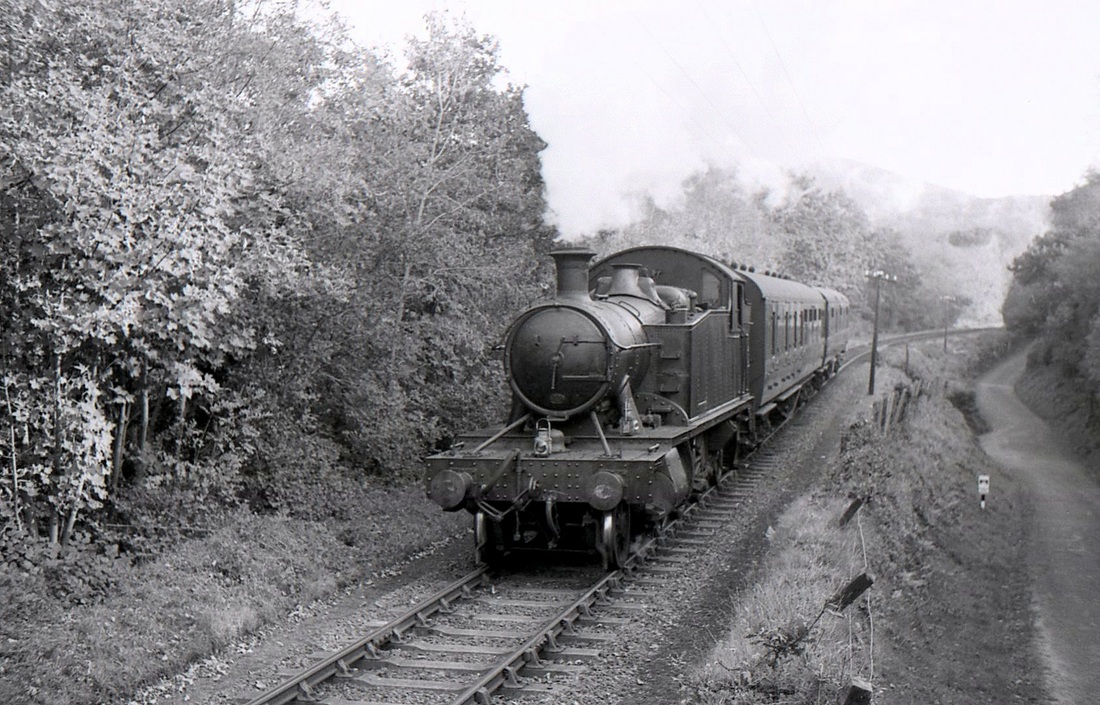
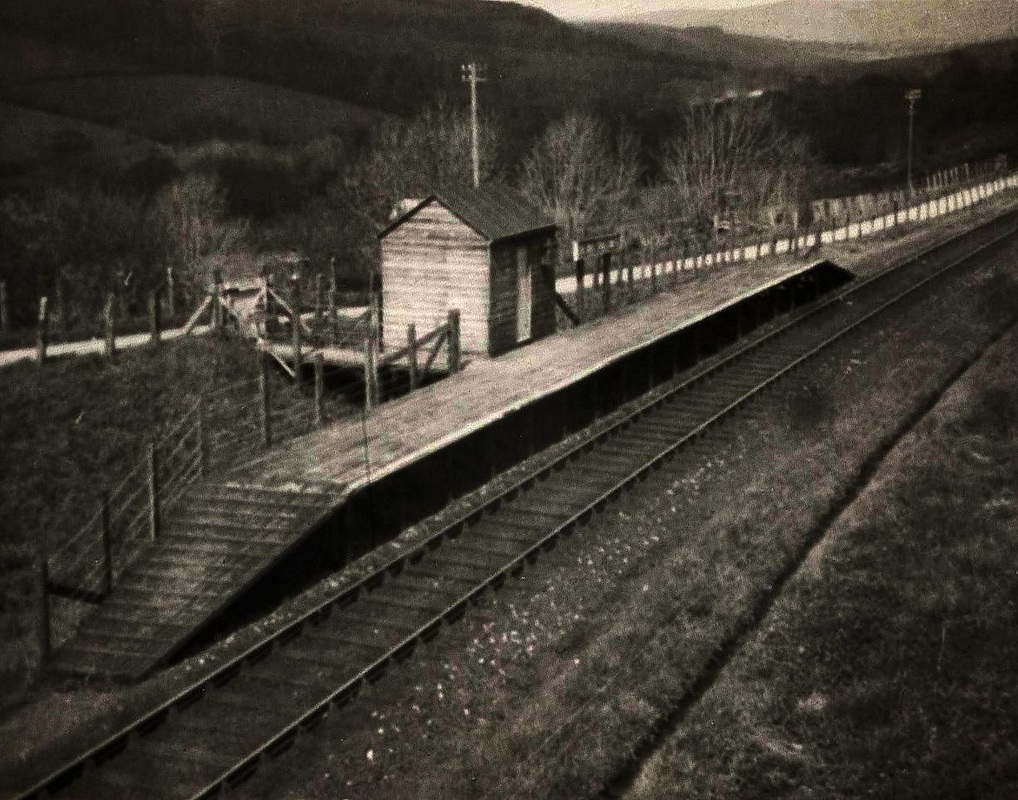
Shaugh Bridge Platform 4Ml. 79Ch
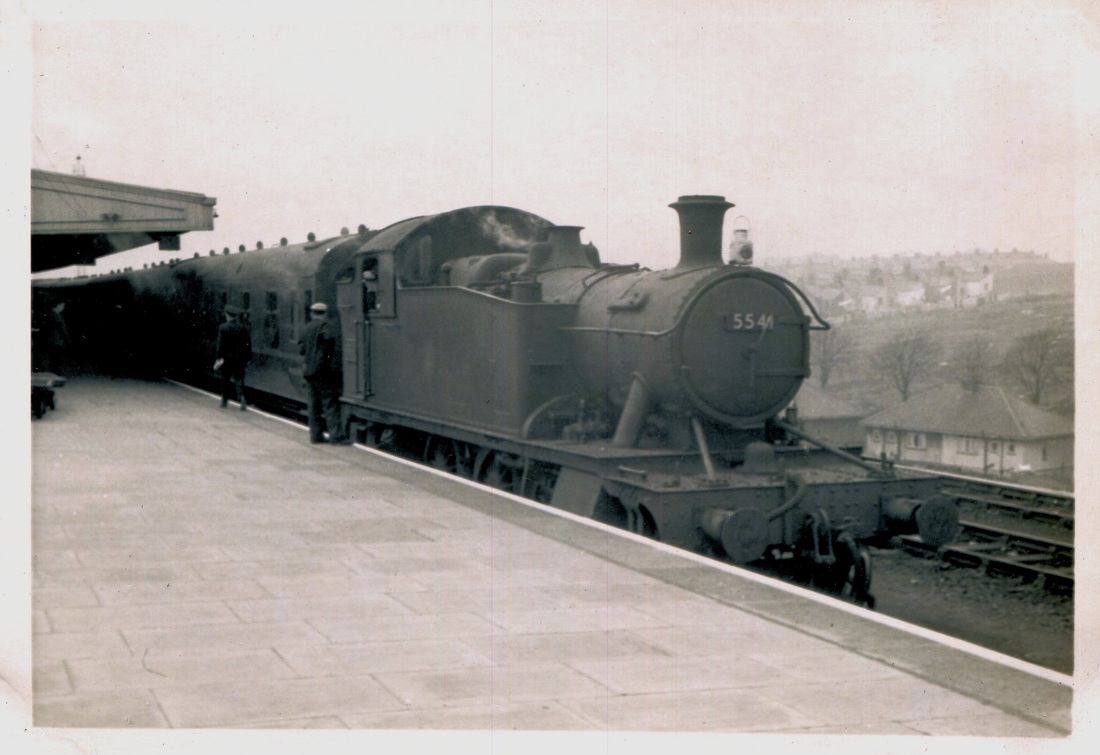
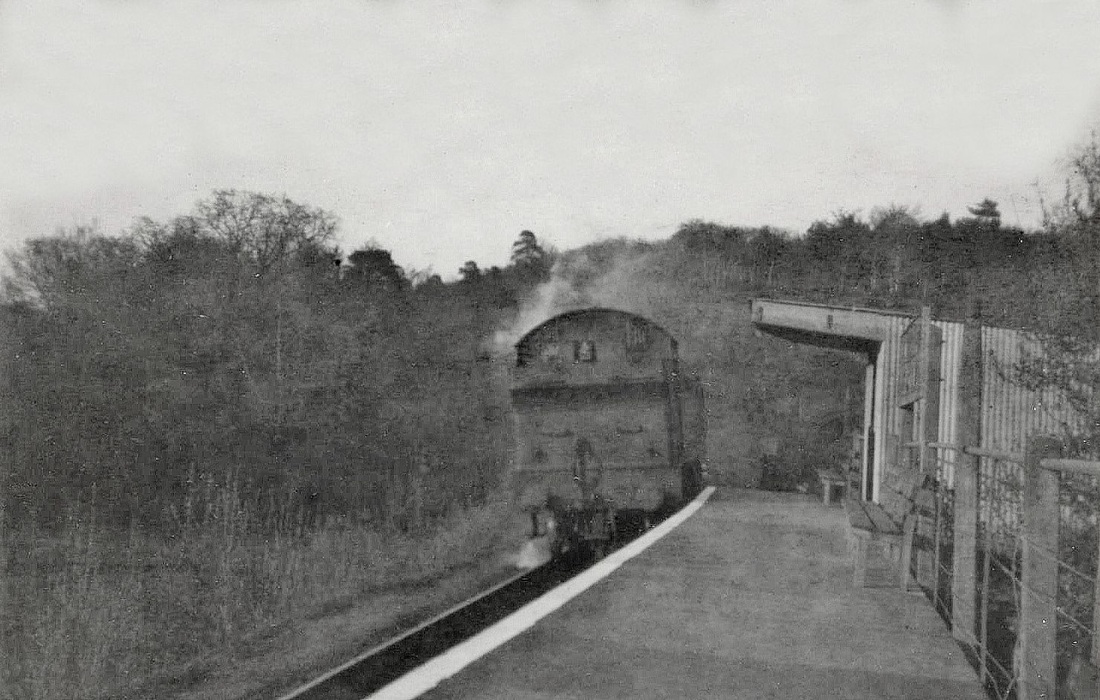
5544 sets out from Shaugh Bridge with the 3.05pm Plymouth to Launceston in May 1962. The mouth of Shaugh Tunnel can just be seen in the middle distance to the left of the bright tree in front of the loco.

Shaugh Bridge Platform seen from above. The departing train is soon to enter Shaugh tunnel. Copyright Mike Roach
4563 passes through Shaugh Bridge with a van train. May62 Copyright Mike Roach
Shaugh Bridge May 62 Copyright Mike Roach

Shaugh bridge Copyright Sid Sponheimer
Mike Roach Ticket Collection
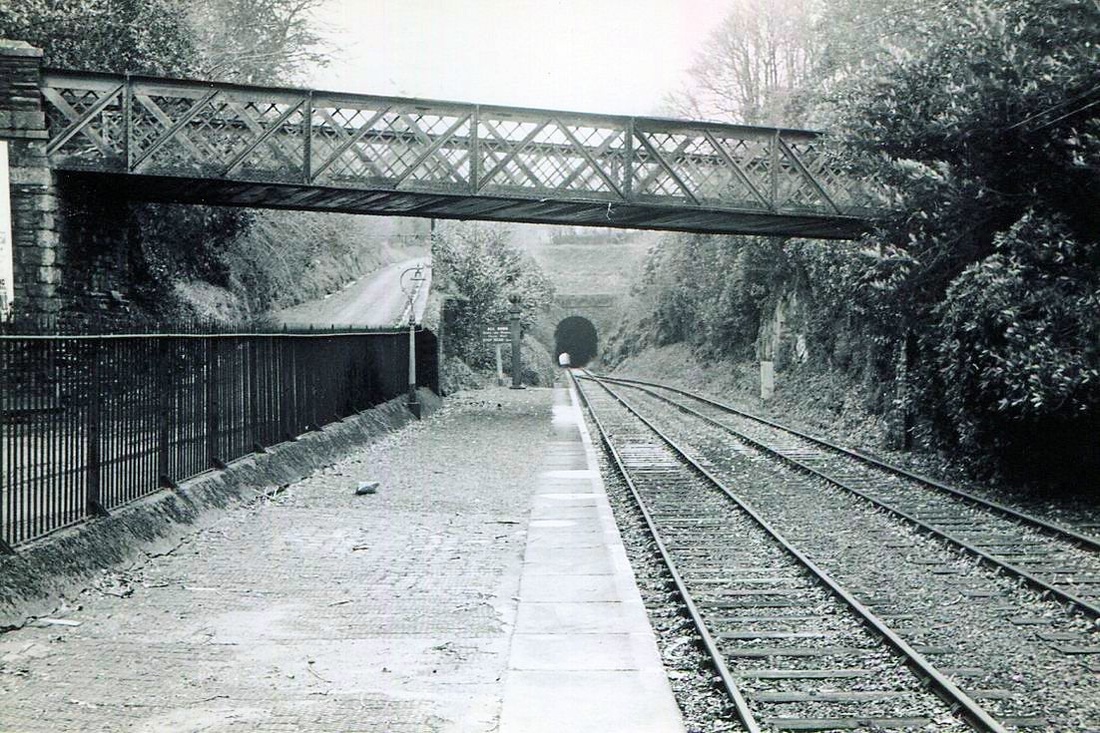
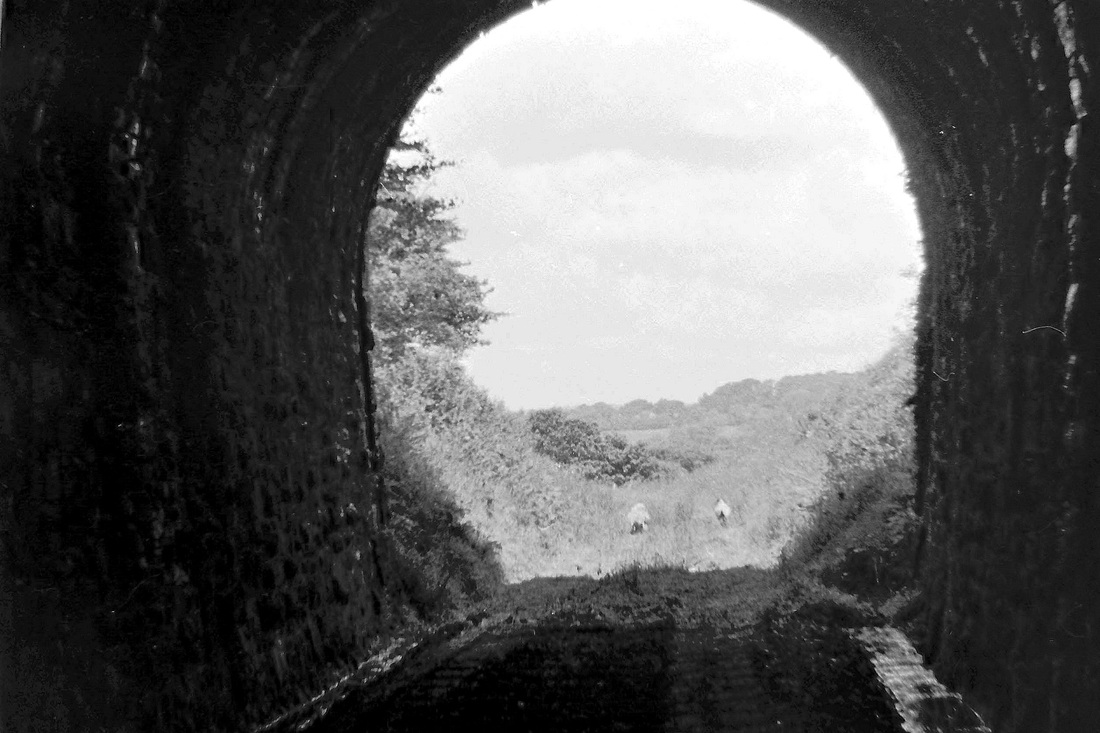
Shaugh Tunnel
107 Yards long
107 Yards long
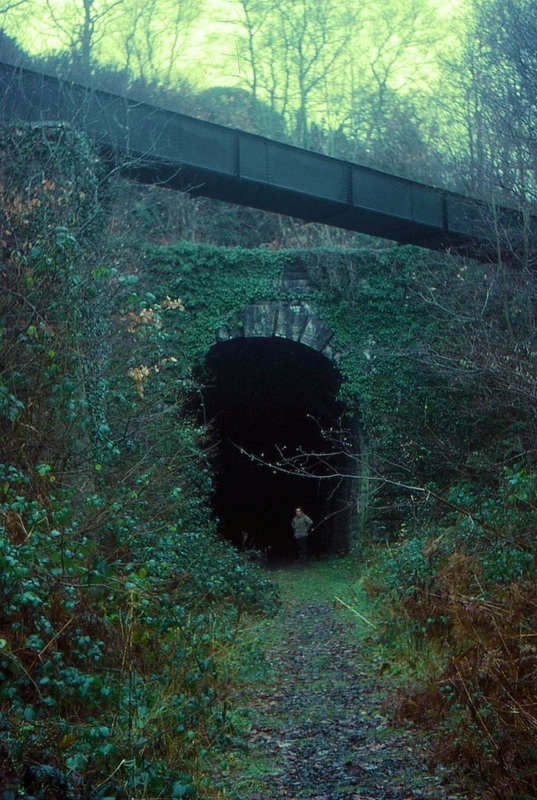
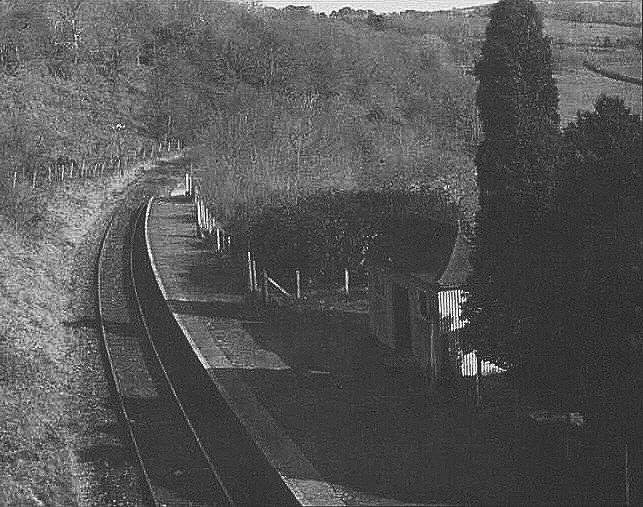
The south end of Shaugh tunnel September 1970. Copyright Mike Roach
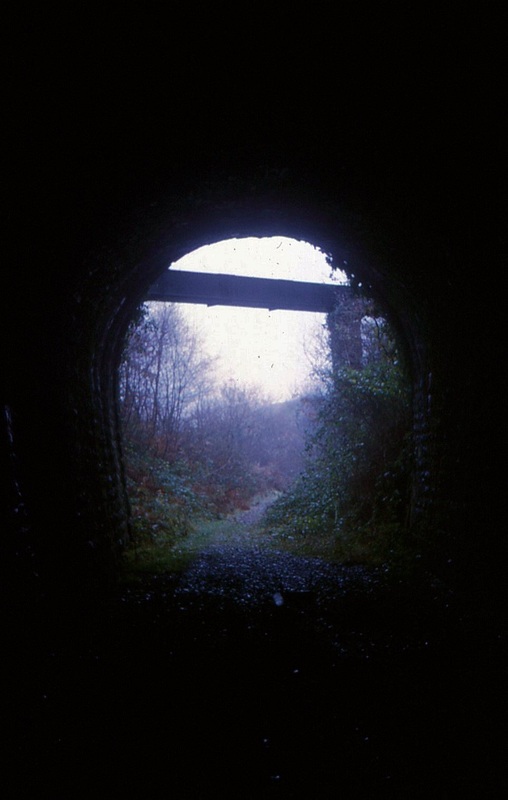
Looking south out of Shaugh Tunnel in September 1970 Copyright Mike Roach
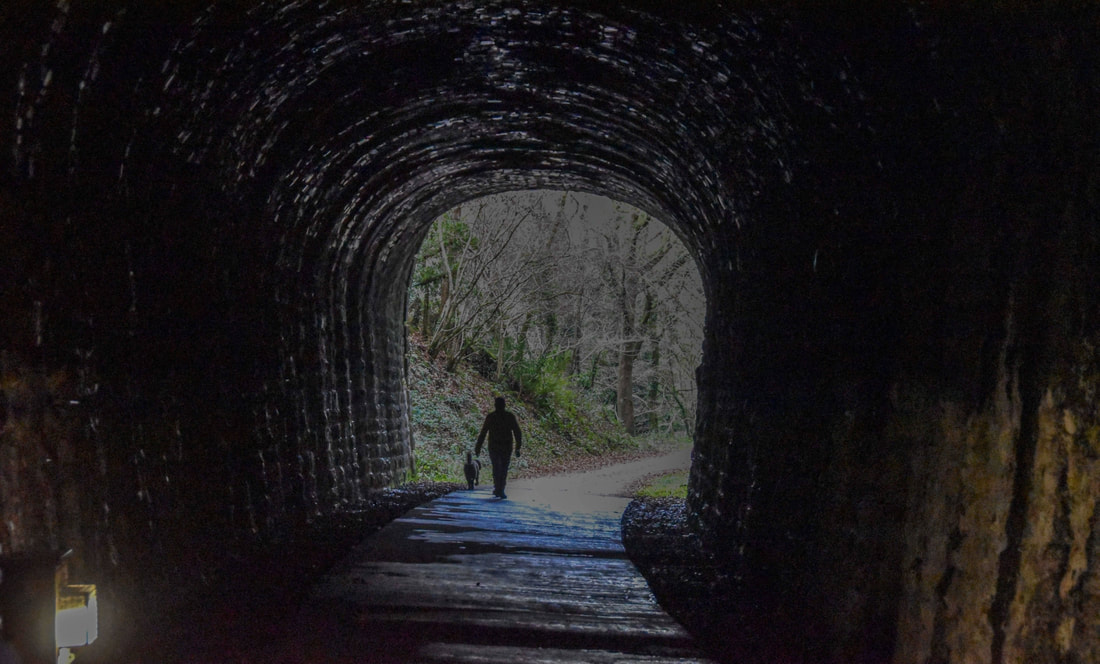
Light at the end of the tunnel. Shaugh tunnel. 25th January 2022. Copyright Clive Smith.
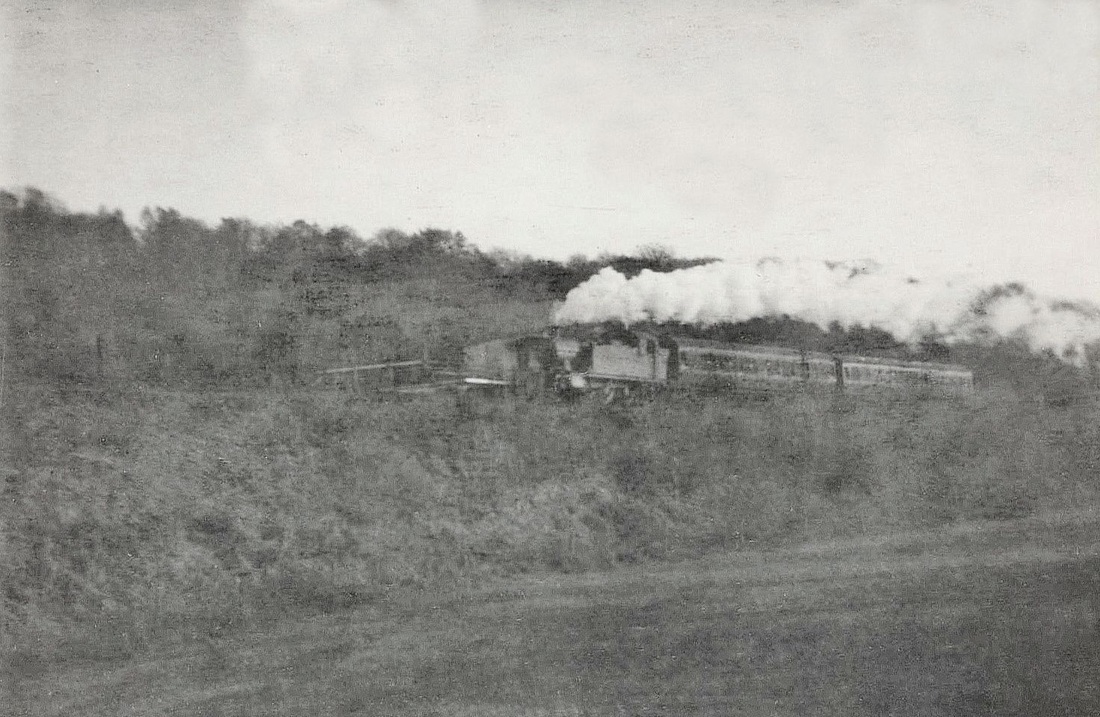
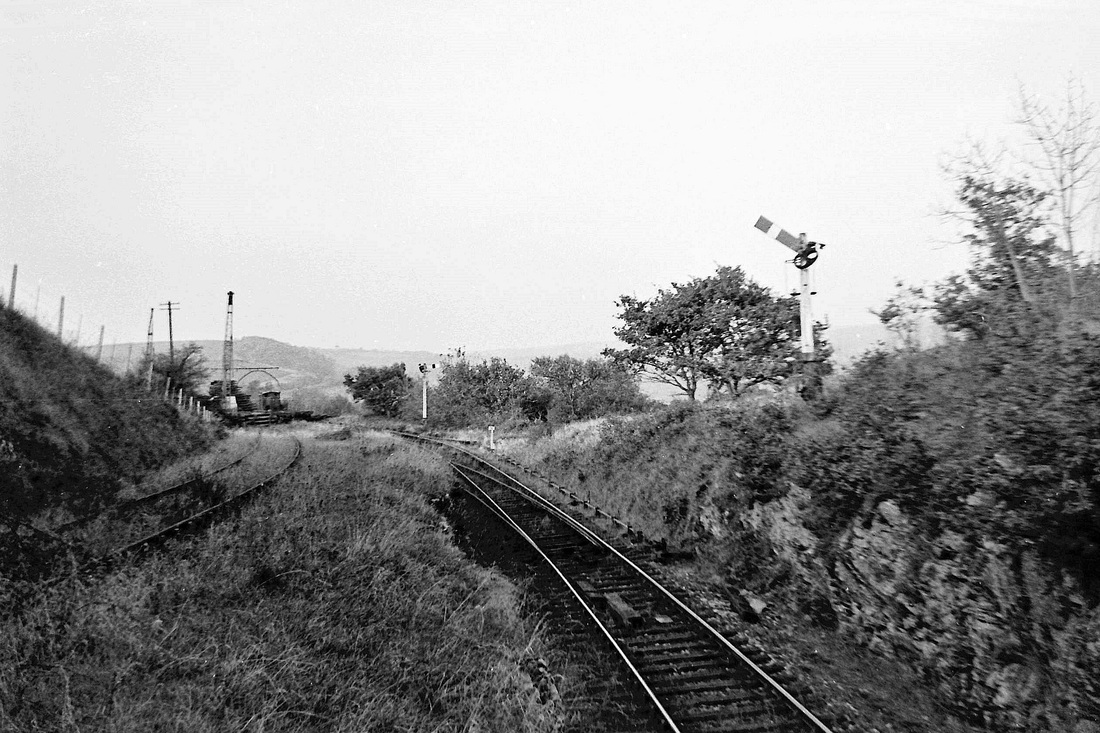
The 3.05pm from Plymouth to Launceston heads north at Lower Goodameavy between Shaugh Bridge and Clearbrook Halts in September 1962 - Copyright Mike Roach
Clearbrook Halt 6Ml. 25Ch
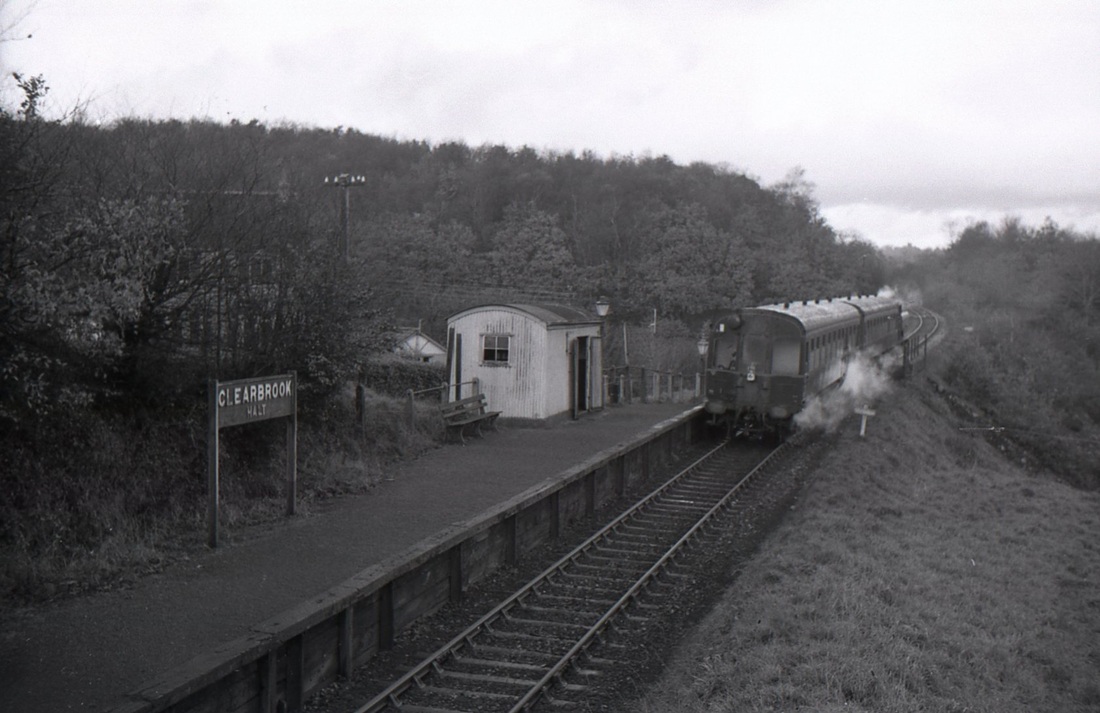
Clearbrook Halt seen in November 62. An auto-train from Tavistock to Plymouth enters, but there is little business on offer. Copyright Mike Roach
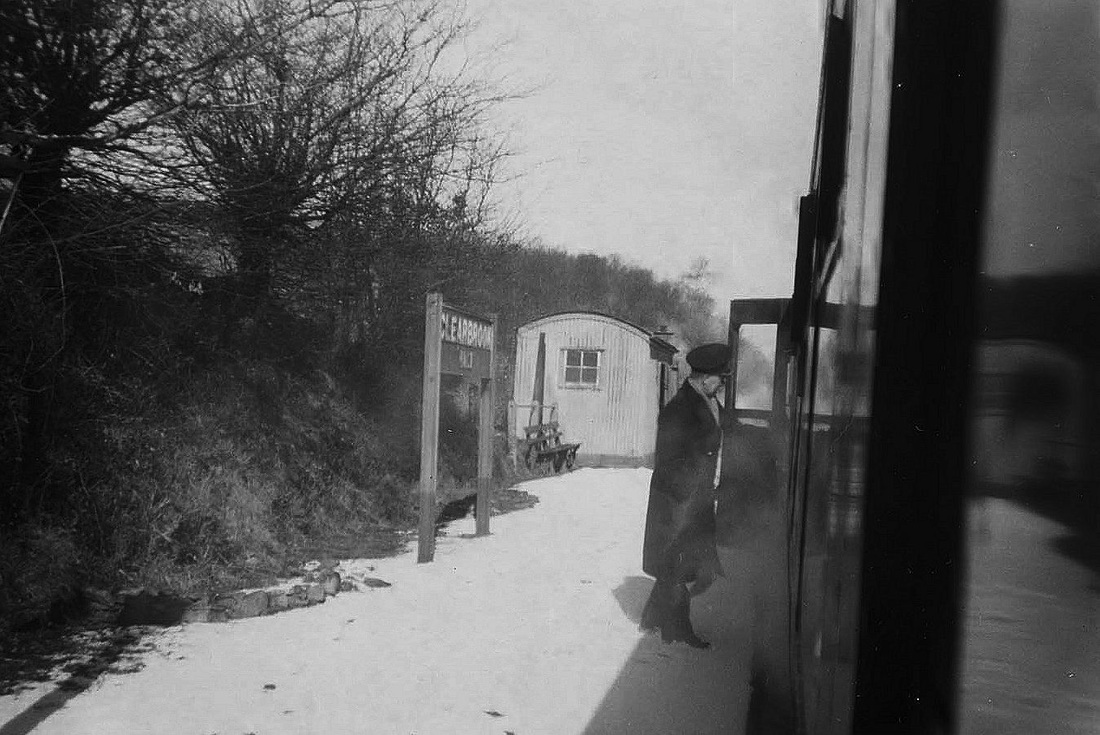
The guard loading a passenger on a winters day at Clearbrook. Copyright Sid Sponheimer
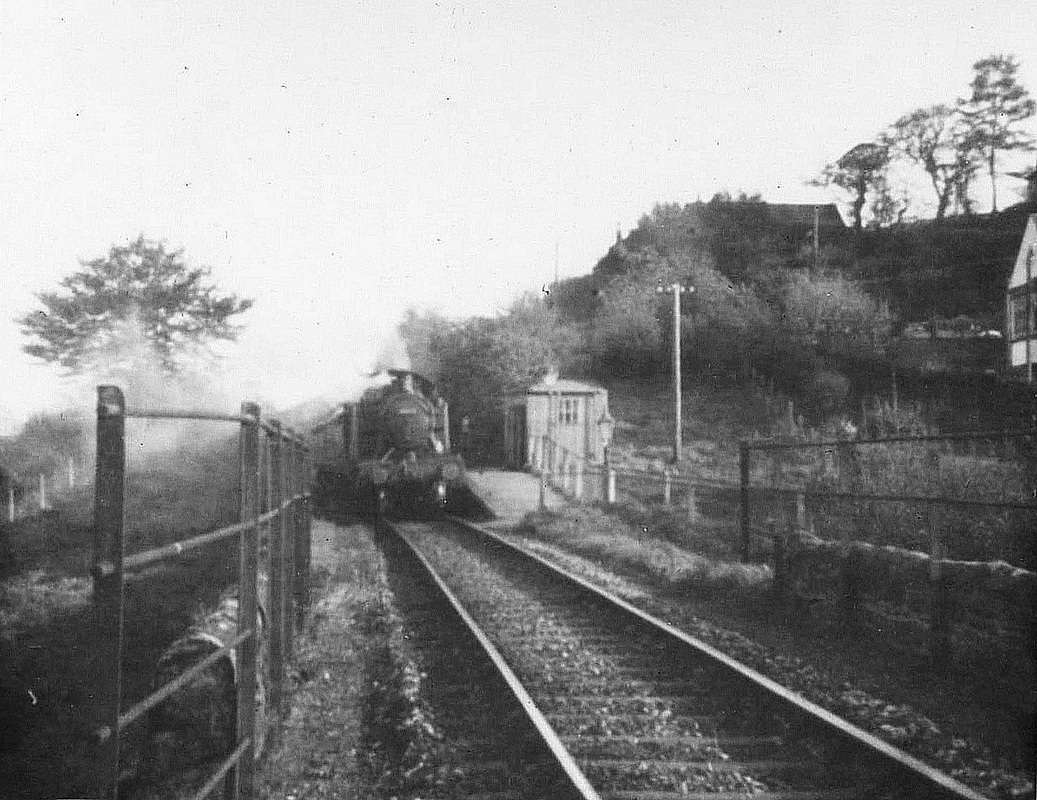
5564 stands at Clearbrook. Copyright Sid Sponheimer

5564 get under way leaving Clearbrook. Copyright Sid Sponheimer
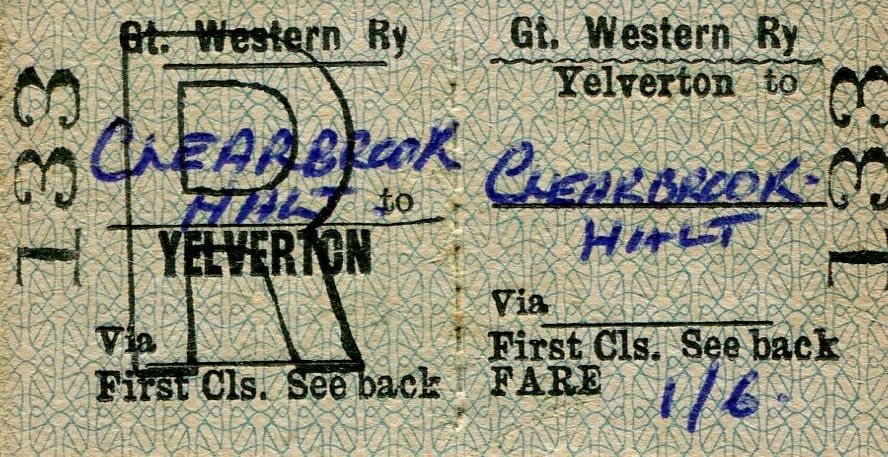
This first class return ticket from Yelverton to Clearbrook Halt was issued on 29 DEC 62 the last day of passenger services.
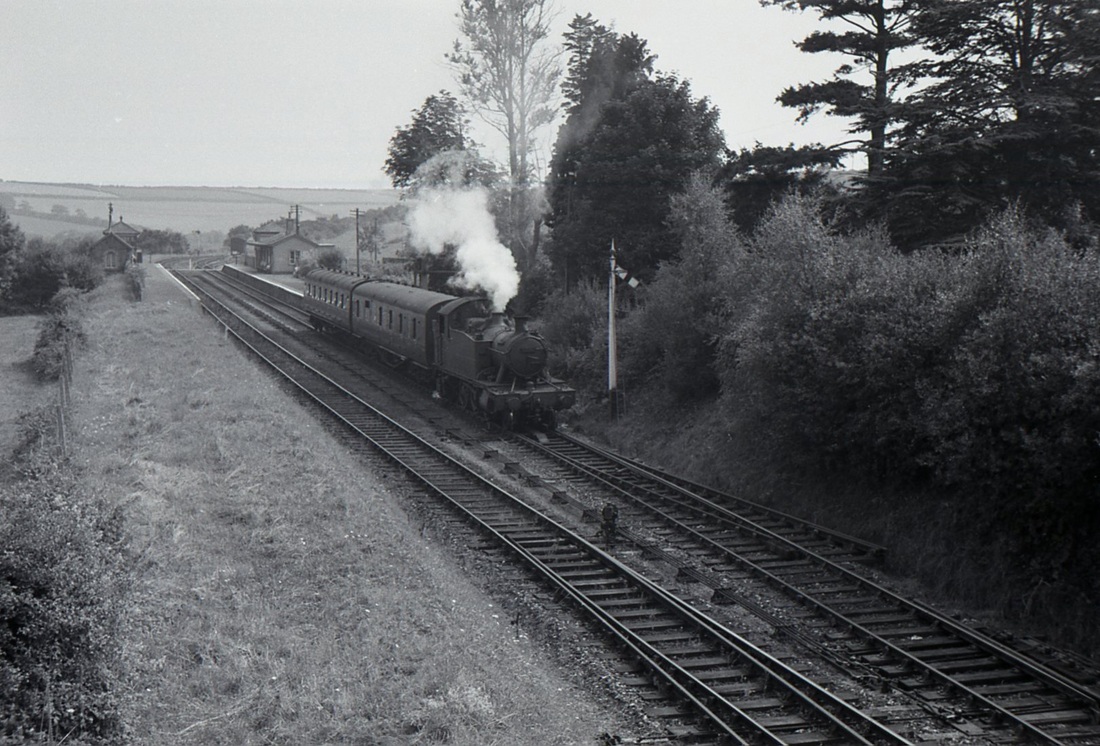
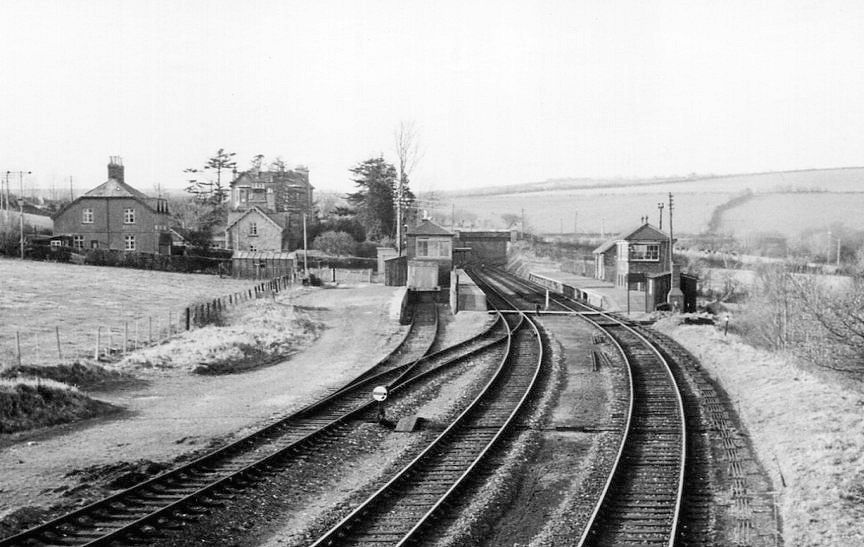
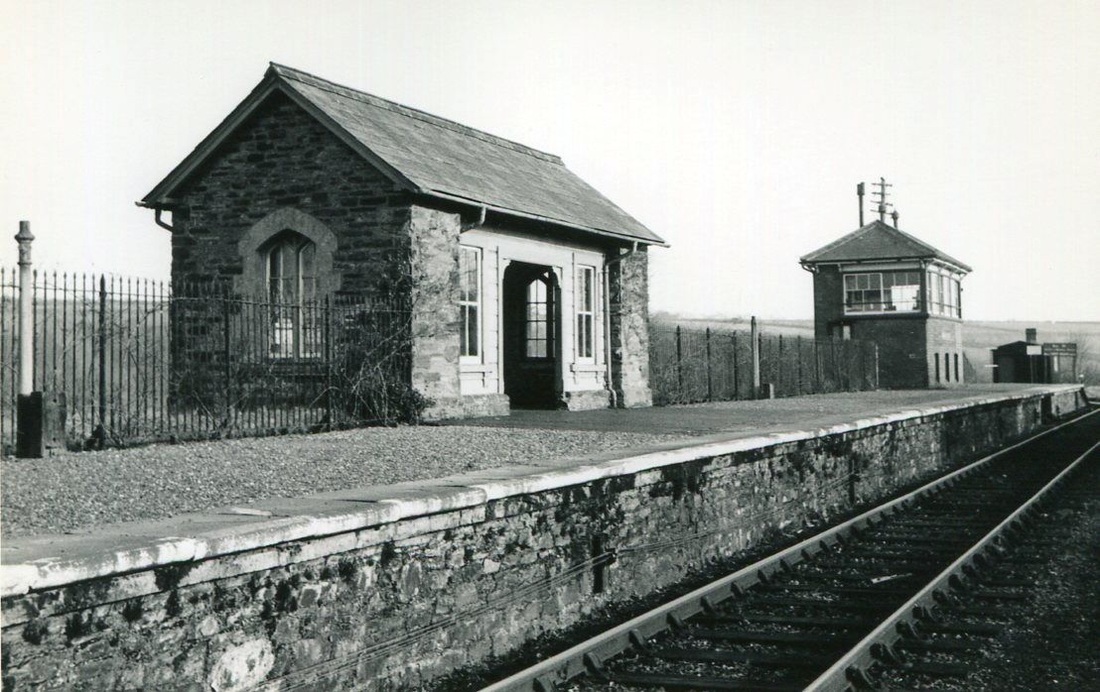
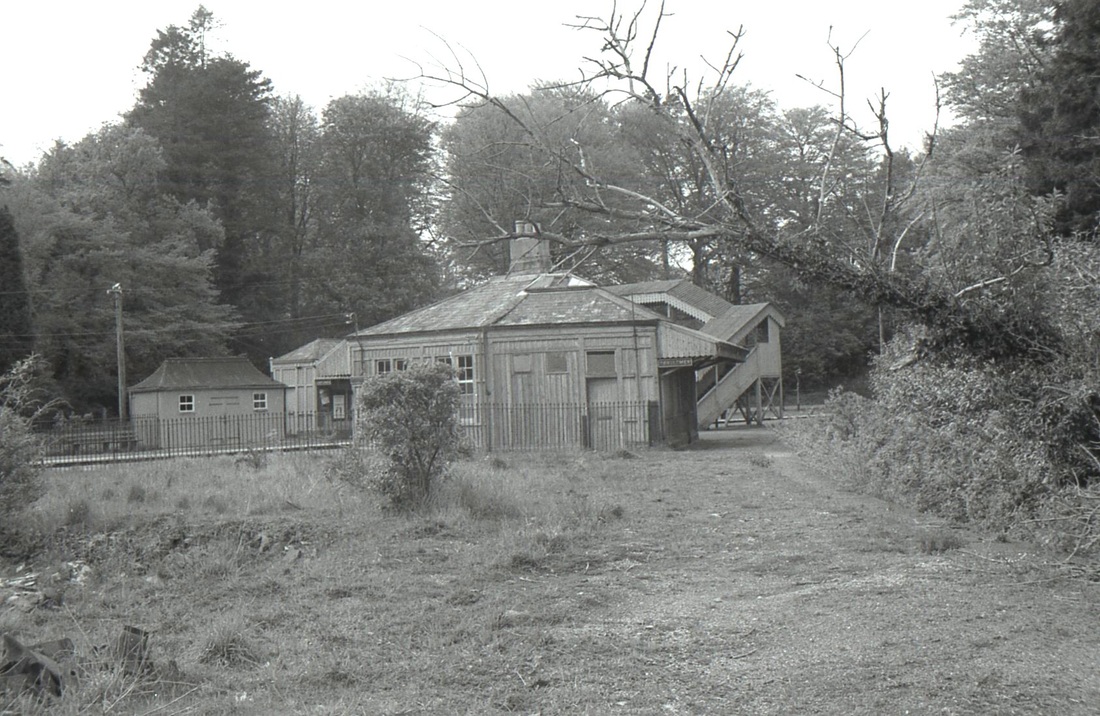
Yelverton 7Ml. 37Ch
It's November 1962 as 4555 approaches Yelverton with a service for Launceston.
Copyright Mike Roach
A service from Tavistock runs in Nov62. Note the approach road, not many cars in evidence. Nov 62 Copyright Mike Roach
Yelverton 1962. A Launceston to Plymouth service pulls away. Note the smoke still drifting out of the 641-yard Yelverton Tunnel. Copyright Mike Roach
The Princetown branch platform is clearly in evidence here curving away to the left, and immediately steepening to 1 in 40. The branch had closed six years earlier, and was lifted soon afterwards. Nov 62 Copyright Mike Roach
A rather grainey image, but well worth keeping for the record, shows a 45 heading off towards Marsh Mills and Plymouth. Previously this would have been the Launceston bound side of the loop but the signalbox has been closed and the nearest metals are disused. Copyright Sid Sponheimer.
Yelverton in April 1963 - note the straight bore of the tunnel. April 1963 Copyright Mike Roach
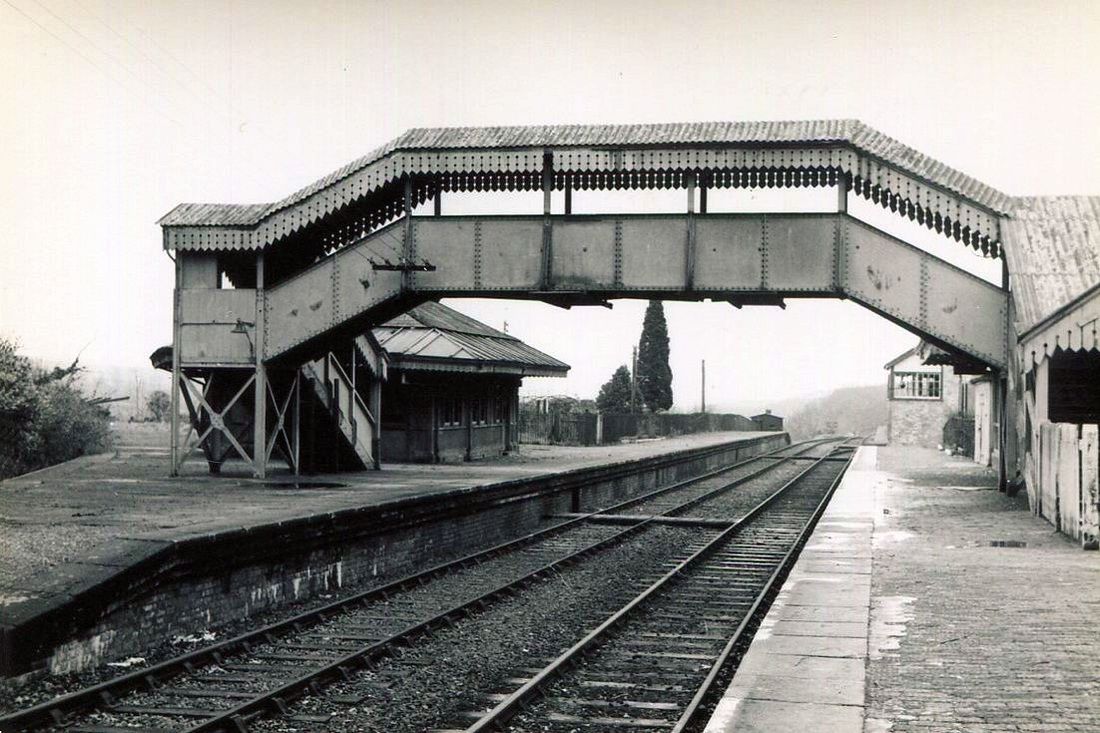
Yelverton April 1963. Everything still seems complete but note the heavily overgrown trackbed at the Princetown platform on the extreme left. Copyright Mike Roach
Looking towards the tunnel from the, by then, disused southbound platform. The footbridge is still open but no longer needed to serve this platform or the platform face just behind the footbridge for trains heading for Princetown. Note the easy access for athletic staff between the platforms by means of the boarded crossing - there was an iron step set into the platform. Copyright Sid Sponheimer
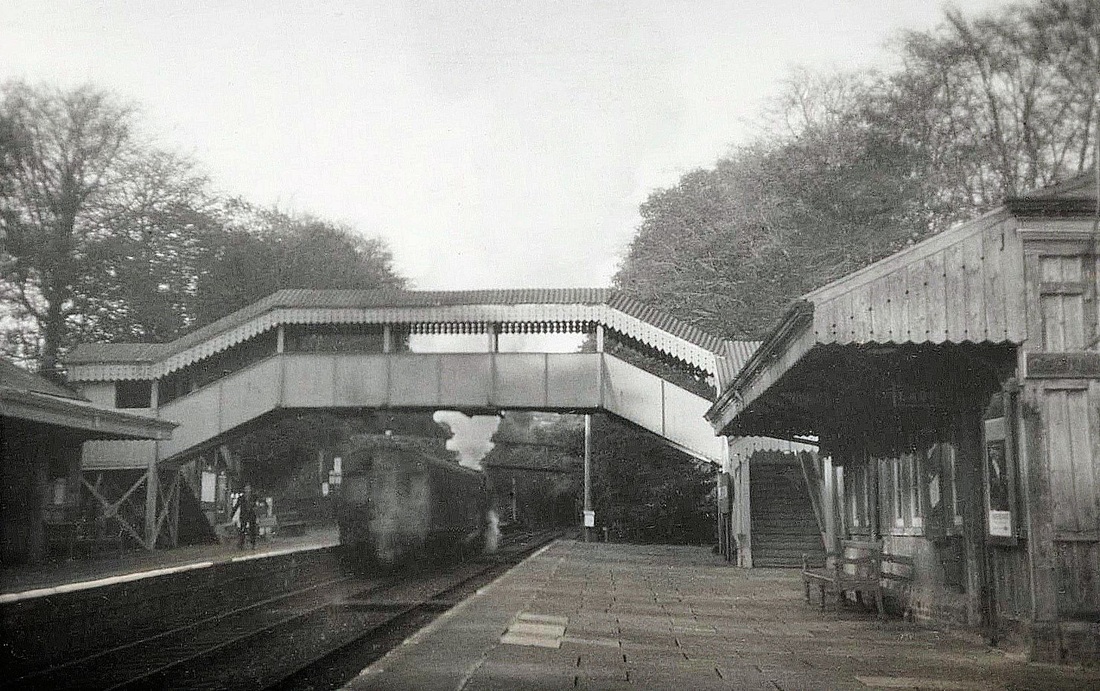
Yelverton station in June 1965 Copyright Mike Roach


Finally on a more cheerful note, in 1961 an auto-train leaves Yelverton for Plymouth. Does anyone recognise the driver ? Answers to the webmaster please. Copyright Mike Roach
TAKETHREE-22.09.1962 Michael L. Roach Mike looks back
Yelverton Station on the afternoon of 22 September 1962
On Thursday last, 22 September 2022, the website published photos taken on the morning of Saturday 22 September 1962 at Laira Shed. That afternoon I visited Yelverton Station on the branch to Launceston to see a couple of trains pass through, as follows:
5725 4574 runs in on the 3.05pm Plymouth to Launceston train, running three minutes early. I was standing by the buffer stop at the end of a siding.
5726 A general view of Yelverton Station looking north; only the left hand line was in use.
5727 4555 leaves Yelverton Tunnel and passes through the station non-stop with 11 wagons on the afternoon goods from Launceston
MLR / 23 September 2022
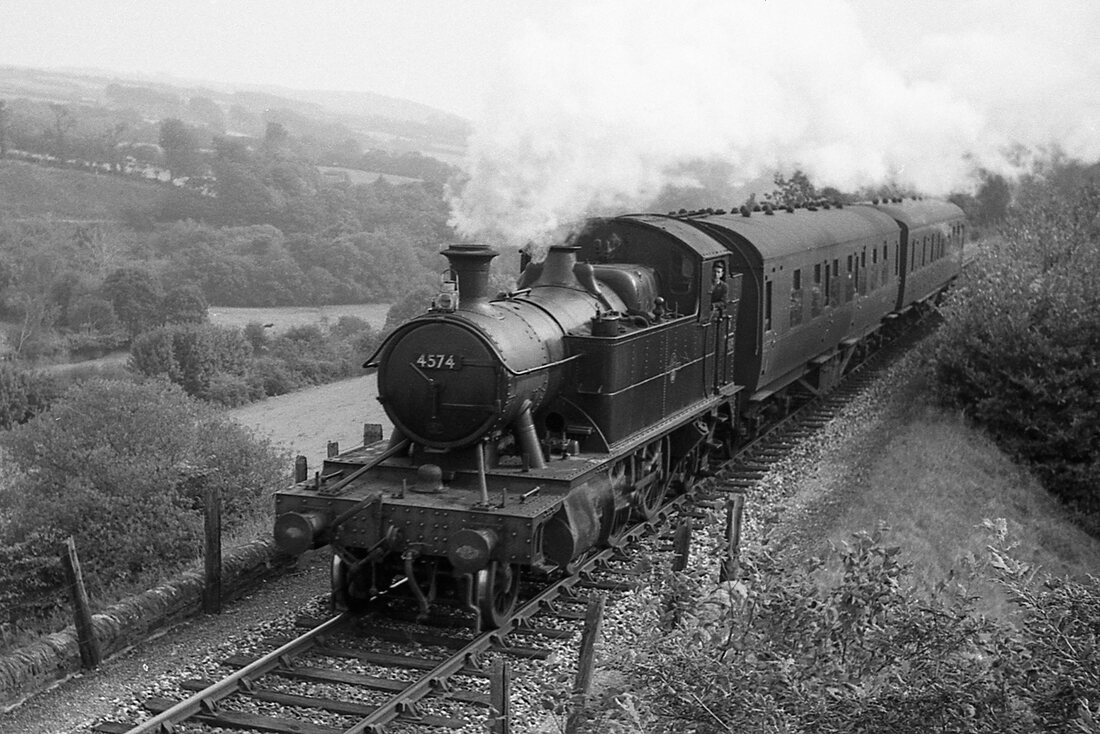
5725 4574 runs in on the 3.05pm Plymouth to Launceston train, running three minutes early. I was standing by the buffer stop at the end of a siding. 22nd September 1962. Copyright Michael L Roach

5726 A general view of Yelverton Station looking north; only the left hand line was in use. 22nd September 2022. Copyright Michael L. Roach.
5727 4555 leaves Yelverton Tunnel and passes through the station non-stop with 11 wagons on the afternoon goods from Launceston. 22nd September 2022. Copyright Michael L Roach.
TAKETHREE-24.11.1962 Michael L. Roach Mike looks back on the very last day of Yelverton Station.
Yelverton Station on the afternoon of 22 September 1962
Yelverton Station on the afternoon of 22 September 1962
TAKETHREE – 24 November 1962
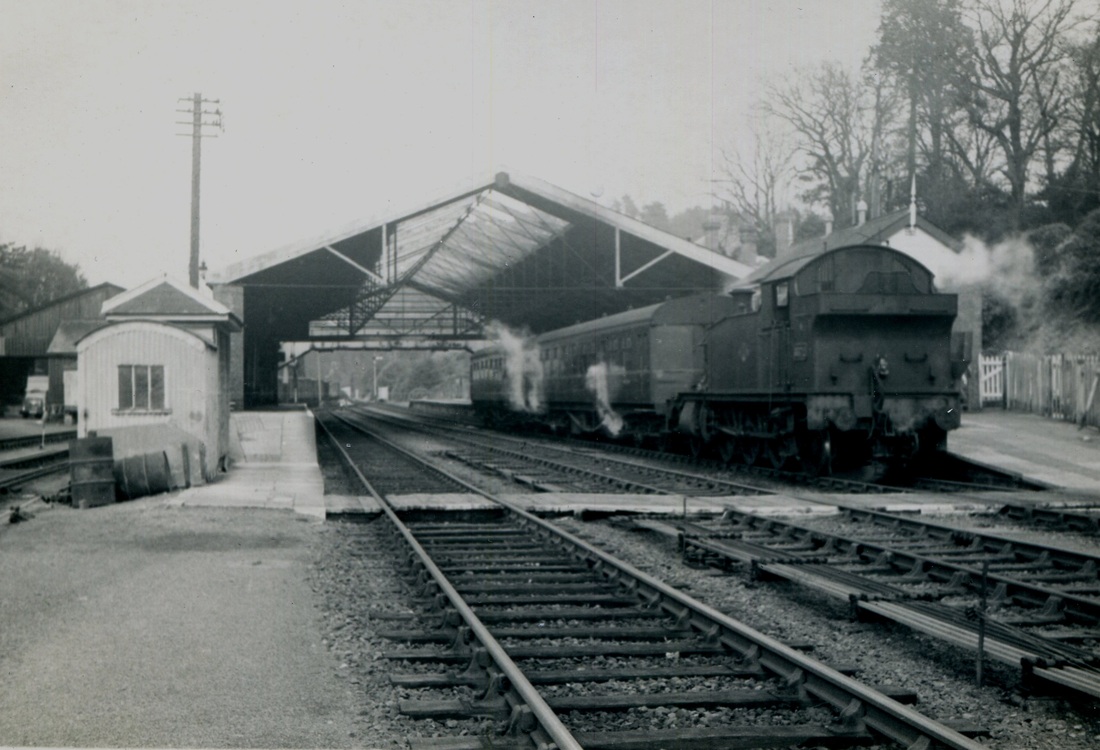
The Tavistock Auto
The Great Western's Launceston Branch ran for 31 miles 67 chains from Tavistock Junction, on the eastern outskirts of Plymouth, to Launceston in Cornwall, via Tavistock GW (later South) and Lydford. The passenger trains started and finished their journeys at Plymouth Millbay and ran ECS to North Road Station which was 2 miles 66 chains west of Tavistock Junction. Many of the passenger trains along the branch only went as far as Tavistock before returning to Plymouth, a journey length of 15¾ miles The Launceston trains were worked by small prairie tanks almost from their first introduction in 1905. However the Plymouth to Tavistock services were worked by auto trains normally hauled by 6400-class pannier tanks but occasinally by auto-fitted 4575-class prairie tanks displaced from South Wales in 1958 by diesel multiple units. For a few years in the mid and late 1950s some auto trains were worked by 1400-class 0-4-2 tanks, but there were only ever one or two of the class at Laira Shed which supplied all the motive power for the branch up to the date of withdrawal of passenger services and complete closure of much of the route at the end of December 1962.
MLR / 21 November 2022
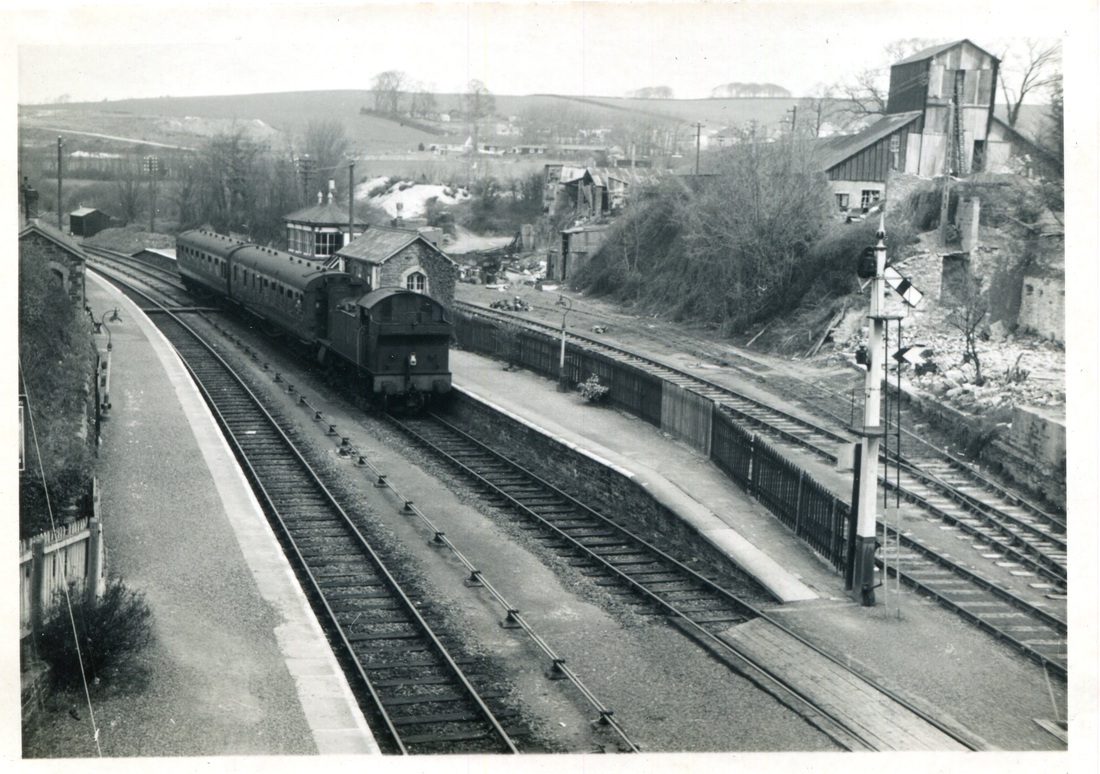
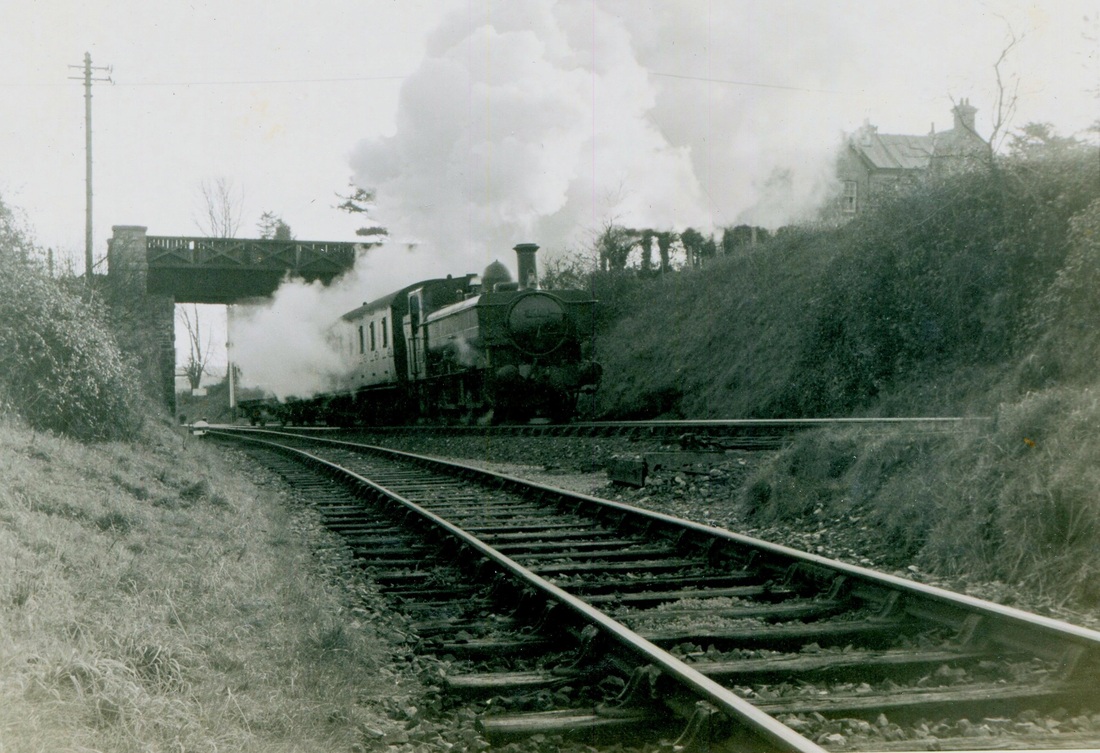
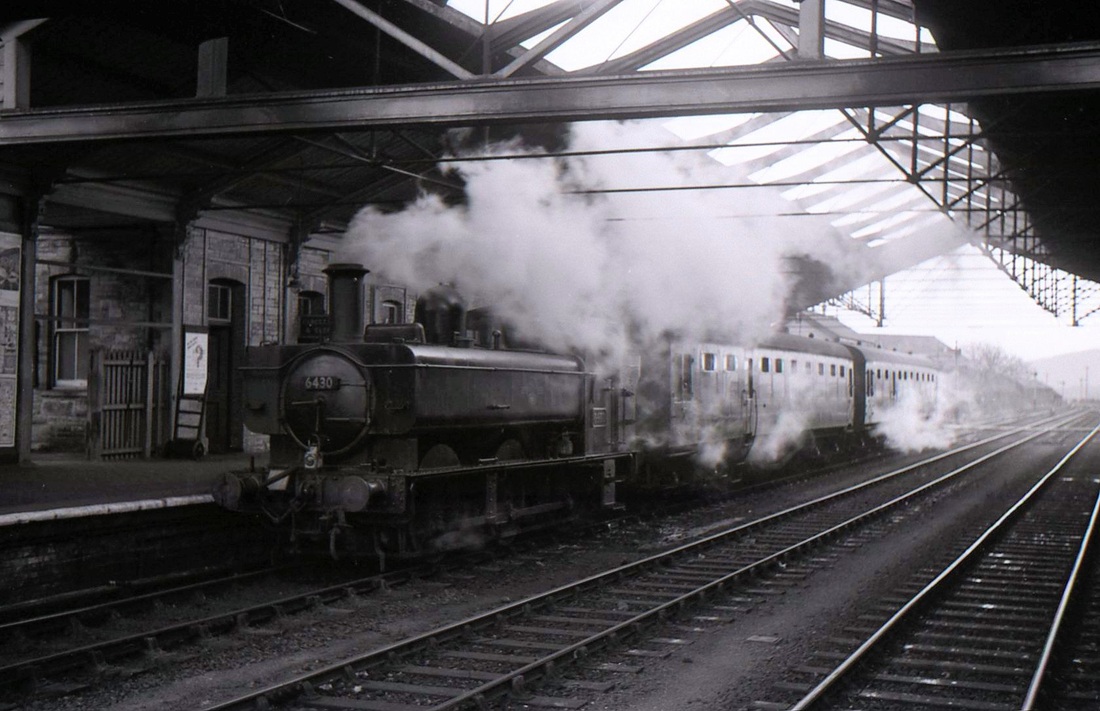
5808 Here we see one autocoach propelled by 6421 at 2.13pm on 24 November 1962 passing through Yelverton Station non-stop because it is an empty stock train. This was the return working of the 12.45pm SO Plymouth to Tavistock train and was due to depart Tavistock at 2.00pm arriving Millbay at 3.00pm. At Bickleigh Station it will cross the 2.10pm Plymouth to Tavistock auto. Note the steeply graded access road and the accommodation bridge. Copyright Michael L. Roach.
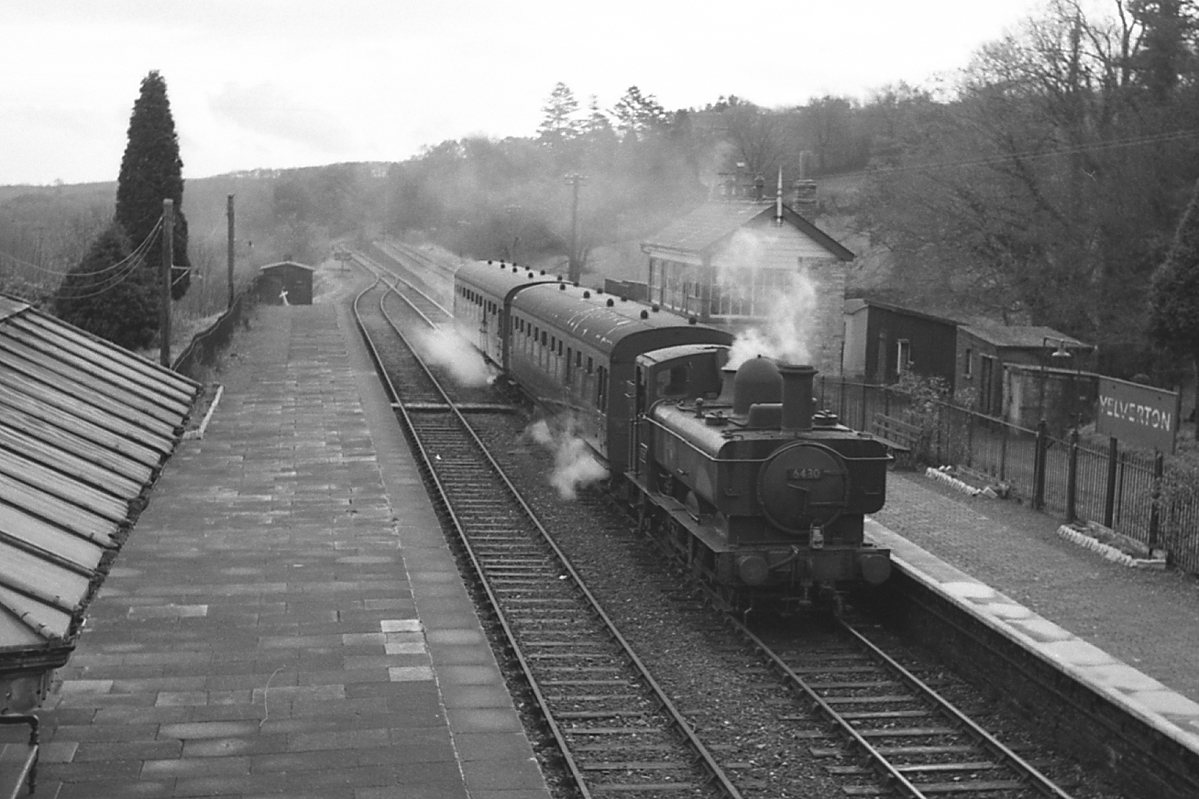
5810 6430 enters Yelverton Station with the 2.10pm Plymouth to Tavistock auto on the same day photographed from the very useful footbridge which led to a footpath. Note the sidings and the Great Western fir trees. Copyright Michael L. Roach.
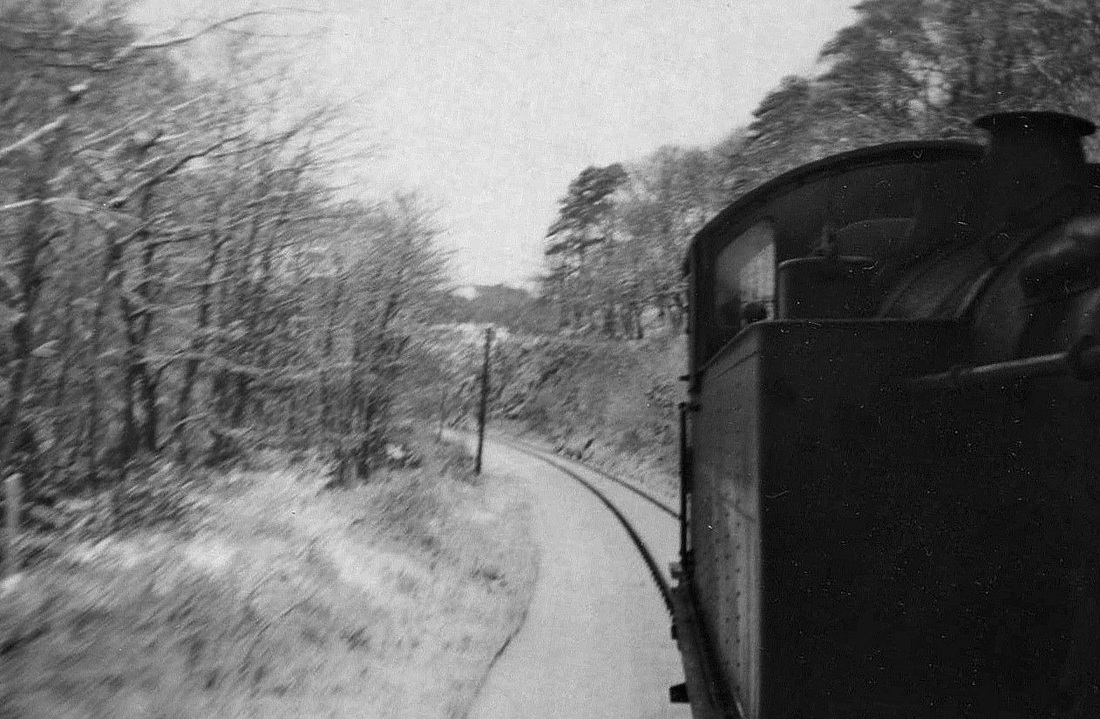
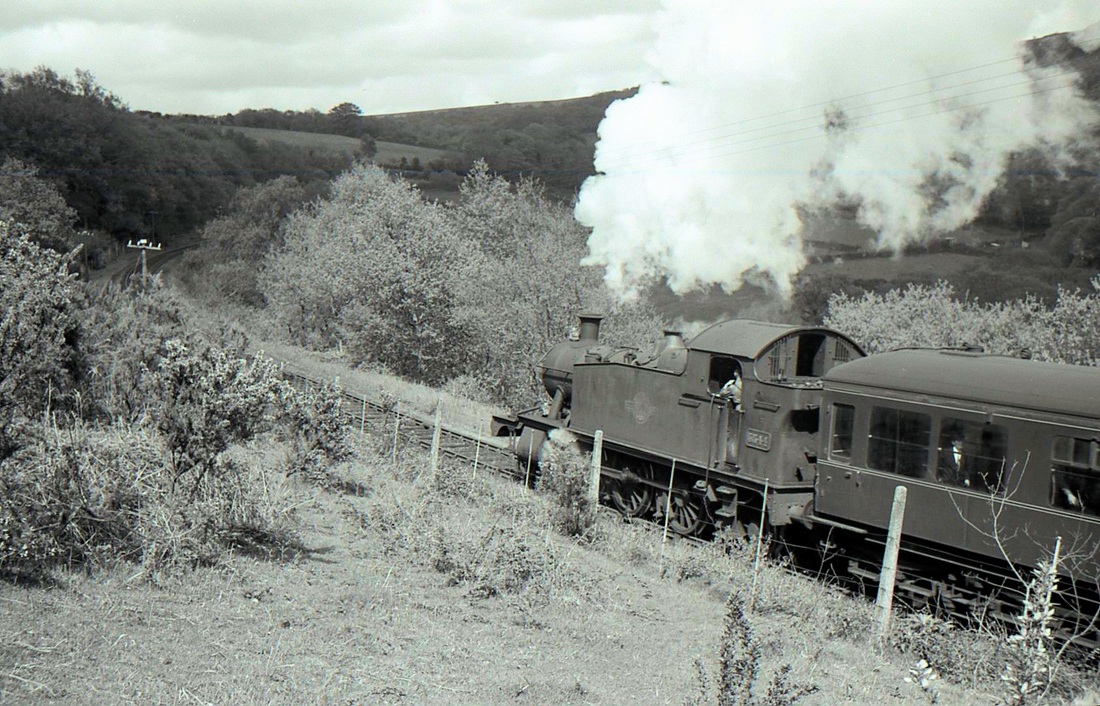
2752 The 12.45pm SO Plymouth to Tavistock South auto is seen in the woods between Clearbrook Halt and Yelverton hauled by the first member of the 6400-class at 1.30pm running 14 minutes late. The date is 29 December 1962 which was the last scheduled day of passenger services over the branch. There had been about 100mm of snow overnight and it started to snow again at mid-day and by 3.00pm a full scale blizzard was raging across Dartmoor and much of Devon and East Cornwall. Copyright Michael L. Roach.
Many thanks Mike for your memories, thank heavens you took along your faithful friend - your camera.
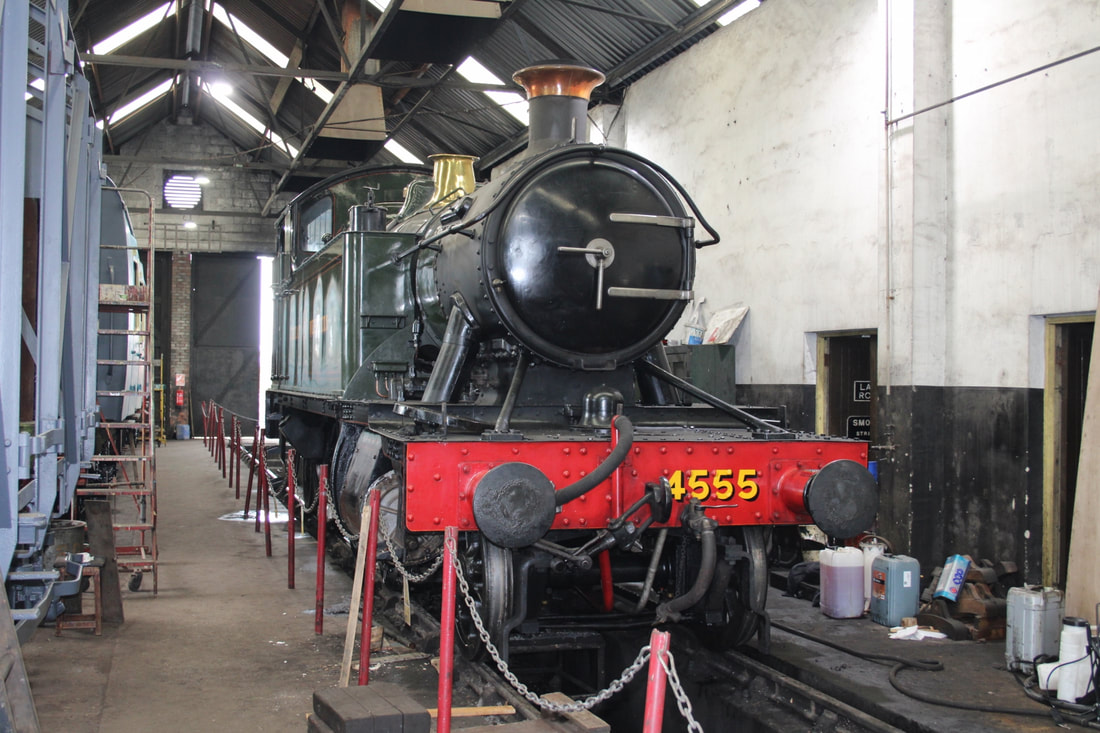
Just to prove that 4555 is still alive and able to kick here she is looking a treat at Cranmore, East Somerset Railway. 25th September 2022. Copyright Guy Vincent.
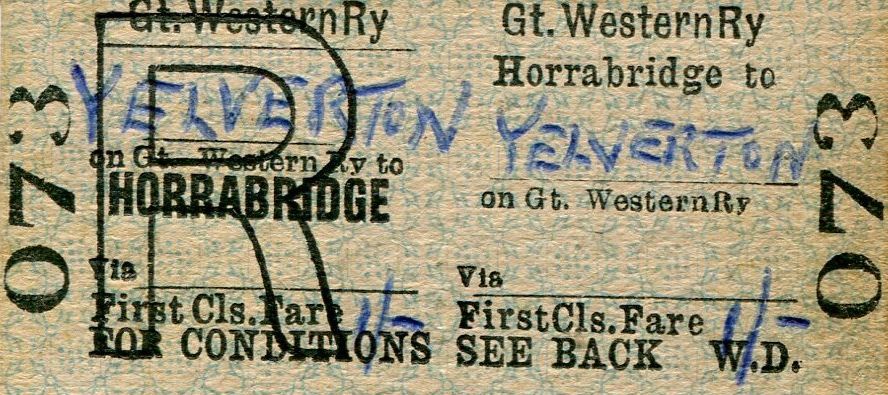
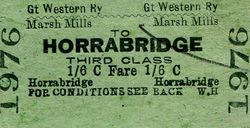
This first class return ticket from Horrabridge to Yelverton was issued on 19 SEP 59. Mike Roach Ticket Collection
This third class (by then second class) monthly return ticket from Horrabridge to Yelverton was also issued on 19 SEP 59. Mike Roach Ticket Collection
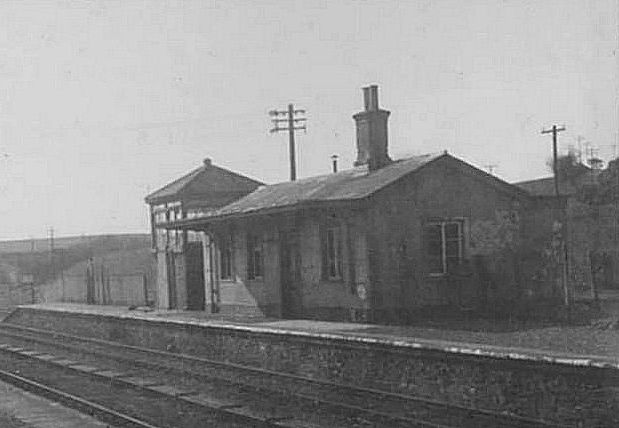
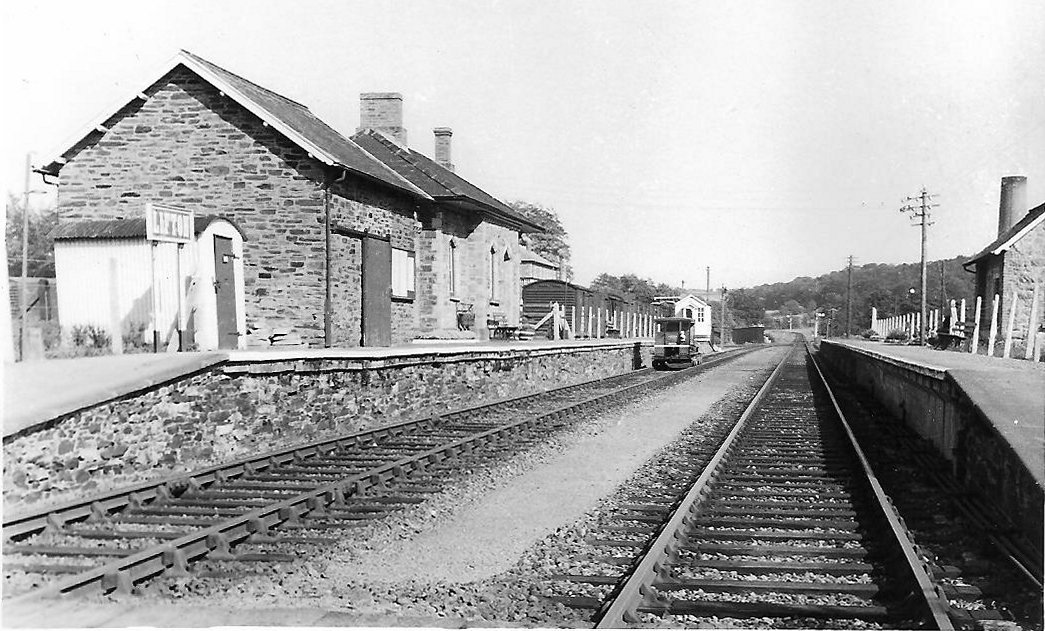
Horrabridge 8Ml 77Ch
From the Mike Morant collection
One of the stations provided for the opening of the line, this served the village of Horrabridge. From 11 August 1883 until the opening of Yelverton station on 1 May 1885 it was the junction station for the Princetown branch line. The Princetown trains thus running an extra one and half miles on each journey.
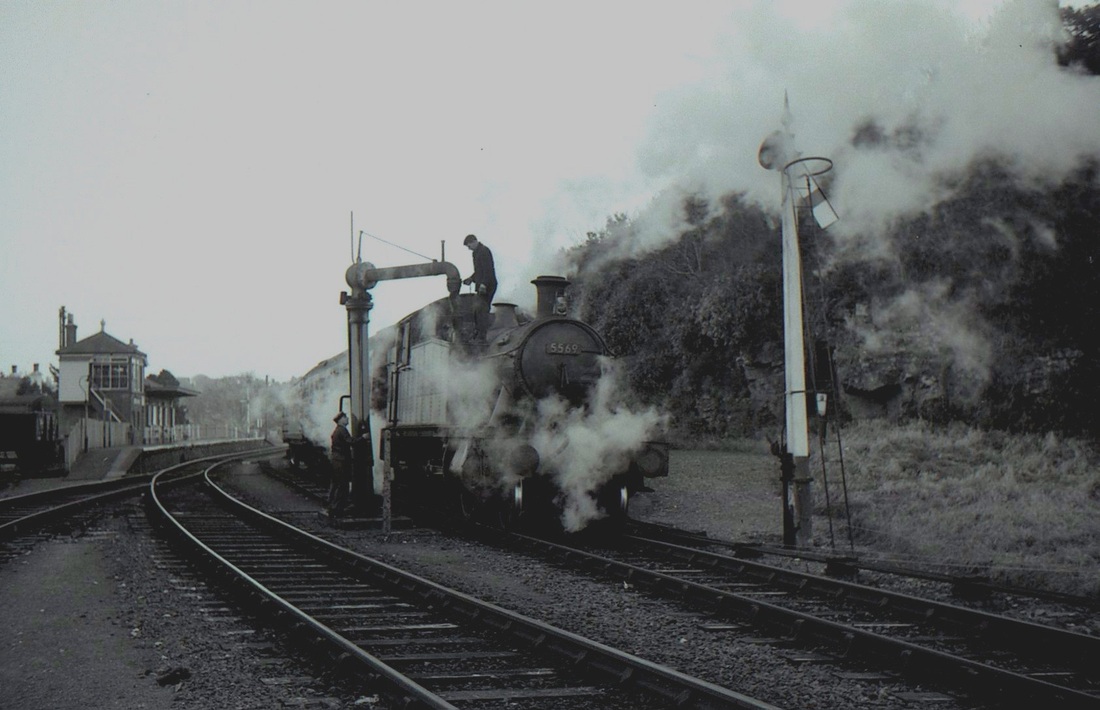
Horrabridge - It's bitterly cold as the fireman directs the water into the tanks of 5569, the driver waits to turn off the valve. So cold is it that the water column at Tavistock South, where water was normally taken was frozen up right from the start of the long cold winter of 1962-63. 24Dec62 Copyright Mike Roach
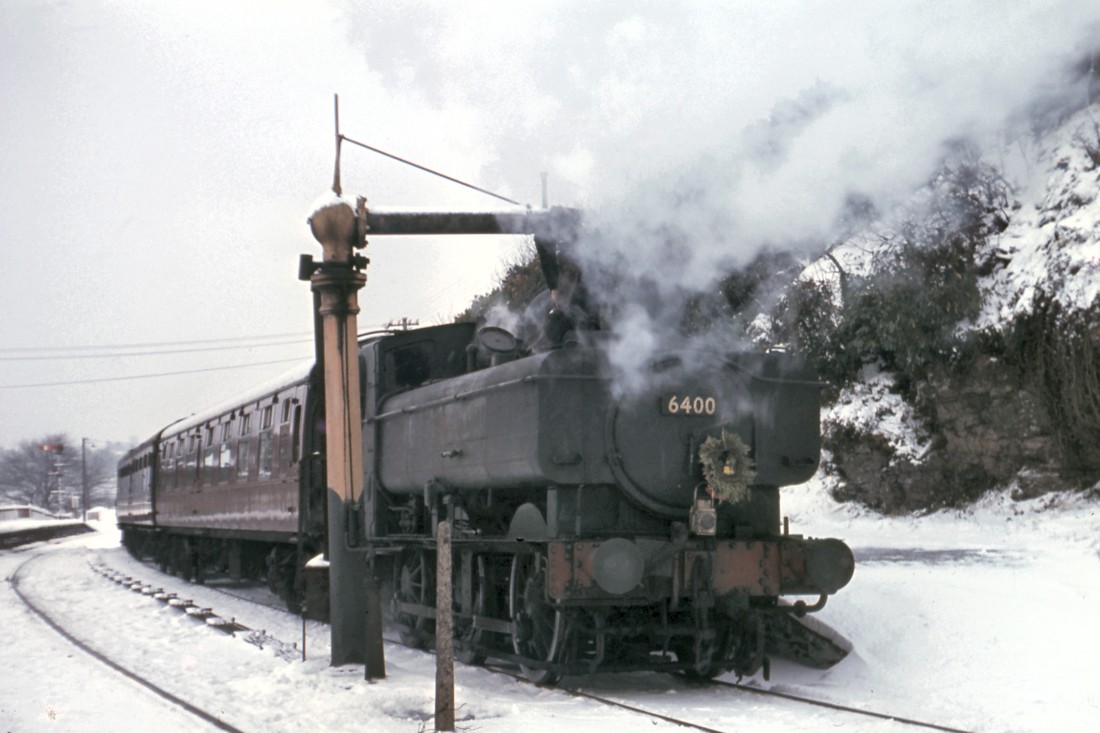
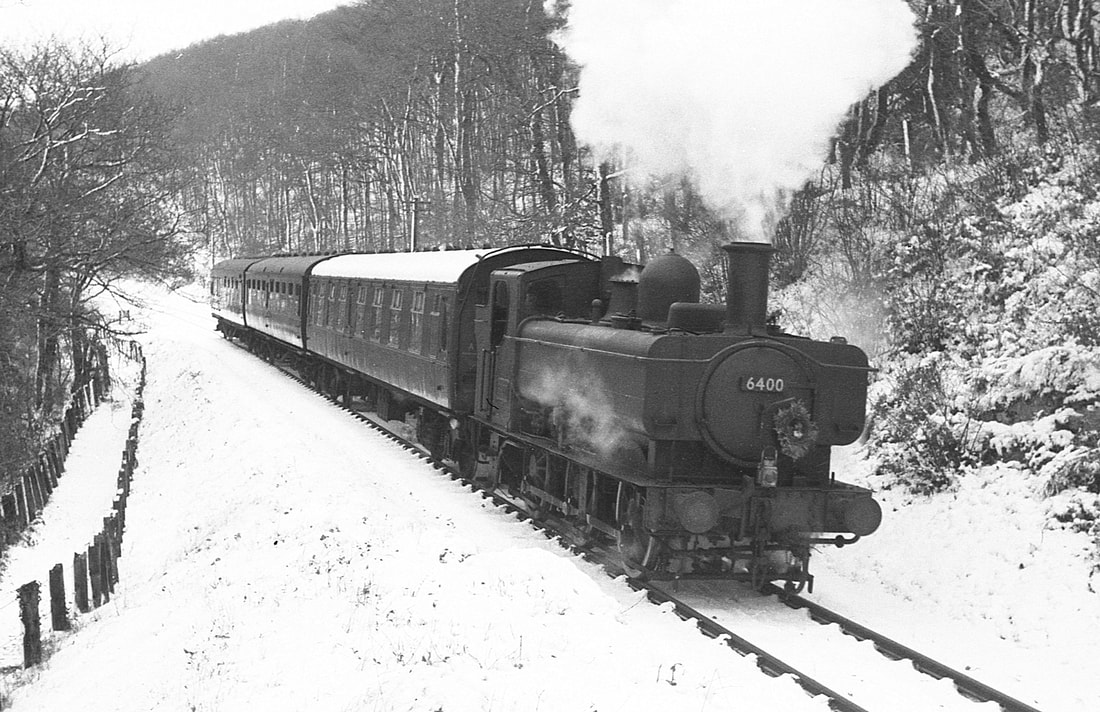
Saturday 28th December 1962.
There being no Sunday service this should have been the very last day of trains on the Marsh Mills, Tavistock and Launceston branch. However due to the big freeze and blizzard conditions trains were stranded and the timetable became chaos. Note that 6400 bears a wreath to signify the sad occasion. From the Mike Morant Collection. 160709_W_BR_6400_Horrabridge_29-12-62
A much warmer day in July 61 when a Plymouth bound train calls. Copyright Mike Roach

Horrabridge bow string bridge. A lucky picture complete with a demolition train standing on the bridge. Copyright Sid Sponheimer
Another shot of the bowstring bridge, one can tell from the polished wheels of the scrap train that it has been moving. Note that half of the double track bridge has been fenced off presumably to reduce maintenance costs. Copyright Sid Sponheimer
A view of a class 55 hauled train leaving Horrabridge heading towards Plymouth. Copyright Sid Sponheimer

The brake van off the demolition train stands at the platform which would have been for Tavistock. Copyright Sid Sponheimer.
Horrabridge with the demolition monster! Copyright Sid Sponheimer

Horrabridge looking towards Plymouth in Oct64. It is marvellous that the signalbox glass seems to have survived, but not for much longer. Copyright Mike Roach
Horrabridge looking towards Tavistock. The station plundered of very nearly all its ferrous materials. Copyright Mike Roach Oct 1964
Magpie viaduct 9Ml 49Ch
111 yards long
111 yards long
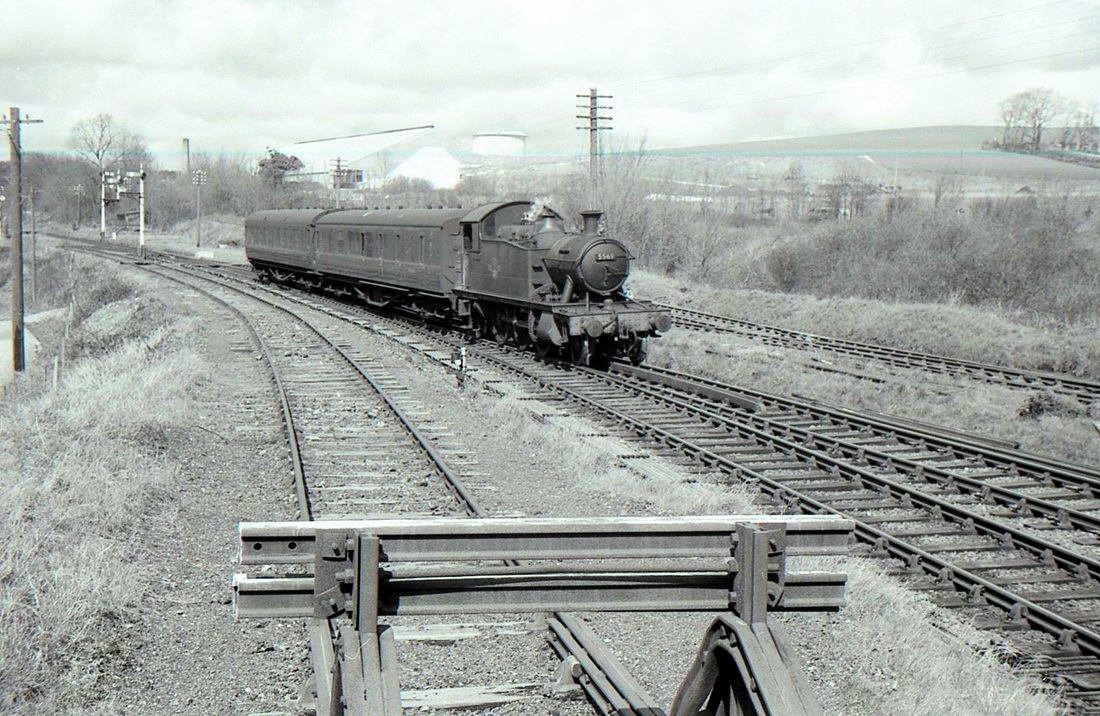
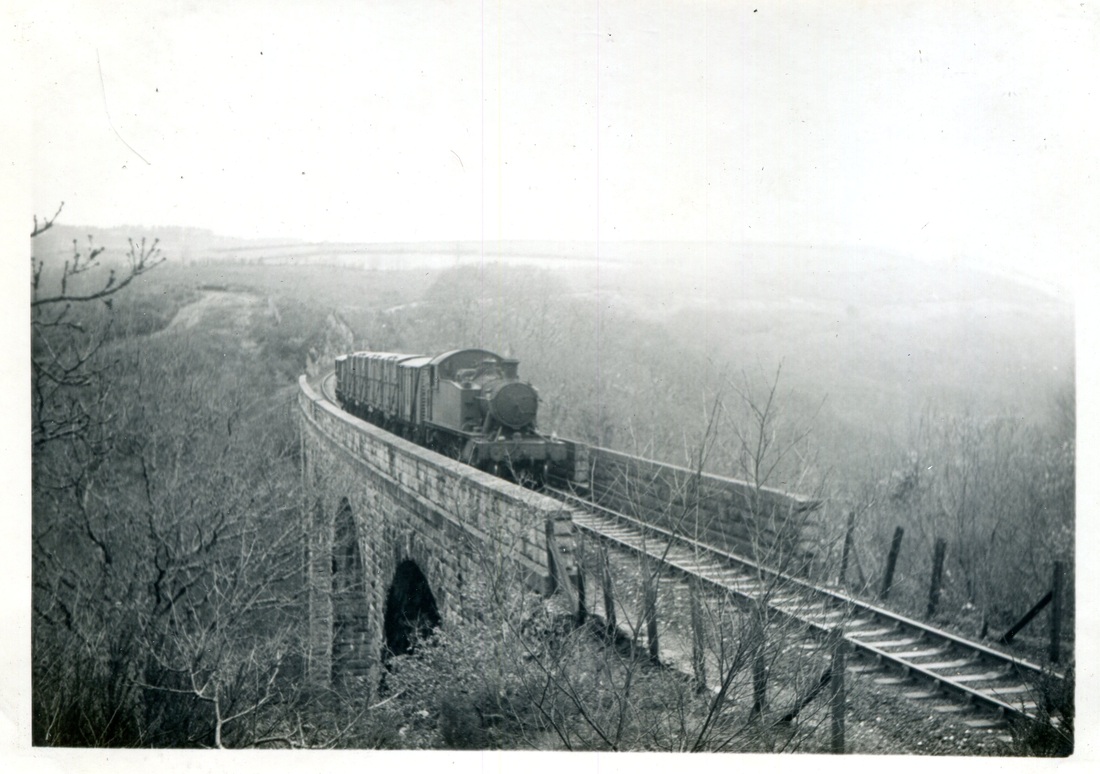
An up service for Launceston crosses Magpie viaduct. Copyright Mike Roach

Looking east across Magpie viaduct long before it was opened up as a footpath/cycleway. 28th August 1978. Copyright Mike Roach

The view for the trackbed about a quarter mile east of Magpie viaduct - in the distance in the valley can be seen the village of Horrabridge. 28th August 1978 Copyright Mike Roach
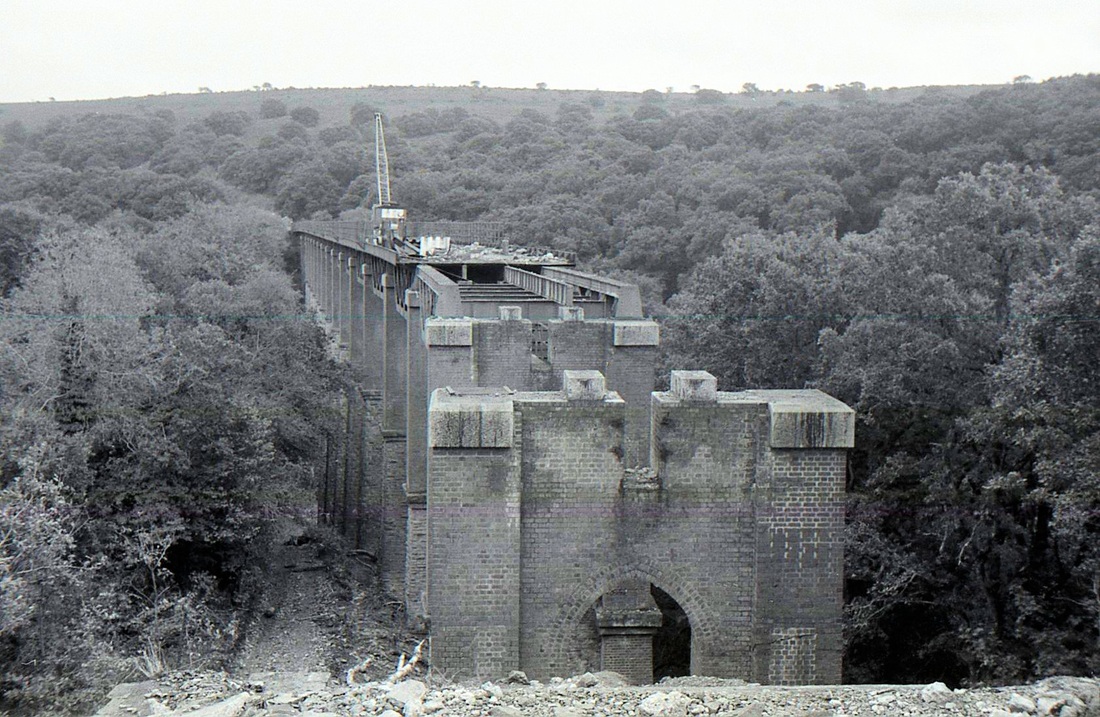
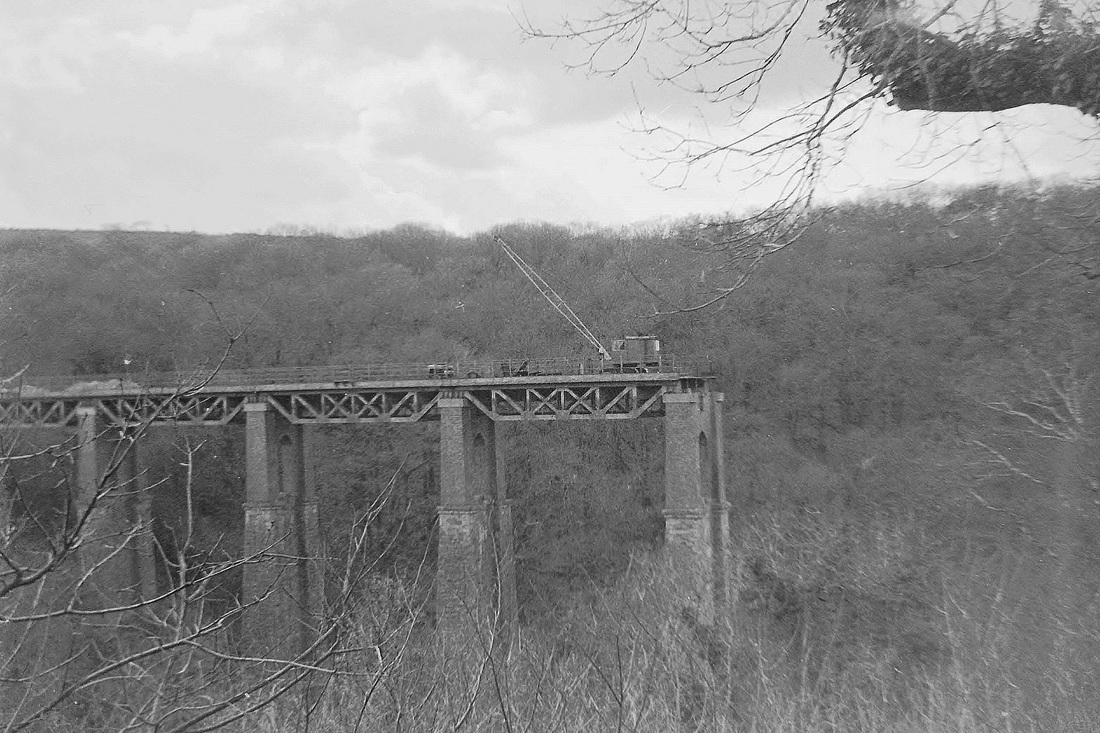
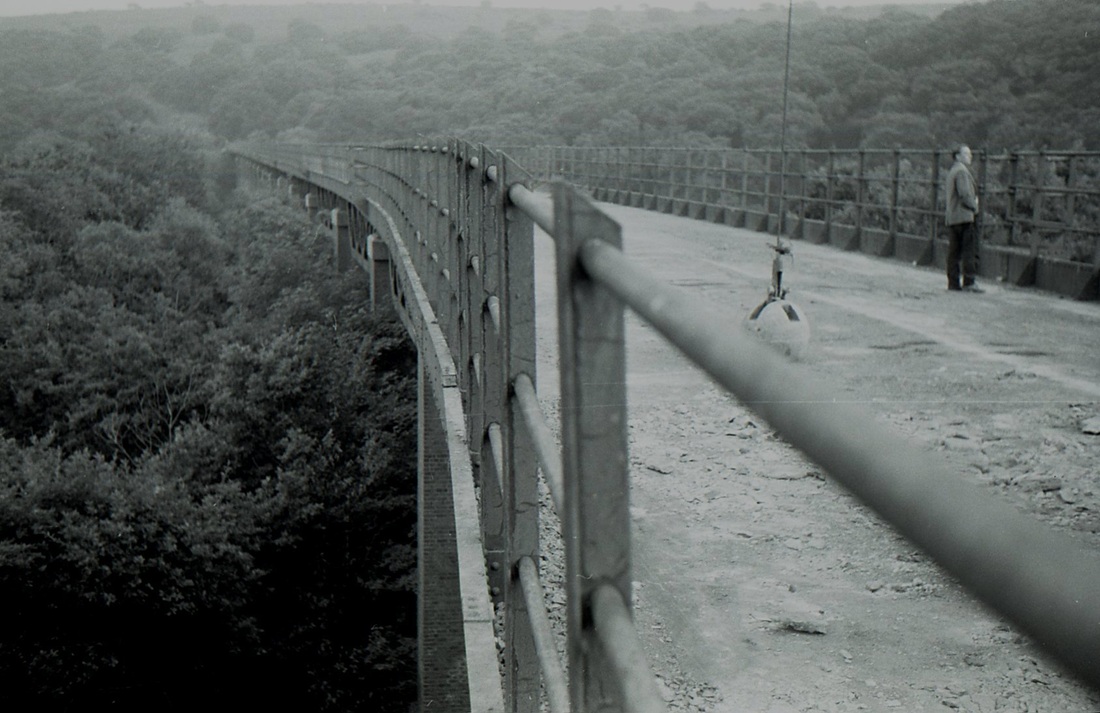
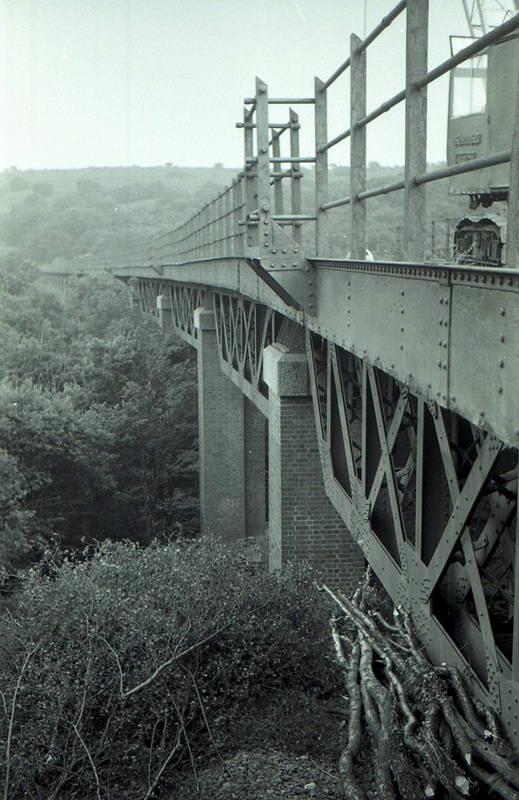
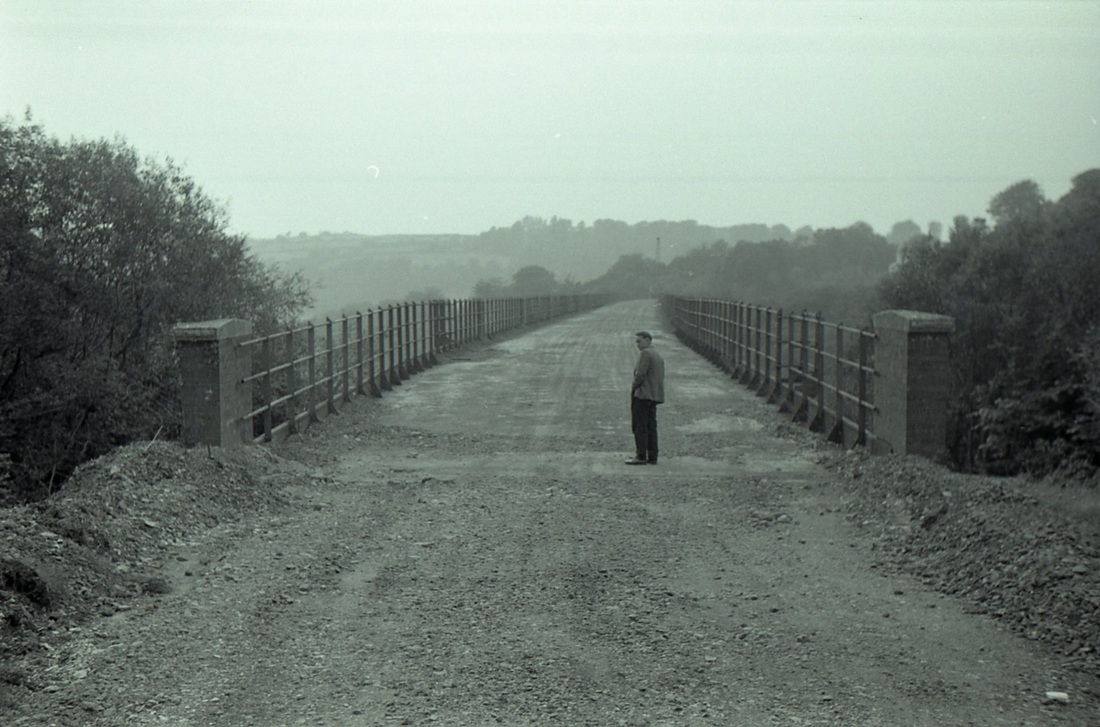
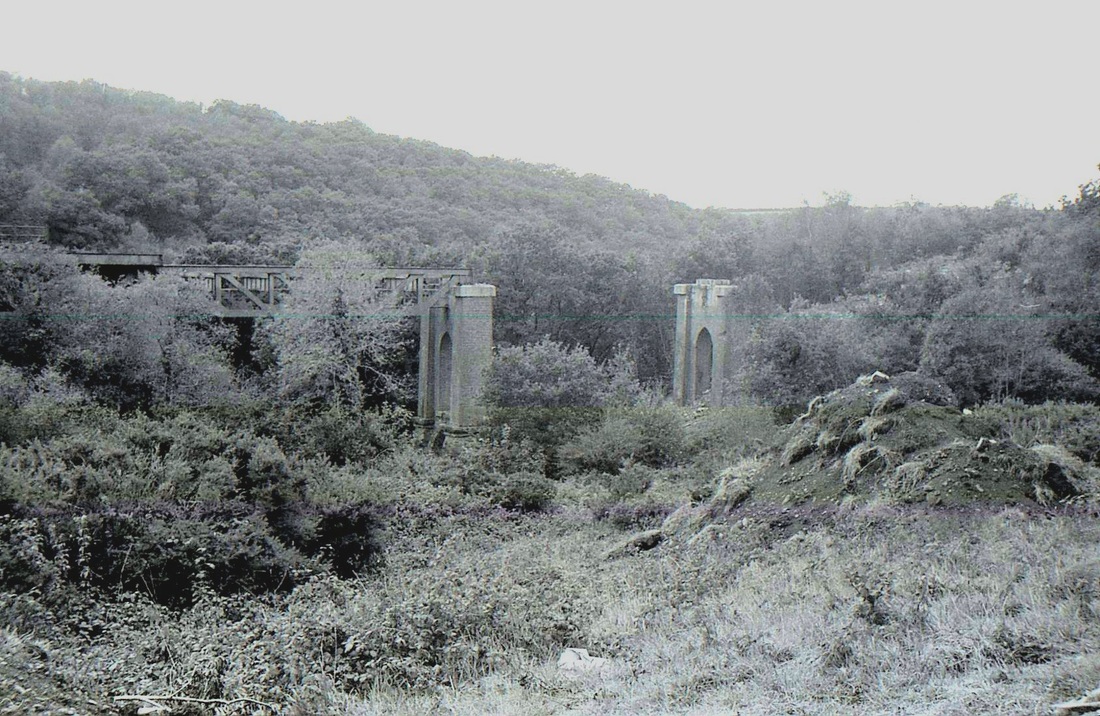
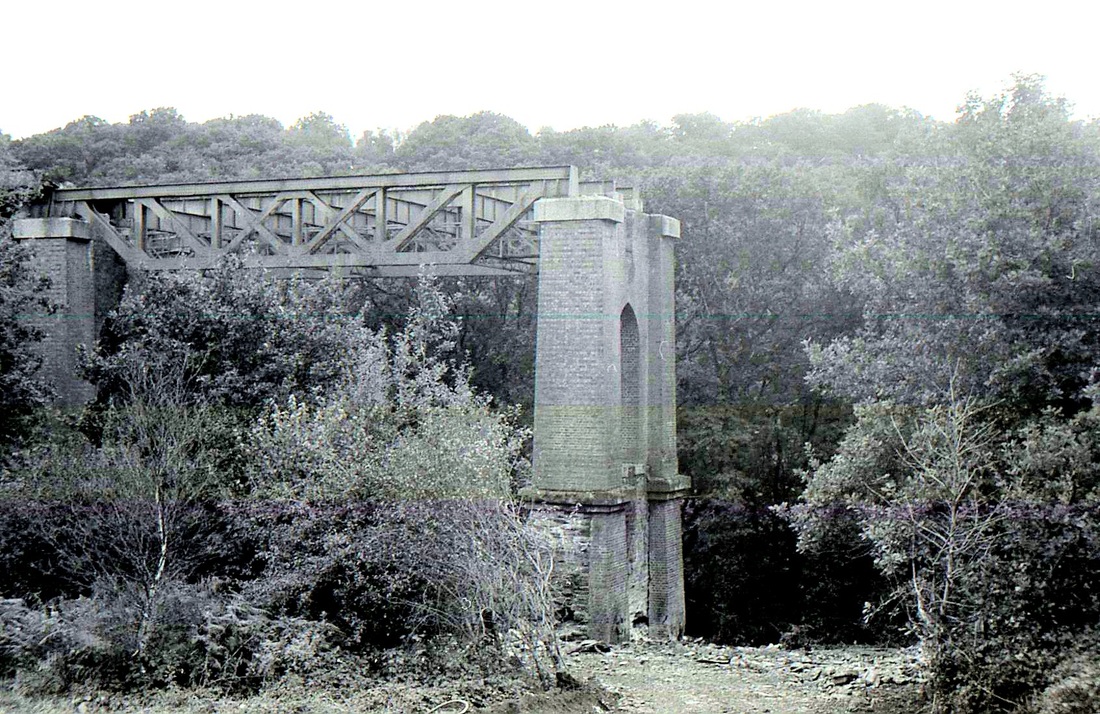
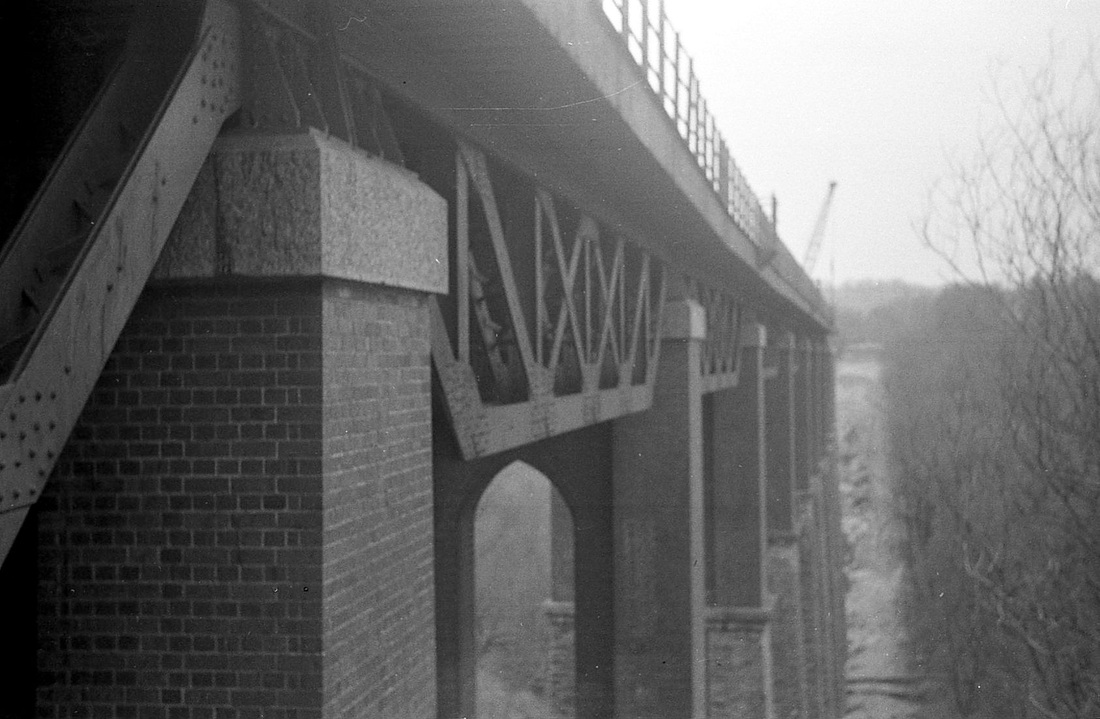
Walkham Viaduct 10 Ml. 21 Ch
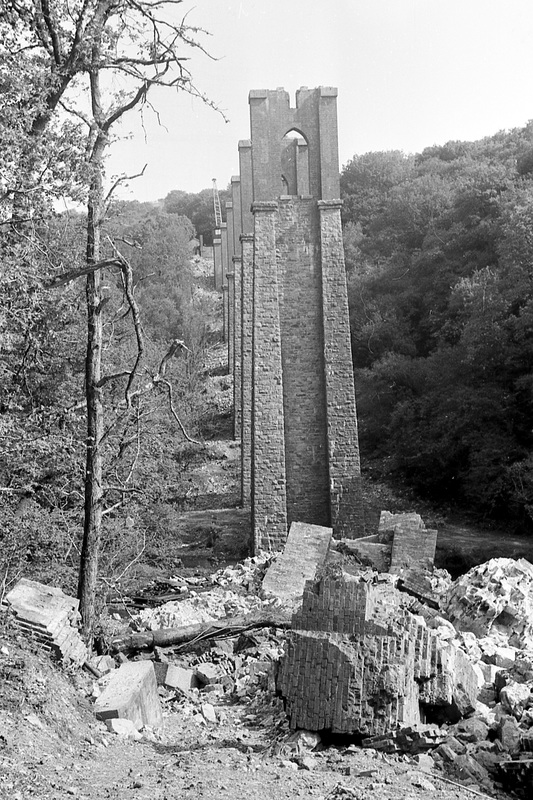
367 yards long was demolshed on closure of the line. However the route has been restored by the construction of Gem Bridge. This is at a slightly lower level than the original viaduct.
367 yards long was demolshed on closure of the line. However the route has been restored by the construction of Gem Bridge. This is at a slightly lower level than the original viaduct.
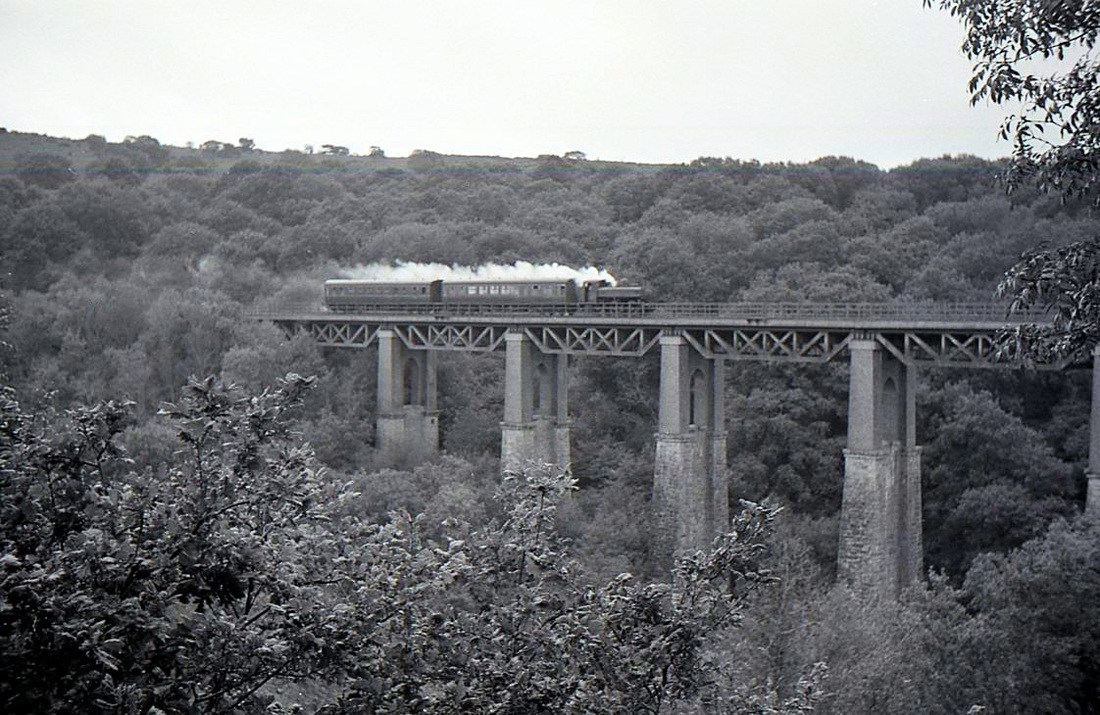
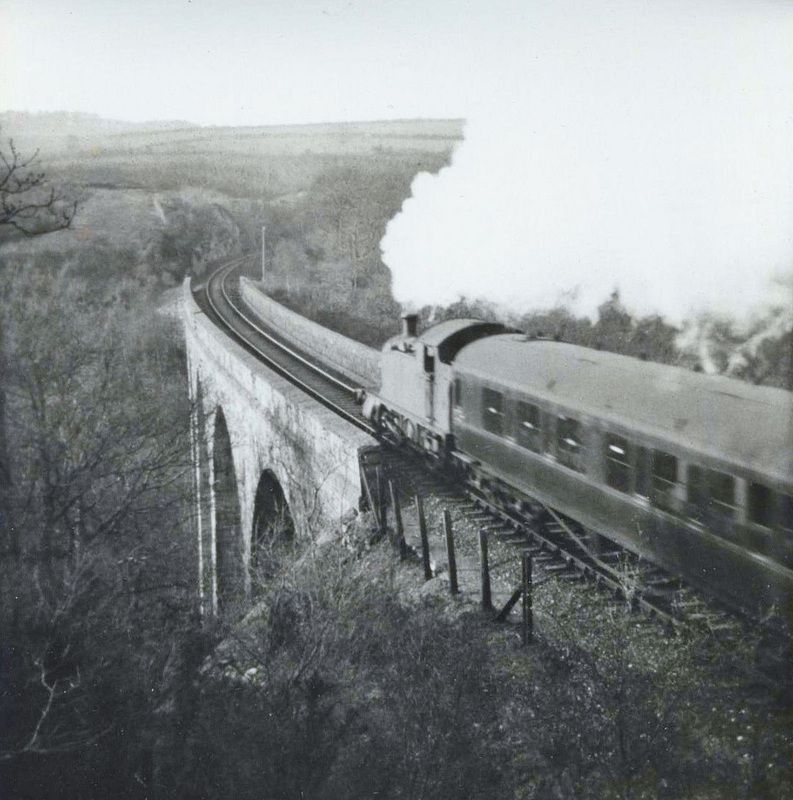
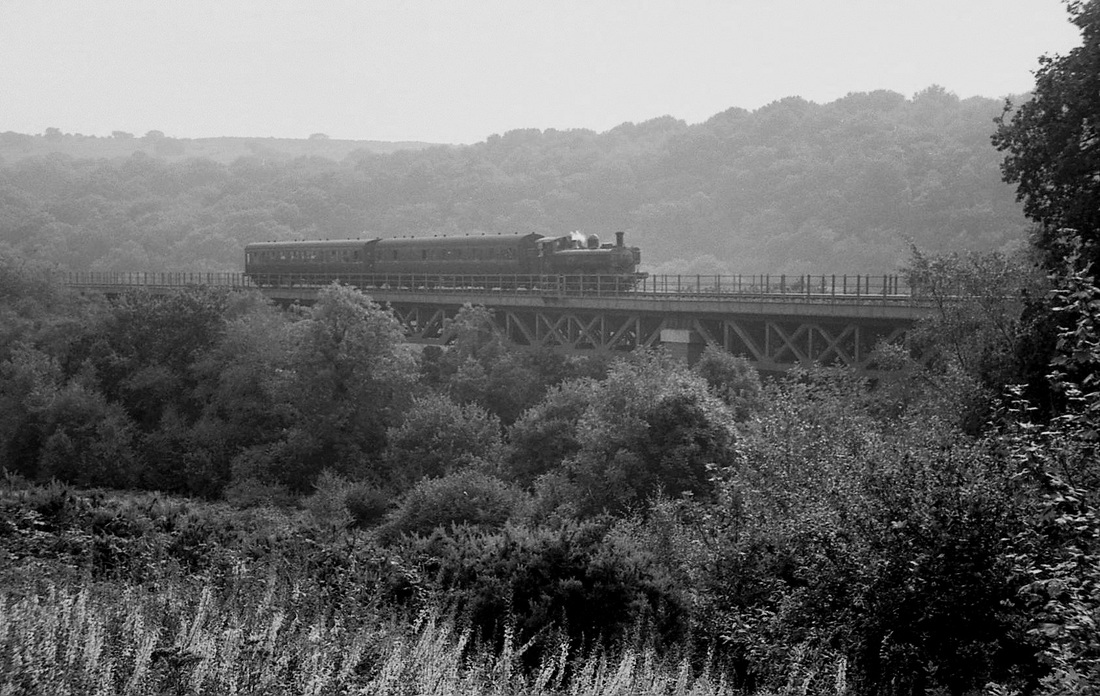
The 2.10pm auto-train from Plymouth to Tavistock South heads across Walkham Viaduct in October 1961. In 2012 a new bridge (Gem Bridge) was opened on the same alignment to carry a cycleway. Copyright Mike Roach
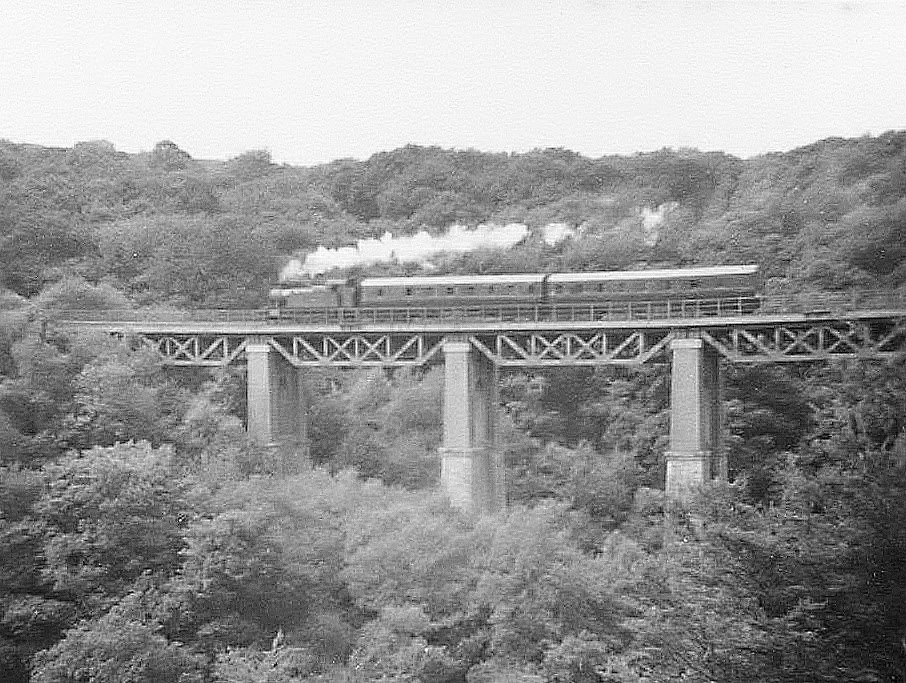
Walkham Viaduct with a Launceston bound train - Grenofen tunnel lies about two hundred yards ahead.
Copyright Sid Sponheimer
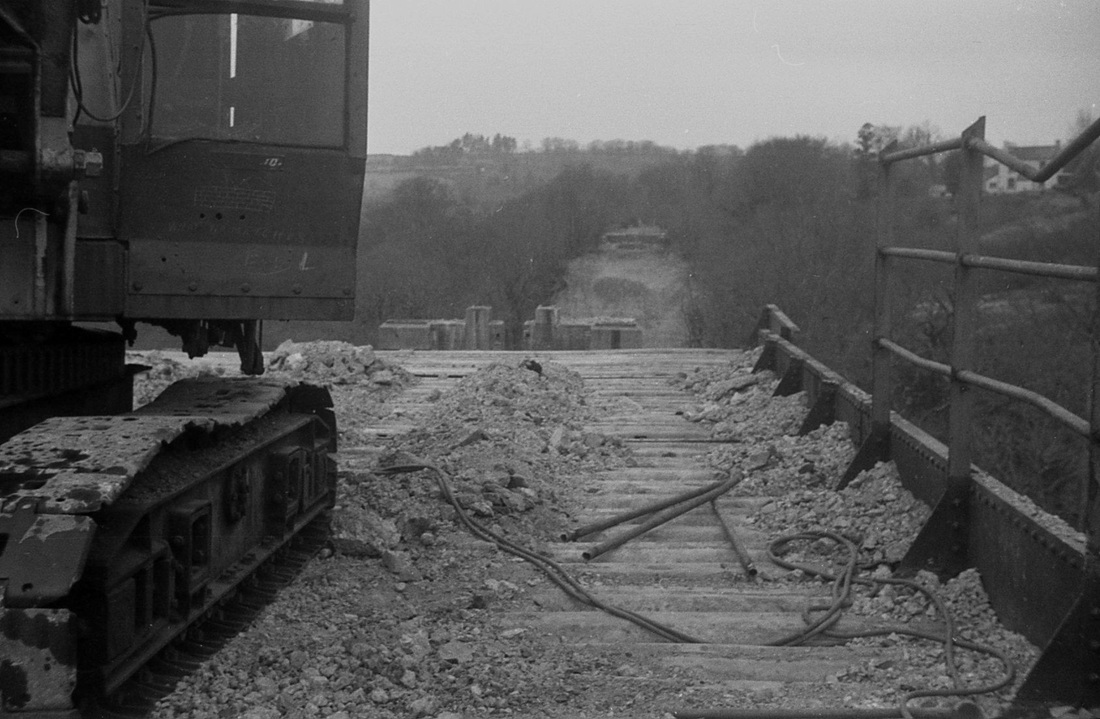
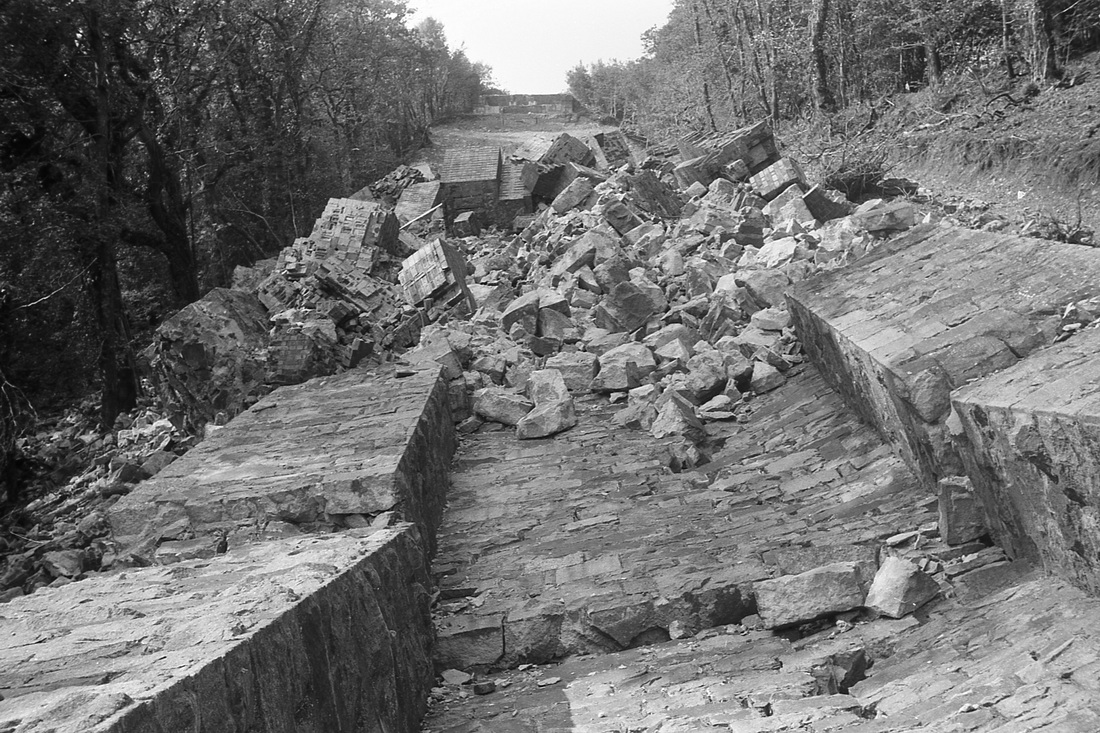
Its July/August 1964 - the track has been removed and the demolition crane waits to start work! Copyright Sid Sponhiemer.
A last high level look from Walkham viaduct. The new Gem bridge is considerably lower. Copyright Sid Sponheimer
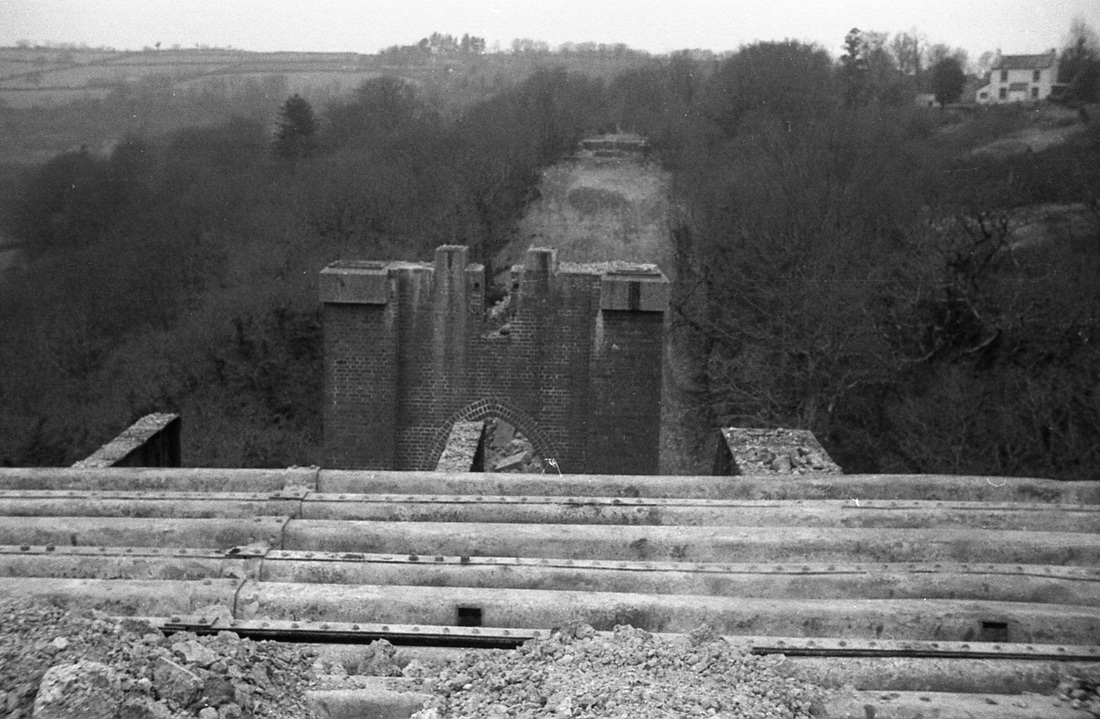
It's October 1964 - the demolition gang go about their business. Not only did they remove all the valuable steelwork but they also demolished the piers as well. It would have been so easy to restore the new pathway over these piers. October 1964 Copyright Mike Roach
Demolition well under way. Copyright Sid Sponheimer
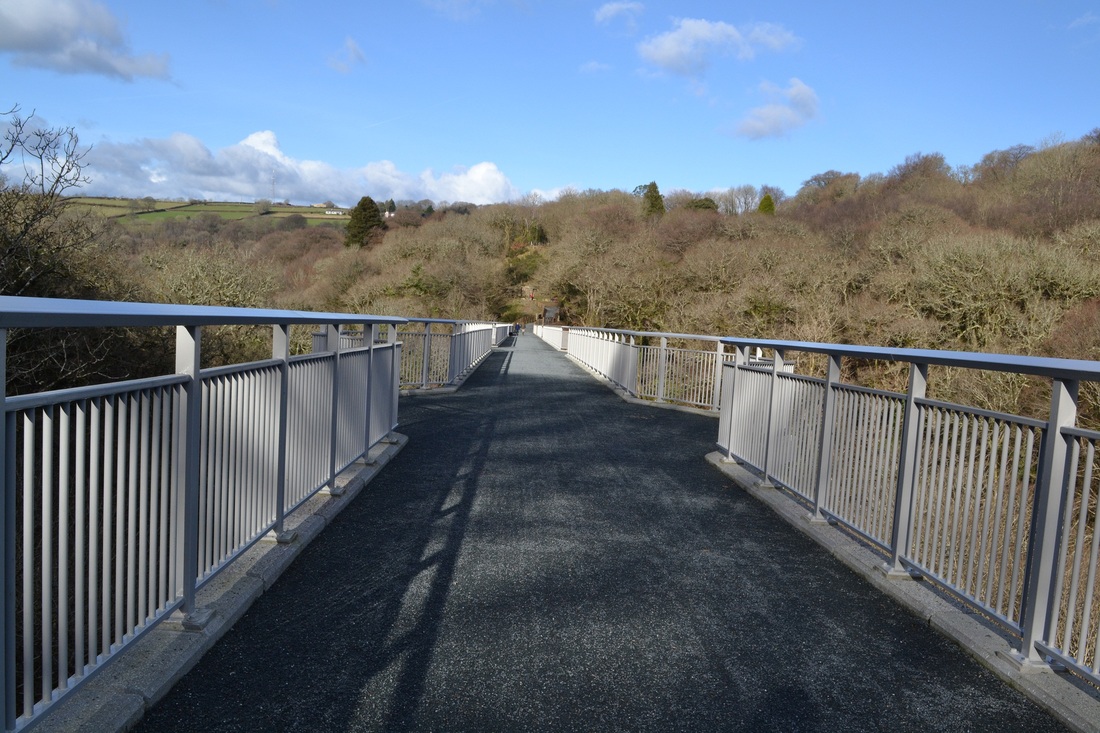
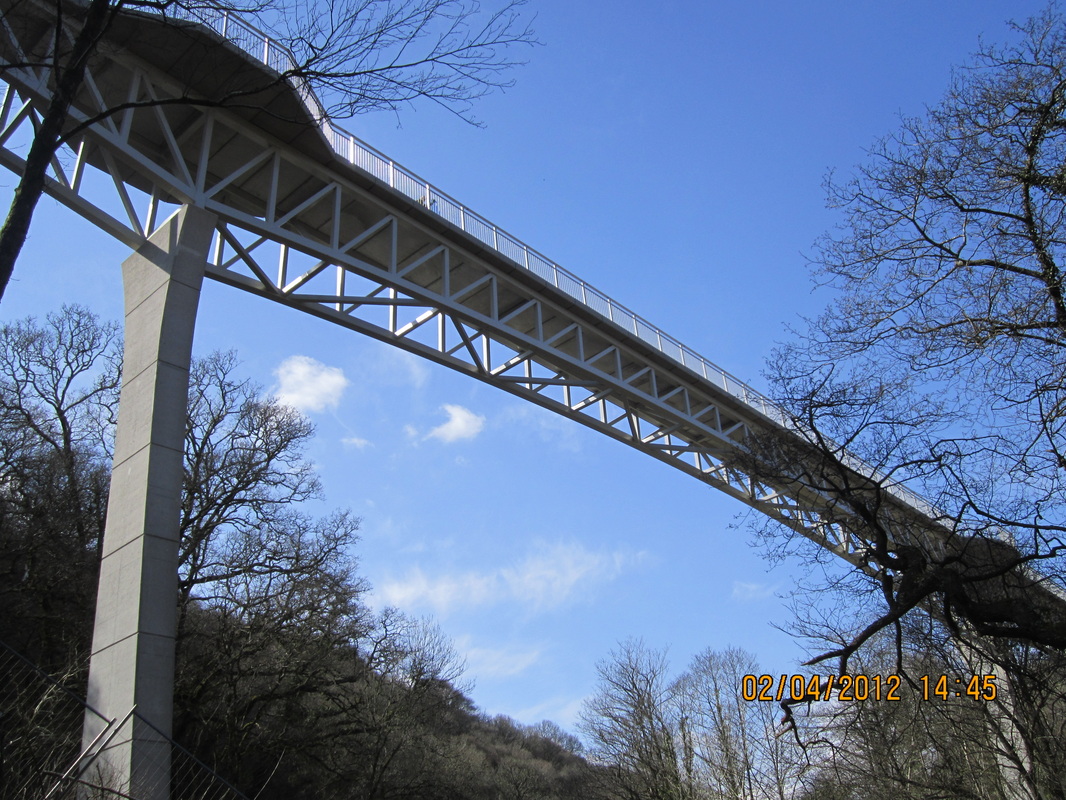
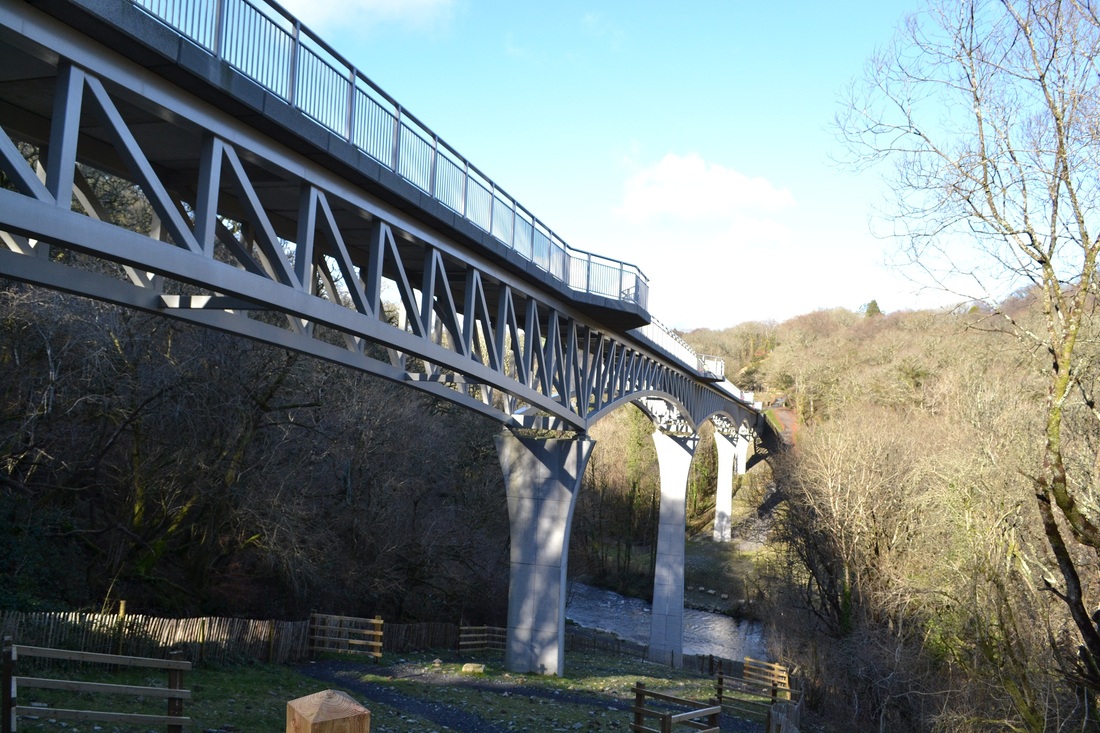
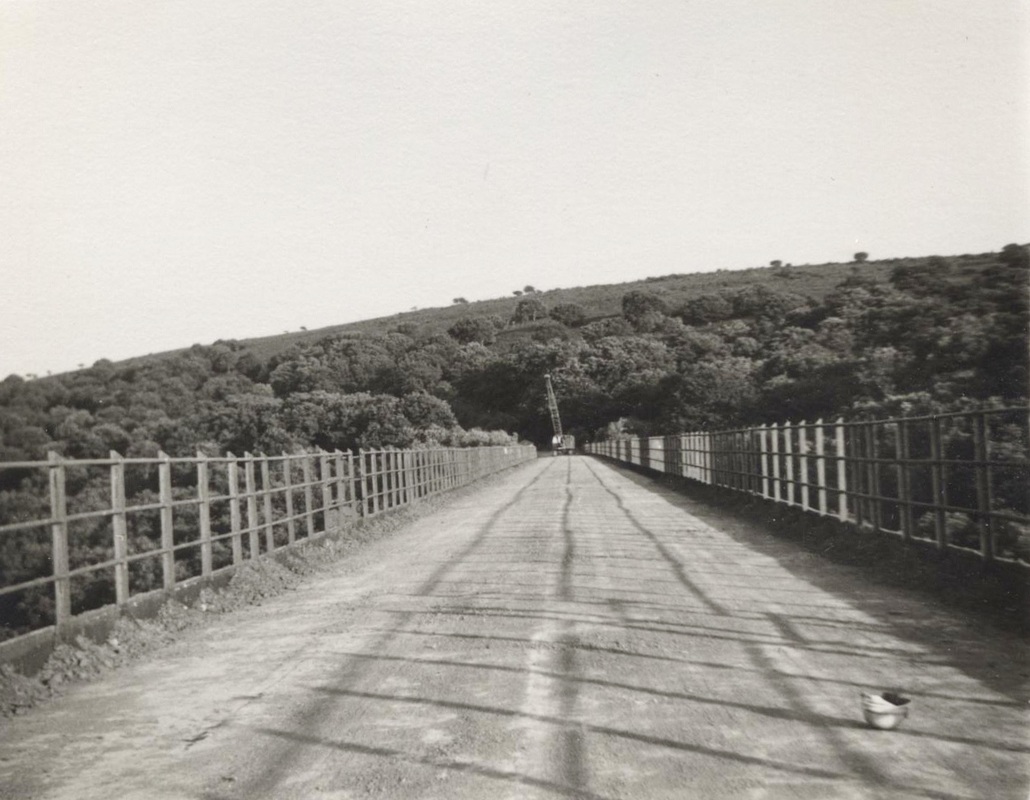
The gap left by the removal of the Walkham viaduct is now spanned by the new Gem Bridge January 2013 Copyright Roger Winnen
Walkham Viaduct where it was and where the new Gem bridge now is. This is the view looking towards the Genofen tunnel and Tavistock on the 28th August 1978 Copyright Mike Roach
In January 2015 Mike Roach came across the following four pictures taken exactly fifty years ago..
He writes - Came across these pics of Walkham Viaduct while looking through my records. They show the details of the riveted construction and the concrete slab above the battle-deck steel flooring which can still be seen underneath some bridges to this day e.g. by Redruth Station and by Hayle Station. Mike Roach
He writes - Came across these pics of Walkham Viaduct while looking through my records. They show the details of the riveted construction and the concrete slab above the battle-deck steel flooring which can still be seen underneath some bridges to this day e.g. by Redruth Station and by Hayle Station. Mike Roach
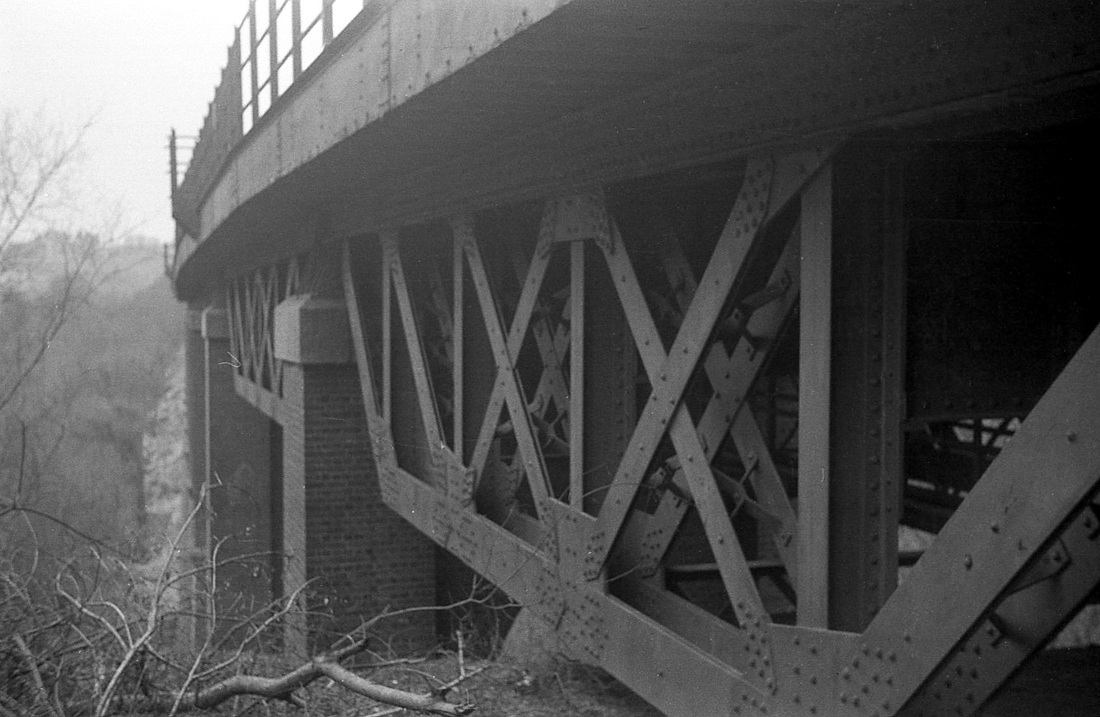
A view along the north face of the viaduct. January 1965 Copyright Mike Roach
A view along the south face of the viaduct. January 1965 Copyright Mike Roach.
This view gives one some idea of the hazardous operation of demolition. January 1965 Copyright Mike Roach
Going right to the brink. A view showing details of the pier construction with its 'gothic arch' January 1965 Copyright Mike Roach
The END
Here we have Mikes final pictures of the demolition of this fine structure - what a shame it happened. Thank heavens for Mikes foresight in recording this very sad event.
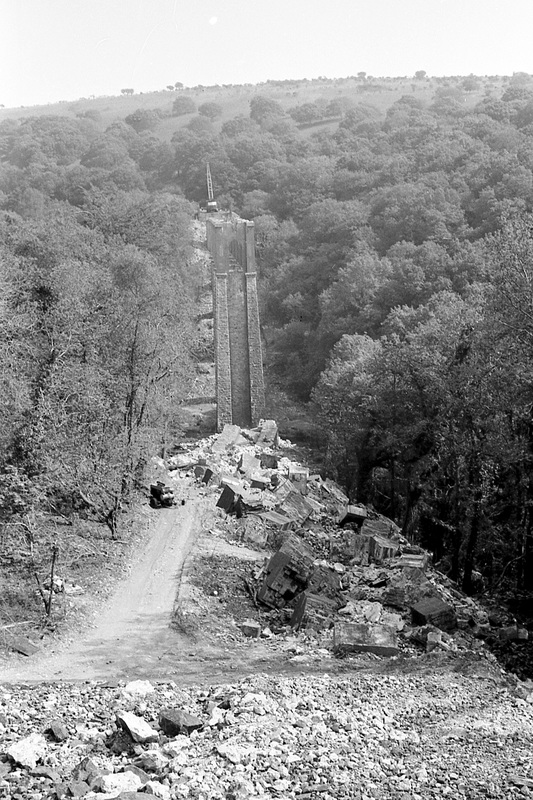
(1) Walkham Viaduct Demolition May 1965. Copyright Mike Roach

(2) Walkham Viaduct Demolition May 1965. Copyright Mike Roach
(3) Walkham Viaduct Demolition May 1965. Copyright Mike Roach

(4) Walkham Viaduct Demolition May 1965. Copyright Mike Roach
(5) Walkham Viaduct Demolition May 1965. Copyright Mike Roach
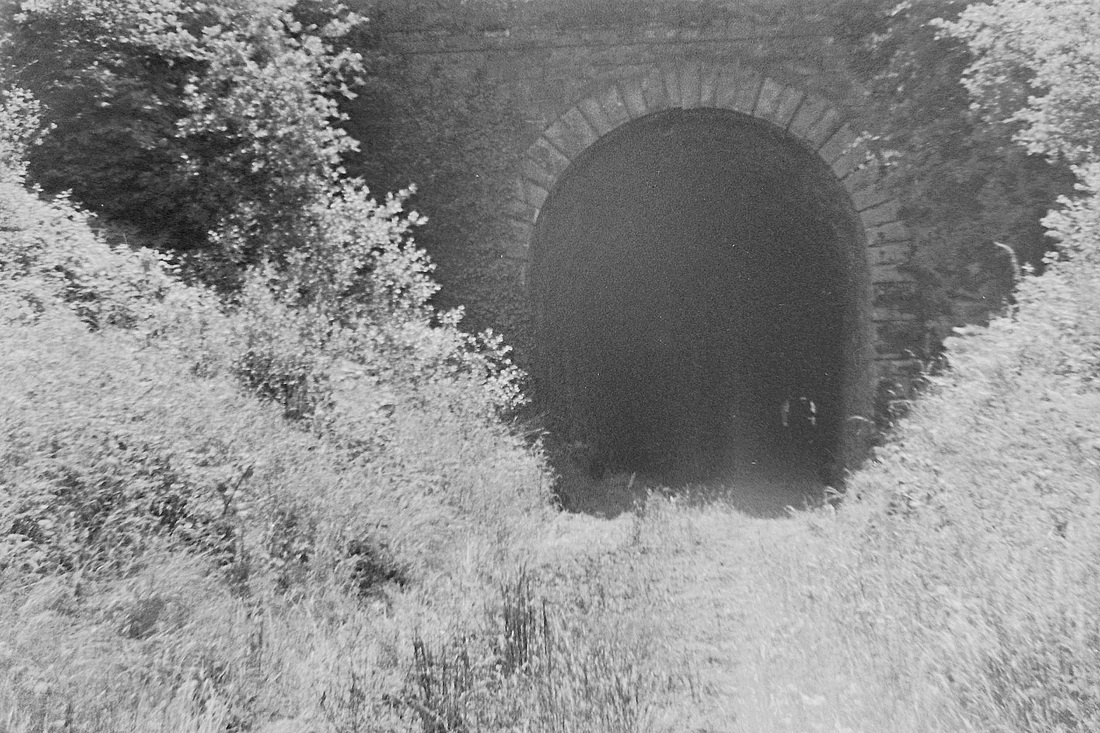
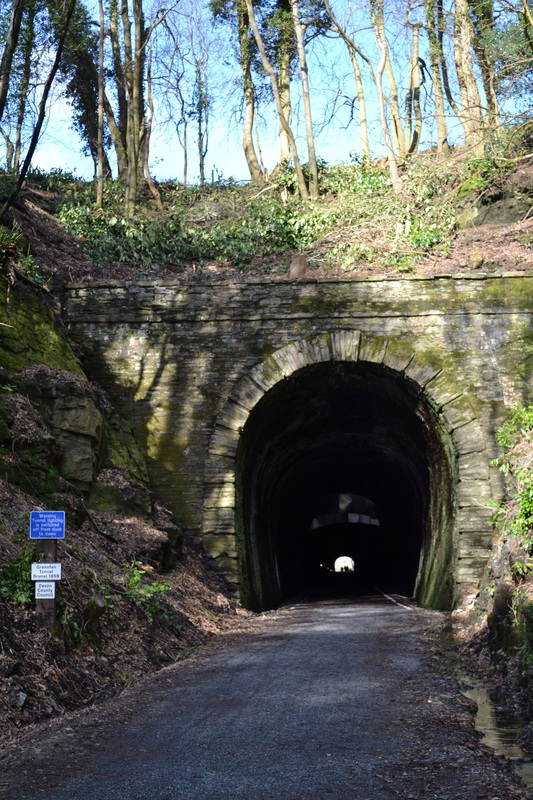
Grenofen Tunnel 374 yards long
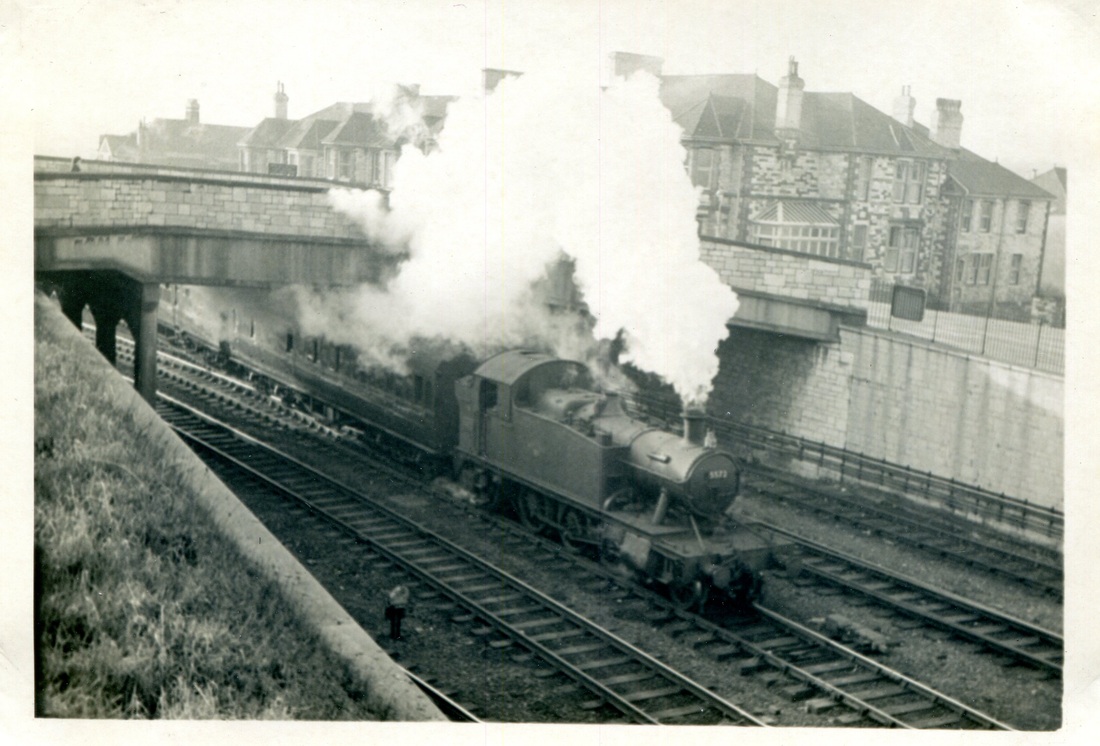
North of Greofen tunnel

North of Grenofen tunnel. This is a train heading south climbing towards the tunnel. To the left you can see the A386 and the village of Whitchurch in the background. Many thanks to Richard Lillicrap for identifying this location. This view can still be obtained to this day using the 'Drakes Trail' opened along this section through the Greofen tunnel. This picture in 1962 Copyright Mike Roach
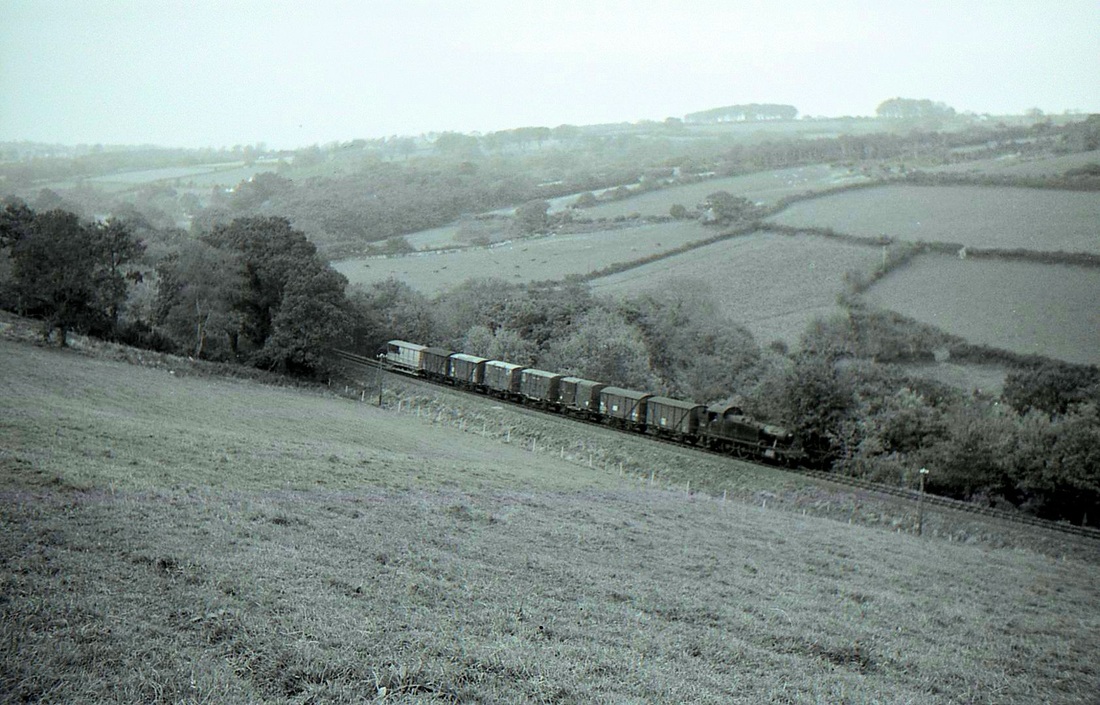
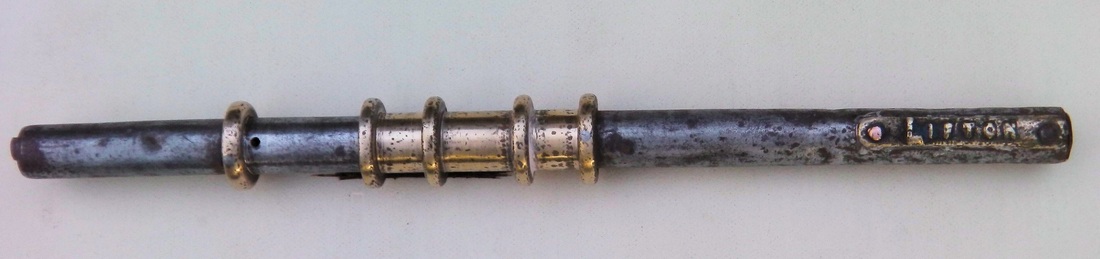
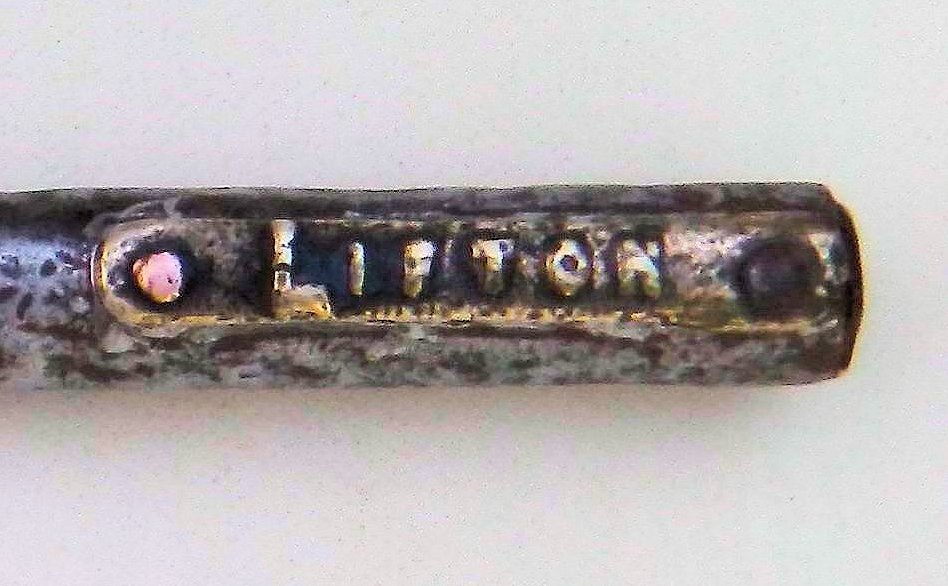
The Launceston to Tavistock Junction freight, including Conflat wagons carrying containers conveying tins of rice pudding from the Ambrosia factory at Lifton. Ambrosia was founded in the village of Lifton in 1917, and it is believed that rice pudding is still made there in 2015. September 1962 Copyright Mike Roach
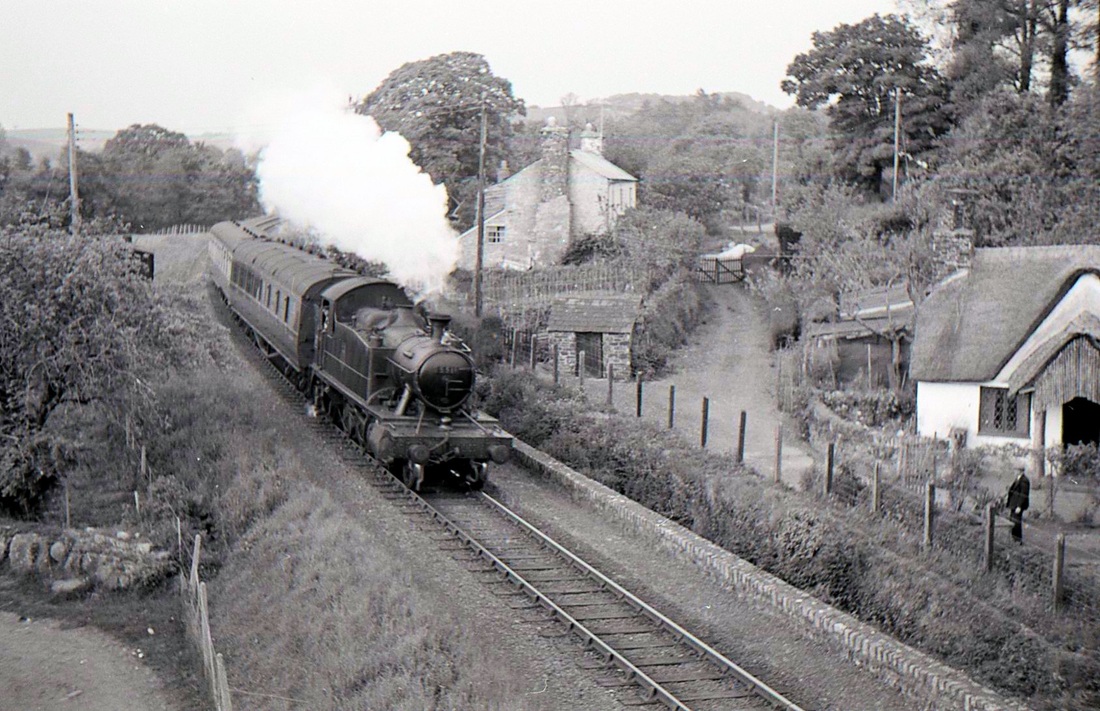
The 4.30pm auto train propelling uphill from Whitchurch Down Halt to Grenofen Tunnel in September 1962 - Copyright Mike Roach
Whitchurch Down Platform
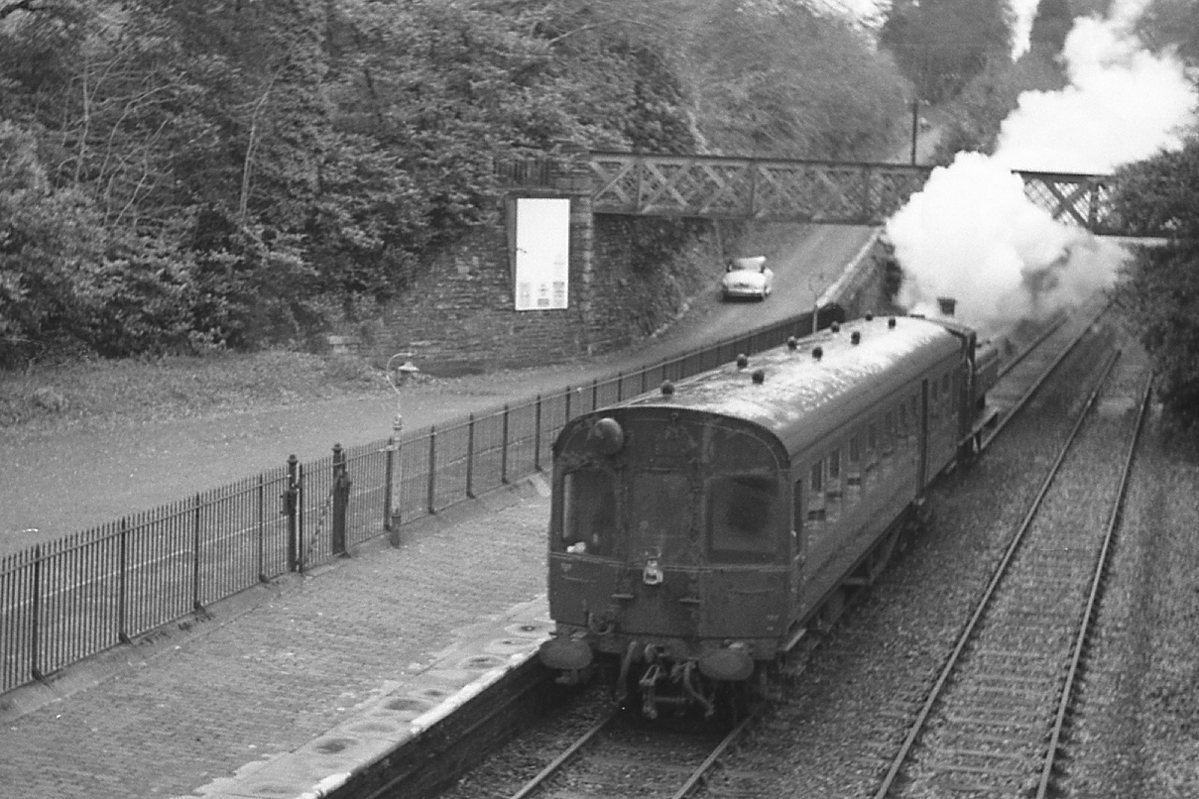
6430 propels a single autocoach through Whitchurch Down Platform looking north towards Tavistock. 1st December 1962. Copyright Mike Roach

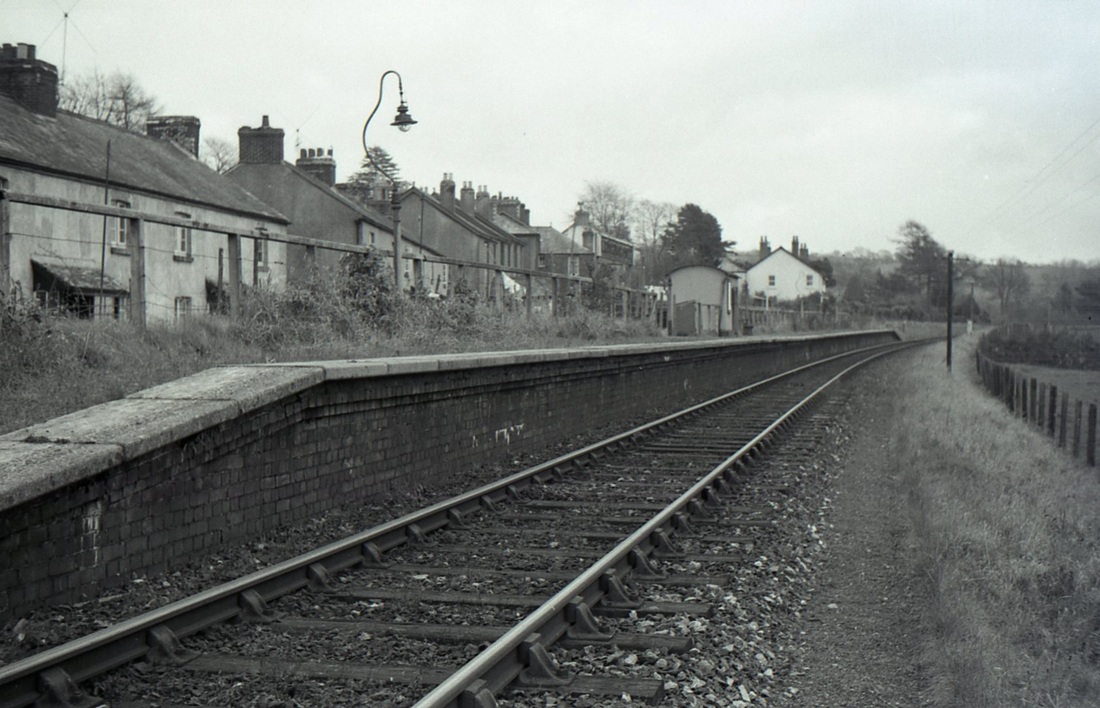
Whitchurch Down after closure and track lifting looking towards Tavistock. Note the departure from the usual pagoda waiting enclosure. Copyright Sid Sponheimer
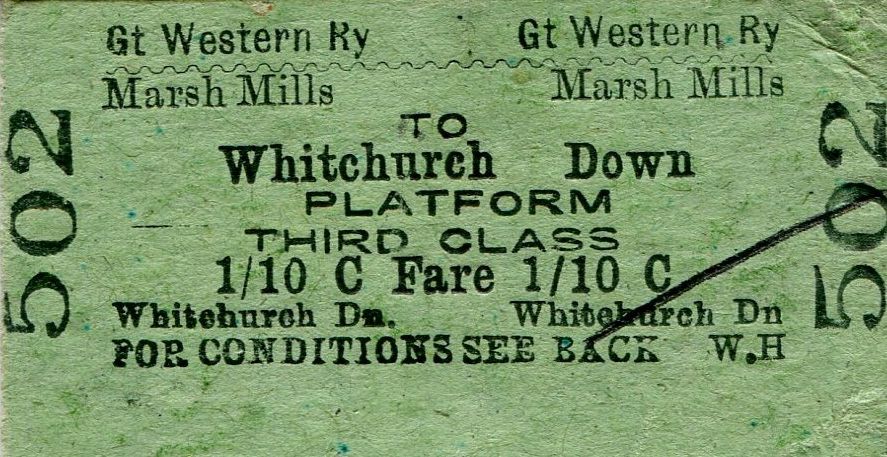
This third class (by then second class) single ticket from Marsh Mills to Whitchurch Down Platform was issued on 24 OCT 59. Mike Roach Ticket Collection
Whitchurch Down. 1st December 1962 - Copyright Mike Roach
TAKETHREE – 01.12.1962(2)
WHITCHURCH DOWN PLATFORM
After visiting Mary Tavy & Blackdown Station on Saturday 1 December 1962 I drove through the town of Travistock to the outskirts where the Great Western Railway had provided a single platform halt in September 1906 for this then developing suburb one mile south of Tavistock Station. Just like Mary Tavy a single siding had been built to serve the local mines. Again I saw one train pass through the halt before moving on to the next location at Grenofen Tunnel. However the train did not stop at the halt because it was the 2.00pm ECS from Tavistock to Plymouth Millbay consisting of a single autocoach propelled by pannier 6430 which had earlier formed the 12.45pm SO rail motor from Plymouth to Tavistock.
MLR / 26 November 2022


Tavistock South 12Ml 71Ch
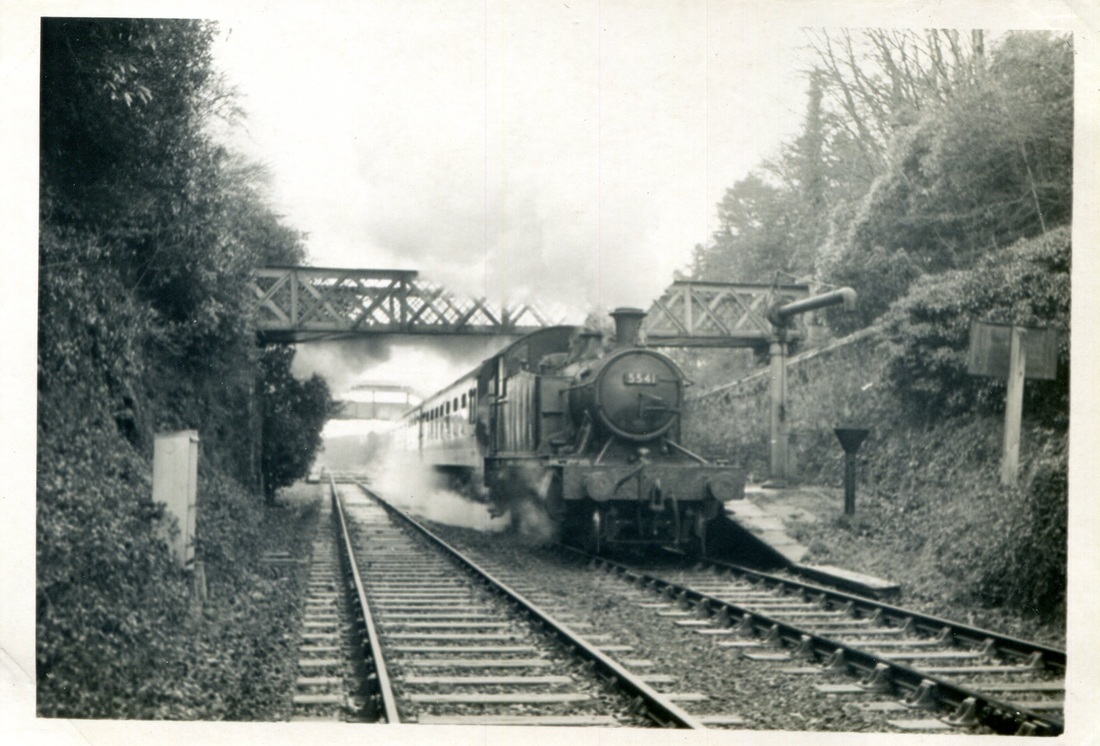
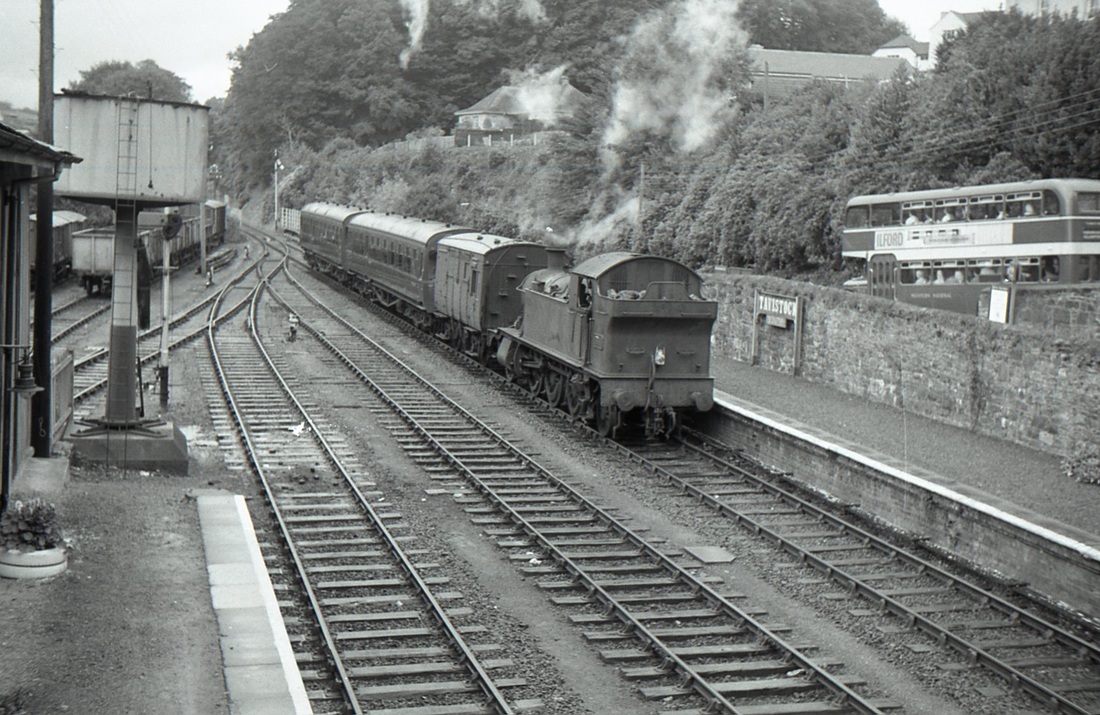
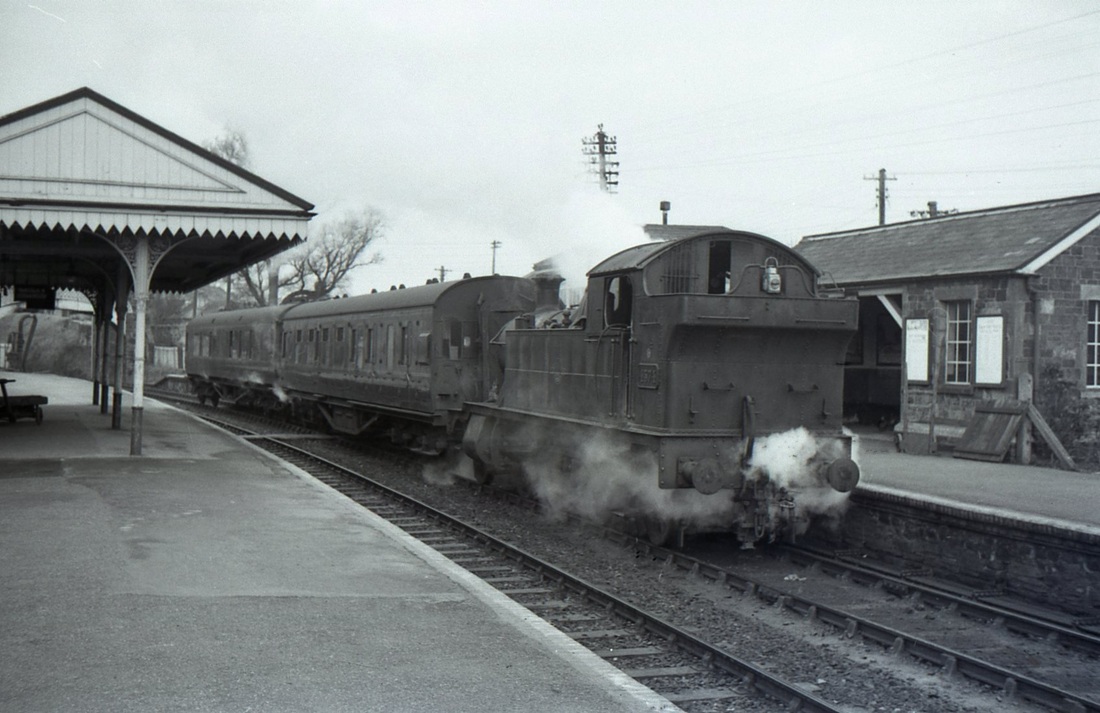
Tavistock 5569 storms out of Tavistock heading for Launceston 24Dec62 - Copyright Mike Roach
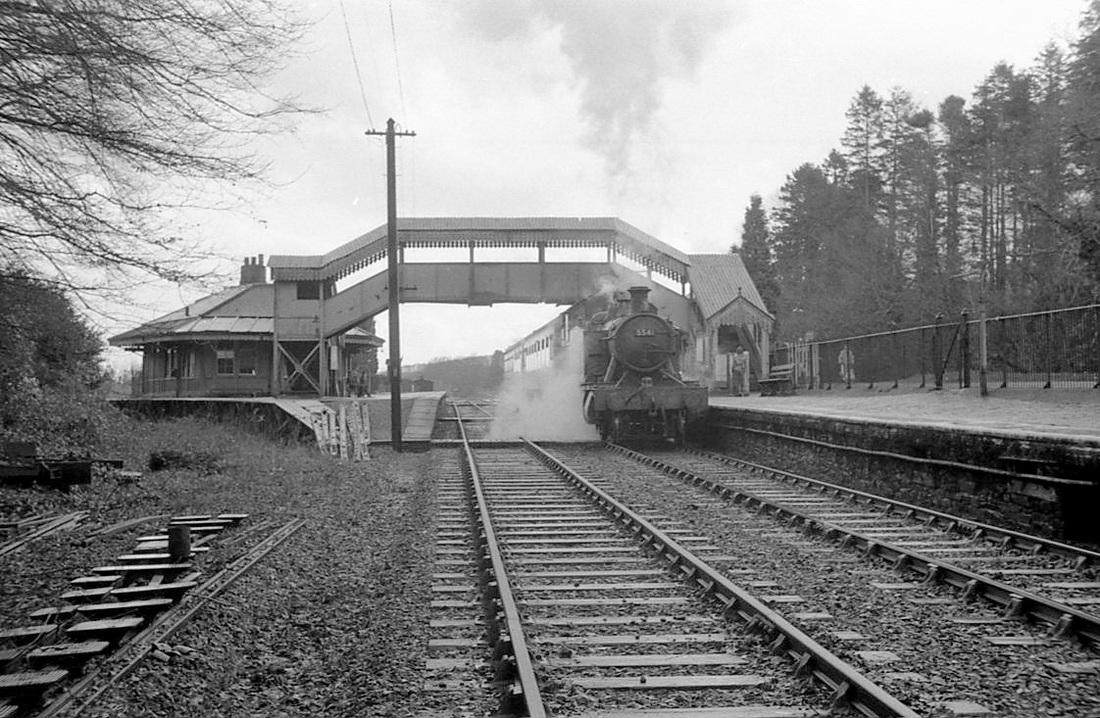
5541 takes water on the 3.05pm from Plymouth to Launceston. Copyright Mike Roach

6430 on 4.30pm auto-train from Tavistock South to Plymouth 24Dec62. 6430 had only arrived at Laira in May of 1962. After the closure of this line 6430 would go on to be shedded at Tondu, Exmouth Junction and Yeovil Town; and would later be preserved. It was withdrawn by BR in November 1963. Copyright Mike Roach
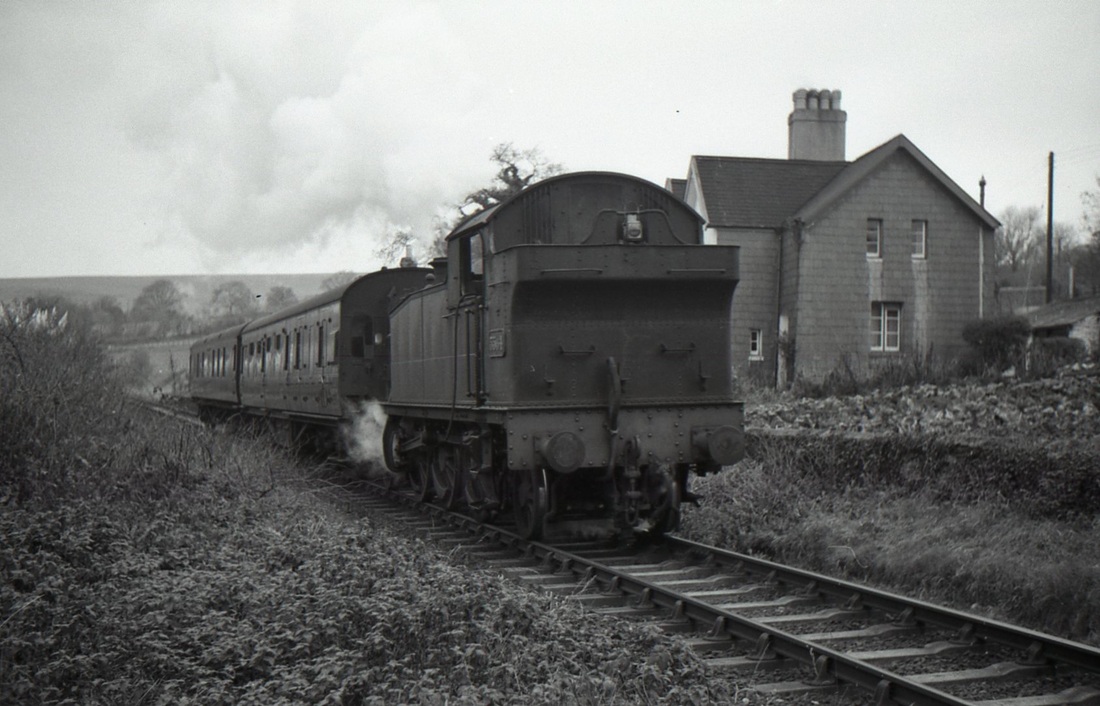
5572 runs round Tavistock Copyright Mike Roach
5569 brings the Launceston to Tavistock Junction freight through Tavistocks train shed - an Auto train waits in the centre road to return to Plymouth at 4.30pm. Freight remained healthy on the branch, right up to closure of the line. 1961 Copyright Mike Roach
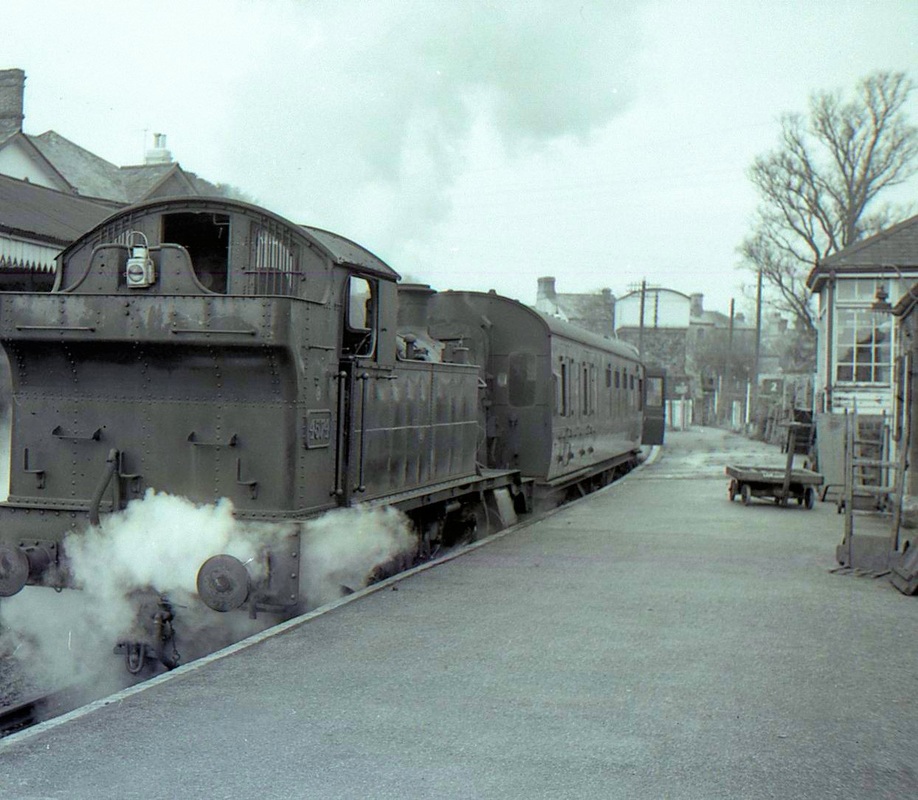
Class 55 5568 bandoned at Tavistock South on the 30th December 1962, the day after the dramatic last day of public service on the line. See note below. A classic picture. Copyright Ian Pollock
A fellow railway enthusiast and myself decided to catch the next to last timetabled passenger train, 29th December 1962, as far as Tavistock South and to return on the last train to Plymouth. As it turned our train was the last. We stayed in Tavistock North station for what was left of the night and wandered over to Tavistock South where I took the attached photograph on the 30th December 1962. Regards Ian
Tavistock South. Copyright Sid Sponheimer
Tavistock Copyright Sid Sponheimer.

Tavistock South. Copyright Sid Sponheimer
Tavistock South Copyright Sid Sponheimer
The last passenger trains were scheduled to run from Launceston to Plymouth via Tavistock on 29 December 1962, the "closure" taking effect from the following Monday, 31 December. In the event heavy snow falls put an end to any celebrations: the 18:20 train from Plymouth reached Tavistock after midnight, and the 19:10 Tavistock to Plymouth was stranded at Bickleigh overnight.
Goods traffic continued to and from Lifton until 1964, serving a dairy there; trains reached Lifton via the LSWR line as far as Lydford. After 1964 Lifton was served by a trip from Launceston; it was finally withdrawn on 28 February 1966
From Wilkipedia.
Goods traffic continued to and from Lifton until 1964, serving a dairy there; trains reached Lifton via the LSWR line as far as Lydford. After 1964 Lifton was served by a trip from Launceston; it was finally withdrawn on 28 February 1966
From Wilkipedia.
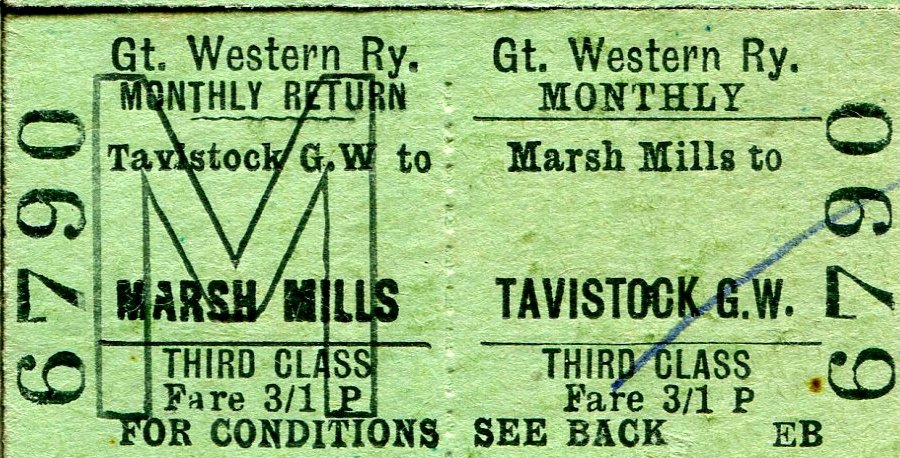
This third class monthly return ticket from Marsh Mills to Tavistock G.W. was issued on 24 OCT 59. Mike Roach Ticket Collection
North of Tavistock South lies Kelly College
A smashing shot taken north of Tavistock South by the grounds of Kelly College. Copyright Sid Sponheimer
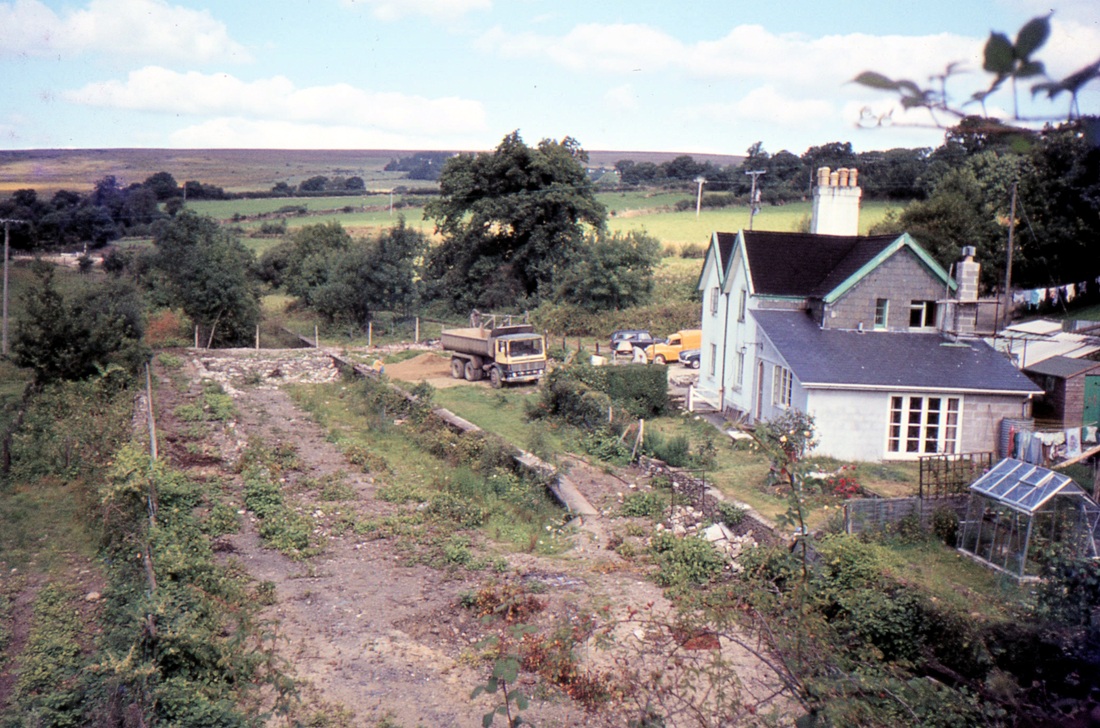
Mary Tavy & Blackdown 16Ml 24 Ch
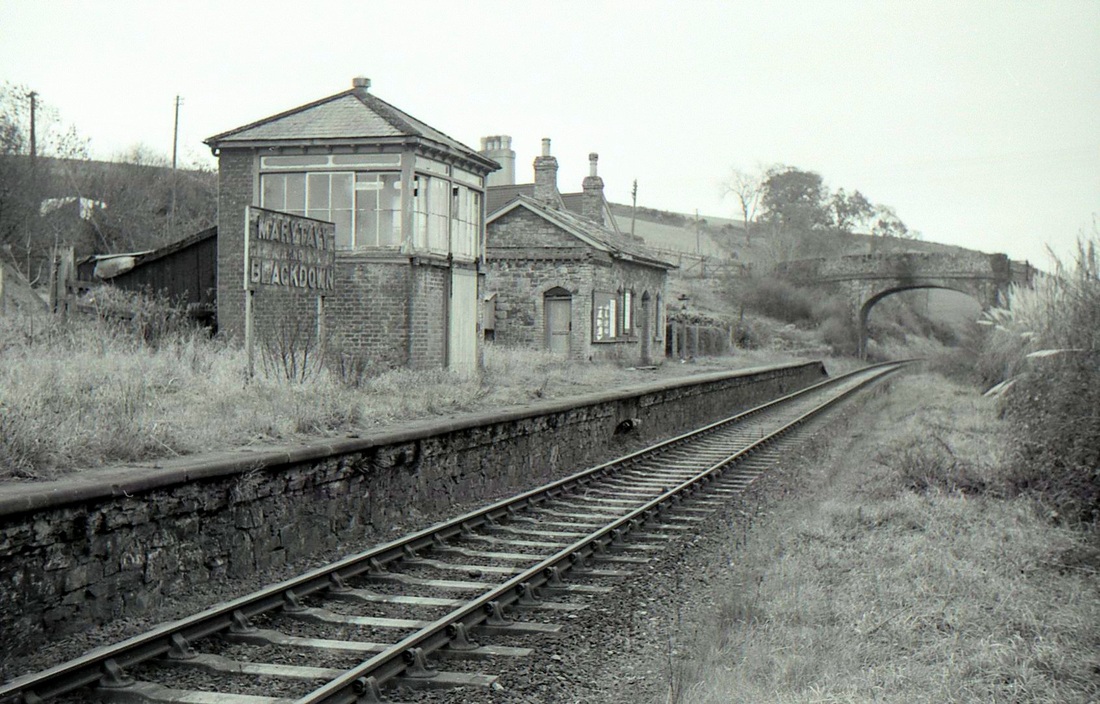
Mary Tavy & Blackdown. In the days when LSWR trains came this way, before the opening of their own parallel route, the station had a loop (for trains to pass), second platform, and a working signal box. Sept 62 Copyright Mike Roach
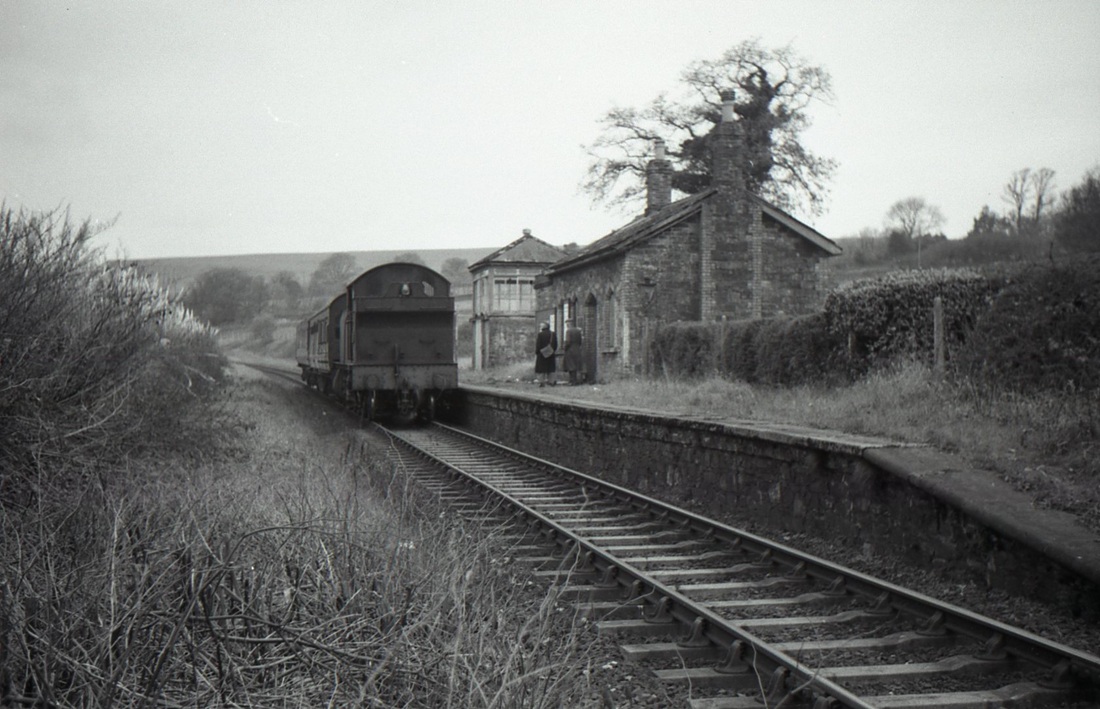
Two passengers wait at Mary Tavy & Blackdown Sep62 Copyright Mike Roach

We are very fortunate in capturing passenger let alone trains at Mary Tavy but in this picture and the one from Mike Roach above we have evidence of its use. Here three intending passengers wait the arrival. Copyright Sid Sponheimer
Sid captures the departure hauled by a '55' under the smoke stained road bridge. What a lovely ride it must have been along this valley with the Southern line alongside to add interest. Copyright Sid Sponheimer
Mary Tavy and Blackdown Halt Sep62 Copyright Mike Roach
A little something to add to the recent photos by Michael Roach of Mary Tavy Halt :-
When the track was recovered between Tavistock South and Lydford (using Laira loco D2197 which was outbased at Lydford in late 1967/ early 1968 to work the dismantling train and returned to Laira on Sat 20/1/68 ) the many chaired concrete sleepers of circa 1949-52 vintage, of which some can be seen in this photo, were taken by rail and reused on the Lostwithiel to Fowey branch.
Tony Hill Thanks Tony
A 55xx leaves Mary Tavvy & Blackdown. Nov62 Copyright Mike Roach
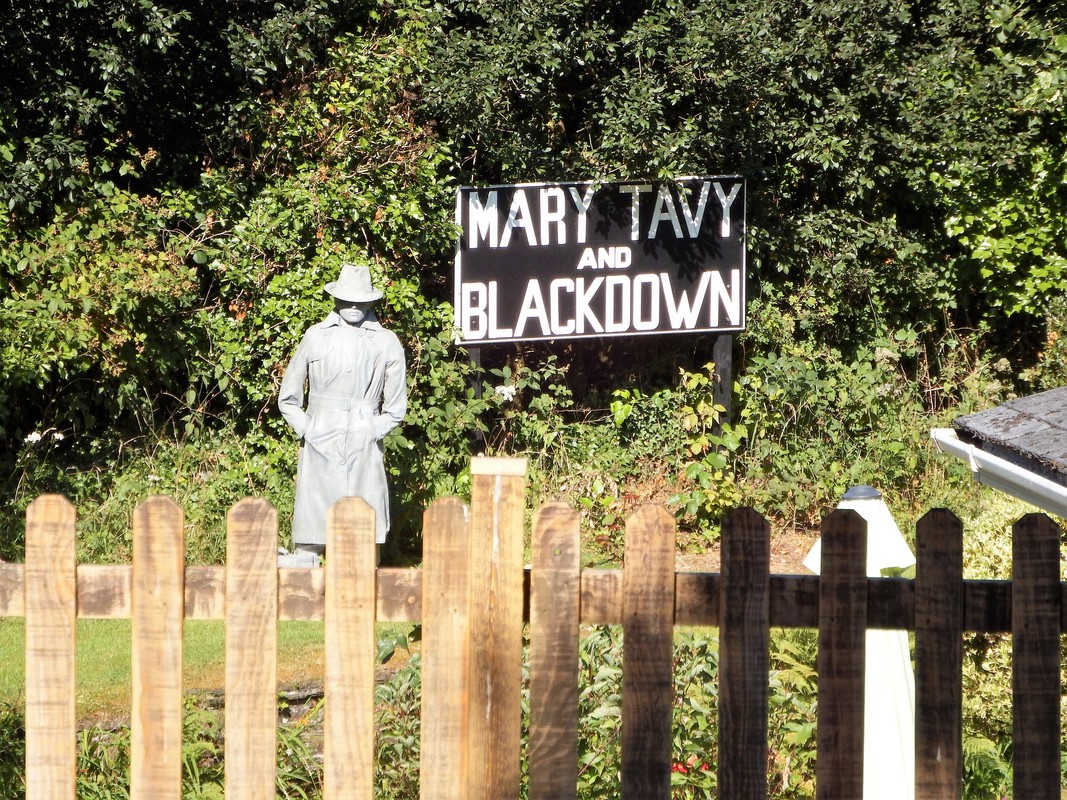
Mary Tavy and Blackdown 1 The 'lone passenger' awaits the next train to Launceston 15th July 2018 Copyright Andrew Triggs
Mary Tavy and Blackdown 2 From the adjacent road. 15th July 2018 Copyright Andrew Triggs
Mary Tavy and Blackdown 3 Looking in the Tavistock direction further along the local road 15th July 2018 Copyright Andrew Triggs
Mary Tavy and Blackdown 4 Nearby road overbridge, the former trackbed curves away towards Tavistock South 15th July 2018 Copyright Andrew Triggs
TAKETWO-01.12.1962(1)
MARY TAVY & BLACKDOWN
On Saturday 1 December 1962 I drove out from Plymouth to do a short day's rail photography on the Tavistock and Launceston Branch which was due to close at the end of the same month. I started and finished at Yelverton Station and also visited Grenofen Tunnel, Mary Tavy Station and Whitchurch Down Platform. The first photo was taken at 11.12am and the last at 3.39pm. It was a dull day as befitted the time of year, just three weeks before the shortest day.
Mary Tavy was one of the original stations of the broad gauge Launceston and South Devon Railway and opened in 1865. For a number of years the station had a crossing loop and a signal box which would have been very necessary while the LSWR trains came this way between 1874 and 1890. The village of Mary Tavy is three and a half miles north of Tavistock and there were once a number of tin and copper mines in the area, so the station was provided with a single siding to load the ore . The loop and signal box were taken out of use in 1892 and the siding in 1941.
The village of Mary Tavy lies on a ridge with the railway station down in a valley to the west some distance away and the bus would have been more convenient if travelling the short hop to Tavistock (3½ miles away). In the other direction along the main road was Okehampton (12½ miles away). Rail passengers from Mary Tavy to Okehampton would have had to change trains at Lydford as there was no station on the Southern route. A mile to the south-east from Mary Tavy was Peter Tavy. I wonder who Peter and Mary Tavy were?
MLR / 26 November 2022
Lydford 19 Ml 43Ch
Many more of Lydford pictures on the Plymouth to Okehampton SR section.
Many more of Lydford pictures on the Plymouth to Okehampton SR section.
Lydford. 7th March 1962 Copyright Mike Roach.
Lydford 8th March 1962 Copyright Mike Roach
Lydford 4570 July 62 Copyright Sid Sponheimer
Lydfor Remains - Keith Jenkin.
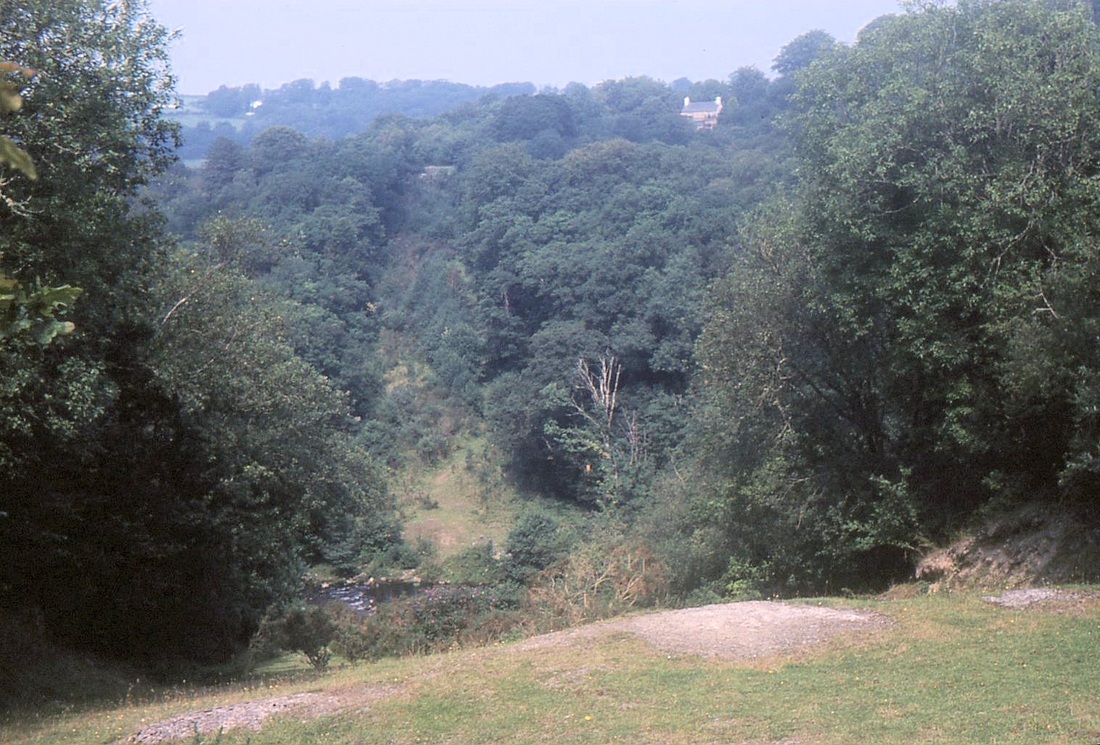
About one mile west of Lydford. Copyright Chris Lunn.
About one mile west of Lydford. Copyright Chris Lunn.
Dear Keith,
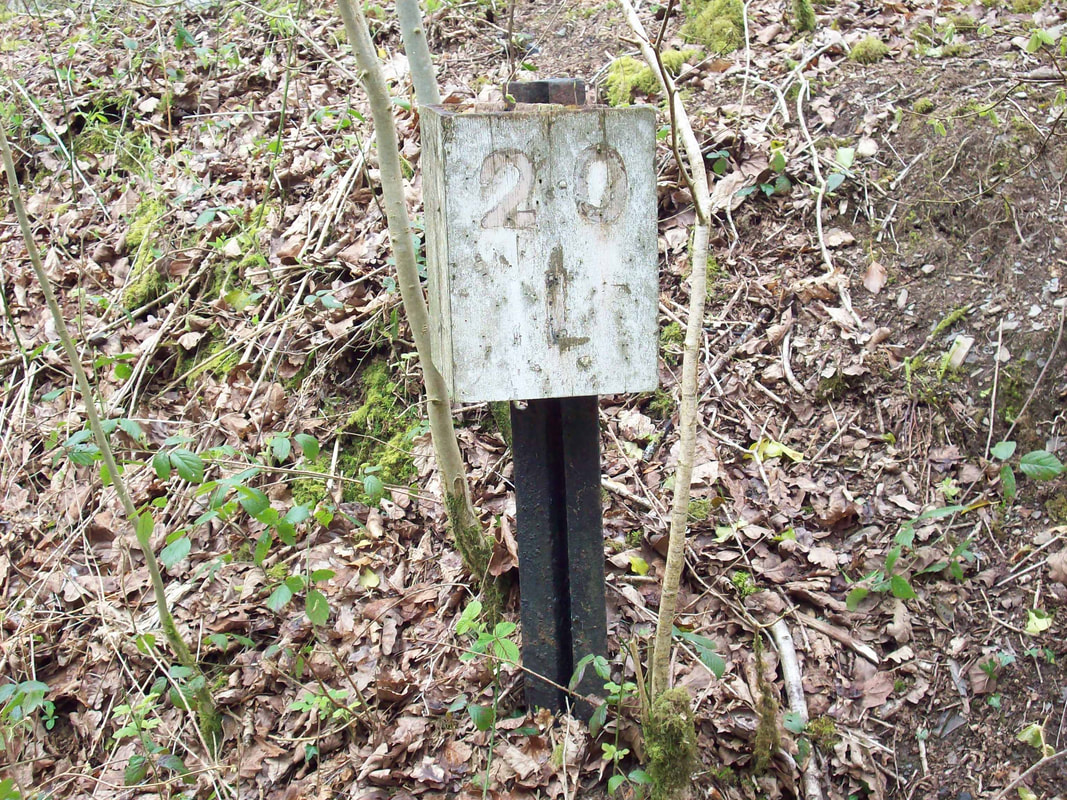
This milepost indicates a distance of 20 miles and a quarter from Tavistock Junction. Lydford station was at 19 miles 43 chains so this spot
Is about 55 chains (1100 yards or so) from Lydford. The stop board was a warning to drivers of freight trains to pause here so that the guard could pin down the brakes of unfitted wagons for the coming down gradient.
In common with most GW mileposts, it is mounted on a piece of old 'bridge' rail.
Branch lines built by the GWR normally had mileposts giving distance from Paddington. Lines (like this one) built by independent companies, tended to have mileposts counting from the junction with the main line. This is not a universal rule, though!
Roy
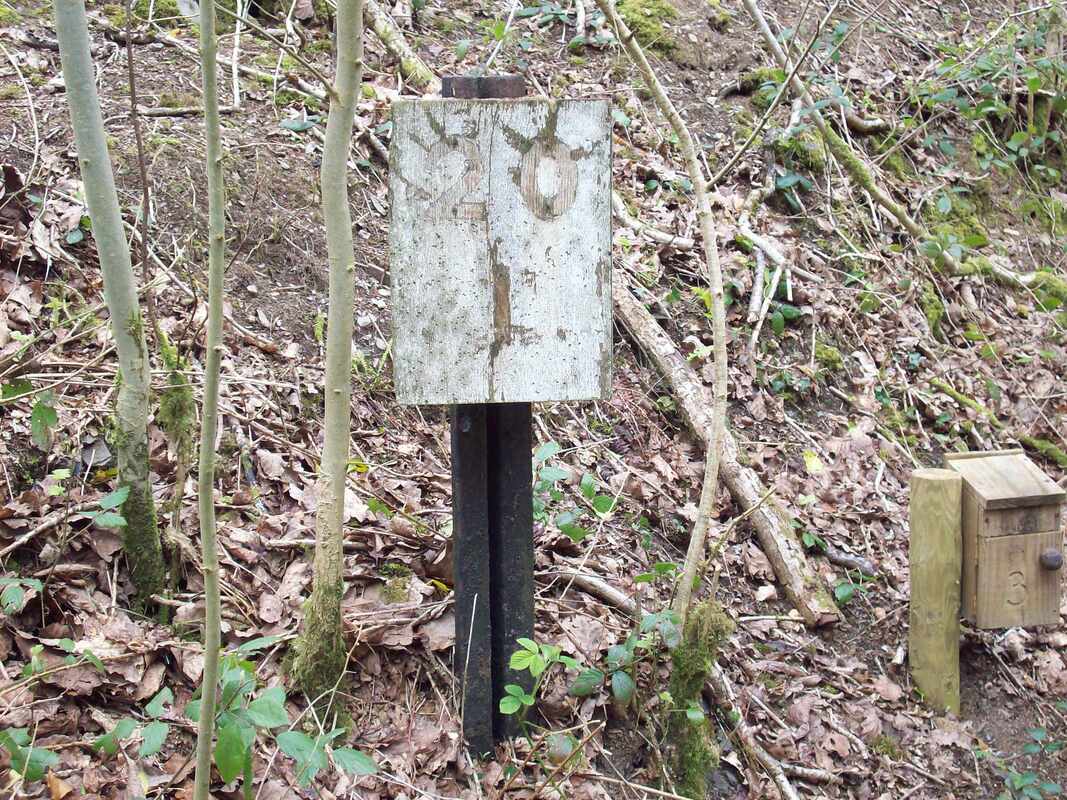
Liddaton Halt 22Ml. 35Ch.
A Plymouth to Launceston train calls at Liddaton Halt. The hills of Dartmoor can be seen in the background, several miles away. Copyright Mike Roach.
Liddaton Halt from the road overbridge caught by Sid Sponheimer. Copyright.
Coryton 23Ml. 76Ch.
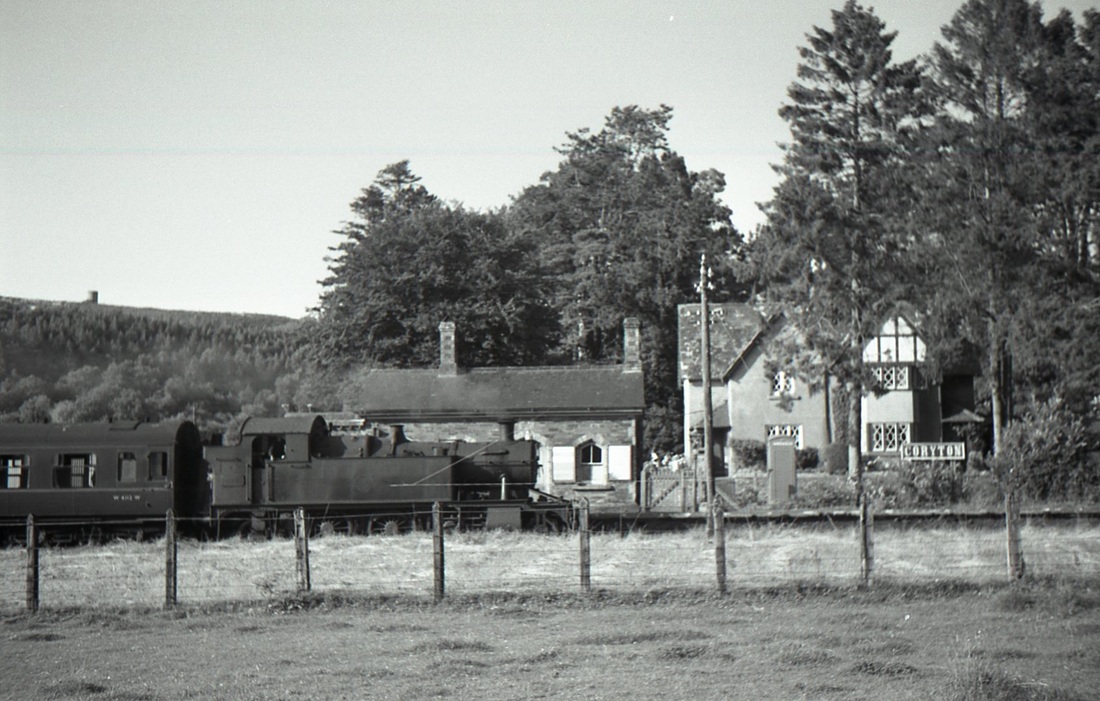
4555 coasts to a stand at Coryton Sep62 Copyright Mike Roach


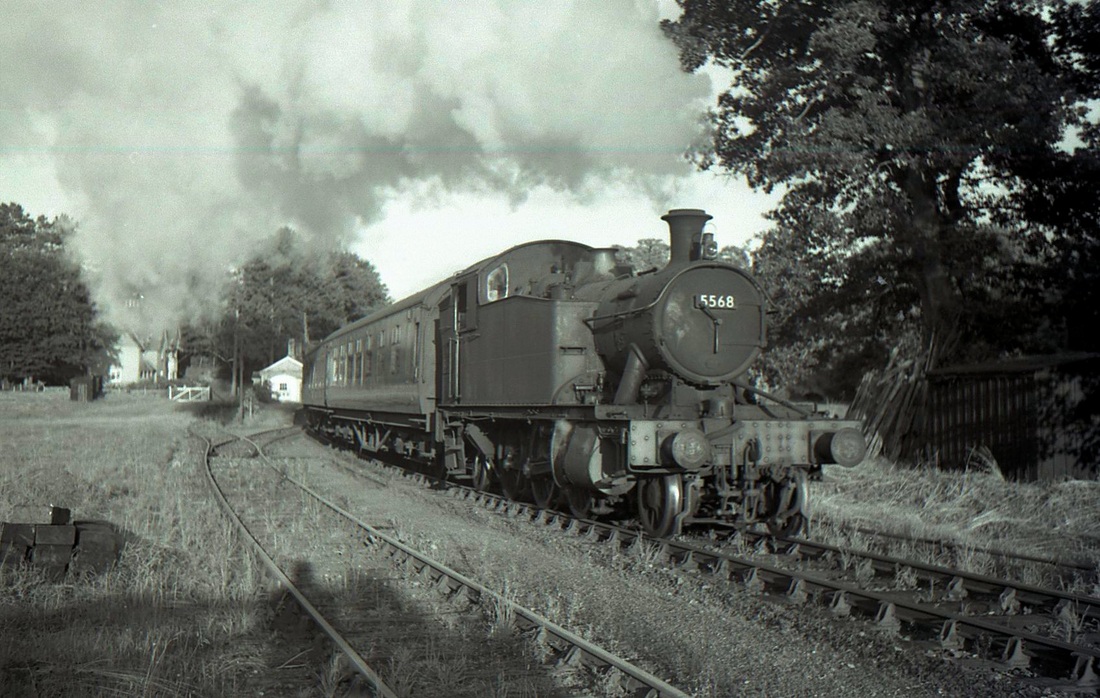
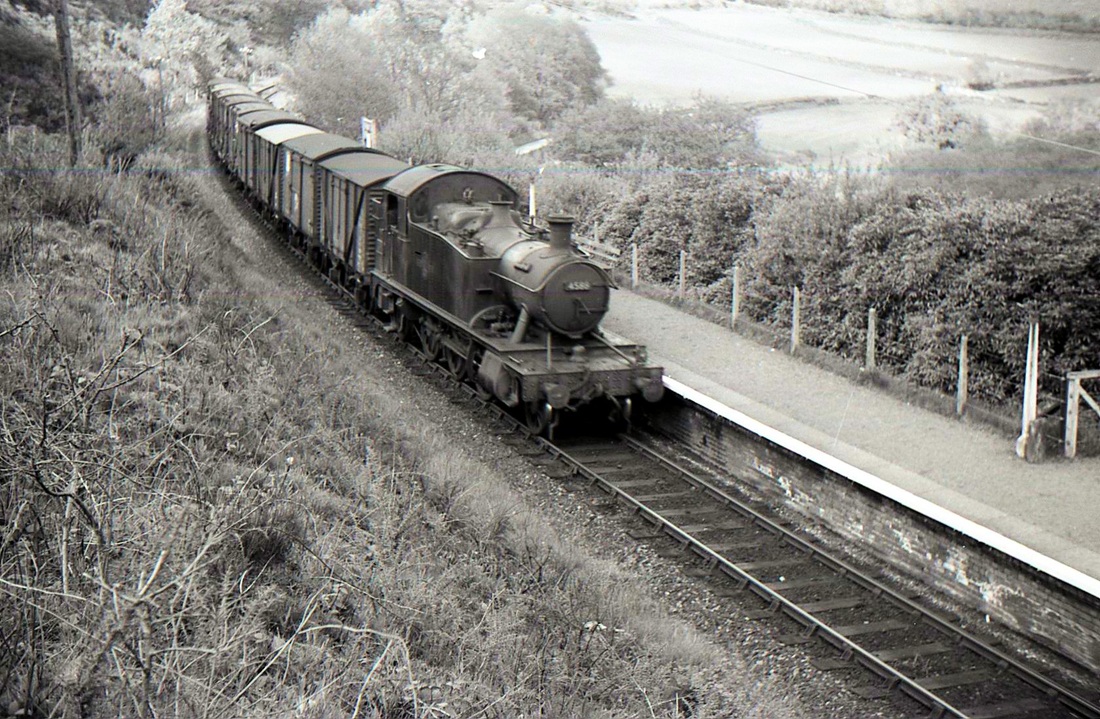
5568 leaves Coryton with the 6.20pm Plymouth to Launceston train. August 1962 Copyright Mike Roach
A '55' runs into Coryton from the Lydford direction. Copyright Sid Sponheimer
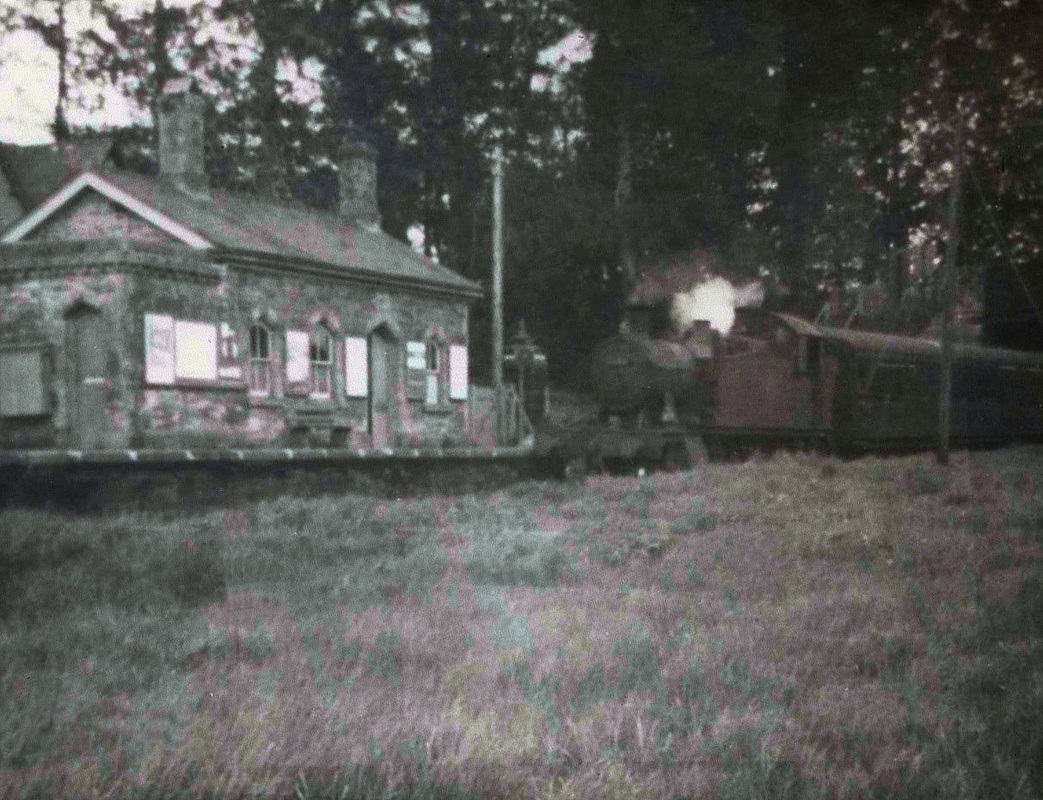
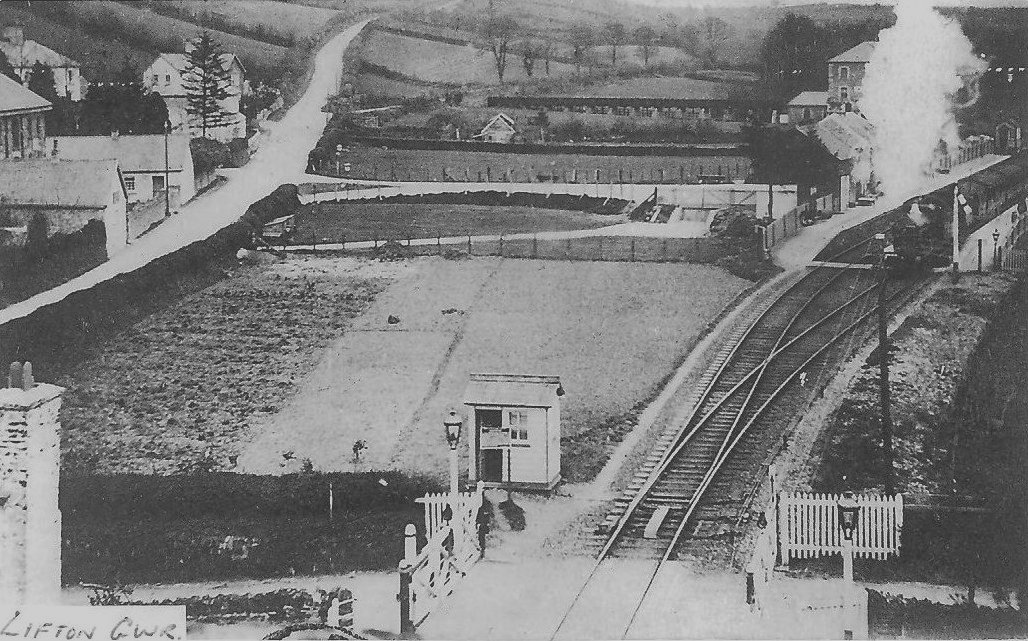
Lifton 27Ml. 14Ch.
Lifton was a calling point on the 'Launceston Branch Centenary' railtour on 5th September 1965. You are recommended to take a look pictures of this train in the Steam Railtours section.
Lifton was a calling point on the 'Launceston Branch Centenary' railtour on 5th September 1965. You are recommended to take a look pictures of this train in the Steam Railtours section.
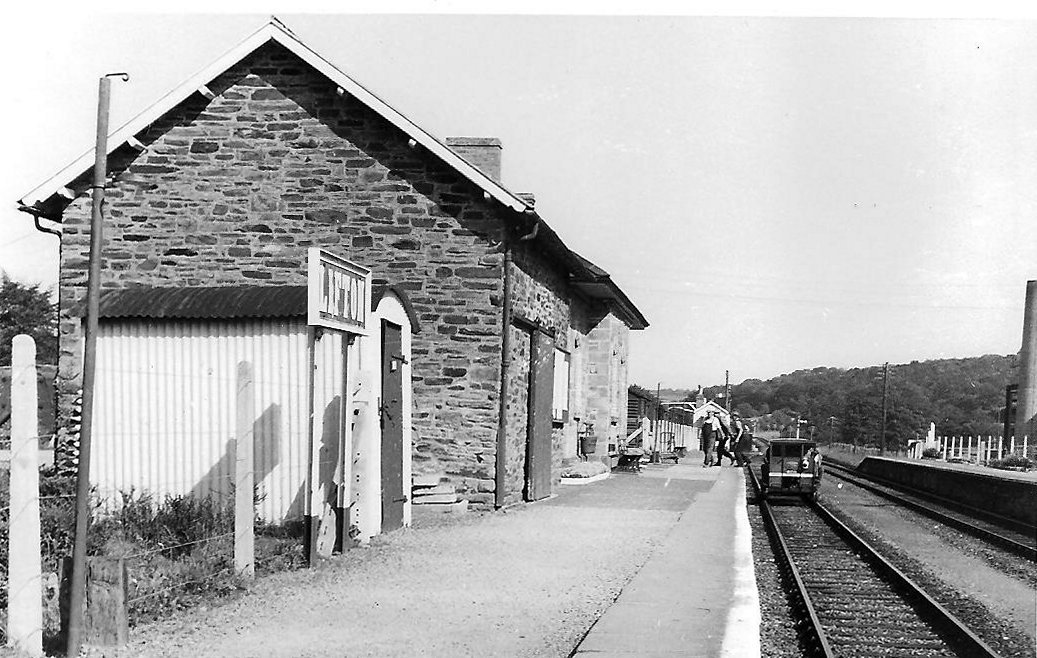
Lifton . A lovely picture from the collection of Geoffrey Harrison of the station looking towards Coryton and Lydford. Copyright Geoffrey Harrison.
Focusing in on the gangers trolley it is many thanks to Geoff Harrison who tells us that his Father-in-Law Jack Wickett is the second of the gangers (left to right), he has just stepped onto the platform and is partly hidden. Also Geoff's Brother-in-Law John Wickett is the one on the right having just stepped onto the platform. A nice personal rouch. Note the back of the trolley is protected by the traditional red lamp. Copyright Geoffrey Harrison
Another view at Lifton on the same day. Presumably the gangers have gone for their 'croust' (Refreshment break) leaving the trolley resting safely within the station bounds and in sight of the signalman. Copyright the Geoff Harrison Collection
As a matter of interest back in those days wooden pallets, much larger and heavier than the standard 4-way pallet of today were just coming into use, but the company would not risk losing these in transit so gangs of men unloaded goods whether it was milk powder or cases of milk puddings and these were 'handballed' onto the decks of lorries. From notes by Geoffrey Harrison. (Geoff worked for Ambrosia for a while and very much regrets that he crossed over the level crossing many times but never had a camera with him).
A lovely view of Lifton from the Tinhay Tramway bridge. Note the provision of a hut for the crossing keeper. The point roding for the adjacent loop point can be seen heading away towards the distant signalbox at the other end of the station. Presumably the cottage seen to the extreme left was provided for the crossing keeper. This picture from the Geoffrey Harrison Collection. Copyright.
This picture courtesy of Sid Sponheimer shows the arch looking almost fragile which carried the Tinhay Tramway across the GWR. Note also the two crossings, one serving the platforms, the other for road traffic to and from the Ambrosia Factory. Note also to the right the vans which would have carried the Ambrosia product away. Copyright Sid Sponheimer
Charles Fennamore catches some action at Lifton. A 45 carries out some shunting at the east end of the station. Copyright
A charming picture taken somewhere near Lifton. Does anyone recognise exactly where? The solution came from Roger Pyke - see below. The gentleman outside the thatched bungalow pauses to watch 5511 glide past with 2 coaches on the 6.20pm Plymouth to Launceston. The date was Saturday 20 May 1961. 5511 had been at Laira 3 years when it was withdrawn 6 months later, but this is the only picture Mike got of this particular loco. Copyright Mike Roach
Hi, I was perusing your wonderful site especially the Plymouth to Launceston line and noticed that you had one photo from near Plymouth 0f 5511 and you were asking if anyone knew exactly where this was. Well its where the line went past Leat Cottage, Lifton just as it headed for Launceston from Lifton Station. Hope that helps. Regards Roger Pyke Many thanks Roger.
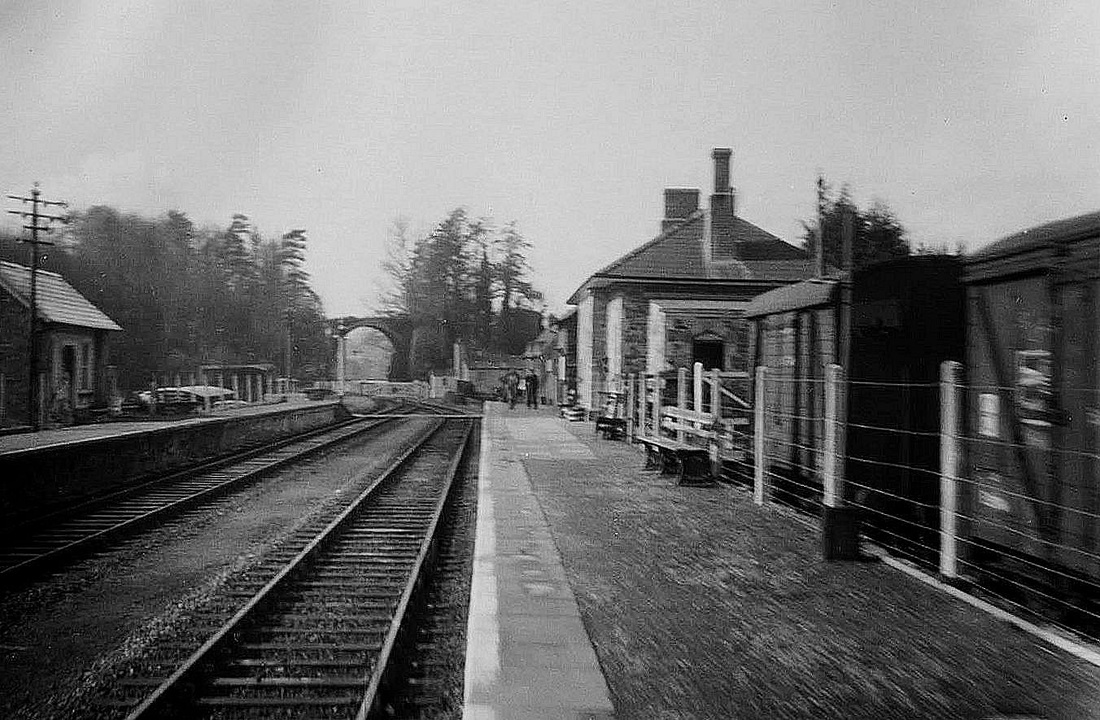
Launceston 31Ml 67 Ch.
We're in Cornwall now but only just - the GWR line crossed the river Tamar a short time before arriving at Launceston.
We're in Cornwall now but only just - the GWR line crossed the river Tamar a short time before arriving at Launceston.
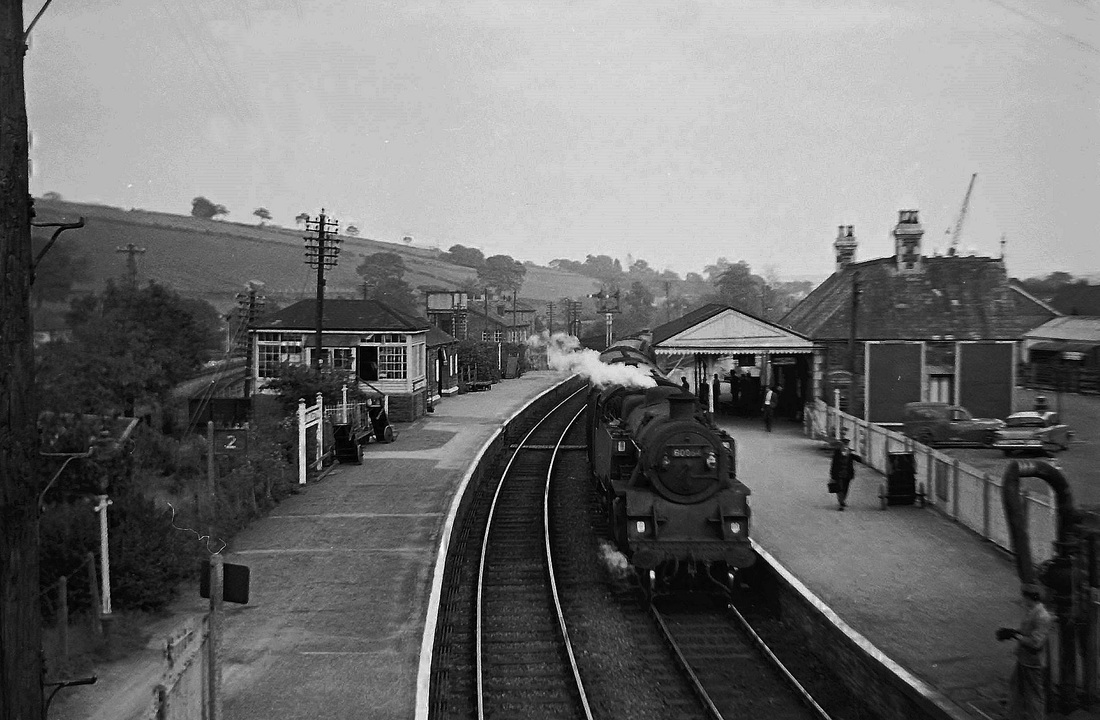
Launceston 80064 on presumably an Okehampton, Halwill, Launceston, and Padstow train. Copyright Sid Sponheimer
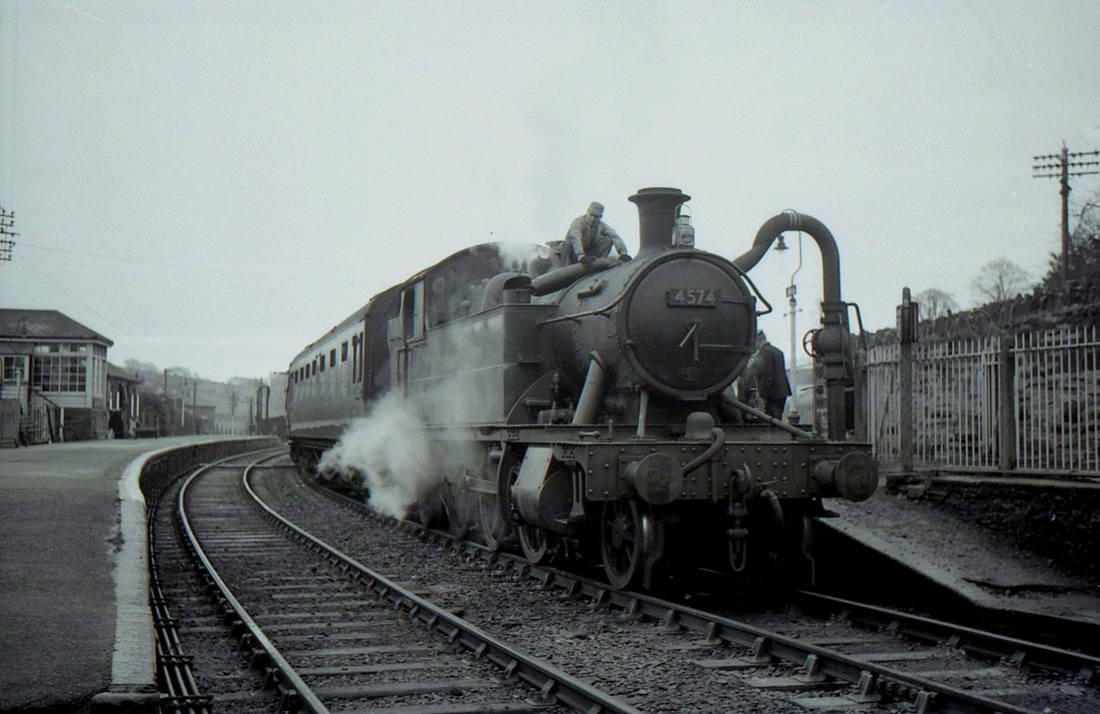
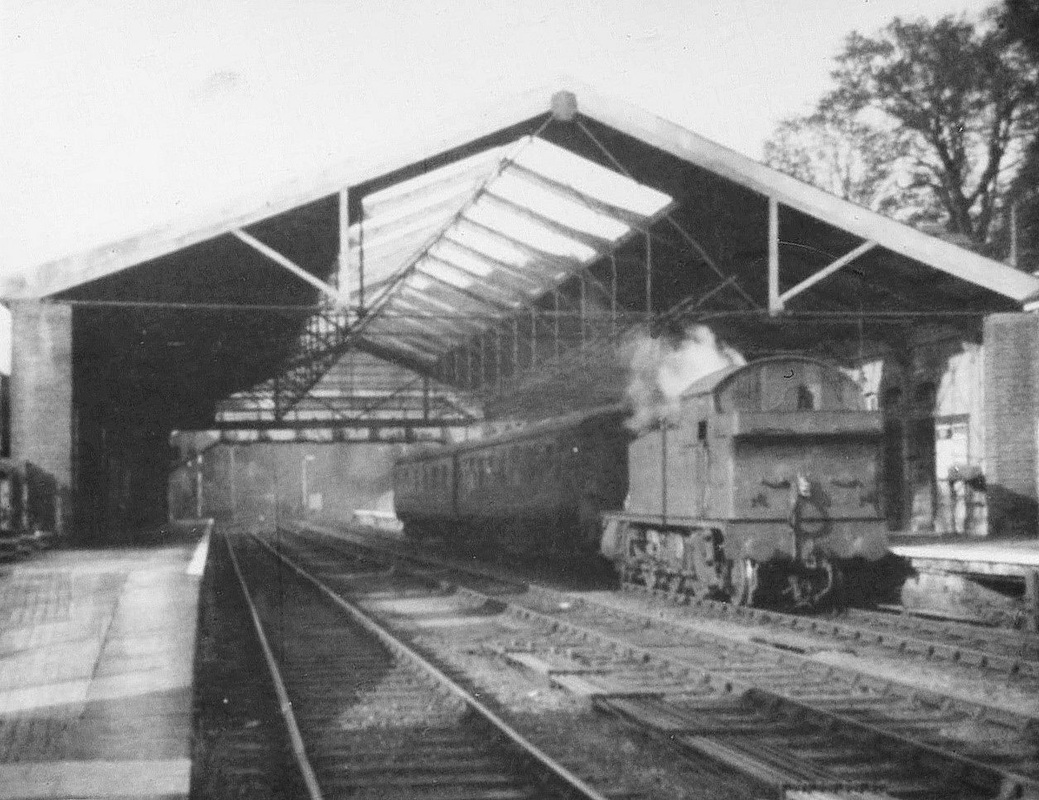
4574 has just arrived on the 07.10am from Plymouth. The date is 27th December 1962 - only a few days left now before the passenger service was withdrawn. Copyright Mike Roach
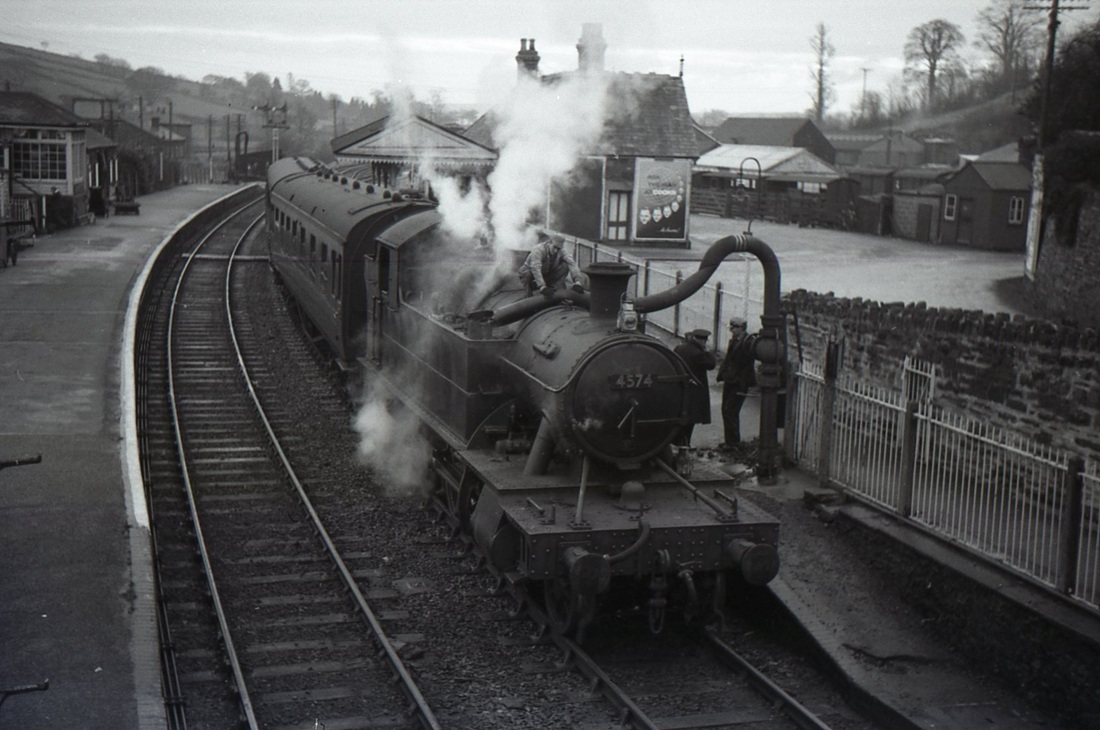
The fireman is still busy filling the tanks, the guard and driver no doubt talking about the future. Note the station furniture and area - the double sided signalbox, the vans in the goods yard. 27th December 1962 Copyright Mike Roach
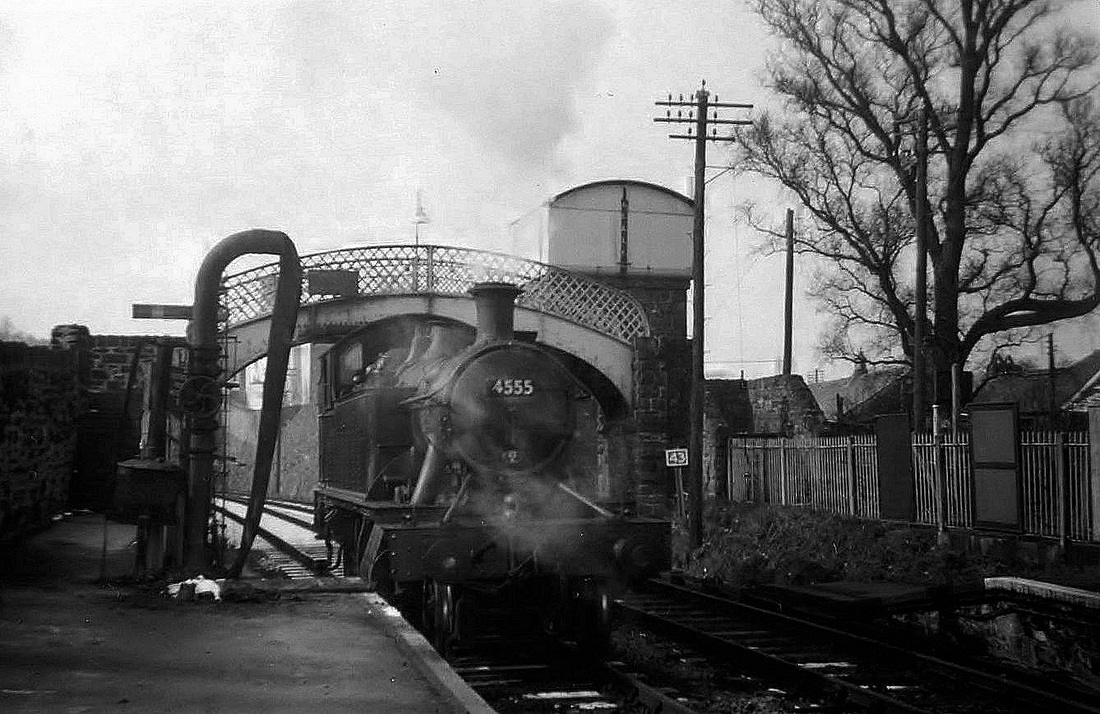
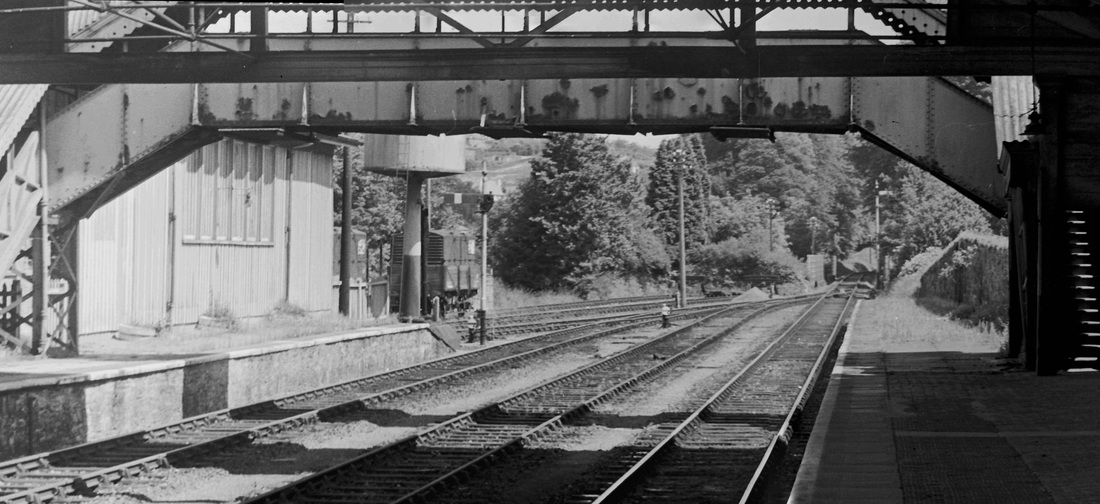
The preserved 45 4555 comes off its train from Plymouth and makes its way out to run round. Plenty of interesting detail in this picture - the curious humped footbridge, the southern bridge number (43), fire devil used to stop the water crane from freezing and in the background the essential water tower. Both the SR and GWR had water towers at Launceston. Copyright Sid Sponheimer
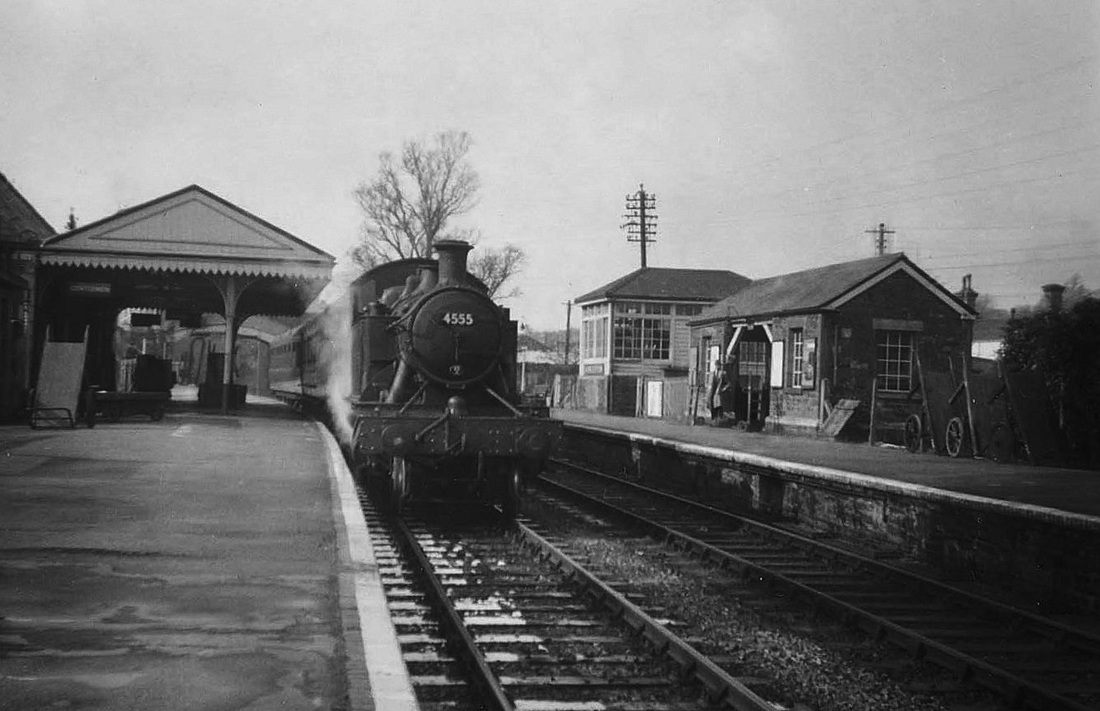
4555 has now gained the head of its train for the return journey to Plymouth. note the double sided signalbox and also the large wheeled platform trolleys in evidence on both platforms. Copyright Sid Sponheimer.
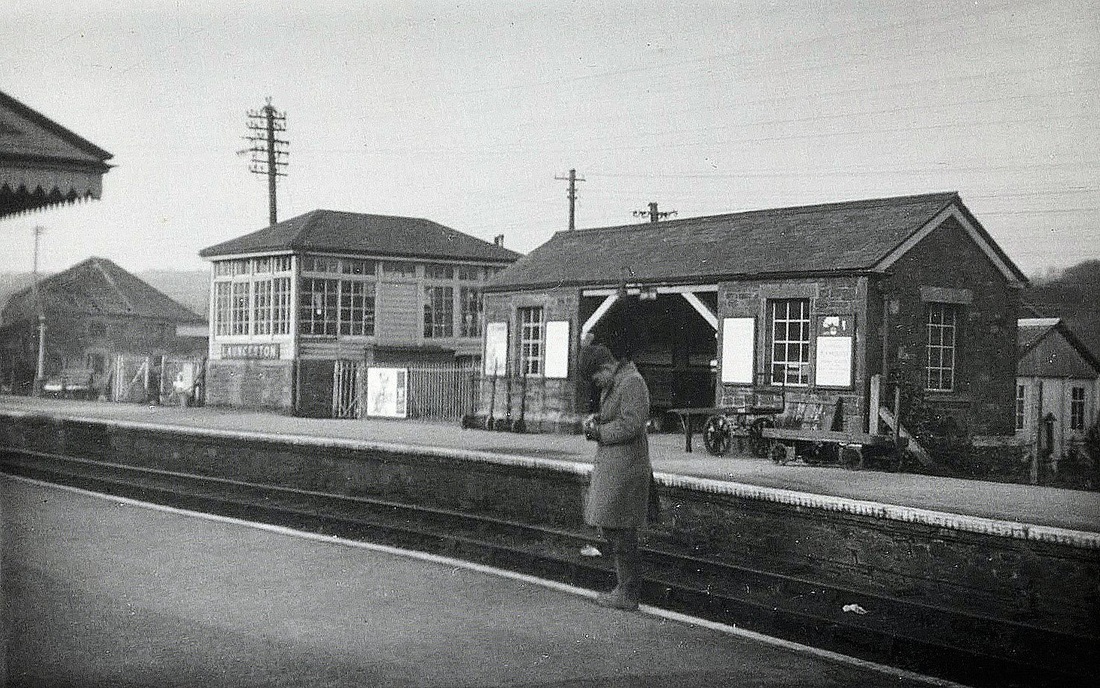
Sid's brother ponders his camera settings as we see the waiting shelter on the up side with both GWR and Southern platform trolleys together for comparison. Copyright Sid Sponheimer.
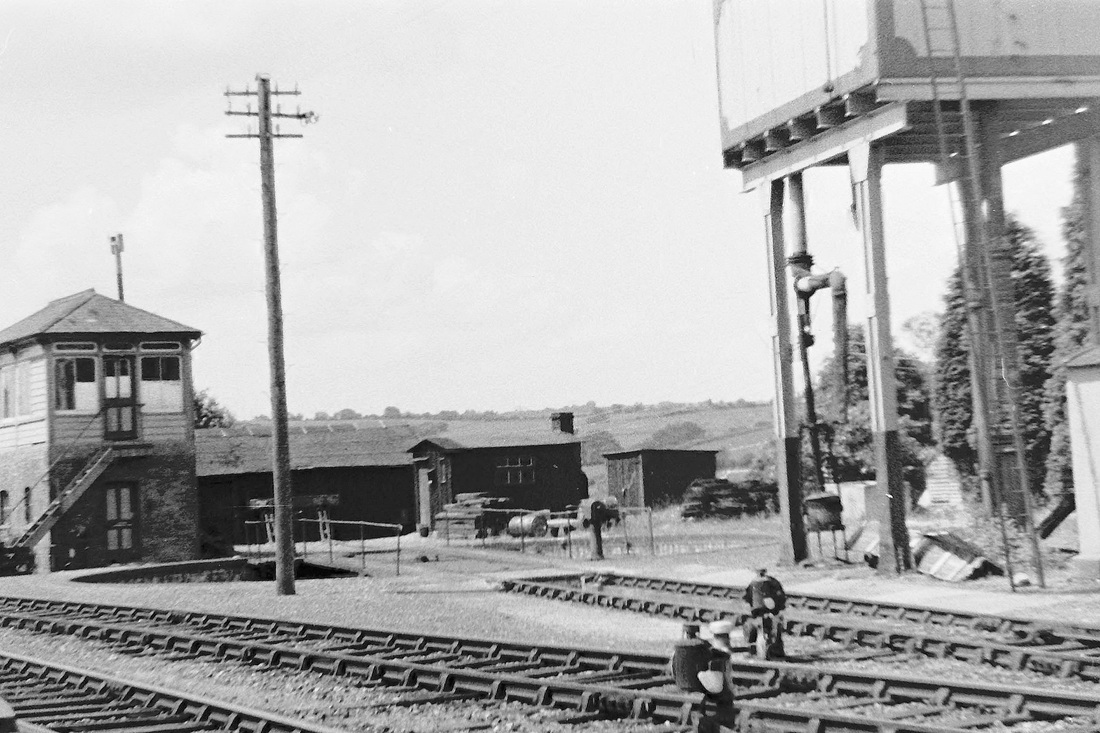
A view from the SR yard showing both the Southern and GW sheds, the latter to the left. Copyright Sid Sponheimer
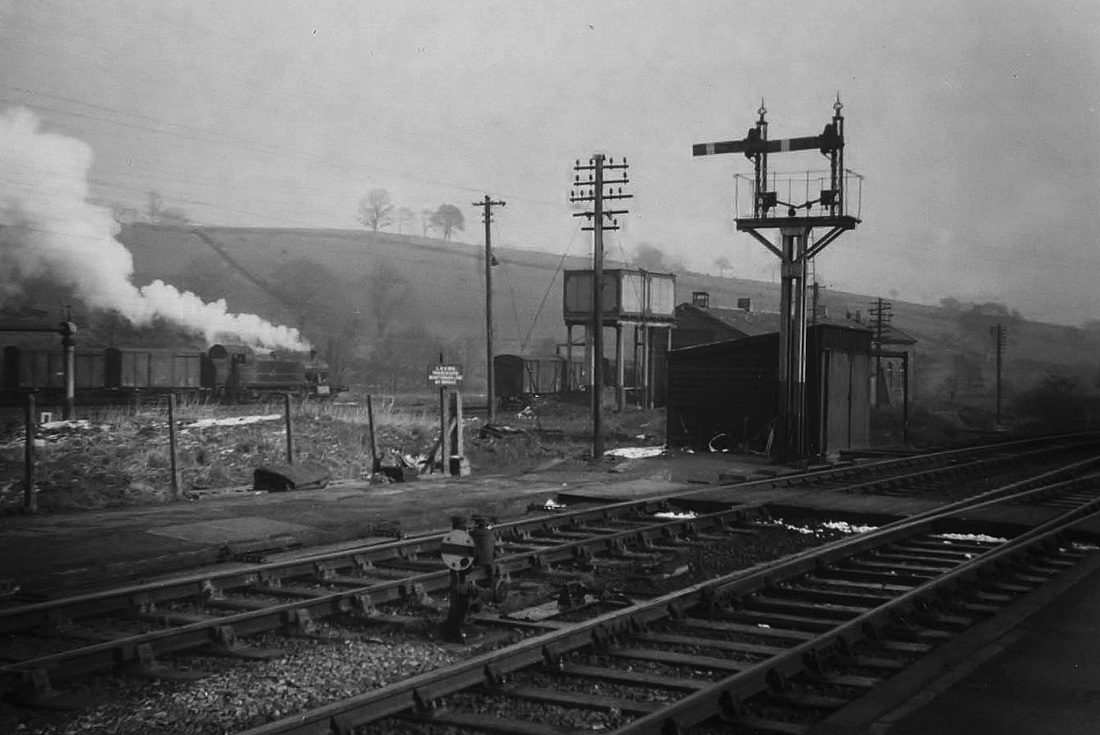
Launceston . The GW shed is visible 14th January 1962. An up North Cornwall Goods train and a GWR 4575 class shunting in the Southern Yard. Copyright Mike Roach

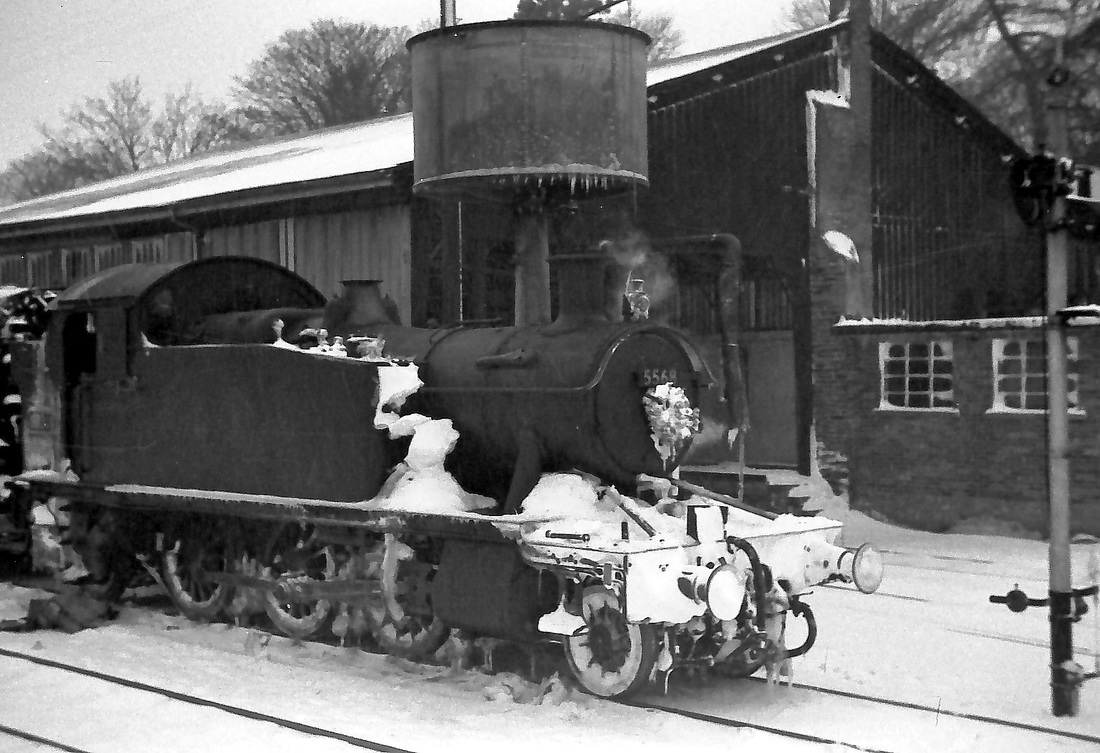
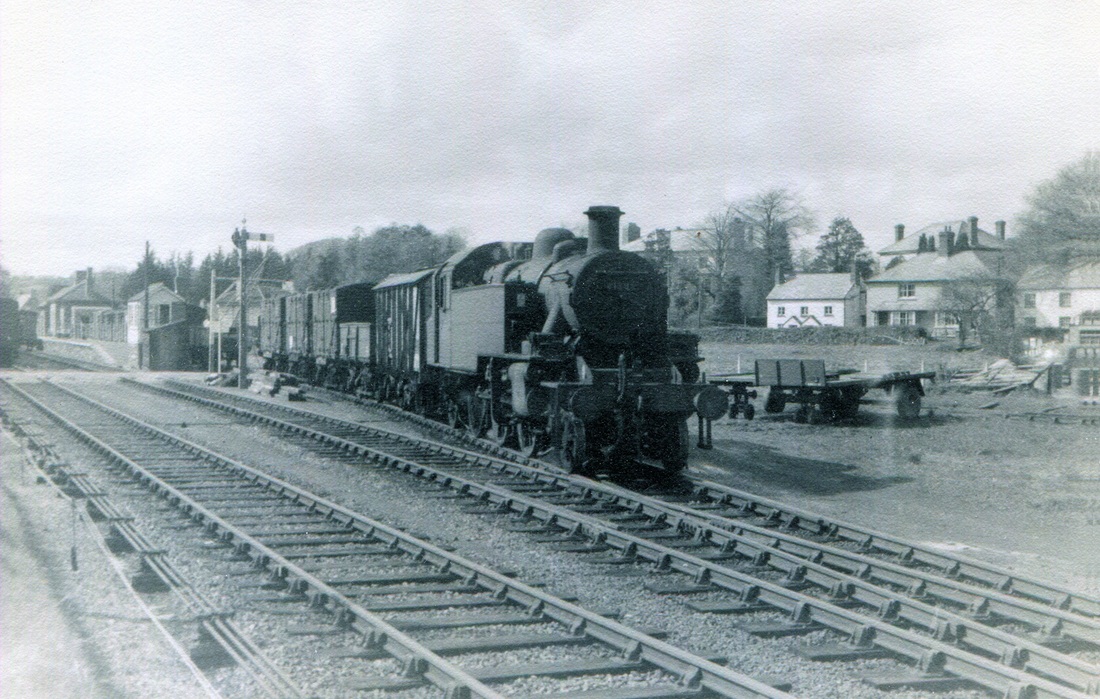
An overall view of the Southern goods yard 27th Dec 1962. Note in the foreground the turntable and 4574 busy doing a little shunting. Beyond the water tower are the GWR metals leading to its yard and station - the station had closed to passengers on 30th June 1952 but both yards remained until officially closing on 28th February 1966. Copyright Mike Roach
An action shot on a cold winters day as a 45 shunts the yard of the GWR station at Launceston. Note the water tower and shed. Copyright Sid Sponheimer
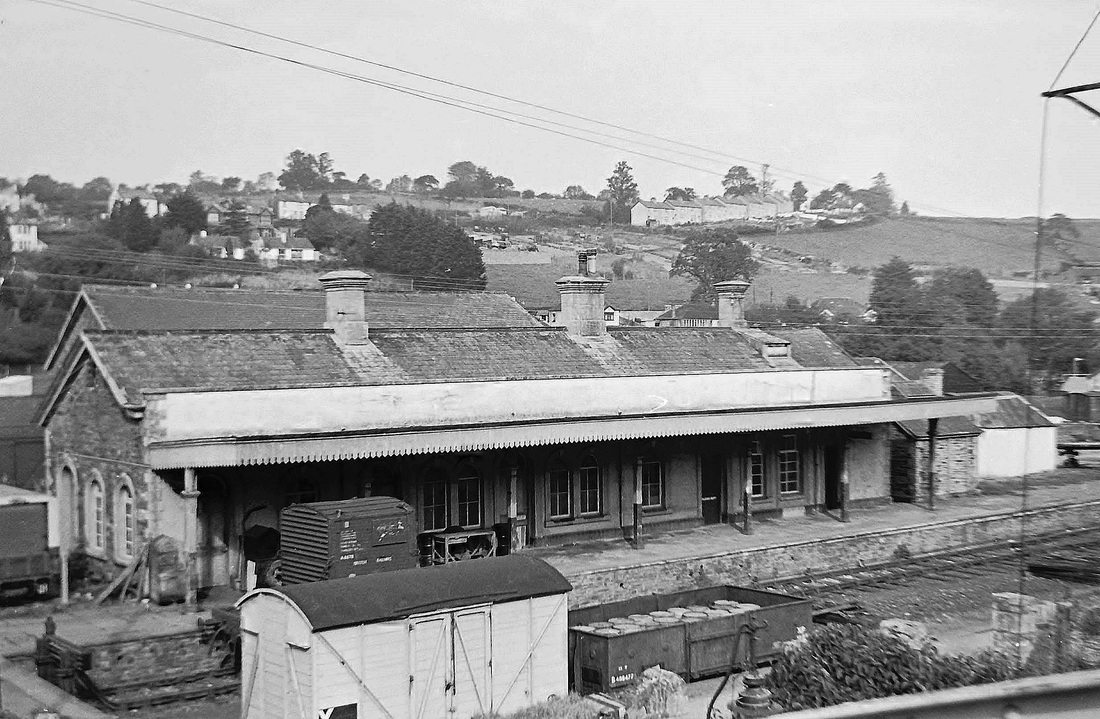
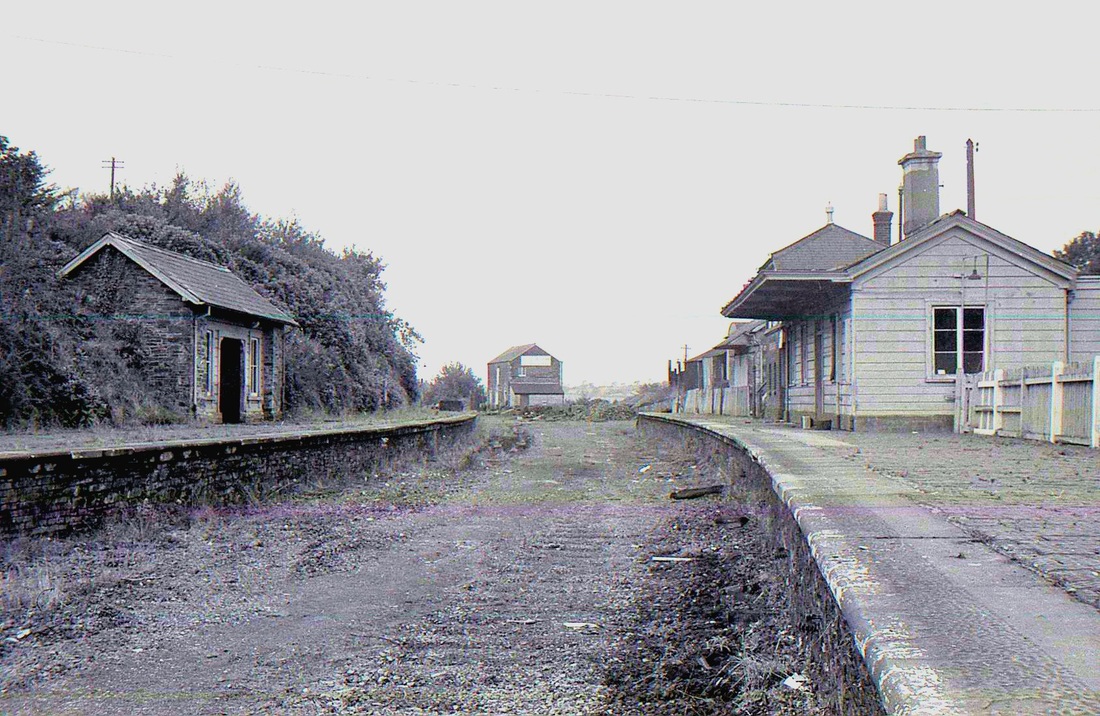
The former GWR station photographed during the period between the cessation of passenger services in 1952 and total closure. This picture 3rd October 1964 Copyright Sid Sponheimer
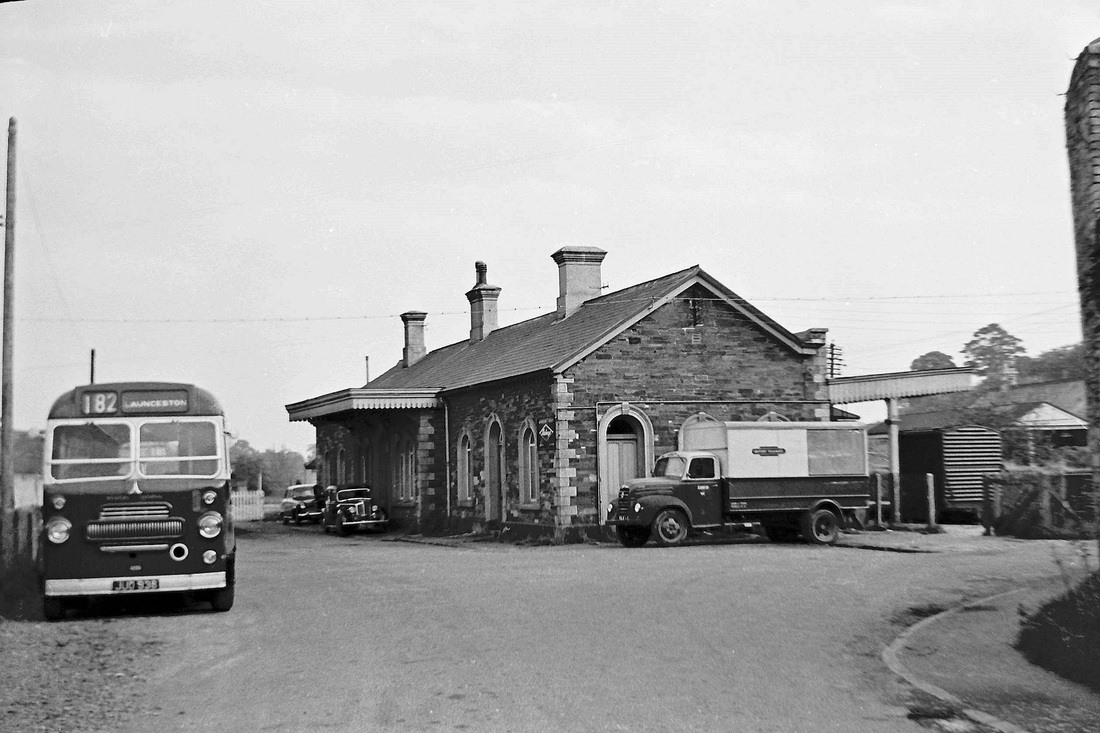
A rare view of the exterior of the GWR station at Launceston, thankfully caught by Sid Sponheimer 3rd October 1964. Copyright
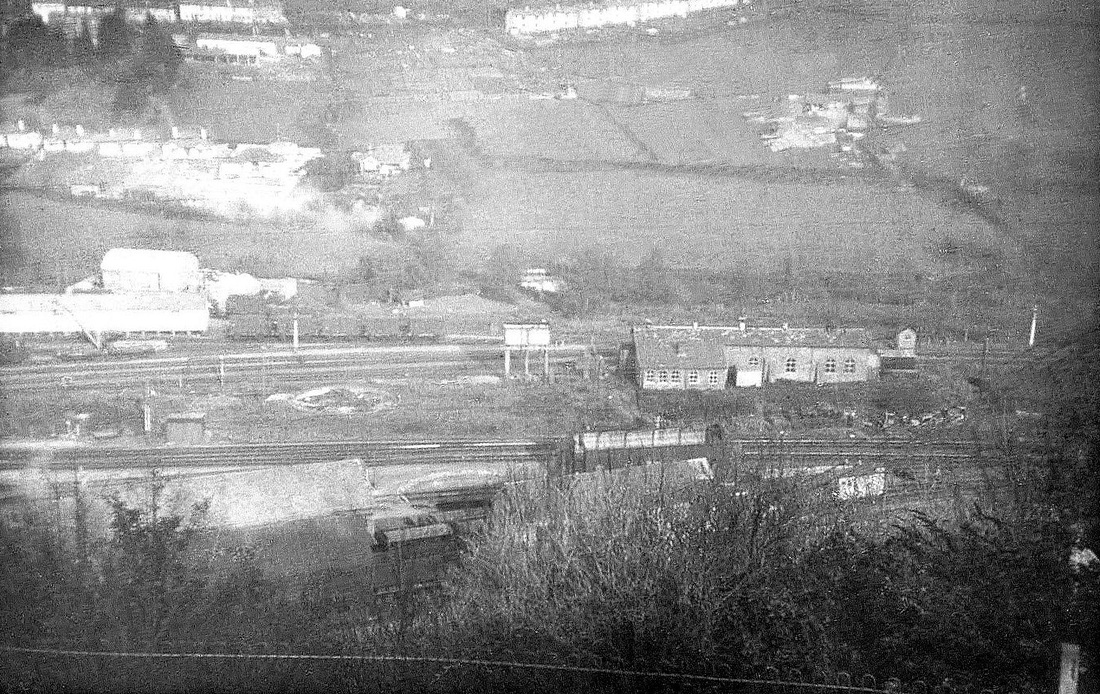
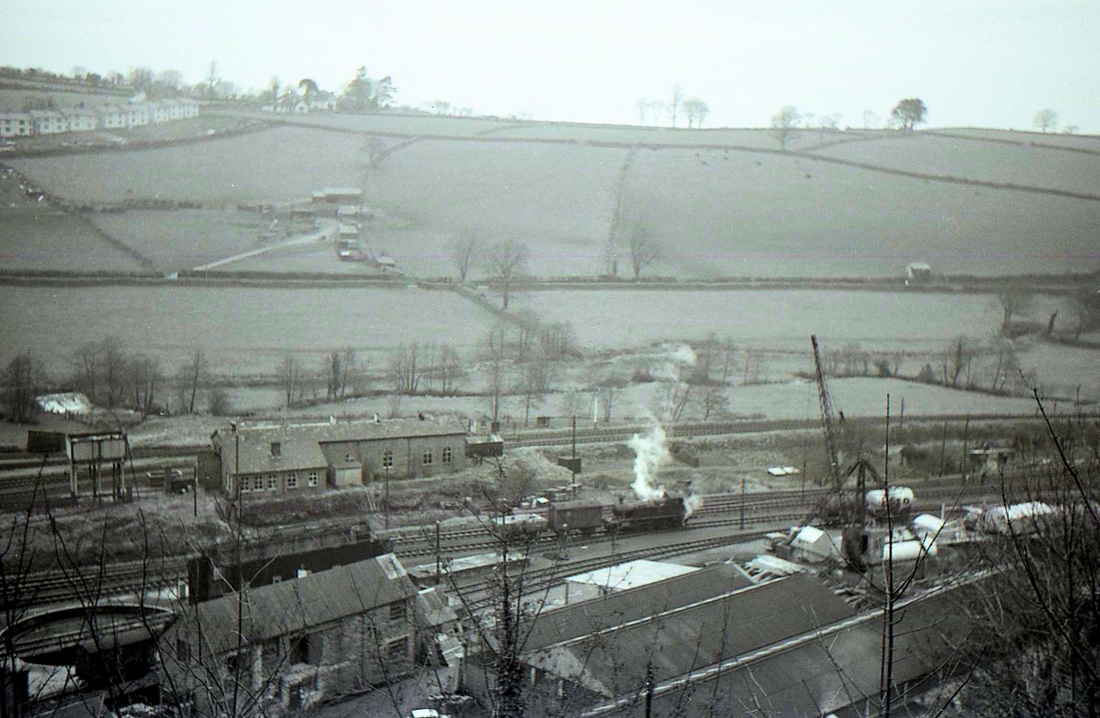
Another view from the hill overlooking the station complex's by Sid Sponheimer Wagons can be seen in the GW yard. Copyright Sid Sponheimer
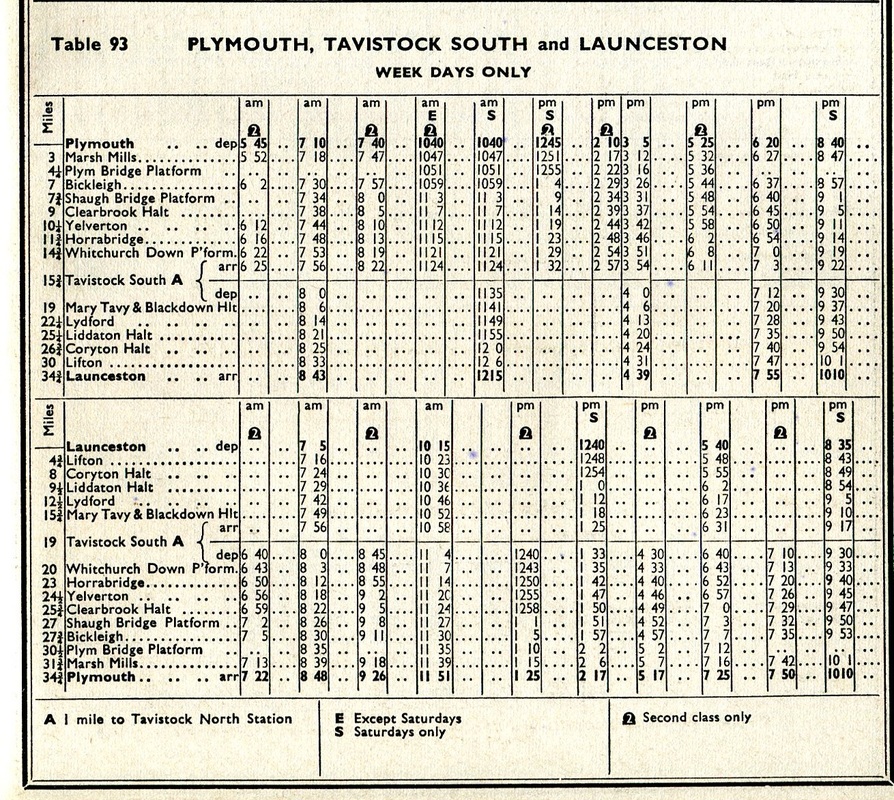
Timetable - Plymouth, Tavistock S and Launceston Winter 1962/63